Darktable 3.0.0 duyuruldu

İkinci sürüm adayı 28 Kasım 2019‘da duyurulan fotoğrafçıların çok sayıda fotoğraf üzerinde kolayca işlem yapabilmesini sağlamayı amaçlayan, resimler üzerinde ayrıntılı değişiklikler yapma imkanı sağlayan Darktable‘ın 3.0.0 sürümünün finali, Pascal Obry tarafından duyuruldu. Darktable’ın 3.0.0 sürümünü duyurmaktan gurur duyduklarını söyleyen Obry; GitHub sürümünün burada bulunabileceğini ifade etti. GNU Genel Kamu Lisansı 3 altında kullanıma sunulan ve GNU/Linux, OS X ve Solaris altında çalışan yazılımın yeni sürümünün varsayılan darktable tema ile geldiği ve daha yoğun yazı tipleri yüklü Roboto fontuyla en iyi deneyimin sağlandığı ifade ediliyor. Darktable 3.0.0’ın başka bir büyük adım olduğunu belirten Obry; sürümün, yeni modüller içerdiğini söyledi. Darktable 3.0.0 hakkında ayrıntılı bilgi edinmek için sürüm duyurusunu ve GitHub sayfasını inceleyebilirsiniz.

Continue Reading →

Darktable 3.0.0 edinmek için aşağıdaki linklerden yararlanabilirsiniz.

0

Hyperbola GNU/Linux-libre sistem değişikliklerine hazırlanıyor

Arch Linux tabanlı, Brezilya kökenli bir GNU/Linux dağıtımı olan ve Free Software Foundation (FSF) tarafından özgür GNU/Linux dağıtımları listesine eklenen Hyperbola GNU/Linux-libre‘nin artık OpenBSD’yi çatallamaya ve BSD olmaya karar vermiş bulunuyor. hyperbola.info’daki bir sayfada yayımlanan bir yazıda bildirildiğine göre, Linux çekirdeğinin hızla kararsız bir yolda ilerlemesi nedeniyle, birkaç BSD uygulamasından türetilen tamamen yeni bir işletim sisteminin uygulanmasının planlandığı ifade ediliyor. Bunun kolay bir karar olmadığı, ancak aktif olarak kullanıcı seçimini ve özgürlüğünü zayıflatmaya çalışan mevcut işletim sistemi trendlerine uygun bir alternatif oluşturmak için zaman ve kaynak kullanımının sağlanmasını istediklerini belirten geliştirici ekip; bunun bir “dağıtım” olmayacağını, ancak GPL uyumlu olmayan parçaların ve serbest olmayan parçaların yerine GPLv3 ve LGPLv3 altında yazılan yeni kodlar da dahil olmak üzere OpenBSD çekirdeğinin ve kullanıcı alanının sert çatalları olacağını söylüyor. HDCP de dahil olmak üzere DRM uyarlamasına zorlanan Linux çekirdeğinin Rust kullanımını önerdiği (özgürlük kusurları ve siber saldırıya daha eğilimli ve genellikle kullanımı için internet erişimi gerektiren merkezi bir kod deposu içerir) hatırlatılıyor.

Continue Reading →

Hyperbola’nın gelecekteki sürümlerinin, yeni bir çekirdek ve kullanıcı alanına sahip olacağı ve önceki sürümlerle ABI uyumlu olmayan HyperbolaBSD’yi kullanacağı söyleniyor. HyperbolaBSD’nin modüler ve minimalist olması amaçlanıyor. Böylece diğer projelerin kodu özgür lisans altında tekrar kullanabileceği ifade ediliyor. KOnuya ilişkin olarak hyperbola.info’da  yayımlanan bir yazıya buradan ulaşabilirsiniz.

0

EndeavourOS 2019.12.22 duyuruldu

Kolay kurulum ve önceden yapılandırılmış bir masaüstü ortamı sağlamayı hedefleyen Arch Linux tabanlı bir GNU/Linux dağıtımı olan EndeavourOS‘un 2019.12.22 sürümü duyuruldu. 5.4.6 Linux çekirdeği üzerine yapılandırılan sistem, Mesa 19.3.1-1, Systemd 244.1-1, Firefox 71.0-1 Arch eos-update-notifier 0.8-2, eos-welcome 2.0 gibi güncel paketler içeriyor. Sistem ayrıca, bash-completion ve broadcom-wl-dkms içeriyor. Önemli hata düzeltmeleriyle gelen sürümde, güç tasarrufu ve ekran kilitlenme sorunlarının giderildiği söyleniyor. Bu topluluk geliştirme sürümünde bir hata bulanların, bunları burada bildirebilecekleri ifade ediliyor. EndeavourOS 2019.09.15 hakkında ayrıntılı bilgi edinmek için sürüm duyurusunu inceleyebilirsiniz.

Continue Reading →

EndeavourOS 2019.09.15 edinmek için aşağıdaki linklerden yararlanabilirsiniz.


0

vc-dwim-1.9 duyuruldu

Bir sürüm kontrol ChangeLog fark ve taahhüt aracı olan vc-dwim‘in 1.9 sürümü, Jim Meyering tarafından duyuruldu. Bu sürümün gecikmiş bir sürüm olduğunu belirten Meyering; önceki sürümün üzerinden yaklaşık iki yıl geçtiğini hatırlattı. Meyering; 1.9 sürümünün Autoconf 2.69.197-b8fd7-dirty, Automake 1.16a ve Gnulib v0.1-3088-g6ad341ee4 gibi araçlarla önyüklendiğini söyledi. Vc-dwim ve vc-chlog’un artık git worktree dizinleriyle de çalıştığını söyleyen Meyering; vc-dwim’in yeni bir seçeneği kabul ettiğini sözlerine ekledi. Gerek vc-dwim gerekse vc-chlog’un sürüm kontrollü dosyalarda yapılan değişiklikleri açıklayan bir ChangeLog dosyasının korunmak istenmesi durumunda kullanışlı olduğu bildirilirken, vc-dwim’in bzr, CVS, git, mercurial, SVN ve darcs sürüm kontrol sistemleriyle çalıştığı hatırlatılıyor. vc-dwim, komut satırından sürüm denetim programlarını kullanırken sizi küçük hatalardan kurtarabileceği ifade ediliyor. vc-dwim-1.9 hakkında bilgi edinmek için sürüm duyurusu  incelenebilir.

Continue Reading →

vc-dwim-1.9 edinmek için aşağıdaki linklerden yararlanabilirsiniz.

0

antiX-19.1 duyuruldu

Debian tabanlı ve hızlı, hafif, kurulumu kolay bir GNU/Linux dağıtımı olan antiX’in Debian “Buster” e dayalı olarak gelen19.1 sürümü, Marielle Franco tarafından duyuruldu. Debian 10 Buster’e dayanan ve systemd içermeyen sürümün, bir hata düzeltme sürümü olduğu söyleniyor. 4.9.200 Linux çekirdeği üzerine yapılandırılan sürüm; Firefox-esr 68.3.0esr-1 içeriyor. Debian 10 Buster’e dayanan ve systemd içermeyen sürüm, IceWM varsayılan olmak üzere fluxbox, jwm ve herbstluftwm biçiminde 4 pencere yöneticisiyle geliyor. Sürümde video oynatmak için gnome-mpv, ses için xmms kullanıma sunuluyor. antiX-19 hakkında ayrıntılı bilgi edinmek için sürüm duyurusunu inceleyebilirsiniz.

Continue Reading →

antiX-19 edinmek için aşağıdaki linkten yararlanabilirsiniz.

0

15+ examples for Linux cURL command

In this tutorial, we will cover the cURL command in Linux. Follow along as we guide you through the functions of this powerful utility with examples to help you understand everything it’s capable of. The cURL command is used to download or upload data to a server, using one of its 20+ supported protocols. This data could be a file, email message, or web page. What is cURL command? cURL is an ideal tool for interacting with a website or API, sending requests and displaying the responses to the terminal or logging the data to a file. Sometimes it’s used as part of a larger script, handing off the retrieved data to other functions for processing. Since cURL can be used to retrieve files from servers, it’s often used to download part of a website. It performs this function well, but sometimes the wget command is better suited for that job. We’ll go over some of the differences and similarities between wget and cURL later in this article. We’ll show you how to get started using cURL in the sections below.

Continue Reading →

Download a file

The most basic command we can give to cURL is to download a website or file. cURL will use HTTP as its default protocol unless we specify a different one. To download a website, just issue this command:

curl http://www.google.com

Of course, enter any website or page that you want to retrieve.

curl basic command

Doing a basic command like this with no extra options will rarely be useful, because this only tells cURL to retrieve the source code of the page you’ve provided.
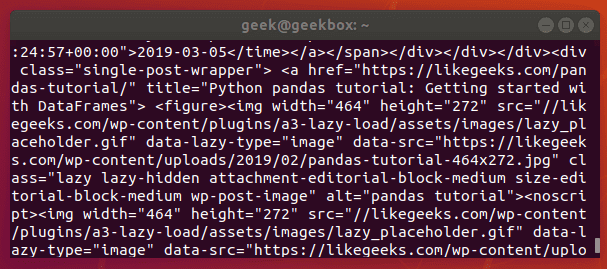
curl output

When we ran our command, our terminal is filled with HTML and other web scripting code – not something that is particularly useful to us in this form.

Let’s download the website as an HTML document instead, that way the content can be displayed. Add the –output option to cURL to achieve this.
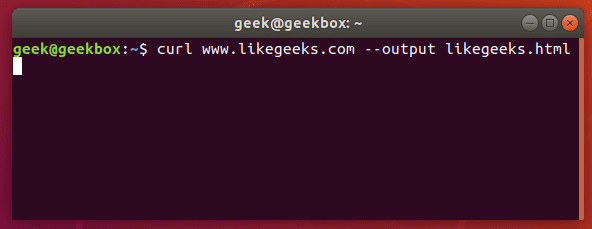
curl output switch

Now the website we downloaded can be opened and displayed in a web browser.

downloaded website

If you’d like to download an online file, the command is about the same. But make sure to append the –output option to cURL as we did in the example above.

If you fail to do so, cURL will send the binary output of the online file to your terminal, which will likely cause it to malfunction.

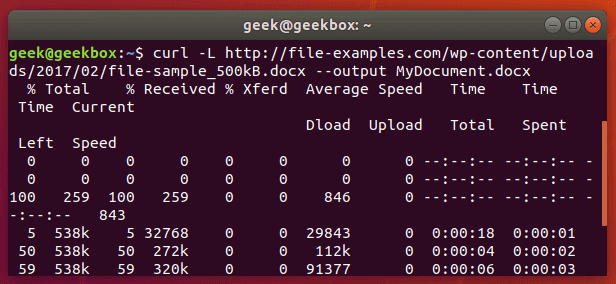
Here’s what it looks like when we initiate the download of a 500KB word document.
curl download document

The word document begins to download and the current progress of the download is shown in the terminal. When the download completes, the file will be available in the directory we saved it to.

In this example, no directory was specified, so it was saved to our present working directory (the directory from which we ran the cURL command).

Also, did you notice the -L option that we specified in our cURL command? It was necessary in order to download this file, and we go over its function in the next section.

Follow redirect

If you get an empty output when trying to cURL a website, it probably means that the website told cURL to redirect to a different URL. By default, cURL won’t follow the redirect, but you can tell it to with the -L switch.

curl -L www.likegeeks.com

curl follow redirect

In our research for this article, we found it was necessary to specify the -L on a majority of websites, so be sure to remember this little trick. You may even want to append it to the majority of your cURL commands by default.

Stop and resume download

If your download gets interrupted, or if you need to download a big file but don’t want to do it all in one session, cURL provides an option to stop and resume the transfer.

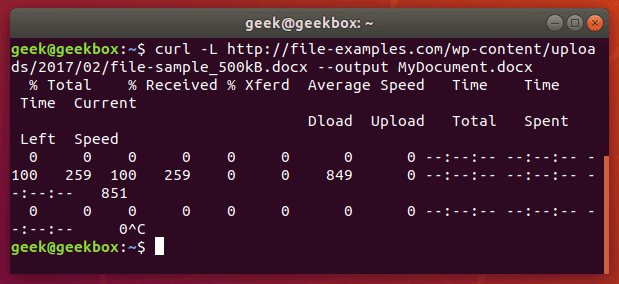
To stop a transfer manually, you can just end the cURL process the same way you’d stop almost any process currently running in your terminal, with a ctrl+c combination.
curl stop download

Our download has begun, but was interrupted with ctrl+c, now let’s resume it with the following syntax:

curl -C - example.com/some-file.zip --output MyFile.zip

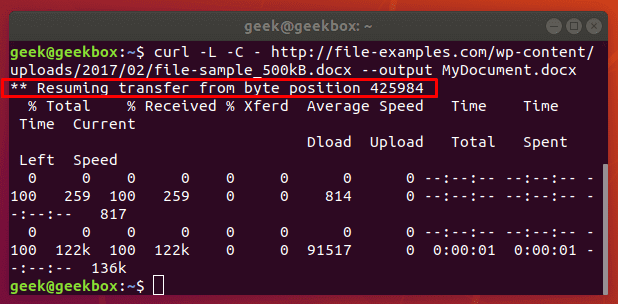
The -C switch is what resumes our file transfer, but also notice that there is a dash (-) directly after it. This tells cURL to resume the file transfer, but to first look at the already downloaded portion in order to see the last byte downloaded and determine where to resume.
resume file download

Our file transfer was resumed and then proceeded to finish downloading successfully.

Specify timeout

If you want cURL to abandon what it’s doing after a certain amount of time, you can specify a timeout in the command. This is especially useful because some operations in cURL don’t have a timeout by default, so one needs to be specified if you don’t want it getting hung up indefinitely.

You can specify a maximum time to spend executing a command with the -m switch. When the specified time has elapsed, cURL will exit whatever it’s doing, even if it’s in the middle of downloading or uploading a file.

cURL expects your maximum time to be specified in seconds. So, to timeout after one minute, the command would look like this:

curl -m 60 example.com

Another type of timeout that you can specify with cURL is the amount of time to spend connecting. This helps make sure that cURL doesn’t spend an unreasonable amount of time attempting to contact a host that is offline or otherwise unreachable.

It, too, accepts seconds as an argument. The option is written as –connect-timeout.

curl --connect-timeout 60 example.com

Using a username and a password

You can specify a username and password in a cURL command with the -u switch. For example, if you wanted to authenticate with an FTP server, the syntax would look like this:

curl -u username:password ftp://example.com

curl authenticate

You can use this with any protocol, but FTP is frequently used for simple file transfers like this.

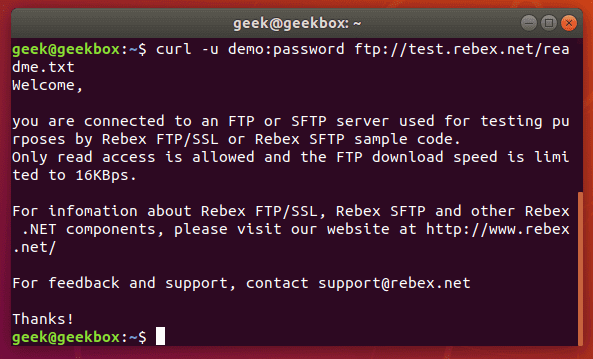
If we wanted to download the file displayed in the screenshot above, we just issue the same command but use the full path to the file.

curl -u username:password ftp://example.com/readme.txt
curl authenticate download

Use proxies

It’s easy to direct cURL to use a proxy before connecting to a host. cURL will expect an HTTP proxy by default, unless you specify otherwise.

Use the -x switch to define a proxy. Since no protocol is specified in this example, cURL will assume it’s an HTTP proxy.

curl -x 192.168.1.1:8080 http://example.com

This command would use 192.168.1.1 on port 8080 as a proxy to connect to example.com.

You can use it with other protocols as well. Here’s an example of what it’d look like to use an HTTP proxy to cURL to an FTP server and retrieve a file.

curl -x 192.168.1.1:8080 ftp://example.com/readme.txt

cURL supports many other types of proxies and options to use with those proxies, but expanding further would be beyond the scope of this guide. Check out the cURL man page for more information about proxy tunneling, SOCKS proxies, authentication, etc.

Chunked download large files

We’ve already shown how you can stop and resume file transfers, but what if we wanted cURL to only download a chunk of a file? That way, we could download a large file in multiple chunks.

It’s possible to download only certain portions of a file, in case you needed to stay under a download cap or something like that. The –range flag is used to accomplish this.
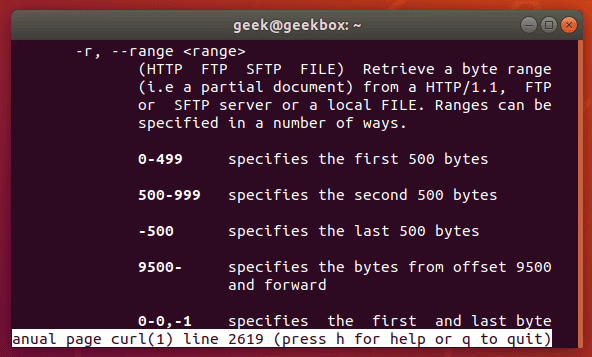
curl range man

Sizes must be written in bytes. So if we wanted to download the latest Ubuntu .iso file in 100 MB chunks, our first command would look like this:

curl --range 0-99999999 http://releases.ubuntu.com/18.04/ubuntu-18.04.3-desktop-amd64.iso ubuntu-part1

The second command would need to pick up at the next byte and download another 100 MB chunk.

curl --range 0-99999999 http://releases.ubuntu.com/18.04/ubuntu-18.04.3-desktop-amd64.iso ubuntu-part1

curl --range 100000000-199999999 http://releases.ubuntu.com/18.04/ubuntu-18.04.3-desktop-amd64.iso ubuntu-part2

Repeat this process until all the chunks are downloaded. The last step is to combine the chunks into a single file, which can be done with the cat command.

cat ubuntu-part? > ubuntu-18.04.3-desktop-amd64.iso

Client certificate

To access a server using certificate authentication instead of basic authentication, you can specify a certificate file with the –cert option.

curl --cert path/to/cert.crt:password ftp://example.com

cURL has a lot of options for the format of certificate files.
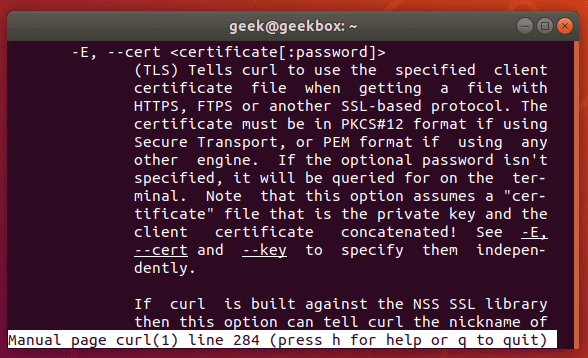
curl cert

There are more certificate related options, too: –cacert, –cert-status, –cert-type, etc. Check out the man page for a full list of options.

Silent cURL

If you’d like to suppress cURL’s progress meter and error messages, the -s switch provides that feature. It will still output the data you request, so if you’d like the command to be 100% silent, you’d need to direct the output to a file.

Combine this command with the -O flag to save the file in your present working directory. This will ensure that cURL returns with 0 output.

curl -s -O http://example.com

Alternatively, you could use the –output option to choose where to save the file and specify a name.

curl -s http://example.com --output index.html

curl silent

Get headers

Grabbing the header of a remote address is very simple with cURL, you just need to use the -I option.

curl -I example.com
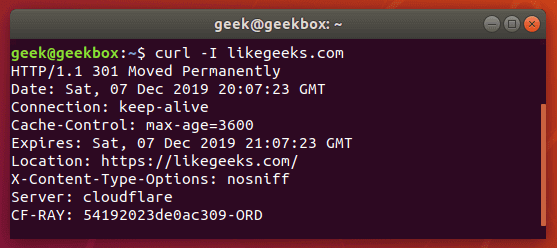
curl headers

If you combine this with the –L option, cURL will return the headers of every address that it’s redirected to.

curl -I -L example.com

Multiple headers

You can pass headers to cURL with the -H option. And to pass multiple headers, you just need to use the -H option multiple times. Here’s an example:

curl -H 'Connection: keep-alive' -H 'Accept-Charset: utf-8 ' http://example.com

Post (upload) file

POST is a common way for websites to accept data. For example, when you fill out a form online, there’s a good chance that the data is being sent from your browser using the POST method. To send data to a website in this way, use the -d option.

curl -d 'name=geek&location=usa' http://example.com

To upload a file, rather than text, the syntax would look like this:

curl -d @filename http://example.com

Use as many -d flags as you need in order to specify all the different data or filenames that you are trying to upload.

You can the -T option if you want to upload a file to an FTP server.

curl -T myfile.txt ftp://example.com/some/directory/

Send an email

Sending an email is simply uploading data from your computer (or another device) to an email server. Since cURL is able to upload data, we can use it to send emails. There are a slew of options, but here’s an example of how to send an email through an SMTP server:

curl smtp://mail.example.com --mail-from me@example.com --mail-rcpt john@domain.com --upload-file email.txt

Your email file would need to be formatted correctly. Something like this:

As usual, more granular and specialized options can be found in the man page of cURL.

Read email message

cURL supports IMAP (and IMAPS) and POP3, both of which can be used to retrieve email messages from a mail server.

Login using IMAP like this:

curl -u username:password imap://mail.example.com

This command will list available mailboxes, but not view any specific message. To do this, specify the UID of the message with the –X option.

curl -u username:password imap://mail.example.com -X 'UID FETCH 1234'

Difference between cURL and wget

Sometimes people confuse cURL and wget because they’re both capable of retrieving data from a server. But this is the only thing they have in common.

We’ve shown in this article what cURL is capable of. wget provides a different set of functions. wget is the best tool for downloading websites and is capable of recursively traversing directories and links to download entire sites.

For downloading websites, use wget. If using some protocol other than HTTP or HTTPS, or for uploading files, use cURL. cURL is also a good option for downloading individual files from the web, although wget does that fine, too.

I hope you find the tutorial useful. Keep coming back.

0

Grep command in Linux (With Examples)

In this tutorial, you will learn how to use the very essential grep command in Linux. We’re going to go over why this command is important to master, and how you can utilize it in your everyday tasks at the command line. Let’s dive right in with some explanations and examples. Why do we use grep? Grep is a command line tool that Linux users use to search for strings of text. You can use it to search a file for a certain word or combination of words or you can pipe the output of other Linux commands to grep, so grep can show you only the output that you need to see. Let’s look at some really common examples. Say that you need to check the contents of a directory to see if a certain file exists there. That’s something you would use the “ls” command for. But, to make this whole process of checking the directory’s contents even faster, you can pipe the output of the ls command to the grep command. Let’s look in our home directory for a folder called Documents.

Continue Reading →

ls without grep

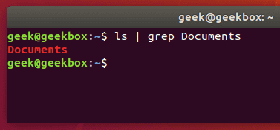
And now let’s try checking the directory again, but this time using grep to check specifically for the Documents folder.

ls | grep Documents

ls grep

As you can see in the screenshot above, using the grep command saved us time by quickly isolating the word we searched for from the rest of the unnecessary output that the ls command produced.

If the Documents folder didn’t exist, grep wouldn’t return any output. So if nothing is returned by grep, that means that it couldn’t find the word you are searching for.

grep no results

Find a string

If you need to search for a string of text, rather than just a single word, you will need to wrap the string in quotes. For example, what if we needed to search for the “My Documents” directory instead of the single-worded “Documents” directory?

ls | grep 'My Documents'

grep for string

Grep will accept both single quotes and double quotes, so wrap your string of text with either.

While grep is often used to search the output piped from other command line tools, you can also use it to search documents directly. Here’s an example where we search a text document for a string.

grep 'Class 1' Students.txt

grep for string in document

Find multiple strings

You can also use grep to find multiple words or strings. You can specify multiple patterns by using the -e switch. Let’s try searching a text document for two different strings:

grep -e 'Class 1' -e Todd Students.txt

grep multiple strings

Notice that we only needed to use quotes around the strings that contained spaces.

Difference between grep, egrep fgrep, pgrep, zgrep

Various grep switches were historically included in different binaries. On modern Linux systems, you will find these switches available in the base grep command, but it’s common to see distributions support the other commands as well.

From the man page for grep:

grep commands

egrep is the equivalent of grep -E

This switch will interpret a pattern as an extended regular expression. There’s a ton of different things you can do with this, but here’s an example of what it looks like to use a regular expression with grep.

Let’s search a text document for strings that contain two consecutive ‘p’ letters:

egrep p\{2} fruits.txt
or
grep -E p\{2} fruits.txt

egrep example

fgrep is the equivalent of grep -F

This switch will interpret a pattern as a list of fixed strings, and try to match any of them. It’s useful when you need to search for regular expression characters. This means you don’t have to escape special characters like you would with regular grep.

fgrep example

pgrep is a command to search for the name of a running process on your system and return its respective process IDs. For example, you could use it to find the process ID of the SSH daemon:

pgrep sshd

fgrep example

This is similar in function to just piping the output of the ‘ps’ command to grep.

prgrep vs ps

You could use this information to kill a running process or troubleshoot issues with the services running on your system.

zgrep is used to search compressed files for a pattern. It allows you to search the files inside of a compressed archive without having to first decompress that archive, basically saving you an extra step or two.

zgrep apple fruits.txt.gz

zgrep example

zgrep also works on tar files, but only seems to go as far as telling you whether or not it was able to find a match.

zgrep tar file

We mention this because files compressed with gzip are very commonly tar archives.

Difference between find and grep

For those just starting out on the Linux command line, it’s important to remember that find and grep are two commands with two very different functions, even though they are both used to “find” something that the user specifies.

It’s handy to use grep to find a file when you use it to search through the output of the ls command, like we showed in the first examples of the tutorial.

However, if you need to search recursively for the name of a file – or part of the file name if you use a wildcard (asterisk) – you’re much ahead to use the ‘find’ command.

find /path/to/search -name name-of-file

find command

The output above shows that the find command was able to successfully locate the file we searched for.

Search recursively

You can use the -r switch with grep to search recursively through all files in a directory and its subdirectories for a specified pattern.

grep -r pattern /directory/to/search

If you don’t specify a directory, grep will just search your present working directory. In the screenshot below, grep found two files matching our pattern, and returns with their file names and which directory they reside in.

recursive grep

Catch space or tab

As we mentioned earlier in our explanation of how to search for string, you can wrap text inside quotes if it contains spaces. The same method will work for tabs, but we’ll explain how to put a tab in your grep command in a moment.

Put a space or multiple spaces inside quotes to have grep search for that character.

grep " " sample.txt

grep spaces

There are a few different ways you can search for a tab with grep, but most of the methods are experimental or can be inconsistent across different distributions.

The easiest way is to just search for the tab character itself, which you can produce by hitting ctrl+v on your keyboard, followed by tab.

Normally, pressing tab in a terminal window tells the terminal that you want to auto-complete a command, but pressing the ctrl+v combination beforehand will cause the tab character to be written out as you’d normally expect it to in a text editor.

grep " " sample.txt

grep tabs

Knowing this little trick is especially useful when greping through configuration files in Linux, since tabs are frequently used to separate commands from their values.

Using regular expressions

Grep’s functionality is further extended by using regular expressions, allowing you more flexibility in your searches. Several exist, and we will go over some of the most commons ones in the examples below:

[ ] brackets are used to match any of a set of characters.

grep "Class [123]" Students.txt

grep brackets

This command will return any lines that say ‘Class 1’, ‘Class2’, or ‘Class 3’.

[-] brackets with hyphen can be used to specify a range of characters, either numerical or alphabetical.

grep "Class [1-3]" Students.txt

grep brackets hyphen

We get the same output as before, but the command is much easier to type, especially if we had a bigger range of numbers or letters.

^ caret is used to search for a pattern that only occurs at the beginning of a line.

grep "^Class" Students.txt

grep caret

[^] brackets with caret are used to exclude characters from a search pattern.

grep "Class [^1-2]" Students.txt

grep brackets caret

$ dollar sign is used to search for a pattern that only occurs at the end of a line.

grep "1$" Students.txt

grep dollar

. dot is used to match any one character, so it’s a wildcard but only for a single character.

grep "A….a" Students.txt

grep dot

Grep gz files without unzipping

As we showed earlier, the zgrep command can be used to search through compressed files without having to unzip them first.

zgrep word-to-search /path/to/file.gz

You can also use the zcat command to display the contents of a gz file, and then pipe that output to grep to isolate the lines containing your search string.

zcat file.gz | grep word-to-search

zcat

Grep email addresses from a zip file

We can use a fancy regular expression to extract all the email addresses from a zip file.

grep -o '[[:alnum:]+\.\_\-]*@[[:alnum:]+\.\_\-]*' emails.txt

The -o flag will extract the email address only, rather than showing the entire line that contains the email address. This results in a cleaner output.

grep emails

As with most things in Linux, there is more than one way to do this. You could also use egrep and a different set of expressions. But the example above works just fine and is a pretty simple way to extract the email addresses and ignore everything else.

Grep IP addresses

Greping for IP addresses can get a little complex because we can’t just tell grep to look for 4 numbers separated by dots – well, we could, but that command has the potential to return invalid IP addresses as well.

The following command will find and isolate only valid IPv4 addresses:

grep -E -o "(25[0-5]|2[0-4][0-9]|[01]?[0-9][0-9]?)\.(25[0-5]|2[0-4][0-9]|[01]?[0-9][0-9]?)\.(25[0-5]|2[0-4][0-9]|[01]?[0-9][0-9]?)\.(25[0-5]|2[0-4][0-9]|[01]?[0-9][0-9]?)" /var/log/auth.log

We used this on our Ubuntu server just to see where the latest SSH attempts have been made from.

grep IP addresses

To avoid repeat information and having your screen flooded, you may want to pipe your grep commands to “uniq” and “more” as we did in the screenshot above.

Grep or condition

There are a few different ways you can use an or condition with grep, but we will show you the one that requires the least amount of keystrokes and is easiest to remember:

grep -E 'string1|string2' filename
or, technically using egrep is even less keystrokes:
egrep 'string1|string2' filename

grep or condition

Ignore case sensitivity

By default, grep is case sensitive, which means you have to be precise in the capitalization of your search string. You can avoid this by telling grep to ignore the case with the -i switch.

grep -i string filename

grep ignore case

Search with case sensitive

What if we want to search for a string where the first can be uppercase or lowercase, but the rest of the string should be lowercase? Ignoring case with the -i switch won’t work in this case, so a simple way to do it would be with brackets.

grep [Ss]tring filename

This command tells grep to be case sensitive except for the first letter.

grep case sensitive

Grep exact match

In our examples above, whenever we search our document for the string “apple”, grep also returns “pineapple” as part of the output. To avoid this, and search for strictly “apple”, you can use this command:

grep "\<apple\>" fruits.txt

exact match

You can also use the -w switch, which will tell grep that the string must match the whole line. Obviously, this will only work in situations where you’re not expecting the rest of the line to have any text at all.

Exclude pattern

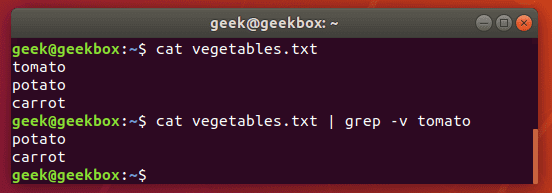
To see the contents of a file but exclude patterns from the output, you can use the -v switch.

grep -v string-to-exclude filename

exclude pattern

As you can see in the screenshot, the string we excluded is no longer shown when we run the same command with the -v switch.

Grep and replace

A grep command piped to sed can be used to replace all instances of a string in a file. This command will replace “string1” with “string2” in all files relative to the present working directory:

grep -rl 'string1' ./ | xargs sed -i 's/string1/string2/g'

Grep with line number

To show the number of a line that your search string is found on, use the -n switch.

grep -n string filename

show line numbers

Show lines before and after

If you need a little more context to the grep output, you can show one line before and after your specified search string with the -c switch:

grep -c 1 string filename

Specify the number of lines you wish to show – we did only 1 line in this example.

line before and after

Sort the result

Pipe grep’s output to the sort command to sort your results in some kind of order. The default is alphabetical.

grep string filename | sort

line before and after

I hope you find the tutorial useful. Keep coming back.

0