 In the previous post, we talked about writing practical shell scripts and we saw how it is easy to write a shell script. Today we are going to talk about a tool that does magic to our shell scripts, that tool is the Expect command or Expect scripting language. Expect command or expect scripting language is a language that talks with your interactive programs or scripts that require user interaction. Expect scripting language works by expecting input, then the Expect script will send the response without any user interaction. You can say that this tool is your robot which will automate your scripts.
If Expect command if not installed on your system, you can install it using the following command:
$ apt-get install expect
Or on Red Hat based systems like CentOS:
$ yum install expect
Expect Command
Before we talk about expect command, Let’s see some of the expect command which used for interaction:
spawn Starting a script or a program.
expect Waiting for program output.
send Sending a reply to your program.
interact Allowing you in interact with your program.
- The spawn command is used to start a script or a program like the shell, FTP, Telnet, SSH, SCP, and so on.
- The send command is used to send a reply to a script or a program.
- The Expect command waits for input.
- The interact command allows you to define a predefined user interaction.
We are going to type a shell script that asks some questions and we will make an Expect script that will answer those questions.
First, the shell script will look like this:
#!/bin/bash
echo "Hello, who are you?"
read $REPLY
echo "Can I ask you some questions?"
read $REPLY
echo "What is your favorite topic?"
read $REPLY
Now we will write the Expect scripts that will answer this automatically:
#!/usr/bin/expect -f
set timeout -1
spawn ./questions
expect "Hello, who are you?\r"
send -- "Im Adam\r"
expect "Can I ask you some questions?\r"
send -- "Sure\r"
expect "What is your favorite topic?\r"
send -- "Technology\r"
expect eof
The first line defines the expect command path which is #!/usr/bin/expect.
On the second line of code, we disable the timeout. Then start our script using spawn command.
We can use spawn to run any program we want or any other interactive script.
The remaining lines are the Expect script that interacts with our shell script.
The last line if the end of file which means the end of the interaction.
Now Showtime, let’s run our answer bot and make sure you make it executable.
$ chmod +x ./answerbot
$./answerbot
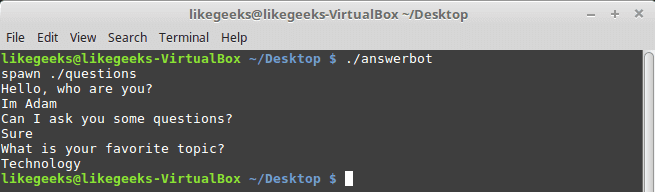
Cool!! All questions are answered as we expect.
If you get errors about the location of Expect command you can get the location using the which command:
$ which expect
We did not interact with our script at all, the Expect program do the job for us.
The above method can be applied to any interactive script or program.Although the above Expect script is very easy to write, maybe the Expect script little tricky for some people, well you have it.
Using autoexpect
To build an expect script automatically, you can the use autoexpect command.
autoexpect works like expect, but it builds the automation script for you. The script you want to automate is passed to autoexpect as a parameter and you answer the questions and your answers are saved in a file.
$ autoexpect ./questions
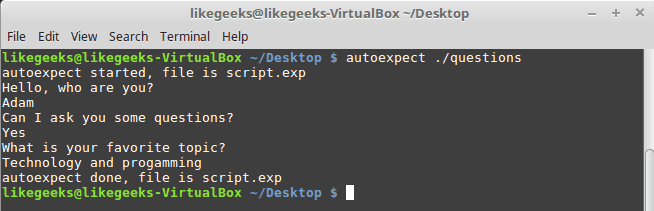
A file is generated called script.exp contains the same code as we did above with some additions that we will leave it for now.

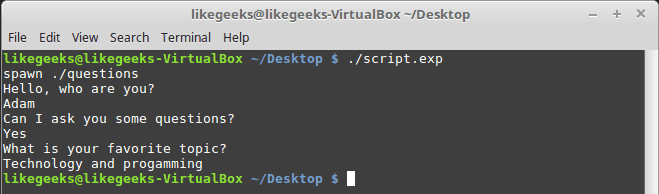
If you run the auto generated file script.exp, you will see the same answers as expected:
Awesome!! That super easy.
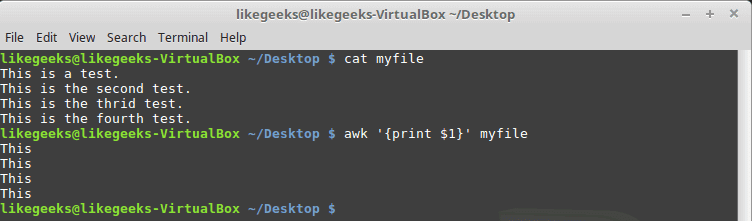
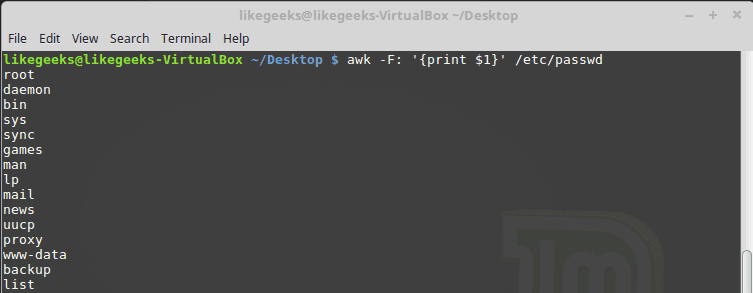
There are many commands that produce changeable output, like the case of FTP programs, the expect script may fail or stuck. To solve this problem, you can use wildcards for the changeable data to make your script more flexible.
Working with Variables
The set command is used to define variables in Expect scripts like this:
set MYVAR 5
To access the variable, precede it with $ like this $VAR1
To define command line arguments in Expect scripts, we use the following syntax:
set MYVAR [lindex $argv 0]
Here we define a variable MYVAR which equals the first passed argument.
You can get the first and the second arguments and store them in variables like this:
set my_name [lindex $argv 0]
set my_favorite [lindex $argv 1]
Let’s add variables to our script:
#!/usr/bin/expect -f
set my_name [lindex $argv 0]
set my_favorite [lindex $argv 1]
set timeout -1
spawn ./questions
expect "Hello, who are you?\r"
send -- "Im $my_name\r"
expect "Can I ask you some questions?\r"
send -- "Sure\r"
expect "What is your favorite topic?\r"
send -- "$my_favorite\r"
expect eof
Now try to run the Expect script with some parameters to see the output:
$ ./answerbot SomeName Programming

Awesome!! Now our automated Expect script is more dynamic.
Conditional Tests
You can write conditional tests using braces like this:
expect {
"something" { send -- "send this\r" }
"*another" { send -- "send another\r" }
}
We are going to change our script to return different conditions, and we will change our Expect script to handle those conditions.
We are going to emulate different expects with the following script:
#!/bin/bash
let number=$RANDOM
if [ $number -gt 25000 ]; then
echo "What is your favorite topic?"
else
echo "What is your favorite movie?"
fi
read $REPLY
A random number is generated every time you run the script and based on that number, we put a condition to return different expects.
Let’s make out Expect script that will deal with that.
#!/usr/bin/expect -f
set timeout -1
spawn ./questions
expect {
"*topic?" { send -- "Programming\r" }
"*movie?" { send -- "Star wars\r" }
}
expect eof
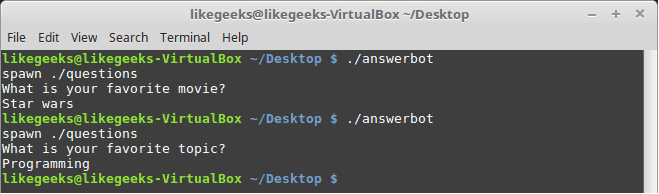
Very clear. If the script hits the topic output, the Expect script will send programming and if the script hits movie output the expect script will send star wars. Isn’t cool?
If else Conditions
You can use if/else clauses in expect scripts like this:
#!/usr/bin/expect -f
set NUM 1
if { $NUM < 5 } {
puts "\Smaller than 5\n"
} elseif { $NUM > 5 } {
puts "\Bigger than 5\n"
} else {
puts "\Equals 5\n"
}

Note: The opening brace must be on the same line.
While Loops
While loops in expect language must use braces to contain the expression like this:
#!/usr/bin/expect -f
set NUM 0
while { $NUM <= 5 } {
puts "\nNumber is $NUM"
set NUM [ expr $NUM + 1 ]
}
puts ""

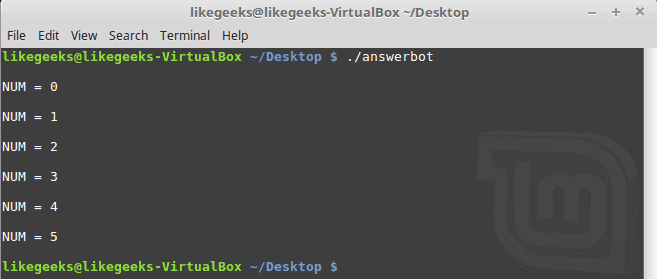
For Loops
To make a for loop in expect, three fields must be specified, like the following format:
#!/usr/bin/expect -f
for {set NUM 0} {$NUM <= 5} {incr NUM} {
puts "\nNUM = $NUM"
}
puts ""
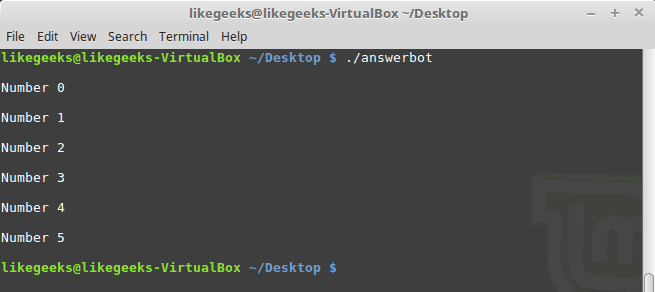
User-defined Functions
You can define a function using proc like this:
proc myfunc { TOTAL } {
set TOTAL [expr $TOTAL + 1]
return "$TOTAL"
}
And you can use them after that.
#!/usr/bin/expect -f
proc myfunc { TOTAL } {
set TOTAL [expr $TOTAL + 1]
return "$TOTAL"
}
set NUM 0
while {$NUM <= 5} {
puts "\nNumber $NUM"
set NUM [myfunc $NUM]
}
puts ""
Interact Command
Sometimes your Expect script contains some sensitive information that you don’t want to share with other users who use your Expect scripts, like passwords or any other data, so you want your script to take this password from you and continuing automation normally.
The interact command reverts the control back to the keyboard.
When this command is executed, Expect will start reading from the keyboard.
This shell script will ask about the password as shown:
#!/bin/bash
echo "Hello, who are you?"
read $REPLY
echo "What is you password?"
read $REPLY
echo "What is your favorite topic?"
read $REPLY
Now we will write the Expect script that will prompt for the password:
#!/usr/bin/expect -f
set timeout -1
spawn ./questions
expect "Hello, who are you?\r"
send -- "Hi Im Adam\r"
expect "*password?\r"
interact ++ return
send "\r"
expect "*topic?\r"
send -- "Technology\r"
expect eof

After you type your password type ++ and the control will return back from the keyboard to the script.
Expect language is ported to many languages like C#, Java, Perl, Python, Ruby and Shell with almost the same concepts and syntax due to its simplicity and importance.
Expect scripting language is used in quality assurance, network measurements such as echo response time, automate file transfers, updates, and many other uses.
I hope you now supercharged with some of the most important aspects of Expect command, autoexpect command and how to use it to automate your tasks in a smarter way.
Thank you.

 In the previous post, we talked about


 In a previous tutorial, we talked about
  In the previous post, we talked about