Tag Archives | secure

How to secure your internet activity with Linux system and VPN

Hackers can access, steal and sell your online activity data as well as manipulate it if you don’t use the right system and tools. The level of protection you want will largely influence which tools and systems to use. With a Linux system and VPN, it becomes possible to hide your browsing tracks, personal information, and various other online activities. When you have the right protection in place, not even the government can access your activity. Keep reading to learn how businesses and individuals alike can use a Linux system and VPN for ongoing protection of their online data. We will also explore why this is important and why you should care about your online data. Hackers steal data for a number of reasons. Sometimes, it’s’ for their own purposes. Other times, they sell it or give it to other entities. These entities may or may not have known about the data collection processes the hackers use to gather the data.

Continue Reading →

What Is a VPN?

VPN stands for virtual private network, which means it provides encryption, making it difficult for the bad guys to steal your data when visiting their sites. It also acts as an added layer of protection against the government from tracking your online activity.

In some areas, a VPN even grants users access to certain content that is not normally available in their geographical areas. Such forms of content often include video, international gaming, certain servers, etc.

The VPN works to protect your online activity by making it appear as if you are logged in from a different location. As soon as you connect to the VPN, you can set your location to anywhere in the world.

Additionally, with a Linux system, you can improve the safety and protection of your data thanks to advanced security measures. Fixes for Linux program exploits made by hackers are generally developed and released well before other operating systems develop and release fixes for their equivalent programs.

How Does a Linux System Make Online Activity More Secure?

Getting fixes to exploits is of the utmost importance in both personal and business settings, particularly those sitting on large amounts of data.

Hackers, crackers, and phreakers steal people’s online data all the time for multiple reasons. Some do it to fight a cause, some steal it unintentionally, some do it for fun, a few do it for commercial espionage or sabotage, and lastly, it’s not uncommon for disgruntled employees to steal data for whistle blowing purposes.

A Linux system helps avoid several types of attacks:

  • Reading data
  • Denial of service
  • Altering/manipulating data
  • Access to system

Tips for Increasing Data Protection With a Linux System

To increase data protection through the use of a Linux system, you must first pinpoint what you mean by “secure.” To do this, you must assess what you intend to do with the system and just how secure you need the data to be. In most cases, Linux systems need security, at a minimum, in the following areas:

  • Authorization: Do not allow ANYONE access to the system unless they NEED access
  • Verification: Make sure users have to go through a 2-step authentication process to verify their identity each time logging into the system
  • Integrity: All personal information must be protected and NEVER compromised
  • Non-repudiation: Must have proof of receipt of data; official receipt showing how you received the data and from whom
  • Privacy/confidentiality: You must abide by any privacy and confidentiality regulations such as the ISO 7984-2 International Standards Organization Security Standard
  • Availability: System must be able to perform its required function at all times during normal operating hours while maintaining security around the clock.

Choose a Native App

When installing a VPN on a Linux system, you will have two options: Open-source or native app. With a native app, you will get access to more features and less required configuration.

Because of this, it is highly suggested that any VPN you use at least comes in the form of a native client for Linux.

In addition to the dedicated app, users of a VPN that comes in the form of a native client enjoy sophisticated security, ultra-fast speeds, and the ability to run on a command-line interface. Additionally, the server list is always kept up to date, making it simple to download and switch between UDP to TCP over the Open VPN protocol.

Run Through Services and Customize Each of Them

When using Linux as a VPN, you will have several types of facilities to choose from, including mail and WWW. Linux handles some of these services through a system of ports.

Take for example Port 21, which controls FTP. You can check out service names in the /etc/services file for a map of port numbers.

It’s ideal to have most of your services running through a configuration file /etc/inetd.conf. You’ll also want to take a lot of time when running through this type of file as you will have the ability to customize how each of the available services is running and protected.

Keep Services in inetd.conf Turned OFF

Check the services in inetd.conf, and make sure they are not set to turn on by default. To achieve maximum security, you must turn them off. You can type the command netstat -vat to see which services are currently running on your Linux or alternatively, you can use ss command. For any services that you are unfamiliar with, make sure to look them up in /etc/inetd.conf.

Final Thoughts

There are numerous VPNs to choose from. The surfshark.com VPN is especially ideal for those who want to unblock lots of region-locked content from sources such as Netflix, Amazon Prime Video and Hulu.

Users of this VPN are also huge fans of their ability to connect to the VPN through an unlimited number of devices. This is an example of a VPN that has the features you should look for when researching for ways to use a Linux system to secure internet activity.

0

SSH port forwarding (tunneling) in Linux

In this tutorial, we will cover SSH port forwarding in Linux. This is a function of the SSH utility that Linux administrators use to create encrypted and secure relays across different systems. SSH port forwarding, also called SSH tunneling, is used to create a secure connection between two or more systems. Applications can then use these tunnels to transmit data. Your data is only as secure as its encryption, which is why SSH port forwarding is a popular mechanism to use. Read on to find out more and see how to setup SSH port forwarding on your own systems. To put it simply, SSH port forwarding involves establishing an SSH tunnel between two or more systems and then configuring the systems to transmit a specified type of traffic through that connection.

Continue Reading →

What is SSH port forwarding?

To put it simply, SSH port forwarding involves establishing an SSH tunnel between two or more systems and then configuring the systems to transmit a specified type of traffic through that connection.

There are a few different things you can do with this: local forwarding, remote forwarding, and dynamic port forwarding. Each configuration requires its own steps to setup, so we will go over each of them later in the tutorial.

Local port forwarding is used to make an external resource available on the local network. An SSH tunnel is established to a remote system, and traffic from the local network can use that tunnel to transmit data back and forth, accessing the remote system and network as if it was a part of the local network.

Remote port forwarding is the exact opposite. An SSH tunnel is established but the remote system is able to access your local network.

Dynamic port forwarding sets up a SOCKS proxy server. You can configure applications to connect to the proxy and transmit all data through it. The most common use for this is for private web browsing or to make your connection seemingly originate from a different country or location.

SSH port forwarding can also be used to setup a virtual private network (VPN). You’ll need an extra program for this called sshuttle. We cover the details later in the tutorial.

Why use SSH port forwarding?

Since SSH creates encrypted connections, this is an ideal solution if you have applications that transmit data in plaintext or use an unencrypted protocol. This holds especially true for legacy applications.

It’s also popular to use it for connecting to a local network from the outside. For example, an employee using SSH tunnels to connect to a company’s intranet.

You may be thinking this sounds like a VPN. The two are similar, but creating ssh tunnels is for specific traffic, whereas VPNs are more for establishing general connections.

SSH port forwarding will allow you to access remote resources by just establishing an SSH tunnel. The only requirement is that you have SSH access to the remote system and, ideally, public key authentication configured for password-less SSHing.

How many sessions are possible?

Technically, you can specify as many port forwarding sessions as you’d like. Networks use 65,535 different ports, and you are able to forward any of them that you want.

When forwarding traffic, be cognizant of the services that use certain ports. For example, port 80 is reserved for HTTP. So you would only want to forward traffic on port 80 if you intend to forward web requests.

The port you forward on your local system doesn’t have to match that of the remote server. For example, you can forward port 8080 on localhost to port 80 on the remote host.

If you don’t care what port you are using on the local system, select one between 2,000 and 10,000 since these are rarely used ports. Smaller numbers are typically reserved for certain protocols.

Local forwarding

Local forwarding involves forwarding a port from the client system to a server. It allows you to configure a port on your system so that all connections to that port will get forwarded through the SSH tunnel.

Use the -L switch in your ssh command to specify local port forwarding. The general syntax of the command is like this:

ssh -L local_port:remote_ip:remote_port [email protected]

Check out the example below:

ssh -L 80:example1.com:80 example2.com

local port forwarding

This command would forward all requests to example1.com to example2.com. Any user on this system that opens a web browser and attempts to navigate to example1.com will, in the background, have their request sent to example2.com instead and display a different website.

Such a command is useful when configuring external access to a company intranet or other private network resources.

Test SSH port forwarding

To see if your port forwarding is working correctly, you can use the netcat command. On the client machine (the system where you ran the ssh -L command), type the netcat command with this syntax:

nc -v remote_ip port_number

Test port forwarding using netcat

If the port is forwarded and data is able to traverse the connection successfully, netcat will return with a success message. If it doesn’t work, the connection will time out.

If you’re having trouble getting the port forwarding to work, make sure you’re able to ssh into the remote server normally and that you have configured the ports correctly. Also, verify that the connection isn’t being blocked by a firewall.

Persistent SSH tunnels (Using Autossh)

Autossh is a tool that can be used to create persistent SSH tunnels. The only prerequisite is that you need to have public key authentication configured between your systems, unless you want to be prompted for a password every time the connection dies and is reestablished.

Autossh may not be installed by default on your system, but you can quickly install it using apt, yum, or whatever package manager your distribution uses.

sudo apt-get install autossh

The autossh command is going to look pretty much identical to the ssh command we ran earlier.

autossh -L 80:example1.com:80 example2.com

Persistent SSH port forwarding autossh

Autossh will make sure that tunnels are automatically re-established in case they close because of inactivity, remote machine rebooting, network connection being lost, etc.

Remote forwarding

Remote port forwarding is used to give a remote machine access to your system. For example, if you want a service on your local computer to be accessible by a system(s) on your company’s private network, you could configure remote port forwarding to accomplish that.

To set this up, issue an ssh command with the following syntax:

ssh -R remote_port:local_ip:local_port [email protected]

If you have a local web server on your computer and would like to grant access to it from a remote network, you could forward port 8080 (common http alternative port) on the remote system to port 80 (http port) on your local system.

ssh -R 8080:localhost:80 [email protected]

Remote port forwarding

Dynamic forwarding

SSH dynamic port forwarding will make SSH act as a SOCKS proxy server. Rather than forwarding traffic on a specific port (the way local and remote port forwarding do), this will forward traffic across a range of ports.

If you have ever used a proxy server to visit a blocked website or view location-restricted content (like viewing stuff on Netflix that isn’t available in your country), you probably used a SOCKS server.

It also provides privacy, since you can route your traffic through a SOCKS server with dynamic port forwarding and prevent anyone from snooping log files to see your network traffic (websites visited, etc).

To set up dynamic port forwarding, use the ssh command with the following syntax:

ssh -D local_port [email protected]

So, if we wanted to forward traffic on port 1234 to our SSH server:

ssh -D 1234 [email protected]

Once you’ve established this connection, you can configure applications to route traffic through it. For example, on your web browser:

Socks proxy

Type the loopback address (127.0.0.1) and the port you configured for dynamic port forwarding, and all traffic will be forwarded through the SSH tunnel to the remote host (in our example, the likegeeks.com SSH server).

Multiple forwarding

For local port forwarding, if you’d like to setup more than one port to be forwarded to a remote host, you just need to specify each rule with a new -L switch each time. The command syntax is like this:

ssh -L local_port_1:remote_ip:remote_port_1 -L local_port_2:remote_ip:remote_port2 [email protected]

For example, if you want to forward ports 8080 and 4430 to 192.168.1.1 ports 80 and 443 (HTTP and HTTPS), respectively, you would use this command:

ssh -L 8080:192.168.1.1:80 -L 4430:192.168.1.1:443 [email protected]

For remote port forwarding, you can setup more than one port to be forwarded by specifying each new rule with the -R switch. The command syntax is like this:

ssh -R remote_port1:local_ip:local_port1 remote_port2:local_ip:local_port2 [email protected]

List port forwarding

You can see what SSH tunnels are currently established with the lsof command.

lsof -i | egrep '\<ssh\>'

SSH tunnels

In this screenshot, you can see that there are 3 SSH tunnels established. Add the -n flag to have IP addresses listed instead of resolving the hostnames.

lsof -i -n | egrep '\<ssh\>'

SSH tunnels n flag

Limit forwarding

By default, SSH port forwarding is pretty open. You can freely create local, remote, and dynamic port forwards as you please.

But if you don’t trust some of the SSH users on your system, or you’d just like to enhance security in general, you can put some limitations on SSH port forwarding.

There are a couple of different settings you can configure inside the sshd_config file to put limitations on port forwarding. To configure this file, edit it with vi, nano, or your favorite text editor:

sudo vi /etc/ssh/sshd_config

PermitOpen can be used to specify the destinations to which port forwarding is allowed. If you only want to allow forwarding to certain IP addresses or hostnames, use this directive. The syntax is as follows:

PermitOpen host:port

PermitOpen IPv4_addr:port

PermitOpen [IPv6_addr]:port

AllowTCPForwarding can be used to turn SSH port forwarding on or off, or specify what type of SSH port forwarding is permitted. Possible configurations are:

AllowTCPForwarding yes #default setting

AllowTCPForwarding no #prevent all SSH port forwarding

AllowTCPForwarding local #allow only local SSH port forwarding

AllowTCPForwarding remote #allow only remote SSH port forwarding

To see more information about these options, you can check out the man page:

man sshd_config

Low latency

The only real problem that arises with SSH port forwarding is that there is usually a bit of latency. You probably won’t notice this as an issue if you’re doing something minor, like accessing text files or small databases.

The problem becomes more apparent when doing network intensive activities, especially if you have port forwarding set up as a SOCKS proxy server.

The reason for the latency is because SSH is tunneling TCP over TCP. This is a terribly inefficient way to transfer data and will result in slower network speeds.

You could use a VPN to prevent the issue, but if you are determined to stick with SSH tunnels, there is a program called sshuttle that corrects the issue. Ubuntu and Debian-based distributions can install it with apt-get:

sudo apt-get install sshuttle

If you package manager on your distribution doesn’t have sshuttle in its repository, you can clone it from GitHub:

git clone https://github.com/sshuttle/sshuttle.git

cd sshuttle

./setup.py install

Setting up a tunnel with sshuttle is different from the normal ssh command. To setup a tunnel that forwards all traffic (akin to a VPN):

sudo sshuttle -r user@remote_ip -x remote_ip 0/0 -vv

sshuttle command

Break the connection with a ctrl+c key combination in the terminal. Alternatively, to run the sshuttle command as a daemon, add the -D switch to your command.

Want to make sure that the connection was established and the internet sees you at the new IP address? You can run this curl command:

curl ipinfo.io

curl IP address

I hope you find the tutorial useful. Keep coming back.

0

Install, Secure, Access and Configure Linux Mail Server (Postfix)

If you want to send or receive an email, you should have a mail server. In this post, we will discuss Linux mail server and how the SMTP (Simple Mail Transfer Protocol) works as well as other mail-related protocols, like Post Office Protocol (POP) and Internet Message Access Protocol (IMAP) and the relationship between them. SMTP defines how a mail is sent from one host to another, it is also system independent, which means the sender and receiver can have different operating systems. SMTP requires only that a server is able to send straight ASCII text to another server, and this is done by connecting to the server on port 25 which is the standard SMTP port. Most Linux distros today are shipped with two of the most common implementations of SMTP which are sendmail and Postfix. Sendmail is a famous and free mail server, but it has a little complex design and less secure. The Postfix took mail server implementation one step further, it was developed with security in mind.

Continue Reading →

Mail Service Components

The mail service on any mail server has three components:

Mail user agent (MUA): this component that the user sees and interacts with like Thunderbird and Microsoft Outlook, these user agents are responsible for reading mail and allowing you to compose mail.

Mail transport agent (MTA): this component is responsible for getting the mail from one site to another like Sendmail and Postfix.

Mail delivery agent (MDA): this component is responsible for distributing received messages on the local machine to the appropriate user mailbox like postfix-maildrop and Procmail.

Setup Email Server

We chose Postfix mail server, which is very popular and common among system administrators today.

Postfix is the default mail server on most modern Linux distros.

First, check if it is installed on your system or not:

rpm -qa | grep postfix

If not installed, you can install Postfix mail server on Red Hat based distros like this:

dnf -y install postfix

Then start the postfix service and enable it on system startup:

systemctl start postfix

systemctl enable postfix

On Debian based distros like Ubuntu, you can install it like this:

apt-get -y install postfix

You will be prompted to select your Postfix mail server configuration type during the installation process.

Among the four choices No configuration, Internet site, Internet with smarthost, Satellite system and Local only, we will choose No configuration option.

Configure Linux Mail Server

After installing the Postfix mail server, you will need to configure it, most of its configuration files can be found under the /etc/postfix/ directory.

You can find the main configuration for Postfix mail server in /etc/postfix/main.cf file.

This file contains a lot of options like:

myhostname

This option is used for specifying the hostname of the mail server. This is the Internet hostname which Postfix will receive emails on it.

The hostnames could be like mail.example.com, smtp.example.com.

It is written like this:

myhostname = mail.example.com

mydomain

This option is the mail domain that you will be servicing, like example.com

The syntax is like this:

mydomain = example.com

myorigin

All emails sent from this mail server will look as though it came from this option. You can set this to $mydomain value.

myorigin = $mydomain

You can use any option value, just precede it with a $ like $mydomain.

mydestination

This option lists the domains that the Postfix server uses for incoming emails.

It can take values like this:

mydestination = $myhostname, localhost.$mydomain, $mydomain, mail.$mydomain, www.$mydomain

mail_spool_directory

There are two modes of delivery that Postfix mail server can use:

  • Directly to a user’s mailbox.
  • To a central spool directory, this way, the mail will be in /var/spool/mail with a file for each user.

mail_spool_directory = /var/spool/mail

mynetworks

This option allows you to configure what servers can relay through your Postfix server.

This option should take local addresses like local mail scripts on your server only.

Otherwise, spammers can utilize your mail server to relay their messages and your mail server blacklisted and as a result, you will not be able to receive many emails.

This option has the following syntax:

mynetworks = 127.0.0.0/8, 192.168.1.0/24

smtpd_banner

This variable sets the message that is sent when the client after successful connection.

It is better to change the banner to something that doesn’t give an indication about the server you are using.

inet_protocols

This option specifies the IP protocol version used for server connections.

inet_protocols = ipv4

If you change the configuration files for Postfix mail server, you need to reload the service:

systemctl reload postfix

When you type any configuration, you may make a mistake, you can check for errors using the following command:

postfix check

This tool will help you find exactly the line and the error so you can fix it.

Checking the Mail Queue

Sometimes the mail queues on your system are filled up. This can be caused by many reasons like network failure or any reason that can delay mail delivery.

To check the mail queue on your Linux mail server, use the following command:

mailq

This command shows the Postfix mail queue.

If your queue is filled up and the message takes several hours to be sent, then you should flush the mail queue.

postfix flush

Now, if you check your mail queue you should find it empty.

Test Linux Mail Server

After configuring Postfix mail server correctly, you should test your mail server.

The first step is to use a local mail user agent like mailx or mail which is a symlink to mailx.

Try to send a mail to someone else on the same server, if this works, then send to a remote site.

echo "This is message body" | mailx -s "This is Subject" -r "likegeeks<[email protected]>" -a /path/to/attachment [email protected]

Then try to receive a mail from a remote site.

If you have any problems, check the logs. The log file on Red Hat based distros in /var/log/maillog file and on Debian based distros in /var/log/mail.log file or as defined in the rsyslogd configuration.

I recommend you to review the Linux Syslog Server for a detailed explanation about logs and how to configure the rsyslogd.

If you still have problems, try checking your DNS settings and check your MX records using Linux network commands.

Secure Mail Boxes From Spam Using SpamAssassin

One of the ways to fight spam is to scan the mailboxes by some tool, searching for certain patterns associated with spam.

One of the best solutions is SpamAssassin, which is open-source.

You can install it like this:

dnf -y install spamassassin

Then start the service and enable it at startup:

systemctl start spamassassin

systemctl enable spamassassin

Once you’ve installed it, you can check the configuration in /etc/mail/spamassassin/local.cf file.

SpamAssassin determines if an email is spam or not based on the result of the different scripts scores.

If the message has a higher score, that means a higher possibility of the mail being spam.

In the configuration file, the parameter required_hits 5 indicates that SpamAssassin will mark an email as spam if its score is five or higher.

The report_safe option takes the values 0, 1, or 2. If set to 0 means email marked as spam is sent as it is, only modifying the headers to show that it is spam.

If it takes the value 1 or 2, a new report message is generated by SpamAssassin and sent to the recipient.

If the value is 1, that means the spam message is coded as content message/rfc822, while if the value is 2, that means the message is coded as text/plain content.

The text/plain is safer since some mail clients execute message/rfc822 and could infect the client computer.

Now we need to integrate it into postfix. The simplest way to do this is probably by using procmail.

We’ll have to create a file, named /etc/procmailrc, and add the following content:

:0 hbfw
| /usr/bin/spamc

Then we edit Postfix configuration file /etc/postfix/main.cf and change mailbox_command like this:

mailbox_command = /usr/bin/procmail

Finally, restart Postfix and SpamAssassin services:

systemctl restart postfix

systemctl restart spamassassin

However, SpamAssassin sometimes does not recognize spam messages, that led to mailboxes filled with spam messages.

Fortunately, you can filter messages before they enter the Postfix server using Realtime Blackhole Lists (RBLs). That will decrease the load on your mail server and keep your mail server clean.

Open the configuration file of postfix server /etc/postfix/main.cf and change smtpd_recipient_restrictions option and add the following options like this:

Then restart your postfix server:

systemctl restart postfix

The above RBLs are the common ones, you can find more lists on the web and try them.

Securing SMTP Connection

It is better to transfer your SMTP traffic over TLS to protect it from being modified in the middle.

First, we need to generate the certificate and the key using openssl command:

openssl genrsa -des3 -out mail.key

openssl req -new -key mail.key -out mail.csr

cp mail.key mail.key.original

openssl rsa -in mail.key.original -out mail_secure.key

openssl x509 -req -days 365 -in mail_secure.csr -signkey mail_secure.key -out mail_secure.crt

cp mail_secure.crt /etc/postfix/

cp mail_secure.key /etc/postfix/

Then add the following option to Postfix configuration file /etc/postfix/main.cf:

smtpd_use_tls = yes

smtpd_tls_cert_file = /etc/postfix/mail_secure.crt

smtpd_tls_key_file = /etc/postfix/mail_secure.key

smtp_tls_security_level = may

Finally, restart your postfix service:

systemctl restart postfix

Now, you have to choose the TLS on your client when connecting to the server.

You will receive a warning when you send a mail the first time after changing the setting because of the certificate is not signed.

Using Let’s Encrypt Certificates

Let’s Encrypt is a free SSL certificate provider that enables you to encrypt your traffic.

Instead of using self-signed certificates which annoy your users about trusting them, you can use this good solution.

First, install letsencrypt:

yum install letsencrypt

Or if you are using Debian based distro, you can use the following command:

apt-get install letsencrypt

Then run letsencrypt like this:

letsencrypt certonly --standalone -d yourdomain.com

You should replace yourdomain.com with your actual domain.

After answering the prompted questions about the contact email, the email server domain, and the license, everything should be OK now.

The certificates will be stored in /etc/letsencrypt/live/yourdomain.com/

One last thing you have to do which is making postfix use those certificates, you can use the following commands:

sudo postconf -e 'smtpd_tls_cert_file = /etc/letsencrypt/live/yourdomain.com/fullchain.pem'

sudo postconf -e 'smtpd_tls_key_file = /etc/letsencrypt/live/yourdomain.com/privkey.pem'

Don’t forget to replace yourdomain.com with your actual domain.

Finally, restart your postfix server

systemctl restart postfix

POP3 and IMAP Protocol Basics

So far we’ve seen how SMTP mail server sends and receives emails without problems, but consider the following situations:

  • Users need local copies of e-mail for offline viewing.
  • mbox file format is not supported. The mbox format is used by many mail user agents like mailx and mutt.
  • Users cannot stay connected to a fast network to grab a local copy to read offline.
  • Some mail servers don’t give access to the shared mail spool directories for security reasons.

To handle these cases, another class of protocols was introduced. This type of protocols may be described as mail access protocols.

The most common two popular mail access protocols are Post Office Protocol (POP) and Internet Message Access Protocol (IMAP).

The idea behind POP is very simple: A central Linux mail server remains online all the time and receives and store emails for all users. All received emails are queued on the server until a user grabs them.

When a user wants to send an email, the email client relays it through the central Linux mail server via SMTP normally.

Note that the SMTP server and POP server can be on the same system without any problem. Most servers do this today.

Features like keeping a master copy of a user’s email on the server were missing, that led to the development of IMAP.

By using IMAP, your Linux mail server will support three modes of access:

  • The online mode is similar to having direct file system access to the Linux mail server.
  • The offline mode is similar to how POP works, where the client is disconnected from the network except when grabbing his email. In this mode, the server normally does not retain a copy of the email.
  • The disconnected mode works by allowing users to keep cached copies of their emails and the server retains a copy of the email.

There are several implementations for IMAP and POP, the most popular one is Dovecot server which provides both protocols.

The POP3, POP3S, IMAP, and IMAPS listen on ports 110, 995, 143, and 993 respectively.

Installing Dovecot

Most Linux distros come with dovecot preinstalled, however, you can install dovecot in Red Hat based distros like this:

dnf -y install dovecot

On Debian based distros, the IMAP and POP3 functionality are provided in two separate packages, you can install them like this:

apt-get -y install dovecot-imapd dovecot-pop3d

You will be prompted to create self-signed certificates for using IMAP and POP3 over SSL/TLS. Select yes and enter the hostname for your system when prompted.

Then you can run the service and enable it at startup like this:

systemctl start dovecot

systemctl enable dovecot

Configure Dovecot

The main configuration file for Dovecot is /etc/dovecot/dovecot.conf file.

Some Linux distros put the configuration under /etc/dovecot/conf.d/ directory and use the include directive to include the settings in the files.

The following list is the some of the parameters used to configure dovecot:

protocols: the protocols you want to support.

protocols = imap pop3 lmtp

lmtp means local mail transfer protocol.

listen: IP addresses to listen on.

listen = *, ::

The asterisk means all ipv4 interfaces and :: means all ipv6 interfaces

userdb: user database for authenticating users.

userdb {

driver = pam

}

passdb: password database for authenticating users.

passdb {

driver = passwd

}

mail_location: this entry in /etc/dovecot/conf.d/10-mail.conf file, and it is written like this:

mail_location = mbox:~/mail:INBOX=/var/mail/%u

Dovecot comes with generic SSL certificates and key files that are used in the /etc/dovecot/conf.d/10-ssl.conf

ssl_cert = </etc/pki/dovecot/certs/dovecot.pem

ssl_key = </etc/pki/dovecot/private/dovecot.pem

When a user tries to connect to dovecot server, it will show a warning because the certificates are not signed, you can purchase a certificate from a certificate authority if you want.

Or if you go with Let’s Encrypt certificates, you can point to them instead:

ssl_cert = </etc/letsencrypt/live/yourdomain.com/fullchain.pem

ssl_key = </etc/letsencrypt/live/yourdomain.com/privkey.pem

Don’t forget to open dovecot server ports in your iptables firewall by adding iptables rules for ports 110, 995, 143, 993, 25.

Then save the rules.

Or if you are using firewalld you can do the following:

firewall-cmd --permanent --add-port=110/tcp --add-port=995/tcp

firewall-cmd --permanent --add-port=143/tcp --add-port=993/tcp

firewall-cmd --reload

And again, for troubleshooting, you check the log files /var/log/messages, /var/log/maillog, and /var/log/mail.log files.

Linux mail server is one of the easiest servers to work with, especially Postfix mail server.

I hope you find the post useful and interesting. Keep coming back.

Thank you.

0

Linux iptables Firewall Simplified Examples

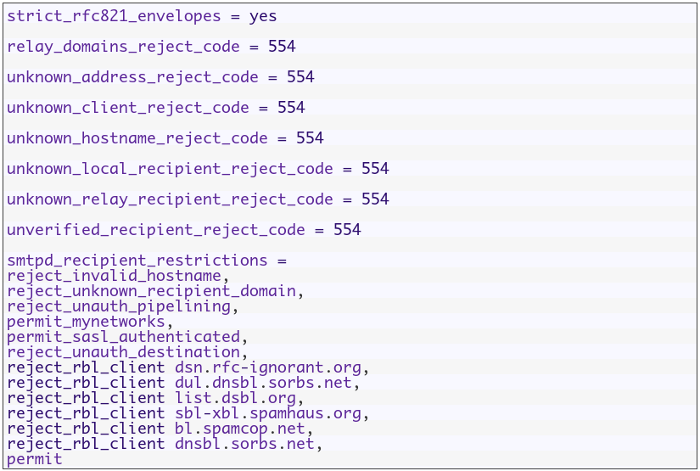
In the previous post, we talked about how to Secure Linux Server Using Hardening Best Practices, some people asked me about the firewall section which was a brief introduction about iptables firewall. Today we will discuss in detail the Linux iptables firewall and how to secure your server traffic using that awesome firewall. If you are using CentOS 7, you will find that firewalld was introduced to manage iptables, so if you want to go back to iptables, you have to stop and mask firewalld.

Continue Reading →

$ systemctl stop firewalld

$ systemctl mask firewalld

Then install iptables service and enable it:

$ yum install iptables-services

$ systemctl enable iptables

Then you can start it:

$ systemctl start iptables

How Linux Firewall Works

Iptables firewall functions are built on Netfilter framework that is available in the Linux kernel for packets filtering.

Firewall Types

There are two types of firewalls:

Stateless firewall process each packet on its own, it means it doesn’t see other packets of the same connection.

Stateful firewall this type of firewalls cares about all packets passed through it, so it knows the state of te connection. It gives more control over the traffic.

Netfilter contains tables. These tables contain chains, and chains contain individual rules.

If the passed packet matches any rule, the rule action will be applied on that packet.

The actions can be: accept, rejectignore, or pass the packet on to other rules for more processing.

Netfilter can process incoming or outgoing traffic using the IP address and port number

Netfilter is managed and configured by the iptables command.

Before we start writing firewall commands, we need to understand the firewall structure a bit so we can write firewall rules easily.

iptables Firewall Tables

Netfilter has three tables that can carry rules for processing.

The iptables filter table is the main table for processing the traffic.

The second is nat table, which handles NAT rules.

The third table is the mangle table, which is used for mangling packets.

Table Chains

Each table of the above-mentioned tables contains chains, these chains are the container of the rules of iptables.

The filter table contains FORWARD, INPUT, and OUTPUT chains.

You can create a custom chain to save your rules on it.

If a packet is coming to the host, it will be processed by INPUT chain rules.

If the packet is going to another host, that means it will be processed by OUTPUT chain rules.

The iptables FORWARD chain is used for handling packets that have accessed the host but are destined to another host.

Chain Policy

Each chain in the filter table has a policy. The policy is the default action taken.

The policy could be DROP, REJECT, and ACCEPT.

The ACCEPT policy allows the packets to pass the firewall. The DROP policy drops a packet without informing the client. The REJECT policy also drops the packet and inform the sender.

From a security perspective, you should drop all the packets coming to the host and accept only the packets that come from trusted sources.

Adding iptables Rules

You can add a new rule using the iptables command like this:

$ iptables -A INPUT -i eth1 -p tcp --dport 80 -d 1.2.3.4 -j ACCEPT

Let’s break this command into pieces so we can understand everything about it.

The -A means we are adding a new rule. By default, all new rules are added to filter table unless you specify another table.

The -i flag means which device will be used for the traffic to enter the host. If no device specified, the rule will be applied to all incoming traffic regardless the devices.

The -p flag specifies the packet’s protocol that you want to process, which is TCP in our case.

The –dport flag specifies the destination port, which is 80.

The -d specifies the destination IP address which is 1.2.3.4. If no destination IP address specified, the rule would apply to all incoming traffic on eth1 regardless of IP address.

The -j specifies the action or the JUMP action to do, here we are accepting the packets using the accept policy.

The above rule allows incoming HTTP traffic which is on port 80.

What about allowing outgoing traffic?

$ iptables -A OUTPUT -o eth1 -p tcp --sport 80 -j ACCEPT

The -A flag is used to add rules to the OUTPUT chain.

The -o flag is used for the device used for outgoing traffic.

The -sport flag specifies the source port.

You can use the service name like http or https instead of the numeric port number on sport or dport. The service names can be found in /etc/services file.

It is recommended to use the service name rather than a port number, which makes reading rules easier.

Iptables Rules Order

When you add a rule, it is added to the end of the chain.

You can add it on the top by using -I option.

The sequence of the rules matters as you will see now.

You can insert your rules exactly where you want using the I flag.

Look at the following rules to understand how rules ordering matters:

$ iptables -I INPUT 3 -i eth1 -p udp -j ACCEPT

$ iptables -I INPUT 4 -i eth1 -p udp --dport 80 -j DROP

The first rule accepts all UDP traffic comes to eth1, and the number 3 is the rule order.

The second rule drops the traffic that enters port 80.

The first rule will accept all the traffic, then the second rule will be ignored because the first rule already accepts all the traffic so the second rule here makes no sense.

Your rules should make sense since the order of the rules in the chain matters.

List iptables Rules

You can list the rules in a chain using -L flag:

$ iptables -L INPUT

You can show the line numbers for rules using –line-numbers:

$ iptables -L INPUT --line-numbers

The list shows the services names, you can show port numbers instead using -n option:

$ iptables -L INPUT -n --line-numbers

This will make the listing faster because it prevents iptables from DNS resolution and service lookups.

You can list all rules for all chains like this:

$ iptables -L -n --line-numbers

To get how many packets processed by each rule, you can use the -v flag:

$ iptables -L -v

Also, you can reset the counters to zero using -Z flag.

Now we can add a new rule to any chain we want, we can insert the rule in a specific order and we can list the rules for any chain or all chains, but what about deleting a rule?

Deleting Rules

You can delete a rule using -D flag:

$ iptables -D INPUT -i eth1 -p tcp --dport 80 -d 1.2.3.4 -j ACCEPT

This command will delete the HTTP rule that you specified earlier.

Before you delete a rule, just make sure of the rule specification by listing it, then delete it.

You can delete the rule using the order number instead of writing the rule specifications.

$ iptables -D INPUT 2

You can delete all rules in a specific chain using -F flag which means flush all rules.

$ iptables -F INPUT

If you forget to mention the chain name when using -F flag, then all chain rules will be deleted.

Replacing Rules

You can replace existing rules with your own rule using -R flag:

$ iptables R INPUT 1 i eth1 p tcp dport httpht d 1.2.3.4 j ACCEPT

This command will replace the first rule in INPUT chain with the typed rule.

Listing Specific Table

To list a specific table, use the -t flag with the table name like this:

$ iptables -L -t nat

Here we list the rules in nat table.

Iptables User Defined Chain

To create a user defined chain, use the -N flag.

$ iptables -N MY_CHAIN

Also, you can rename it using -E flag.

$ iptables -E MY_CHAIN NEW_NAME

And you can delete the user-defined chain using -X flag.

$ iptables -X MY_CHAIN

If you don’t mention the chain name when using -X flag it will delete all user-defined chains. You can’t delete built-in chains like INPUT and OUTPUT.

Redirection to a User Defined Chain

You can redirect packets to a user-defined chain like built-in chains using -j flag.

$ iptables -A INPUT -p icmp -j MY_CHAIN

So all incoming ICMP traffic will be redirected to the newly created chain called MY_CHAIN.

Setting The Default Policy for Chains

You can use the -P flag to set the default policy for a specific chain. The default policy could be ACCEPT, REJECT and DROP.

$ iptables -P INPUT DROP

So now the input chain will drop any packet come unless you write a rule to allow any incoming traffic.

SYN Flooding

The attacker sends SYN packets only without completing the TCP handshake and as a result, the receiving host would have many opened connections, and your server becomes too busy to respond to other clients.

We can use the limit module of iptables firewall to protect us from SYN flooding.

$ iptables -A INPUT -i eth1 -p tcp --syn -m limit --limit 10/second -j ACCEPT

Here we specify 10 SYN packets per second only. You can adjust this value according to your network needs.

If this will throttle your network, you can use SYN cookies.

SYN Cookies

In /etc/sysctl.conf file and add this line:

net.ipv4.tcp_syncookies = 1

Then save and reload.

$ sysctl -p

Drop INVALID State Packets

The INVALID state packets are packets that don’t belong to any connection and should be dropped.

$ iptables -A INPUT -m state --state INVALID -j DROP

This rule will drop all incoming invalid state packets.

Drop Fragmented Packets

Fragmented packets are broken pieces of large malformed packets and should be dropped

The -f flag tells iptables firewall to select all fragments. So if you are not using iptables as a router, you can drop fragmented packets.

$ iptables -A INPUT -f -j DROP

Save iptables Rules

All the rules we discussed will be lost if you reboot your server, so how to persist them.

You can save all of your rules using the iptables-save command if you are using CentOS or Red Hat.

iptables-save > /etc/sysconfig/iptables

On CentOS 7, you can save rules like this:

$ service iptables save

You can save specific table like filter table only:

$ iptables-save -t filter

Also, you can use iptables-restore to restore rules that were saved.

On Debian based distros, you can use the iptables-persistent package to save and restore rules.

First, install it:

$ apt-get install iptables-persistent

Then you can save and restore rules:

$ netfilter-persistent save

$ netfilter-persistent reload

I Hope you find iptables firewall easy. Keep coming back.

Thank you.

likegeeks.com

0

Secure Linux Server Using Hardening Best Practices

In the previous post we talked about some Linux security tricks and as I said, we can’t cover everything about Linux hardening in one post, but we are exploring some tricks to secure Linux server instead of searching for ready Linux hardening scripts to do the job without understanding what’s going on, However, the checklist is so long so let’s get started. This is important if you are not securing your server physically. If you are using Systems prior to CentOS 7, all you have to do is to comment out the following line in /etc/inittab file.

Continue Reading →

ca::ctrlaltdel:/sbin/shutdown -t3 -r now

Otherwise, if you are using CentOS 7 use the following command:

$ ln -s /dev/null /etc/systemd/system/ctrl-alt-del.target

Secure Mounted Filesystems

Each of your Linux file systems is mounted so you can the files inside it. You can mount your file systems using different options.

You can type these options in the /etc/fstab file.

LABEL=/ / ext4 defaults 1 1

The first column is just a label for your device.

The second column is the location of the mounted filesystem.

The third column is the file system type like ext4.

The fourth column contains security options which are the most important one for us.

The last two columns control the options for the dump and fsck commands.

There are many different ways to control how file systems are mounted and the following list shows some of them:

auto                       It will be mounted automatically at boot time.

noauto                   It will not be mounted automatically at boot time.

exec                       You can execute binaries on this file system.

noexec                  You can’t execute binaries on this file system.

suid                       setuid bits are permitted.

nosuid                  No setuid bits.

user                       non-root users can mount this device.

nouser                  No user except root can mount this device.

owner                   Only owner can mount the device.

ro                          Mount device read-only.

rw                          Mount device read-write.

defaults                Make your file system’s options: rw, suid, exec, auto, nouser.

The exec and noexec options enable you to control whether binary execution is allowed or not.

You can mount /home securely with noexec like this:

/dev/hda1 /home ext4 noexec 0 2

Keep in mind that this line will prevent the execution of binaries on /home, so if you have any executables, you should take care of that.

You can mount /tmp with noexec option as a step of hardening, but keep in mind that some programs might not work properly because they use /tmp to execute. So you can test your software with this mount option, if it goes well then it’s OK.

If you have binaries that have the setuid and setgid bits, and you set the nosuid option, the setuid and setgid bits will be neglected.

Only root users can mount file systems, but if you want other users to do that, you can set the user, nouser options. If you set the user option, then any user can mount or unmount file systems.

Any user other than root shouldn’t be allowed to mount file systems.

By setting ro and rw options, you can set your filesystem as read-only or writable.

You can mount any file system as read-only like this:

/dev/hda2 /usr ext4 ro,nodev 0 2

You can mount /boot as read-only using the same way, but keep in mind that if any kernel update arrives, you have to remount it as rw to apply the update like this:

$ mount -o remount,rw /boot

You know mount options and you should be wise enough to take the decision about which directory needs which option to mount with.

Protect /etc/services File

The /etc/services file translates service names to port numbers.

This file is writable by root only, but you may make a mistake without intention.

Well, you can use the immutable attribute to avoid any mistakes.

Also, that prevents accidental deleting or overwriting of such a vital file.

$ chattr +i /etc/services

Remove Unused Accounts

These vendor accounts are preinstalled on your system for some Linux system activity.

If you don’t need those accounts, it’s preferred to remove them using the userdel command, and these are some of the unused users for me.

$ userdel adm

$ userdel games

$ userdel halt

$ userdel lp

$ userdel shutdown

Also, you will need to remove the groups belongs to those accounts if exist using groupdel command

If you check /etc/passwd file, you’ll see that the users are deleted.

If you run your own VPS or server you can set the immutable bit on /etc/passwd and /etc/shadow to prevent any unwanted changes.

$ chattr +i /etc/passwd

$ chattr +i /etc/shadow

If you need to add new users to the system or install a program that will add users, consider removing the immutable flag first.

Hardening Cron Scripts

Some scripts under /etc/cron.d doesn’t have the secured permissions, they are readable to normal users.

Consider fixing the permission for the scripts that are responsible for executing scheduled job on our server so root only can read it.

$ chmod 0700 /etc/cron.daily/*

Normal users don’t need to look at those scripts.

Keep in mind that if you update a program that provides a cron file on your system, consider updating the permission, or you can make a shell script that does the job for you instead.

And the same for the other cron directories like:

/etc/cron.weekly

/etc cron.monthly/

/etc cron.hourly/

Securing SUID Programs

SUID (Set User ID) is a special type of file permissions given to a file. When you want to use a tool like passwd command which writes on files belong to root such as /etc/passwd and /etc/shadow, the passwd command must have this SUID permission to enable normal users to use that command.

You may take a look at all programs that have this permission and consider removing that permission from unnecessary programs that you think that normal users won’t need it.

$ find / -type f -user root -perm -4000 -print

All these programs have SUID bit and normal users can run them as root. To remove that permission, you can use this command:

$ chmod a-s /bin/mount

Keep in mind that some programs need that permission to work so be careful when doing that.

Risky World-Writable Files and Directories

World-writable directories and files can lead to serious problems if the attacker gains access to them.

He will be allowed to modify or delete any file, and this is a serious problem.

To get all writable files in your web folder, use this command:

$ find /home/*/public_html -type f -writable -exec ls -la {} \;

And writable directories:

$ find /home/*/public_html -type d -writable -exec ls -ld {} \;

You may find writable directories and files in some locations like /var/mail which has no problem, but on web folders, you have to be careful about that much.

You can use some integrity check tool like tripwire.

This tool will scan the system for any public writable files and directors and warn you, so you can take action about them.

Risky Symlinks

Symlinks or symbolic links are useful if they used for a good purpose to simplify your work, but the attacker in some cases uses any scripting language on your server to build a symlink to travel between directories and see your files, steal passwords and gain access to all websites on the server, so it’s very important to keep any eye on that.

The following command searches for any symlink and deletes it.

$ find -L /home/*/public_html -type l –delete

You can change the path based on your server paths, you may also create a shell script to find those symlinks and send to your email so you can investigate how it was created.

#!/bin/bash
find /home/*/public_html/ -type l >> /root/symlinks
cat /root/symlinks | cut -d"/" -f3 | uniq >> /root/out
echo "Symlinks:"|mail -s "Symlinks in $(hostname)" [email protected] < /root/out > /root/symlinks > /root/out

There are many ways to stop symlink creation, if you are using PHP, you can disable some serious functions, and apply Symlinks only if owner matches for your server if you are using apache.

This trick is very useful, especially when dealing with compromised systems.

There is a lot to talk about securing PHP; maybe we should make another post about that, but let’s keep simple for now.

Securing Log Files

Your last line of defense is the log files. Log files for each running service tell you everything about that service, so you can keep track of everything happened on your system.

In worst scenarios (like gaining root access), the attacker might delete those log files and left you without any evidence of what had happened.

Consider copying your log files to a different place or schedule a regular backup of log files to somewhere else that shouldn’t be accessible to the attacker if he gains access to your system.

Securing Linux Resources

Securing Linux Resources is a must because users can jeopardize the stability of your server if they left to use server resources without limits.

You can allocate how much memory for each user, how many processes and other server resources.

Under /etc/security, there is a file called limits.conf, in this file you can specify the limits for your users like this:

* hard rss 500000

* hard nproc 50

The first line says for all users, limit the memory usage to 500 MB.

The second line says for all users, limit the number of processes to 50 processes.

All these restriction rules applied to all users expect root user.

The asterisk on both lines means all users, and some systems have users running services like www or mysql users and these service users are used by all users on the system and if we apply our restriction rules for them too, that can lead to problems.

A good solution for this problem is to add a special group and add our users to that group and apply our restriction rules to that group.

In this case, the rules will be applied for every user in this group and not to the whole users of the group.

@myusers hard rss 500000

@myusers hard nproc 50

Hardening /proc Directory

The /proc directory or as they call it (process information pseudo-file system) gives you hints about the currently running processes. Linux is installed by default to allow normal users to see that information. You can see what processes belong to root and all other user’s processes.

Before you use this trick, as you can see that normal user can see all processes even root processes:

Secure Linux Server ps -ef

The hidepid mount option allows you to hide process IDs. It takes a value of 0, 1, 2.

$ mount -o remount,rw,hidepid=2 /proc

And you can write it to /etc/fstab to make it permanent so after reboot, the process IDs remains hidden.

proc /proc proc defaults,hidepid=2 0 0

proc directory Hardening Best Practices

After that command, you are only allowed to see your processes. Only root users can see all processes for all users.

$ ps -ef

Secure Linux Server ps -ef

Another mount option is gid which allows users in a specific group to see /proc directory.

If the group you want to assign the permission to has ID of 100, you can write it like this:

$ mount -o remount,rw,gid=100 /proc

Also, you can write it in /etc/fstab file:

proc /proc proc defaults,gid=100 0 0

The last advice for you is to keep your system and software updated always, that will protect you from many threats.

I hope you find these hardening tricks useful. Keep coming back.

Thank you.

likegeeks.com

0