

Linux çekirdeği resmi sitesi: https://www.kernel.org
Uzun süreli destek sürümü:
![]() 4.1.47 2017-12-07
4.1.47 2017-12-07
Değişiklik listesi…
Calamares 3.1.10 duyuruldu
 3.1 serisinin bir artımlı hata düzeltme sürümü olan Calamares 3.1.10 duyuruldu. Calamares ekibinin Calamares 3.1.10’u duyurmaktan mutluluk duyduğu ifade edilirken, dağıtımdan bağımsız bir sistem kurulumcusu olan Calamares’in hem manuel hem de otomatik bölümleme işlemleri için gelişmiş bölümleme özelliğine sahip olduğu belirtildi. Özelleştirilebilir bir yazılım olarak tasarlanan Calamares; bilindiği gibi Manjaro Linux için geliştirilen ve grafik bir arayüz ile sunulan yeni sistem yükleyicisidir. Manjaro Linux’un hızlı ve kolay bir biçimde kurulabilmesi için geliştirilmiştir. Qt tabanlı bir yazılım olan Calamares, Manjaro Türkiye ekibi tarafından tamamen Türkçeye çevirilmiş bulunuyor. Calamares 3.1.10 hakkında ayrıntılı bilgi edinmek için sürüm duyurusunu inceleyebilirsiniz.
Yalnızca Manjaro Linux için değil, tüm dağıtımlar için bir kurulum aracı olarak düşünülen Calamares ile ilgili ilk fikir Mayıs 2014’te çıkmış ortaya. Blue Systems’in desteği ile Haziran 2014’te sıfırdan başlayan süreç; KaOS, Manjaro, Maui ve Netrunner geliştiricilericilerinin değerli katkılarıyla bugünlere gelmiş. Sürece sonradan, Fedora, BBQLinux, OpenMandriva ve KDE Visual Design Group katılmış. Hem DOS hem de GPT bölüm tablosuna destek veren Calamares; otomasyon ve yeniden boyutlandırma işlevselliğine sahip bulunuyor. Calamares hakkında edinilen izlenimlerin ve tespit edilen problemlerin hata takip sistemine bildirilmesi isteniyor. Calamares 3.1.10 edinmek için aşağıdaki linkten yararlanabilirsiniz.
Shell Scripting Part4 – Input, Output, and Redirection
 In the previous post, we talked about parameters and options in detail, today we will talk about something very important in shell scripting which are Input, Output, and Redirection. You can display the output from your shell scripts in two ways:
- Display output on the screen.
- Send output to a file.
Everything is a file in Linux and that includes input and output.
Each process can have 9 file descriptors opened at the same time. The file descriptors 0, 1, 2 are kept for the bash shell usage.
0 STDIN.
1 STDOUT.
2 STDERR.
You can use the above file descriptors to control input and output.
You need to fully understand these three because they are like the backbones of your shell scripting. So we are going to describe every one of them in detail.
STDIN
STDIN stands for standard input which is the keyboard by default.
You can replace the STDIN which is the keyboard and replace it with a file by using the input redirect symbol (<), it sends the data as keyboard typing. No magic!!
When you type the cat command without anything, it accepts input from STDIN. Any line you type, the cat command prints that line to the screen.
STDOUT
This stands for the standard output which is the screen by default.
You can redirect output to a file using the >> symbol.
If we have a file contains data, you can append data to it using this symbol like this:
pwd >> myfile
The output generated by pwd is appended to myfile without deleting the existed content.
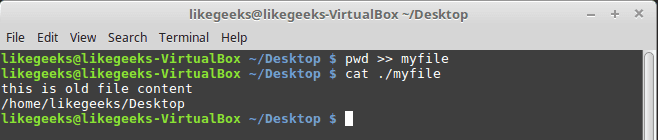
The following command tries to redirect the output to a file using > symbol.
ls –l xfile > myfile

I have no file called xfile on my PC, and that generates an error which is sent to STDERR.
STDERR
This file descriptor is the standard error output of the shell which is sent to the screen by default.
If you need to redirect the errors to a log file instead of sending it to the screen, you can redirect errors using the redirection symbol.
Redirecting Errors
We can redirect the errors by placing the file descriptor which is 2 before the redirection symbol like this:
ls -l xfile 2>myfile
cat ./myfile

As you can see, the error now is in the file and nothing on the screen.
Redirecting Errors and Normal Output
To redirect errors and the normal output, you have to precede each with the proper file descriptor like this:
ls –l myfile xfile anotherfile 2> errorcontent 1> correctcontent
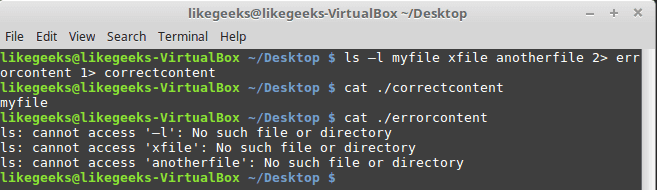
The ls command result is sent to the correctcontent file using the 1> symbol. And error messages were sent to the errorcontent file using the 2> symbol.
You can redirect normal output and errors to the same file using &> symbol like this:
ls –l myfile xfile anotherfile &> content
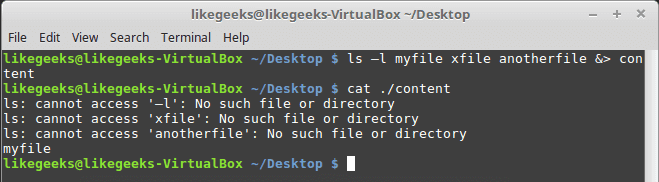
All errors and normal output are redirected to file named content.
Output Redirection
There are two ways for output redirection:
- Temporarily redirection.
- Permanently redirection.
Temporary Redirections
For temporary redirections, you can use the >&2 symbol like this:
#!/bin/bash
echo "Error message" >&2
echo "Normal message"

So if we run it, we will see both lines printed normally because as we know errors go to the screen by default.
You can redirect errors to a file like this:
./myscript 2> myfile
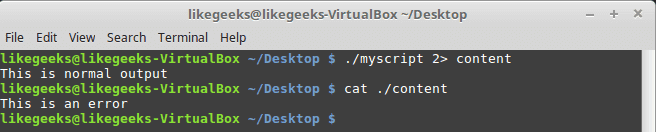
Shell scripting is Awesome! Normal output is sent to the screen, while the echo message which has >&2 symbol sends errors to the file.
Permanent Redirections
If you have much data that need to be redirected, you can have a permanent redirection using the exec command like this:
#!/bin/bash
exec 1>outfile
echo "Permanent redirection"
echo "from a shell to a file."
echo "without redirecting every line"
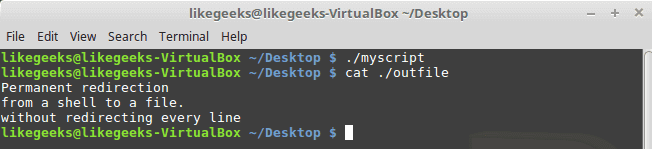
If we look at the file called outfile, we will see the output of the echo lines.
We redirect the STDOUT at the beginning, what about in the middle of a script like this:
#!/bin/bash
exec 2>myerror
echo "Script Begining ..."
echo "Redirecting Output"
exec 1>myfile
echo "Output goes to the myfile"
echo "Output goes to myerror file" >&2
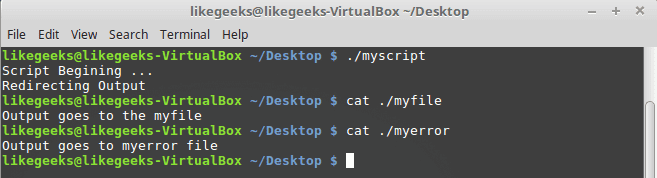
The exec command redirects all errors to the file myerror, and standard output is sent to the screen.
The statement exec 1>myfile is used to redirect output to the myfile file, and finally, errors go to myerror file using >&2 symbol.
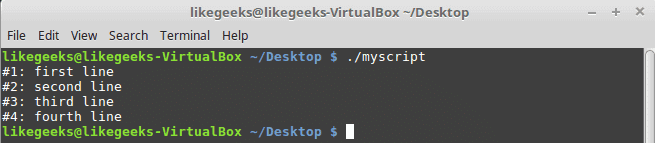
Redirecting Input
You can redirect input to a file instead of STDIN using exec command like this:
exec 0< myfile
This command tells the shell to take the input from a file called myfile instead of STDIN and here is an example:
#!/bin/bash
exec 0< testfile
total=1
while read line
do
echo "#$total: $line"
total=$(( $total + 1 ))
done
Shell scripting is easy.
You know how to use the read command to get user input. If you redirect the STDIN to a file, the read command will try to read from STDIN which points to the file.
Some Linux system administrators use this technique to read the log files for processing and we will discuss more ways to read the log on the upcoming posts in a professional way.
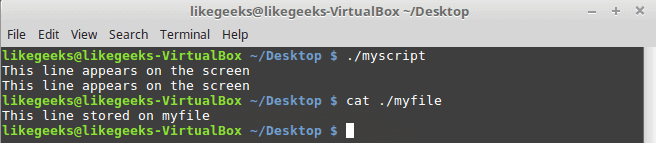
Creating Custom Redirection
You know that there are 9 file descriptors, you use only 3 of them for input, output, and error.
The remaining six file descriptors are available for use for input and output redirection.
The exec command is used to assign a file descriptor for output like this:
#!/bin/bash
exec 3>myfile
echo "This line appears on the screen"
echo "This line stored on myfile" >&3
echo "This line appears on the screen"
Creating Input File Descriptors
To redirect input file descriptors do the following:
1- Save the STDIN to another file descriptor.
2- Redirecting it to a file.
3- Revert STDIN to its original location.
Look at the following code to understand these steps:
#!/bin/bash
exec 7<&0
exec 0< myfile
total=1
while read line
do
echo "#$total: $line"
total=$(( $total + 1 ))
done
exec 0<&7
read -p "Finished? " res
case $res in
y) echo "Goodbye";;
n) echo "Sorry, this is the end.";;
esac
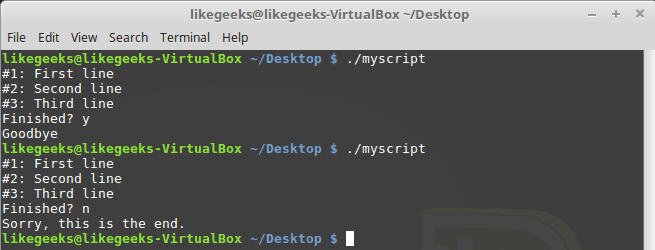
The STDIN is saved to file descriptor 7 and the STDIN is redirected to a file.
The STDIN reverted back to its original location after iterating over file lines.
The last read command just to make sure that STDIN is reverted back to and you can use the keyboard normally.
Close File Descriptors
The file descriptors are closed automatically when the script exits. If you want to close the file descriptor yourself, redirect the file descriptor to this symbol &- it will be closed.
#!/bin/bash
exec 3> myfile
echo "Testing ..." >&3
exec 3>&-
echo "Nothing works" >&3

As you can see, it gives error bad file descriptor because it is no longer exist.
lsof Command
The lsof command is used to list all the opened files on the system and background processes.
On many Linux systems like Fedora, the lsof command is located under /usr/sbin.
This is some of the important options for lsof command:
-p: for process ID.
-d: for the file descriptor.
You can get the process PID using $$ variable.

The -a is used to combine results of -p option and -d option.
Now, testing the command from a script:
#!/bin/bash
exec 4> myfile1
exec 5> myfile2
exec 6< myfile3
lsof -a -p $$ -d 0,1,2,4,5,6
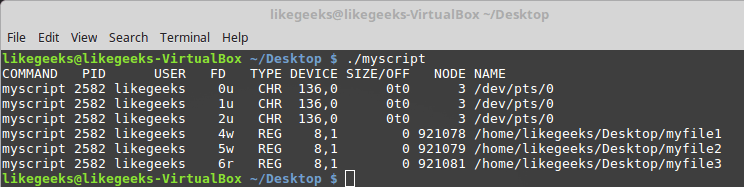
The shell script creates the file descriptors 4 and 5 for writing and 6 for reading.
Suppressing Command Output
Sometimes you don’t want to see any output. We redirect the output to the black hole which is /dev/null.
For example, we can suppress errors like this:
ls -al badfile anotherfile 2> /dev/null
And this idea is also used when you want to truncate a file without deleting it completely.
cat /dev/null > myfile
Now you understand the input, output, how to redirect them, how to create your own file descriptor, and redirect to it.
I hope you enjoy it. keep coming back.
Thank you.
Qt 5.10 duyuruldu
![]() Üçüncü sürüm adayı 4 Aralık 2017’de duyurulan uygulamaların oluşturulmasını hızlandırmak için tasarlanmış araçlar, masaüstü ortamları, gömülü ve mobil aygıtlar için kullanıcı arabirimleri içeren yetkin bir geliştirme platformu olan Qt’nin 5.10.0 final sürümü, Lars Knoll tarafından duyuruldu. Qt 5.10’u duyurmaktan mutluluk duyduklarını söyleyen Knoll; sürümün pek çok yeni işlevsellikle birlikte geldiğini belirtti. Bunlardan en önemlisinin hem ticari hem de GPL lisansı altında edinilebilecewk olan Qt 3D Studio olduğunu ifade eden Knoll; aracın, UI’yı tasarlamak ve oluşturmak için bir grafik tasarım aracından oluştuğunu söyledi. Qt’yi daha esnek ve kullanımı kolay bir yazılım haline getirilmeye çalışıldığı belirtilirken; kullanıcıların Qt Project mailing lists aracılığıyla e-posta gönderebileceği ve IRC aracılığıyla geliştirme ekibiyle iletişim kurabileceği ifade edildi. Qt 5.10 hakkında ayrıntılı bilgi edinmek için sürüm duyurusunu inceleyebilirsiniz.
Üçüncü sürüm adayı 4 Aralık 2017’de duyurulan uygulamaların oluşturulmasını hızlandırmak için tasarlanmış araçlar, masaüstü ortamları, gömülü ve mobil aygıtlar için kullanıcı arabirimleri içeren yetkin bir geliştirme platformu olan Qt’nin 5.10.0 final sürümü, Lars Knoll tarafından duyuruldu. Qt 5.10’u duyurmaktan mutluluk duyduklarını söyleyen Knoll; sürümün pek çok yeni işlevsellikle birlikte geldiğini belirtti. Bunlardan en önemlisinin hem ticari hem de GPL lisansı altında edinilebilecewk olan Qt 3D Studio olduğunu ifade eden Knoll; aracın, UI’yı tasarlamak ve oluşturmak için bir grafik tasarım aracından oluştuğunu söyledi. Qt’yi daha esnek ve kullanımı kolay bir yazılım haline getirilmeye çalışıldığı belirtilirken; kullanıcıların Qt Project mailing lists aracılığıyla e-posta gönderebileceği ve IRC aracılığıyla geliştirme ekibiyle iletişim kurabileceği ifade edildi. Qt 5.10 hakkında ayrıntılı bilgi edinmek için sürüm duyurusunu inceleyebilirsiniz.
KDE masaüstü ortamı ve pek çok açık kaynak kodlu ve ticari amaçlı yazılımın Qt ile geliştirilmesi Nokia’nın da ilgisine çekmiş ve 2008 yılında Trolltech’i 104 Milyon Euro karşılığında satın almıştır. Qt; özellikle KDE masaüstü ortamının bu araç takımını kullanması ile dikkatleri üzerine çekmiştir. Değerli bir geliştirme ortamı olan Qt, C++ ile ilişkili olsa da Python, Ruby, PHP, Perl, Pascal, C# ve Java ile de kullanılabilmektedir. Dikkatleri ilk kez KDE masaüstü ortamının bu araç takımını kullanması ile çeken Qt’nin ilk sürümleri özgür olmayan bir lisansla dağıtılmış, GNU/Linux gibi özgür bir işletim sisteminin en popüler masaüstü ortamının özgür olmayan bir araç takımını kullanması doğallıkla hoş karşılanmamıştır. Buna tepki olarak GTK+ kullanarak GNOME masaüstü geliştirilmeye başlanmıştır. Ayrıca, Harmony denen ve Qt’ye benzeyen bir araç takımı da geliştirilmeye başlanmıştır. Trolltech, bu tepkilere karşı Qt’yi QPL denen, GPL benzeri bir lisansla yayınlamış, ancak, özgür yazılım savunucuları Trolltech’e Qt’yi GPL lisanslı olarak dağıtmasını dayatmıştır. Dördüncü sürümle birlikte Windows için de GPL lisansıyla dağıtılmaya başlanan Qt; Trolltech firmasının Nokia tarafından satın alınmasından sonra, 4.5 sürümünden itibaren LGPL lisansı altında dağıtmaya başlanmıştır. Nokia Qt platformunu cep telefonları için zengin görselliğe sahip uygulamalar geliştirilmesi amacı ile Nokia yazılım geliştirici topluluğuna tanıtır. Günümüzde Qt C++ geliştirilen herhangi bir uygulamada kullanılabileceği gibi, cep telefonu ve gömülü sistemlerde kullanılmaktadır. Qt masa üstü ve sunucu ortamlarında Unix, Linux, Mac OS ve Windows işletim sistemlerini desteklemektedir. Qt C++ ile geliştirme yapmak için Qt SDK ile gelen Qt Creator kullanılabileceği gibi, Eclipse, Visual Studio yada Mac Os X üzerinde XCode kullanılabilir. Qt 5.10 edinmek için aşağıdaki linkten yararlanabilirsiniz.
Qt Creator 4.5.0 duyuruldu
![]() Sürüm adayı 22 Kasım 2017‘de duyurulan oldukça basit arayüzü ve yetenekleriyle pek çok kişinin vazgeçilmezi bir ide olan Qt Creator’un 4.5.0 final sürümü, Eike Ziller tarafından duyuruldu. Qt Creator 4.5.0’ı duyurdukları için mutlu olduklarını söyleyen Ziller; yapılandırma değişiklikleriyle gelen yeni sürümün, önbelleğe alınan değerlerin diskteki değerlerden nasıl farklı olduğuyla ilgili ayrıntılı bilgiler gösterdiğini ifade etti. Qt Creator 4.5.0 hakkında ayrıntılı bilgi edinmek için sürüm duyurusunu inceleyebilirsiniz.
Sürüm adayı 22 Kasım 2017‘de duyurulan oldukça basit arayüzü ve yetenekleriyle pek çok kişinin vazgeçilmezi bir ide olan Qt Creator’un 4.5.0 final sürümü, Eike Ziller tarafından duyuruldu. Qt Creator 4.5.0’ı duyurdukları için mutlu olduklarını söyleyen Ziller; yapılandırma değişiklikleriyle gelen yeni sürümün, önbelleğe alınan değerlerin diskteki değerlerden nasıl farklı olduğuyla ilgili ayrıntılı bilgiler gösterdiğini ifade etti. Qt Creator 4.5.0 hakkında ayrıntılı bilgi edinmek için sürüm duyurusunu inceleyebilirsiniz.
Qt Creator 4.5.0 edinmek için aşağıdaki linkten yararlanabilirsiniz.
Audacity 2.2.1 duyuruldu
![]() Windows®, Mac®, GNU/Linux® ve diğer işletim sistemleriyle kullanılabilen özgür ve ücretsiz bir sayısal ses düzenleme ve ses kaydetme yazılımı olan Audacity’nin 2.2.1 sürümü duyuruldu. Pek çok hata düzeltmesi ve iyileştirme içeren sürüm, indirilmek üzere yansılarda yerini aldı. Popüler açık kaynak kodlu ses yazılımı; çok izli sesleri düzenleyen ve kaydeden, kullanımı kolay bir yazılım ve pek çok dili de destekliyor. Audacity ile canlı ses kaydı yapabilir; WAV, AIFF, FLAC, MP2, MP3 ya da Ogg Vorbis ses dosyalarını düzenleyebilir; kaset ve kayıtları sayısal kayıt ya da CD biçimine dönüştürebilir; sesleri kesebilir, kopyalayabilir, ekleyebilir ya da karıştırabilir; bir kaydın hızını ya da tonunu değiştirebilirsiniz. Audacity 2.2.1 hakkında ayrıntılı bilgi sahibi olmak için sürüm notlarını inceleyebilirsiniz.
Windows®, Mac®, GNU/Linux® ve diğer işletim sistemleriyle kullanılabilen özgür ve ücretsiz bir sayısal ses düzenleme ve ses kaydetme yazılımı olan Audacity’nin 2.2.1 sürümü duyuruldu. Pek çok hata düzeltmesi ve iyileştirme içeren sürüm, indirilmek üzere yansılarda yerini aldı. Popüler açık kaynak kodlu ses yazılımı; çok izli sesleri düzenleyen ve kaydeden, kullanımı kolay bir yazılım ve pek çok dili de destekliyor. Audacity ile canlı ses kaydı yapabilir; WAV, AIFF, FLAC, MP2, MP3 ya da Ogg Vorbis ses dosyalarını düzenleyebilir; kaset ve kayıtları sayısal kayıt ya da CD biçimine dönüştürebilir; sesleri kesebilir, kopyalayabilir, ekleyebilir ya da karıştırabilir; bir kaydın hızını ya da tonunu değiştirebilirsiniz. Audacity 2.2.1 hakkında ayrıntılı bilgi sahibi olmak için sürüm notlarını inceleyebilirsiniz.
Audacity bir grup gönüllü tarafından geliştirilmiş ve GNU Genel Kamu Lisansı (GPL) koşulları altında yayınlanan özgür ve ücretsiz dağıtılan bir yazılımdır. Audacity projesinin geliştirilmesini desteklemek için yapılan bağışlar memnuniyetle kabul edilmektedir. İsteyen herkes, belgelerin hazırlanması, çeviri, kullanıcı desteği ve son kodların sınanması konularında Audacity projesine katkıda bulunabilir. Audacity 2.2.1 edinmek için aşağıdaki linklerden yararlanabilirsiniz.
Webmin 1.870 çıktı
![]() UNIX türevi işletim sistemleri için bir Web tabanlı yönetim arayüzü olan Webmin‘in 1.870 sürümü çıktı. Sürümün resmi duyurusu henüz yapılmadı ama paketler indirilmek üzere yansılarda yerini aldı. 50’den fazla GNU/Linux dağıtımına destek veren Webmin, kullanıcı hesapları ayarlarından, Apache, DNS, dosya paylaşımlarına kadar pek çok işlemi web arayüzünden kolaylıkla gerçekleştirilebiliyor. Tamamı PERL dili ile yazılan yazılan Webmin; sistem ile ilgili her türlü ayarın web üzerinden yapılmasına olanak sağlıyor. Sun Solaris, Linux, LinuxPPC, FreeBSD, OpenBSD, HPUX, SGI Irix, DEC Compaq, MacOS X işletim sistemlerinde çalışıyor. Desteklenen tüm işletim sistemleri ve dağıtımları görmek için bu sayfaya bakılabilir. Webmin tüm UNIX türevi işletim sistemleri için standart bir kontrol arayüzü sunmaktadır. Webmin 1.870 hakkında daha ayrıntılı bilgi edinmek için, resmi duyurusu yapıldıktan sonra projenin değişiklikler sayfasını inceleyebilirsiniz.
UNIX türevi işletim sistemleri için bir Web tabanlı yönetim arayüzü olan Webmin‘in 1.870 sürümü çıktı. Sürümün resmi duyurusu henüz yapılmadı ama paketler indirilmek üzere yansılarda yerini aldı. 50’den fazla GNU/Linux dağıtımına destek veren Webmin, kullanıcı hesapları ayarlarından, Apache, DNS, dosya paylaşımlarına kadar pek çok işlemi web arayüzünden kolaylıkla gerçekleştirilebiliyor. Tamamı PERL dili ile yazılan yazılan Webmin; sistem ile ilgili her türlü ayarın web üzerinden yapılmasına olanak sağlıyor. Sun Solaris, Linux, LinuxPPC, FreeBSD, OpenBSD, HPUX, SGI Irix, DEC Compaq, MacOS X işletim sistemlerinde çalışıyor. Desteklenen tüm işletim sistemleri ve dağıtımları görmek için bu sayfaya bakılabilir. Webmin tüm UNIX türevi işletim sistemleri için standart bir kontrol arayüzü sunmaktadır. Webmin 1.870 hakkında daha ayrıntılı bilgi edinmek için, resmi duyurusu yapıldıktan sonra projenin değişiklikler sayfasını inceleyebilirsiniz.
Webmin 1.870 edinmek için aşağıdaki linklerden yararlanabilirsiniz.
- İndirme sayfası (Sourceforge)
Resmi duyurusu yapıldıktan sonra: