When it comes to locating files or directories on your system, the find command on Linux is unparalleled. It’s simple to use, yet has a lot of different options that allow you to fine-tune your search for files. Read on to see examples of how you can wield this command to find anything on your system. Every file is only a few keystrokes away once you know how to use the find command in Linux. You can tell the find command to look specifically for directories with the -type d option. This will make find command only search for matching directory names and not file names. Since hidden files and directories in Linux begin with a period, we can specify this search pattern in our search string in order to recursively list hidden files and directories.
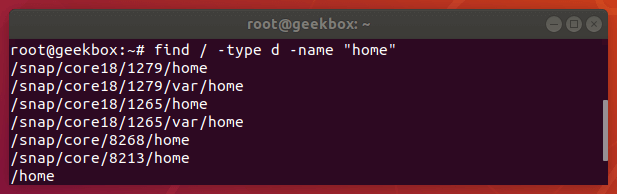
Find a directory
You can tell the find command to look specifically for directories with the -type d option. This will make find command only search for matching directory names and not file names.
find /path/to/search -type d -name "name-of-dir"
Since hidden files and directories in Linux begin with a period, we can specify this search pattern in our search string in order to recursively list hidden files and directories.
find /path/to/search -name ".*"
Find files of a certain size or greater than X
The -size option on find allows us to search for files of a specific size. It can be used to find files of an exact size, files that are larger or smaller than a certain size, or files that fit into a specified size range. Here are some examples:
Search for files bigger than 10MB in size:
find /path/to/search -size +10M
Search for files smaller than 10MB in size:
find /path/to/search -size -10M
Search for files that are exactly 10MB in size:
find /path/to/search -size 10M
Search for files that are between 100MB and 1GB in size:
find /path/to/search -size +100M -size -1G
Find from a list of files
If you have a list of files (in a .txt file, for example) that you need to search for, you can search for your list of files with a combination of the find and grep commands. For this command to work, just make sure that each pattern you want to search for is separated by a new line.
find /path/to/search | grep -f filelist.txt
The -f option on grep means “file” and allows us to specify a file of strings to be matched with. This results in the find command returning any file or directory names that match those in the list.
Find not in a list
Using that same list of files we mentioned in the previous example, you can also use find to search for any files that do not fit the patterns inside the text file. Once again, we’ll use a combination of the find and grep command; we just need an additional option specified with grep:
find /path/to/search | grep -vf filelist.txt
The -v option on grep means “inverse match” and will return a list of files that don’t match any of the patterns specified in our list of files.
Set the maxdepth
The find command will search recursively by default. This means that it will search the specified directory for the pattern you specified, as well as any and all subdirectories within the directory you told it to search.
For example, if you tell find to search the root directory of Linux (/), it will search the entire hard drive, no matter how many subdirectories of subdirectories exist. You can circumvent this behavior with the -maxdepth option.
Specify a number after -maxdepth to instruct find on how many subdirectories it should recursively search.
Search for files only in the current directory and don’t search recursively:
find . -maxdepth 0 -name "myfile.txt"
Search for files only in the current directory and one subdirectory deeper:
find . -maxdepth 1 -name "myfile.txt"
Find empty files (zero-length)
To search for empty files with find, you can use the -empty flag. Search for all empty files:
find /path/to/search -type f -empty
Search for all empty directories:
find /path/to/search -type d -empty
It is also very handy to couple this command with the -delete option if you’d like to automatically delete the empty files or directories that are returned by find.
Delete all empty files in a directory (and subdirectories):
find /path/to/search -type f -empty -delete
Find largest directory or file
If you would like to quickly determine what files or directories on your system are taking up the most room, you can use find to search recursively and output a sorted list of files and/or directories by their size.
How to show the biggest file in a directory:
find /path/to/search -type f -printf "%s\t%p\n" | sort -n | tail -1
Notice that the find command was sorted to two other handy Linux utilities: sort and tail. Sort will put the list of files in order by their size, and tail will output only the last file in the list, which is also the largest.
You can adjust the tail command if you’d like to output, for example, the top 5 largest files:
find /path/to/search -type f -printf "%s\t%p\n" | sort -n | tail -5
Alternatively, you could use the head command to determine the smallest file(s):
find /path/to/search -type f -printf "%s\t%p\n" | sort -n | head -5
If you’d like to search for directories instead of files, just specify “d” in the type option. How to show the biggest directory:
find /path/to/search -type d -printf "%s\t%p\n" | sort -n | tail -1
Find setuid set files
Setuid is an abbreviation for “set user ID on execution” which is a file permission that allows a normal user to run a program with escalated privileges (such as root).
This can be a security concern for obvious reasons, but these files can be easy to isolate with the find command and a few options.
The find command has two options to help us search for files with certain permissions: -user and -perm. To find files that are able to be executed with root privileges by a normal user, you can use this command:
find /path/to/search -user root -perm /4000
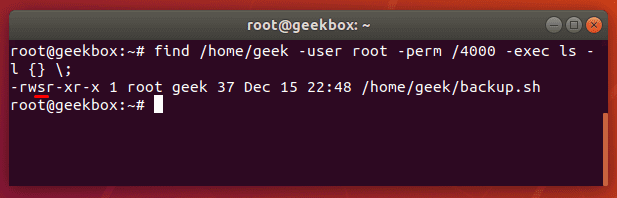
In the screenshot above, we included the -exec option in order to show a little more output about the files that find returns with. The whole command looks like this:
find /path/to/search -user root -perm /4000 -exec ls -l {} \;
You could also substitute “root” in this command for any other user that you want to search for as the owner. Or, you could search for all files with SUID permissions and not specify a user at all:
find /path/to/search -perm /4000
Find sgid set files
Finding files with SGID set is almost the same as finding files with SUID, except the permissions for 4000 need to be changed to 2000:
find /path/to/search -perm /2000
You can also search for files that have both SUID and SGID set by specifying 6000 in the perms option:
find /path/to/search -perm /6000
List files without permission denied
When searching for files with the find command, you must have read permissions on the directories and subdirectories that you’re searching through. If you don’t, find will output an error message but continue to look throughout the directories that you do have permission on.
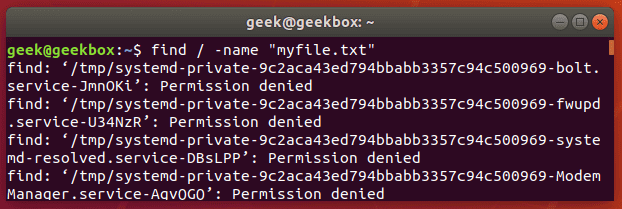
Although this could happen in a lot of different directories, it will definitely happen when searching your root directory.
That means that when you’re trying to search your whole hard drive for a file, the find command is going to produce a ton of error messages.
To avoid seeing these errors, you can redirect the stderr output of find to stdout, and pipe that to grep.
find / -name "myfile.txt" 2>%1 | grep -v "Permission denied"
This command uses the -v (inverse) option of grep to show all output except for the lines that say “Permission denied.”
Find modified files within the last X days
Use the -mtime option on the find command to search for files or directories that were modified within the last X days. It can also be used to search for files older than X days, or files that were modified exactly X days ago.
Here are some examples of how to use the -mtime option on the find command:
Search for all files that were modified within the last 30 days:
find /path/to/search -type f -mtime -30
Search for all files that were modified more than 30 days ago:
find /path/to/search -type f -mtime +30
Search for all files that were modified exactly 30 days ago:
find /path/to/search -type f -mtime 30
If you want the find command to output more information about the files it finds, such as the modified date, you can use the -exec option and include an ls command:
find /path/to/search -type f -mtime -30 -exec ls -l {} \;
Sort by time
To sort through the results of find by modified time of the files, you can use the -printf option to list the times in a sortable way, and pipe that output to the sort utility.
find /path/to/search -printf "%T+\t%p\n" | sort
This command will sort the files older to newer. If you’d like the newer files to appear first, just pass the -r (reverse) option to sort.
find /path/to/search -printf "%T+\t%p\n" | sort -r
Difference between locate and find
The locate command on Linux is another good way to search for files on your system. It’s not packed with a plethora of search options like the find command is, so it’s a bit less flexible, but it still comes in handy.
locate myfile.txt
The locate command works by searching a database that contains all the names of the files on the system. The database that it searches through is updated with the upatedb command.
Since the locate command doesn’t have to perform a live search of all the files on the system, it’s much more efficient than the find command. But in addition to the lack of options, there’s another drawback: the database of files only updates once per day.
You can update this database of files manually by running the updatedb command:
updatedb
The locate command is particularly useful when you need to search the entire hard drive for a file, since the find command will naturally take a lot longer, as it has to traverse every single directory in real-time.
If searching a specific directory, known to not contain a large number of subdirectories, it’s better to stick with the find command.
CPU load of find command
When searching through loads of directories, the find command can be resource-intensive. It should inherently allow more important system processes to have priority, but if you need to ensure that the find command takes up fewer resources on a production server, you can use the ionice or nice command.
Monitor CPU usage of the find command:
top
Reduce the Input/Output priority of find command:
ionice -c3 -n7 find /path/to/search -name "myfile.txt"
Reduce the CPU priority of find command:
nice -n 19 find /path/to/search -name "myfile.txt"
Or combine both utilities to really ensure low I/O and low CPU priority:
nice -n ionice -c2 -n7 find /path/to/search -name "myfile.txt"
I hope you find the tutorial useful. Keep coming back.