Tag Archives | Linux server

Linux iptables Firewall Simplified Examples

In the previous post, we talked about how to Secure Linux Server Using Hardening Best Practices, some people asked me about the firewall section which was a brief introduction about iptables firewall. Today we will discuss in detail the Linux iptables firewall and how to secure your server traffic using that awesome firewall. If you are using CentOS 7, you will find that firewalld was introduced to manage iptables, so if you want to go back to iptables, you have to stop and mask firewalld.

Continue Reading →

$ systemctl stop firewalld

$ systemctl mask firewalld

Then install iptables service and enable it:

$ yum install iptables-services

$ systemctl enable iptables

Then you can start it:

$ systemctl start iptables

How Linux Firewall Works

Iptables firewall functions are built on Netfilter framework that is available in the Linux kernel for packets filtering.

Firewall Types

There are two types of firewalls:

Stateless firewall process each packet on its own, it means it doesn’t see other packets of the same connection.

Stateful firewall this type of firewalls cares about all packets passed through it, so it knows the state of te connection. It gives more control over the traffic.

Netfilter contains tables. These tables contain chains, and chains contain individual rules.

If the passed packet matches any rule, the rule action will be applied on that packet.

The actions can be: accept, rejectignore, or pass the packet on to other rules for more processing.

Netfilter can process incoming or outgoing traffic using the IP address and port number

Netfilter is managed and configured by the iptables command.

Before we start writing firewall commands, we need to understand the firewall structure a bit so we can write firewall rules easily.

iptables Firewall Tables

Netfilter has three tables that can carry rules for processing.

The iptables filter table is the main table for processing the traffic.

The second is nat table, which handles NAT rules.

The third table is the mangle table, which is used for mangling packets.

Table Chains

Each table of the above-mentioned tables contains chains, these chains are the container of the rules of iptables.

The filter table contains FORWARD, INPUT, and OUTPUT chains.

You can create a custom chain to save your rules on it.

If a packet is coming to the host, it will be processed by INPUT chain rules.

If the packet is going to another host, that means it will be processed by OUTPUT chain rules.

The iptables FORWARD chain is used for handling packets that have accessed the host but are destined to another host.

Chain Policy

Each chain in the filter table has a policy. The policy is the default action taken.

The policy could be DROP, REJECT, and ACCEPT.

The ACCEPT policy allows the packets to pass the firewall. The DROP policy drops a packet without informing the client. The REJECT policy also drops the packet and inform the sender.

From a security perspective, you should drop all the packets coming to the host and accept only the packets that come from trusted sources.

Adding iptables Rules

You can add a new rule using the iptables command like this:

$ iptables -A INPUT -i eth1 -p tcp --dport 80 -d 1.2.3.4 -j ACCEPT

Let’s break this command into pieces so we can understand everything about it.

The -A means we are adding a new rule. By default, all new rules are added to filter table unless you specify another table.

The -i flag means which device will be used for the traffic to enter the host. If no device specified, the rule will be applied to all incoming traffic regardless the devices.

The -p flag specifies the packet’s protocol that you want to process, which is TCP in our case.

The –dport flag specifies the destination port, which is 80.

The -d specifies the destination IP address which is 1.2.3.4. If no destination IP address specified, the rule would apply to all incoming traffic on eth1 regardless of IP address.

The -j specifies the action or the JUMP action to do, here we are accepting the packets using the accept policy.

The above rule allows incoming HTTP traffic which is on port 80.

What about allowing outgoing traffic?

$ iptables -A OUTPUT -o eth1 -p tcp --sport 80 -j ACCEPT

The -A flag is used to add rules to the OUTPUT chain.

The -o flag is used for the device used for outgoing traffic.

The -sport flag specifies the source port.

You can use the service name like http or https instead of the numeric port number on sport or dport. The service names can be found in /etc/services file.

It is recommended to use the service name rather than a port number, which makes reading rules easier.

Iptables Rules Order

When you add a rule, it is added to the end of the chain.

You can add it on the top by using -I option.

The sequence of the rules matters as you will see now.

You can insert your rules exactly where you want using the I flag.

Look at the following rules to understand how rules ordering matters:

$ iptables -I INPUT 3 -i eth1 -p udp -j ACCEPT

$ iptables -I INPUT 4 -i eth1 -p udp --dport 80 -j DROP

The first rule accepts all UDP traffic comes to eth1, and the number 3 is the rule order.

The second rule drops the traffic that enters port 80.

The first rule will accept all the traffic, then the second rule will be ignored because the first rule already accepts all the traffic so the second rule here makes no sense.

Your rules should make sense since the order of the rules in the chain matters.

List iptables Rules

You can list the rules in a chain using -L flag:

$ iptables -L INPUT

You can show the line numbers for rules using –line-numbers:

$ iptables -L INPUT --line-numbers

The list shows the services names, you can show port numbers instead using -n option:

$ iptables -L INPUT -n --line-numbers

This will make the listing faster because it prevents iptables from DNS resolution and service lookups.

You can list all rules for all chains like this:

$ iptables -L -n --line-numbers

To get how many packets processed by each rule, you can use the -v flag:

$ iptables -L -v

Also, you can reset the counters to zero using -Z flag.

Now we can add a new rule to any chain we want, we can insert the rule in a specific order and we can list the rules for any chain or all chains, but what about deleting a rule?

Deleting Rules

You can delete a rule using -D flag:

$ iptables -D INPUT -i eth1 -p tcp --dport 80 -d 1.2.3.4 -j ACCEPT

This command will delete the HTTP rule that you specified earlier.

Before you delete a rule, just make sure of the rule specification by listing it, then delete it.

You can delete the rule using the order number instead of writing the rule specifications.

$ iptables -D INPUT 2

You can delete all rules in a specific chain using -F flag which means flush all rules.

$ iptables -F INPUT

If you forget to mention the chain name when using -F flag, then all chain rules will be deleted.

Replacing Rules

You can replace existing rules with your own rule using -R flag:

$ iptables R INPUT 1 i eth1 p tcp dport httpht d 1.2.3.4 j ACCEPT

This command will replace the first rule in INPUT chain with the typed rule.

Listing Specific Table

To list a specific table, use the -t flag with the table name like this:

$ iptables -L -t nat

Here we list the rules in nat table.

Iptables User Defined Chain

To create a user defined chain, use the -N flag.

$ iptables -N MY_CHAIN

Also, you can rename it using -E flag.

$ iptables -E MY_CHAIN NEW_NAME

And you can delete the user-defined chain using -X flag.

$ iptables -X MY_CHAIN

If you don’t mention the chain name when using -X flag it will delete all user-defined chains. You can’t delete built-in chains like INPUT and OUTPUT.

Redirection to a User Defined Chain

You can redirect packets to a user-defined chain like built-in chains using -j flag.

$ iptables -A INPUT -p icmp -j MY_CHAIN

So all incoming ICMP traffic will be redirected to the newly created chain called MY_CHAIN.

Setting The Default Policy for Chains

You can use the -P flag to set the default policy for a specific chain. The default policy could be ACCEPT, REJECT and DROP.

$ iptables -P INPUT DROP

So now the input chain will drop any packet come unless you write a rule to allow any incoming traffic.

SYN Flooding

The attacker sends SYN packets only without completing the TCP handshake and as a result, the receiving host would have many opened connections, and your server becomes too busy to respond to other clients.

We can use the limit module of iptables firewall to protect us from SYN flooding.

$ iptables -A INPUT -i eth1 -p tcp --syn -m limit --limit 10/second -j ACCEPT

Here we specify 10 SYN packets per second only. You can adjust this value according to your network needs.

If this will throttle your network, you can use SYN cookies.

SYN Cookies

In /etc/sysctl.conf file and add this line:

net.ipv4.tcp_syncookies = 1

Then save and reload.

$ sysctl -p

Drop INVALID State Packets

The INVALID state packets are packets that don’t belong to any connection and should be dropped.

$ iptables -A INPUT -m state --state INVALID -j DROP

This rule will drop all incoming invalid state packets.

Drop Fragmented Packets

Fragmented packets are broken pieces of large malformed packets and should be dropped

The -f flag tells iptables firewall to select all fragments. So if you are not using iptables as a router, you can drop fragmented packets.

$ iptables -A INPUT -f -j DROP

Save iptables Rules

All the rules we discussed will be lost if you reboot your server, so how to persist them.

You can save all of your rules using the iptables-save command if you are using CentOS or Red Hat.

iptables-save > /etc/sysconfig/iptables

On CentOS 7, you can save rules like this:

$ service iptables save

You can save specific table like filter table only:

$ iptables-save -t filter

Also, you can use iptables-restore to restore rules that were saved.

On Debian based distros, you can use the iptables-persistent package to save and restore rules.

First, install it:

$ apt-get install iptables-persistent

Then you can save and restore rules:

$ netfilter-persistent save

$ netfilter-persistent reload

I Hope you find iptables firewall easy. Keep coming back.

Thank you.

likegeeks.com

0

Secure Linux Server Using Hardening Best Practices

In the previous post we talked about some Linux security tricks and as I said, we can’t cover everything about Linux hardening in one post, but we are exploring some tricks to secure Linux server instead of searching for ready Linux hardening scripts to do the job without understanding what’s going on, However, the checklist is so long so let’s get started. This is important if you are not securing your server physically. If you are using Systems prior to CentOS 7, all you have to do is to comment out the following line in /etc/inittab file.
Continue Reading →

ca::ctrlaltdel:/sbin/shutdown -t3 -r now

Otherwise, if you are using CentOS 7 use the following command:

$ ln -s /dev/null /etc/systemd/system/ctrl-alt-del.target

Secure Mounted Filesystems

Each of your Linux file systems is mounted so you can the files inside it. You can mount your file systems using different options.

You can type these options in the /etc/fstab file.

LABEL=/ / ext4 defaults 1 1

The first column is just a label for your device.

The second column is the location of the mounted filesystem.

The third column is the file system type like ext4.

The fourth column contains security options which are the most important one for us.

The last two columns control the options for the dump and fsck commands.

There are many different ways to control how file systems are mounted and the following list shows some of them:

auto                       It will be mounted automatically at boot time.

noauto                   It will not be mounted automatically at boot time.

exec                       You can execute binaries on this file system.

noexec                  You can’t execute binaries on this file system.

suid                       setuid bits are permitted.

nosuid                  No setuid bits.

user                       non-root users can mount this device.

nouser                  No user except root can mount this device.

owner                   Only owner can mount the device.

ro                          Mount device read-only.

rw                          Mount device read-write.

defaults                Make your file system’s options: rw, suid, exec, auto, nouser.

The exec and noexec options enable you to control whether binary execution is allowed or not.

You can mount /home securely with noexec like this:

/dev/hda1 /home ext4 noexec 0 2

Keep in mind that this line will prevent the execution of binaries on /home, so if you have any executables, you should take care of that.

You can mount /tmp with noexec option as a step of hardening, but keep in mind that some programs might not work properly because they use /tmp to execute. So you can test your software with this mount option, if it goes well then it’s OK.

If you have binaries that have the setuid and setgid bits, and you set the nosuid option, the setuid and setgid bits will be neglected.

Only root users can mount file systems, but if you want other users to do that, you can set the user, nouser options. If you set the user option, then any user can mount or unmount file systems.

Any user other than root shouldn’t be allowed to mount file systems.

By setting ro and rw options, you can set your filesystem as read-only or writable.

You can mount any file system as read-only like this:

/dev/hda2 /usr ext4 ro,nodev 0 2

You can mount /boot as read-only using the same way, but keep in mind that if any kernel update arrives, you have to remount it as rw to apply the update like this:

$ mount -o remount,rw /boot

You know mount options and you should be wise enough to take the decision about which directory needs which option to mount with.

Protect /etc/services File

The /etc/services file translates service names to port numbers.

This file is writable by root only, but you may make a mistake without intention.

Well, you can use the immutable attribute to avoid any mistakes.

Also, that prevents accidental deleting or overwriting of such a vital file.

$ chattr +i /etc/services

Remove Unused Accounts

These vendor accounts are preinstalled on your system for some Linux system activity.

If you don’t need those accounts, it’s preferred to remove them using the userdel command, and these are some of the unused users for me.

$ userdel adm

$ userdel games

$ userdel halt

$ userdel lp

$ userdel shutdown

Also, you will need to remove the groups belongs to those accounts if exist using groupdel command

If you check /etc/passwd file, you’ll see that the users are deleted.

If you run your own VPS or server you can set the immutable bit on /etc/passwd and /etc/shadow to prevent any unwanted changes.

$ chattr +i /etc/passwd

$ chattr +i /etc/shadow

If you need to add new users to the system or install a program that will add users, consider removing the immutable flag first.

Hardening Cron Scripts

Some scripts under /etc/cron.d doesn’t have the secured permissions, they are readable to normal users.

Consider fixing the permission for the scripts that are responsible for executing scheduled job on our server so root only can read it.

$ chmod 0700 /etc/cron.daily/*

Normal users don’t need to look at those scripts.

Keep in mind that if you update a program that provides a cron file on your system, consider updating the permission, or you can make a shell script that does the job for you instead.

And the same for the other cron directories like:

/etc/cron.weekly

/etc cron.monthly/

/etc cron.hourly/

Securing SUID Programs

SUID (Set User ID) is a special type of file permissions given to a file. When you want to use a tool like passwd command which writes on files belong to root such as /etc/passwd and /etc/shadow, the passwd command must have this SUID permission to enable normal users to use that command.

You may take a look at all programs that have this permission and consider removing that permission from unnecessary programs that you think that normal users won’t need it.

$ find / -type f -user root -perm -4000 -print

All these programs have SUID bit and normal users can run them as root. To remove that permission, you can use this command:

$ chmod a-s /bin/mount

Keep in mind that some programs need that permission to work so be careful when doing that.

Risky World-Writable Files and Directories

World-writable directories and files can lead to serious problems if the attacker gains access to them.

He will be allowed to modify or delete any file, and this is a serious problem.

To get all writable files in your web folder, use this command:

$ find /home/*/public_html -type f -writable -exec ls -la {} \;

And writable directories:

$ find /home/*/public_html -type d -writable -exec ls -ld {} \;

You may find writable directories and files in some locations like /var/mail which has no problem, but on web folders, you have to be careful about that much.

You can use some integrity check tool like tripwire.

This tool will scan the system for any public writable files and directors and warn you, so you can take action about them.

Risky Symlinks

Symlinks or symbolic links are useful if they used for a good purpose to simplify your work, but the attacker in some cases uses any scripting language on your server to build a symlink to travel between directories and see your files, steal passwords and gain access to all websites on the server, so it’s very important to keep any eye on that.

The following command searches for any symlink and deletes it.

$ find -L /home/*/public_html -type l –delete

You can change the path based on your server paths, you may also create a shell script to find those symlinks and send to your email so you can investigate how it was created.

#!/bin/bash
find /home/*/public_html/ -type l >> /root/symlinks
cat /root/symlinks | cut -d"/" -f3 | uniq >> /root/out
echo "Symlinks:"|mail -s "Symlinks in $(hostname)" [email protected] < /root/out > /root/symlinks > /root/out

There are many ways to stop symlink creation, if you are using PHP, you can disable some serious functions, and apply Symlinks only if owner matches for your server if you are using apache.

This trick is very useful, especially when dealing with compromised systems.

There is a lot to talk about securing PHP; maybe we should make another post about that, but let’s keep simple for now.

Securing Log Files

Your last line of defense is the log files. Log files for each running service tell you everything about that service, so you can keep track of everything happened on your system.

In worst scenarios (like gaining root access), the attacker might delete those log files and left you without any evidence of what had happened.

Consider copying your log files to a different place or schedule a regular backup of log files to somewhere else that shouldn’t be accessible to the attacker if he gains access to your system.

Securing Linux Resources

Securing Linux Resources is a must because users can jeopardize the stability of your server if they left to use server resources without limits.

You can allocate how much memory for each user, how many processes and other server resources.

Under /etc/security, there is a file called limits.conf, in this file you can specify the limits for your users like this:

* hard rss 500000

* hard nproc 50

The first line says for all users, limit the memory usage to 500 MB.

The second line says for all users, limit the number of processes to 50 processes.

All these restriction rules applied to all users expect root user.

The asterisk on both lines means all users, and some systems have users running services like www or mysql users and these service users are used by all users on the system and if we apply our restriction rules for them too, that can lead to problems.

A good solution for this problem is to add a special group and add our users to that group and apply our restriction rules to that group.

In this case, the rules will be applied for every user in this group and not to the whole users of the group.

@myusers hard rss 500000

@myusers hard nproc 50

Hardening /proc Directory

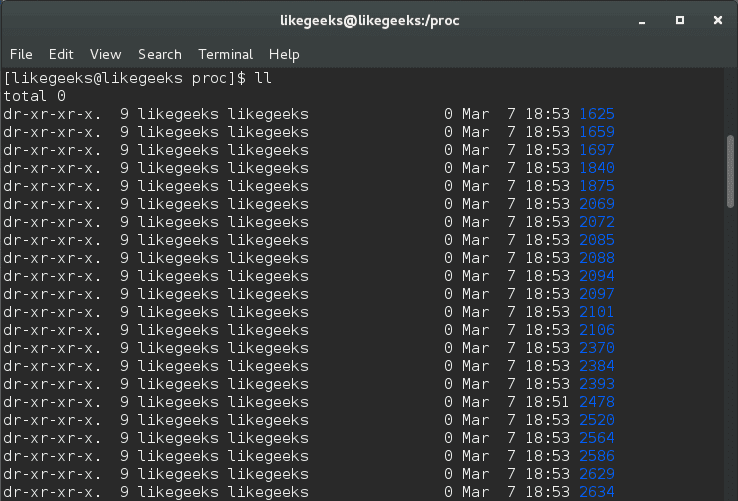
The /proc directory or as they call it (process information pseudo-file system) gives you hints about the currently running processes. Linux is installed by default to allow normal users to see that information. You can see what processes belong to root and all other user’s processes.

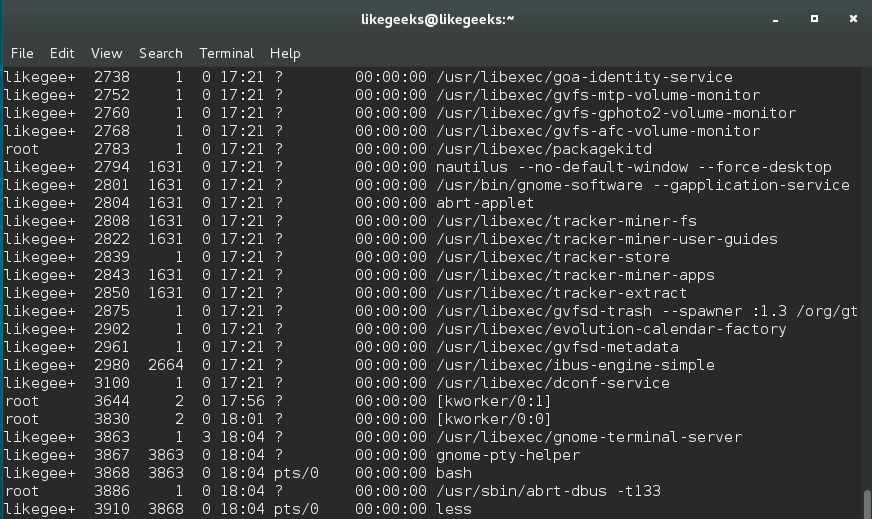
Before you use this trick, as you can see that normal user can see all processes even root processes:

Secure Linux Server ps -ef

The hidepid mount option allows you to hide process IDs. It takes a value of 0, 1, 2.

$ mount -o remount,rw,hidepid=2 /proc

And you can write it to /etc/fstab to make it permanent so after reboot, the process IDs remains hidden.

proc /proc proc defaults,hidepid=2 0 0

proc directory Hardening Best Practices

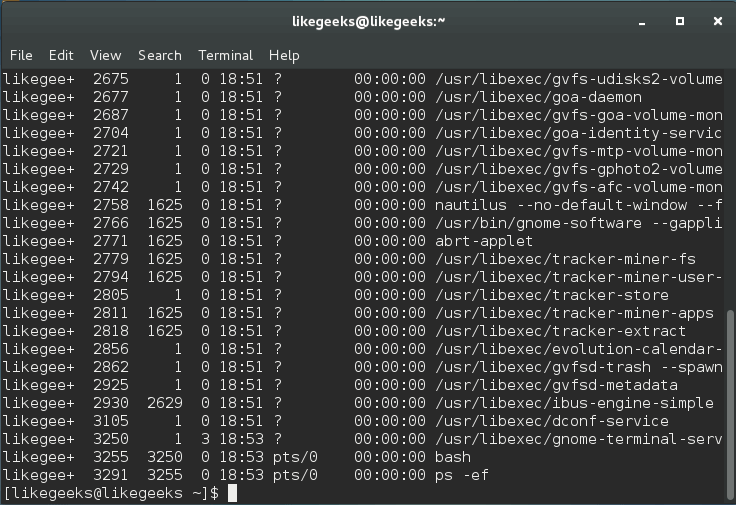
After that command, you are only allowed to see your processes. Only root users can see all processes for all users.

$ ps -ef

Secure Linux Server ps -ef

Another mount option is gid which allows users in a specific group to see /proc directory.

If the group you want to assign the permission to has ID of 100, you can write it like this:

$ mount -o remount,rw,gid=100 /proc

Also, you can write it in /etc/fstab file:

proc /proc proc defaults,gid=100 0 0

The last advice for you is to keep your system and software updated always, that will protect you from many threats.

I hope you find these hardening tricks useful. Keep coming back.

Thank you.

likegeeks.com

0