
 Qtile pencere yöneticisini kullanan, Arch tabanlı, Norveç kökenli minimalist bir GNU/Linux dağıtımı olan TobbeOS‘un 2026.03.07 sürümü çıktı. Kullanıcıyı kurulum sürecinde yönlendiren basit bir komut dosyası içeren bir ağ kurulum imajı sağlayan sistem; Arch Linux depolarından en son paketleri indirip ve kuruyor. Komut dosyası, Btrfs ve ext4 dosya sistemleri arasında seçim yapma olanağı sunmaktadır. TobbeOS ayrıca önceden yapılandırılmış bir Emacs editörü sağlarken, varsayılan web tarayıcısı Zen Browser adlı gizliliğe odaklı bir Firefox çatalı kullanmaktadır. Hobi olarak biraz kodlama ve betik yazan Tobias tarafından geliştirilen TobbeOS için GitLab üzerinden destek sağlıyor. Bu nedenle ismi TobbeOS olan sistem, X11 ile birlikte fish shell ve wezterm terminali vb. içeren tam bir Qtile masaüstü ortamıyla geliyor. Continue Reading →
Tag Archives | shell
TobbeOS 2026.02.01 çıktı
Qtile pencere yöneticisini kullanan, Arch tabanlı, Norveç kökenli minimalist bir GNU/Linux dağıtımı olan TobbeOS‘un 2026.02.01 sürümü çıktı. Kullanıcıyı kurulum sürecinde yönlendiren basit bir komut dosyası içeren bir ağ kurulum imajı sağlayan sistem; Arch Linux depolarından en son paketleri indirip ve kuruyor. Komut dosyası, Btrfs ve ext4 dosya sistemleri arasında seçim yapma olanağı sunmaktadır. TobbeOS ayrıca önceden yapılandırılmış bir Emacs editörü sağlarken, varsayılan web tarayıcısı Zen Browser adlı gizliliğe odaklı bir Firefox çatalı kullanmaktadır. Hobi olarak biraz kodlama ve betik yazan Tobias tarafından geliştirilen TobbeOS için GitLab üzerinden destek sağlıyor. Bu nedenle ismi TobbeOS olan sistem, X11 ile birlikte fish shell ve wezterm terminali vb. içeren tam bir Qtile masaüstü ortamıyla geliyor.
Expect command and how to automate shell scripts like magic
 In the previous post, we talked about writing practical shell scripts and we saw how it is easy to write a shell script. Today we are going to talk about a tool that does magic to our shell scripts, that tool is the Expect command or Expect scripting language. Expect command or expect scripting language is a language that talks with your interactive programs or scripts that require user interaction. Expect scripting language works by expecting input, then the Expect script will send the response without any user interaction. You can say that this tool is your robot which will automate your scripts.
If Expect command if not installed on your system, you can install it using the following command:
$ apt-get install expect
Or on Red Hat based systems like CentOS:
$ yum install expect
Expect Command
Before we talk about expect command, Let’s see some of the expect command which used for interaction:
spawn Starting a script or a program.
expect Waiting for program output.
send Sending a reply to your program.
interact Allowing you in interact with your program.
- The spawn command is used to start a script or a program like the shell, FTP, Telnet, SSH, SCP, and so on.
- The send command is used to send a reply to a script or a program.
- The Expect command waits for input.
- The interact command allows you to define a predefined user interaction.
We are going to type a shell script that asks some questions and we will make an Expect script that will answer those questions.
First, the shell script will look like this:
#!/bin/bash
echo "Hello, who are you?"
read $REPLY
echo "Can I ask you some questions?"
read $REPLY
echo "What is your favorite topic?"
read $REPLY
Now we will write the Expect scripts that will answer this automatically:
#!/usr/bin/expect -f
set timeout -1
spawn ./questions
expect "Hello, who are you?\r"
send -- "Im Adam\r"
expect "Can I ask you some questions?\r"
send -- "Sure\r"
expect "What is your favorite topic?\r"
send -- "Technology\r"
expect eof
The first line defines the expect command path which is #!/usr/bin/expect.
On the second line of code, we disable the timeout. Then start our script using spawn command.
We can use spawn to run any program we want or any other interactive script.
The remaining lines are the Expect script that interacts with our shell script.
The last line if the end of file which means the end of the interaction.
Now Showtime, let’s run our answer bot and make sure you make it executable.
$ chmod +x ./answerbot
$./answerbot
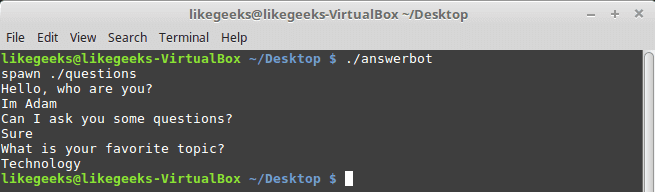
Cool!! All questions are answered as we expect.
If you get errors about the location of Expect command you can get the location using the which command:
$ which expect
We did not interact with our script at all, the Expect program do the job for us.
The above method can be applied to any interactive script or program.Although the above Expect script is very easy to write, maybe the Expect script little tricky for some people, well you have it.
Using autoexpect
To build an expect script automatically, you can the use autoexpect command.
autoexpect works like expect, but it builds the automation script for you. The script you want to automate is passed to autoexpect as a parameter and you answer the questions and your answers are saved in a file.
$ autoexpect ./questions
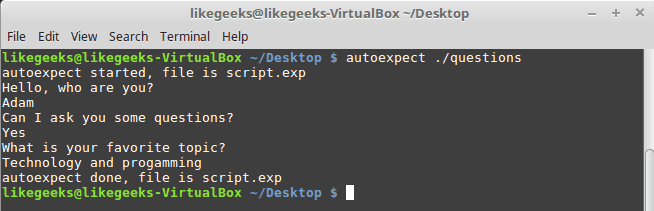
A file is generated called script.exp contains the same code as we did above with some additions that we will leave it for now.

If you run the auto generated file script.exp, you will see the same answers as expected:
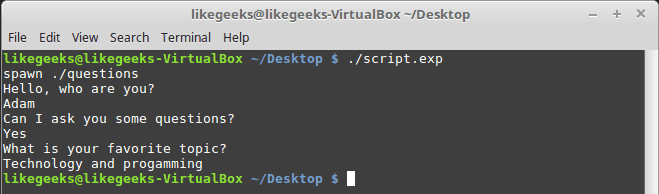
Awesome!! That super easy.
There are many commands that produce changeable output, like the case of FTP programs, the expect script may fail or stuck. To solve this problem, you can use wildcards for the changeable data to make your script more flexible.
Working with Variables
The set command is used to define variables in Expect scripts like this:
set MYVAR 5
To access the variable, precede it with $ like this $VAR1
To define command line arguments in Expect scripts, we use the following syntax:
set MYVAR [lindex $argv 0]
Here we define a variable MYVAR which equals the first passed argument.
You can get the first and the second arguments and store them in variables like this:
set my_name [lindex $argv 0]
set my_favorite [lindex $argv 1]
Let’s add variables to our script:
#!/usr/bin/expect -f
set my_name [lindex $argv 0]
set my_favorite [lindex $argv 1]
set timeout -1
spawn ./questions
expect "Hello, who are you?\r"
send -- "Im $my_name\r"
expect "Can I ask you some questions?\r"
send -- "Sure\r"
expect "What is your favorite topic?\r"
send -- "$my_favorite\r"
expect eof
Now try to run the Expect script with some parameters to see the output:
$ ./answerbot SomeName Programming

Awesome!! Now our automated Expect script is more dynamic.
Conditional Tests
You can write conditional tests using braces like this:
expect {
"something" { send -- "send this\r" }
"*another" { send -- "send another\r" }
}
We are going to change our script to return different conditions, and we will change our Expect script to handle those conditions.
We are going to emulate different expects with the following script:
#!/bin/bash
let number=$RANDOM
if [ $number -gt 25000 ]; then
echo "What is your favorite topic?"
else
echo "What is your favorite movie?"
fi
read $REPLY
A random number is generated every time you run the script and based on that number, we put a condition to return different expects.
Let’s make out Expect script that will deal with that.
#!/usr/bin/expect -f
set timeout -1
spawn ./questions
expect {
"*topic?" { send -- "Programming\r" }
"*movie?" { send -- "Star wars\r" }
}
expect eof
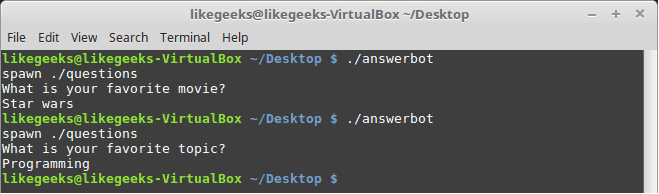
Very clear. If the script hits the topic output, the Expect script will send programming and if the script hits movie output the expect script will send star wars. Isn’t cool?
If else Conditions
You can use if/else clauses in expect scripts like this:
#!/usr/bin/expect -f
set NUM 1
if { $NUM < 5 } {
puts "\Smaller than 5\n"
} elseif { $NUM > 5 } {
puts "\Bigger than 5\n"
} else {
puts "\Equals 5\n"
}

Note: The opening brace must be on the same line.
While Loops
While loops in expect language must use braces to contain the expression like this:
#!/usr/bin/expect -f
set NUM 0
while { $NUM <= 5 } {
puts "\nNumber is $NUM"
set NUM [ expr $NUM + 1 ]
}
puts ""

For Loops
To make a for loop in expect, three fields must be specified, like the following format:
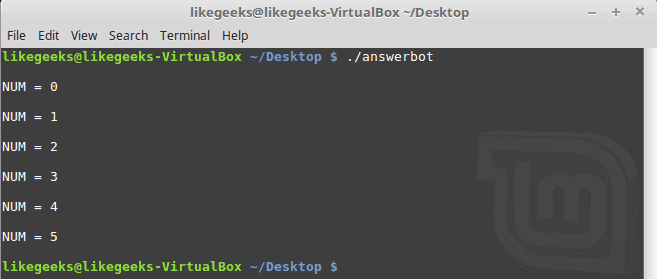
#!/usr/bin/expect -f
for {set NUM 0} {$NUM <= 5} {incr NUM} {
puts "\nNUM = $NUM"
}
puts ""
User-defined Functions
You can define a function using proc like this:
proc myfunc { TOTAL } {
set TOTAL [expr $TOTAL + 1]
return "$TOTAL"
}
And you can use them after that.
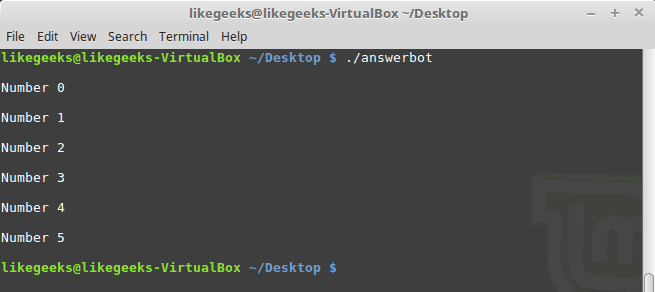
#!/usr/bin/expect -f
proc myfunc { TOTAL } {
set TOTAL [expr $TOTAL + 1]
return "$TOTAL"
}
set NUM 0
while {$NUM <= 5} {
puts "\nNumber $NUM"
set NUM [myfunc $NUM]
}
puts ""
Interact Command
Sometimes your Expect script contains some sensitive information that you don’t want to share with other users who use your Expect scripts, like passwords or any other data, so you want your script to take this password from you and continuing automation normally.
The interact command reverts the control back to the keyboard.
When this command is executed, Expect will start reading from the keyboard.
This shell script will ask about the password as shown:
#!/bin/bash
echo "Hello, who are you?"
read $REPLY
echo "What is you password?"
read $REPLY
echo "What is your favorite topic?"
read $REPLY
Now we will write the Expect script that will prompt for the password:
#!/usr/bin/expect -f
set timeout -1
spawn ./questions
expect "Hello, who are you?\r"
send -- "Hi Im Adam\r"
expect "*password?\r"
interact ++ return
send "\r"
expect "*topic?\r"
send -- "Technology\r"
expect eof

After you type your password type ++ and the control will return back from the keyboard to the script.
Expect language is ported to many languages like C#, Java, Perl, Python, Ruby and Shell with almost the same concepts and syntax due to its simplicity and importance.
Expect scripting language is used in quality assurance, network measurements such as echo response time, automate file transfers, updates, and many other uses.
I hope you now supercharged with some of the most important aspects of Expect command, autoexpect command and how to use it to automate your tasks in a smarter way.
Thank you.

How to write practical shell scripts
 In the last post, we talked about regular expressions and we saw how to use them in sed and awk for text processing, and we discussed before Linux sed command and awk command. During the series, we wrote small shell scripts, but we didn’t mix things up, I think we should take a small step further and write a useful shell script. However, the scripts in this post will help you to empower your scriptwriting skills. You can send messages to someone by phone or email, but one method, not commonly used anymore, is sending a message directly to the user’s terminal. We are going to build a bash script that will send a message to a user who is logged into the Linux system. For this simple shell script, only a few functions are required. Most of the required commands are common and have been covered in our series of shell scripting; you can review the previous posts.
Sending Messages
First, we need to know who is logged in. This can be done using the who command which retrieves all logged in users.
who

To send a message you need the username and his current terminal.
You need to know if messages are allowed or not for that user using the mesg command.
mesg

If the result shows “is y” that means messaging is permitted. If the result shows “is n”, that means messaging is not permitted.
To check any logged user message status, use the who command with -T option.
who -T
If you see a dash (-) that means messages are turned off and if you see plus sign (+) that means messages are enabled.
To allow messages, type mesg command with the “y” option like this
mesg y
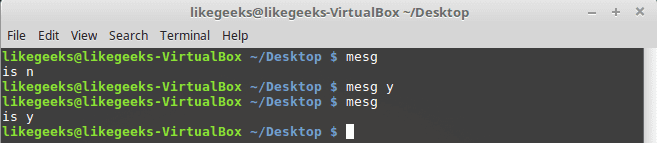
Sure enough, it shows “is y” which means messages are permitted for this user.
Of course, we need another user to be able to communicate with him so in my case I’m going to connect to my PC using SSH and I’m already logged in with my user, so we have two users logged onto the system.
Let’s see how to send a message.
Write Command
The write command is used to send messages between users using the username and current terminal.
For those users who logged into the graphical environment (KDE, Gnome, Cinnamon or any), they can’t receive messages. The user must be logged onto the terminal
We will send a message to testuser user from my user likegeeks like this:
write testuser pts/1
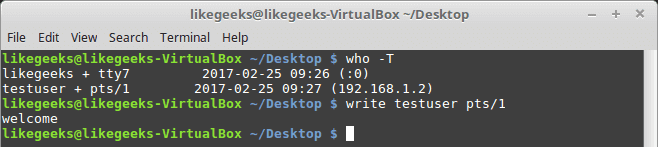
Type the write command followed by the user and the terminal and hit Enter.
When you hit Enter, you can start typing your message. After finishing the message, you can send the message by pressing the Ctrl+D key combination which is the end of file signal. I recommend you to review the post about signals and jobs.

The receiver can recognize which user on which terminal sends the message. EOF means that the message is finished.
I think now we have all the parts to build our shell script.
Creating The Send Script
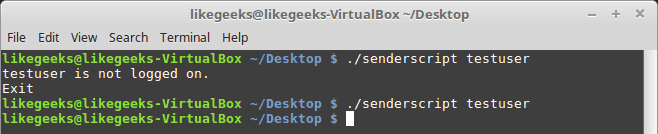
Before we create our shell script, we need to determine whether the user we want to send a message to him is currently logged on the system, this can be done using the who command to determine that.
logged=$(who | awk -v IGNORECASE=1 -v usr=$1 '{ if ($1==usr) { print $1 }exit }')
We get the logged in users using the who command and pipe it to awk and check if it is matching the entered user.
The final output from the awk command is stored in the variable logged.
Then we need to check the variable if it contains something or not:
if [ -z $logged ]; then
echo "$1 is not logged on."
echo "Exit"
exit
fi
I recommend you to read the post about the if statement and how to use it Bash Script.
The logged variable is tested to check if it is a zero or not.
If it is zero, the script prints the message, and the script is terminated.
If the user is logged, the logged variable contains the username.
Checking If The User Accepts Messages
To check if messages are allowed or not, use the who command with -T option.
check=$(who -T | grep -i -m 1 $1 | awk '{print $2}')
if [ "$check" != "+" ]; then
echo "$1 disable messaging."
echo "Exit"
exit
fi
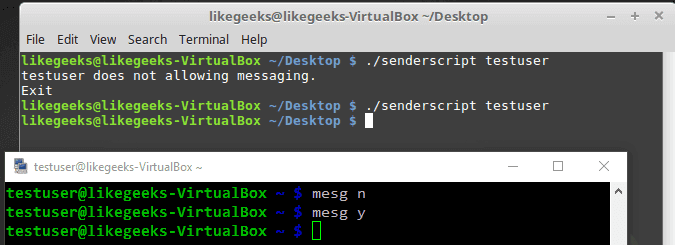
Notice that we use the who command with -T. This shows a (+) beside the username if messaging is permitted. Otherwise, it shows a (-) beside the username, if messaging is not permitted.
Finally, we check for a messaging indicator if the indicator is not set to plus sign (+).
Checking If Message Was Included
You can check if the message was included or not like this:
if [ -z $2 ]; then
echo "Message not found"
echo "Exit"
exit
fi
Getting the Current Terminal
Before we send a message, we need to get the user current terminal and store it in a variable.
terminal=$(who | grep -i -m 1 $1 | awk '{print $2}')
Then we can send the message:
echo $2 | write $logged $terminal
Now we can test the whole shell script to see how it goes:
$ ./senderscript likegeeks welcome
Let’s see the other shell window:
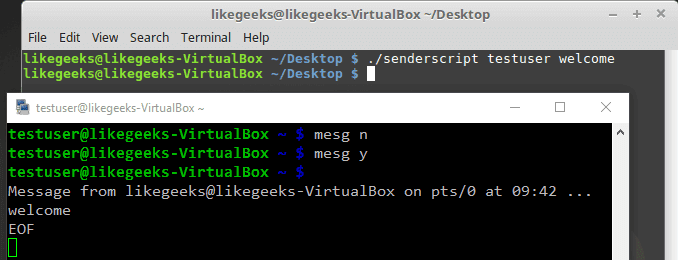
Good! You can now send simple one-word messages.
Sending a Long Message
If you try to send more than one word:
$ ./senderscript likegeeks welcome to shell scripting
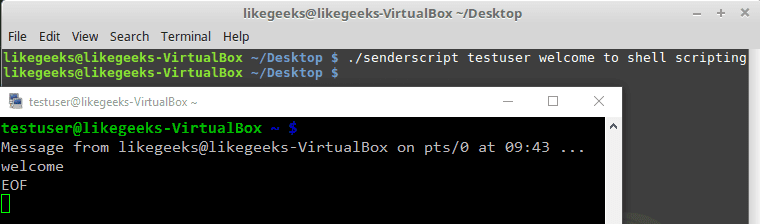
It didn’t work. Only the first word of the message is sent.
To fix this problem, we will use the shift command with the while loop.
shift
while [ -n "$1" ]; do
message=$message' '$1
shift
done
And now one thing needs to be fixed, which is the message parameter.
echo $whole_message | write $logged $terminal
So now the whole script should be like this:
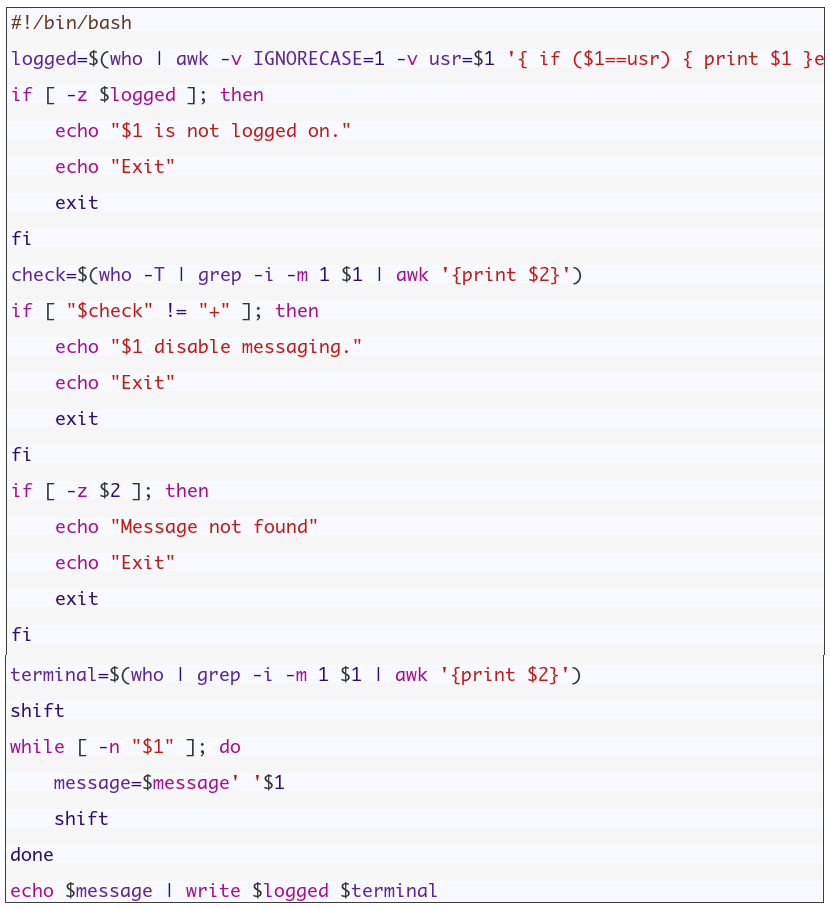
If you try now:
$ ./senderscript likegeeks welcome to shell scripting

Awesome!! It worked. Again, I’m not here to make a script to send the message to the user, but the main goal is to review our shell scripting knowledge and use all the parts we’ve learned together and see how things work together.
Monitoring Disk Space
Let’s build a script that monitors the biggest top ten directories.
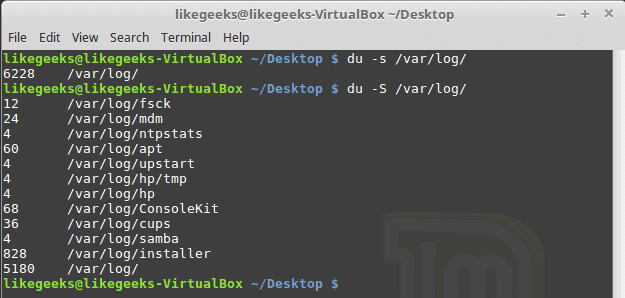
If you add -s option to the du command, it will show summarized totals.
$ du -s /var/log/
The -S option is used to show the subdirectories totals.
$ du -S /var/log/
You should use the sort command to sort the results generated by the du command to get the largest directories like this:
$ du -S /var/log/ | sort -rn
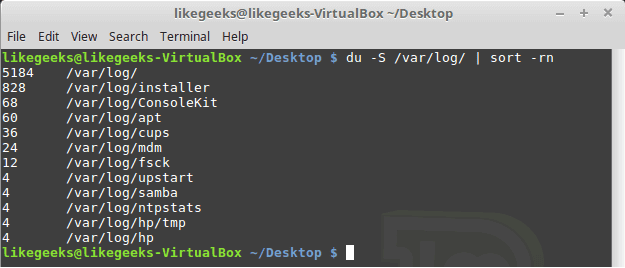
The -n to sort numerically and the -r option to reverse the order so it shows the bigger first.
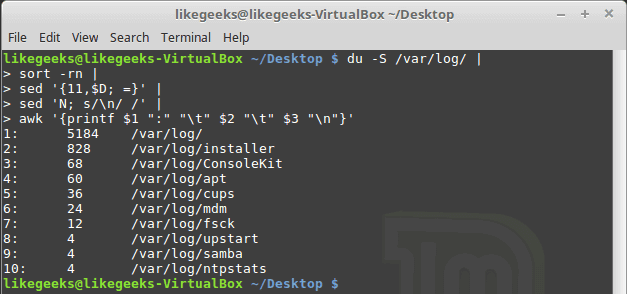
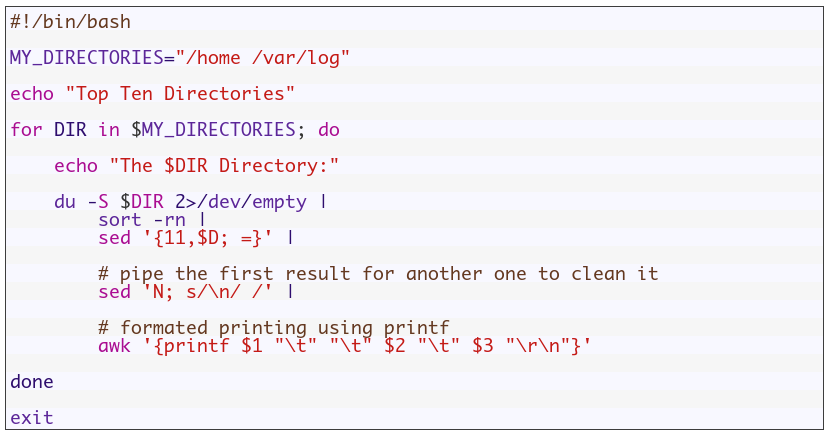
The N command is used to label each line with a number:
sed '{11,$D; =}' |
sed 'N; s/\n/ /' |
Then we can clean the output using the awk command:
awk '{printf $1 ":" "\t" $2 "\t" $3 "\n"}'
Then we add a colon and a tab so it appears much better.
$ du -S /var/log/ |
sort -rn |
sed '{11,$D; =}' |
# pipe the first result for another one to clean it
sed 'N; s/\n/ /' |
# formated printing using printf
awk '{printf $1 ":" "\t" $2 "\t" $3 "\n"}'
Suppose we have a variable called MY_DIRECTORIES that holds 2 folders.
MY_DIRECTORIES=”/home /var/log”
We will iterate over each directory from MY_DIRECTORIES variable and get the disk usage using du command.
So the shell script will look like this:
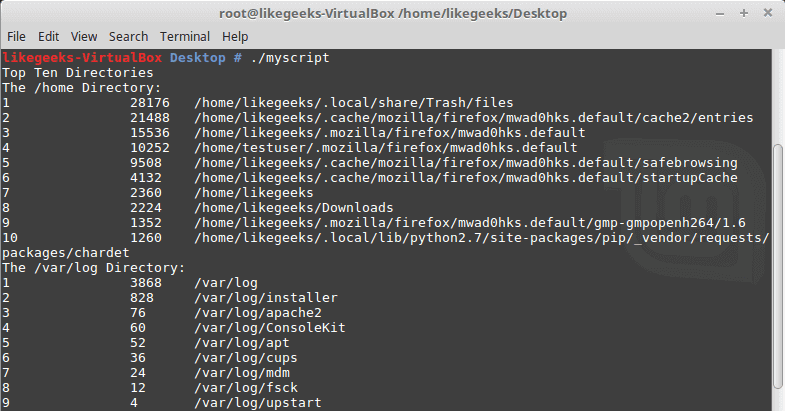
Good!! Both directories /home and /var/log are shown on the same report.
You can filter files, so instead of calculating the consumption of all files, you can calculate the consumption for a specific extension like *.log or whatever.
One thing I have to mention here, in production systems, you can’t rely on disk space report instead, you should use disk quotas.
Quota package is specialized for that, but here we are learning how bash scripts work.
Again the shell scripts we’ve introduced here is for showing you how shell scripting work, there are a ton of ways to implement any task in Linux.
My post is finished! I tried to reduce the post length and make everything as simple as possible, hope you like it.
Keep coming back. Thank you.
Main Linux Commands Easy Guide
 In the previous post, we discussed how to install Linux, now we are going to talk about the most powerful features in Linux which is Linux commands or shell commands. For the whole documentation of Linux Commands, you can check Linux Documentation. The power of Linux is in the power of commands that you can use. I’m going to talk about the main Linux commands with their main parameters that you might use daily.
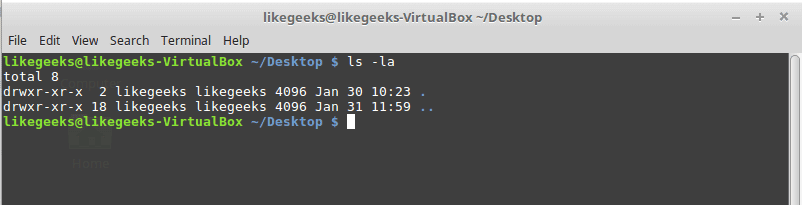
ls Command
List file and folders of the current directory.
Parameters
–l
to list the content as a detailed list.
-a
Display all files (hidden + non-hidden).
You can combine parameters like this:
ls -la
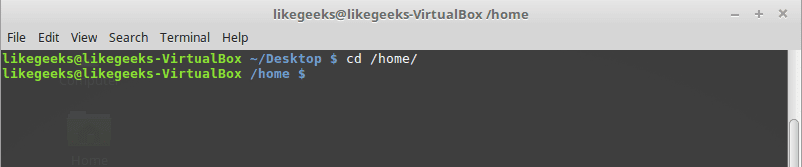
cd Command
Change directory from the current directory to another one.
cd /home
Will go to home directory
cp Command
Copy the source to target.
Parameters
-i
Interactive mode means wait for the confirmation if there are files on the target will be overwritten.
-r
Recursive copy means include subdirectories if they found.
Example
cp –ir sourcedir targetdir

mv Command
Move the source to target and remove the source.
Parameters
-i
Interactive mode means wait for the confirmation if there are files on the target will be overwritten.
Example
mv –i sourceFile targetFile

rm Command
Delete file or directory and you must use –r in case you want to delete a directory.
Parameters
-r
Recursive delete means delete all subdirectories if found.
-i
Interactive means wait till confirmation

mkdir Command
Create a new directory.
mkdir newDir

rmdir Command
Delete a directory

chown Command
Change the owner of a file or directory.
Parameters:
-R
Capital R here means to change ownership of all subdirectories if found and you must use this parameter if you use the command against a directory.
chown –R root:root myDir

chmod Command
Change the permission of a file or directory.
Parameters
The mode which consists of 3 parts, owner, group, and others means what will be the permissions for these modes, and you must specify them.
The permission is one of the followings:
Read =4
Write = 2
Execute =1
Every permission represented by a number as shown and you can combine permissions.
Example
chmod 755 myfile
That means set permission for the file named myfile as follows:
owner: set it to 7 which means 4+2+1 means read+write+execute.
group: set it to 5 which means 4+1 means read+execute.
other: set it to 5 which means 4+1 means read+execute.
Note: execute for a folder permission means opening it.

locate Command
To find a file in your system, the locate command will search the system for the pattern you provide.
locate myfile
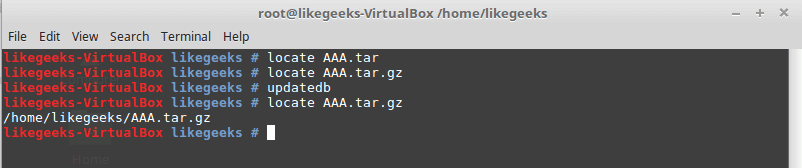
updatedb Command
updates the database used by the locate command.
date Command
Simply prints today’s date. Just type date on the shell.
tar Command
Combines several files into archive and compression if you want.
Parameters
-c
Create new archive.
-z
Compress the archive using gzip package.
-j
Compress the archive using bzip2 package.
-v
Verbose mode means show the processed files.
-f
Write the output to a file and not to screen.
-x
Unpack files from archive.
Example
tar –czvf myfiles.tar.gz myfiles

This command will pack and compress all files in folder myfiles to a compressed archive named myfiles.tar.gz.
tar-xzvf myfiels.tar.gz

This command will decompress the archive.
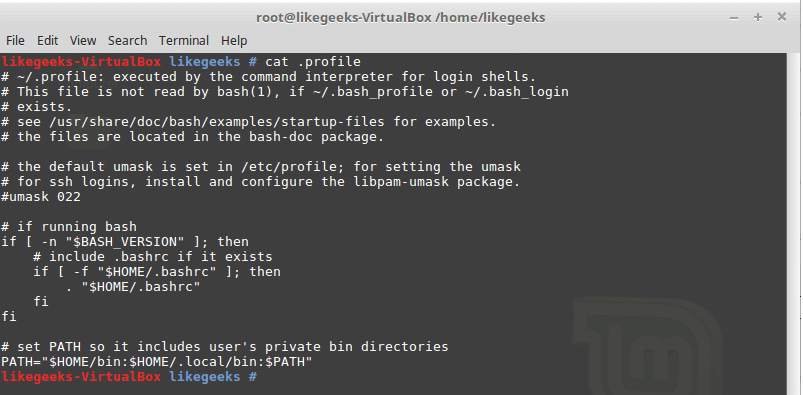
cat Command
Display file content to screen without limits.
Example
cat myfile.txt
less Command
Displays file content with scroll screen so you can navigate between pages using PgUp, PgDn, Home, and End.
less myfile
grep Command
Searches for a string in the specified files and displays which line contains the matched string.
Parameters
-R
Recursive search inside subdirectories if found.
-i
Insensitive search and ignore case.
-l
Display file name, not the text lines.
Example
grep –Ril mystring /home

passwd Command
Used to change your user password.

du Command
Calculates the disk usage of a file or a directory.
Parameters
-h
Display human readable form.
-s
Summarize the output total size.
Example
du –hs /home

reboot Command
Reboot the system immediately. Just type reboot.
halt Command
Shuts down the system, but make sure to close all of your files to avoid data loss.
That was just some of the main Linux commands.
Notice that, if you forget any command parameters, just type the command with – -help as a parameter and it will list the used parameters so you don’t have to remember all those parameters at the beginning.
cat --help
Temel Linux Sistem Yönetimi & Afşin Taşkıran
 Unix ve benzeri işletim sistemlerinde kullanıcının komut yazmasını sağlayan, bu komutları yorumlayarak gerekli işlemleri yapan programlara kabuk (shell) adı verilir. Linux da bir kullanıcı bir dizi kabuktan istediğini seçebilir. Kullandığımız kabuk ne olursa olsun standartlardan kaynaklanan geleneksel yapılar vardır. UNIX’te (ve Linux’ta) bütün komutlar ve dosya isimlerinde büyük/küçük harf ayrımı önemlidir. Sistem komutlarının ve dosyaların çoğu küçük harfle yazılır. Komut ve dosya adlarında kullanacağınız bazı karakterlerin gerek dosya ve dizin yapısı, gerekse kabuk ve diğer komutlar nedeniyle bazı özel anlamları vardır. Bu karakterlerden yeri geldikçe söz edilecektir. Örneğin, `/’ karakteri hiçbir dosya adında bulunamaz (dosya ve dizinler için ayraç olarak kullanıldığından). `-‘ ile başlayan bir dosya oluşturulabilir olsa da silmeye kalktığında yeni bir UNIX kullanıcısının başına dert açabilir. UNIX’te komutlara seçenek verirken seçenekten önce `-‘ karakteri kullanılır.
Örneğin ls -l •UNIX komutları tersi istenmedikçe girdilerini standart girdiden (klavye) alır, çıktılarını standart çıktıya (ekran) yazar. Bu özellik ileride anlatılacak olan yönlendirme ve boru (pipe) öperatorleri ile birlikte komut satırından birçok işlemi kolayca yapmanızı sağlar.
Temel Linux Sistem Yönetimi adlı e-kitabı edinmek için tıklayınız.