Tag Archives | terminal

Deb paketi nasıl yüklenir?

Bilindiği gibi, Debian Türkiye Forum’un değerli bir üyesi, değerli arkadaşımız Vedat Kılıç; uzun zamandır kendine özgü ISO kalıpları hazırlıyor. Vedat, bunları kendisine ait olan gnulinuxfree.blogspot.com üzerinden yayımlıyor. Bilindiği gibi, daha geniş bir çevreye duyurulması amacıyla bu çalışmaları forum üzerinden ve buradan da sizlere duyurmaya çaba gösteriyoruz. Vedat Kılıç‘ın en son yazdığı “Deb paketi nasıl yüklenir?” yazısı, .deb paketlerinin kurulumunu ele alıyor. Kılıç sözlerine: “Debian ve Debian tabanlı Linux sistemlerinde internetten indirdiğiniz deb paketini yüklemek için Gdebi denilen araçla da yapabiliriz, ancak bu program bağımlılıkları yüklemediği için pek pratik sayılmaz ve ayrıca paket bağımlılığını kurmadan paketi kurma özelliği olduğundan bazı sorunlara da sebep olabilir.“diye başlamış.

Continue Reading →

Yazı aynen şu şekilde:

deb-paketi

Debian ve Debian tabanlı Linux sistemlerinde internetten indirdiğiniz deb paketini yüklemek için Gdebi denilen araçla da yapabiliriz, ancak bu program bağımlılıkları yüklemediği için pek pratik sayılmaz ve ayrıca paket bağımlılığını kurmadan paketi kurma özelliği olduğundan bazı sorunlara da sebep olabilir. Bunun için bence en iyisi yine uçbirimden yararlanmak, hem daha kolay hem de sorun yaşama olasılığı yok.
Şunu da belirtmekte yarar var,  bu işi hiç bilmediğim zamanlarda deb paketi yükleme konusunu anlatan bir çok siteye denk gelmiş ancak hiç birinden olumlu sonuç alamamıştım. Kendim böyle bir deneyimden geçtiğim için oldukça anlaşılır anlatmaya çalışacağım. Çünkü bu konu hiç bilmeyenlere oldukça yabancı gelebilir ve bir dakikalık işlem gereksiz zaman kaybına yol açabilir. Çeşitli nedenlerden dolayı internetten indirdiğiniz deb paketini yüklemek için alttaki yönergeyi iyi takip etmeniz bence yeterli olacaktır…

Önce uçbirimi (terminal) açın, indirdiğiniz paketin “İndirilenler” dizininde olduğunu varsayalım, ama siz hangi dizine indirdiyseniz o dizinin adını kullanın. Buna göre uçbirime gireceğimiz komut örneği şöyle olmalı:
sudo  dpkg  -i  /home/KULLANICI-ADINIZ/İndirilenler/PAKET ADI

Hangisinin arasında boşluk olduğuna dikkat edin ve siz de boşluk olması gereken yerde boşluk bırakın. Şimdi internetten indirdiğim GoogleChrome deb paketini yüklemek için kendi kullandığım sisteme göre komut örneği verelim.
sudo dpkg  -i  /home/illedelinux/İndirilenler/google-chrome-stable_54.0.2840.90-1_amd64.deb
Görüldüğü gibi indirdiğim paketin tam adını yazdım. İndirdiğiniz paketin adı neyse tamamını kopyalayıp uçbirime yapıştırın ama hiç eksik olmadığına dikkat edin.Yukarıdaki komut örneğinde deb paketi henüz sisteme yüklenmedi, yani bu komutla uçbirime ne yapmak istediğimizi bildirmiş olduk. Bu yüzden “yüklenmedi, yarım bırakıldı” gibi bir uyarı verecek, onu ciddiye almayın, çünkü ikinci komutla işi bitireceğiz. Şimdi ise kurmak istediğimiz paketin bağımlılıklarını yükleyeceğiz. Uçbirime alttaki komutu girdiğmizde eksik bağımlılıkları yükleyecek ve büyük ihtimalle paket sorunsuz yüklenmiş, kullanıma hazır olacaktır.
sudo apt-get install -f
Anlaşılacağı üzere uçbirime girdiğimiz iki komutla paketin yüklenme kolaylığı Linux sistemlerinin avantajlarından biridir, başarılar…

gnulinuxfree.blogspot.com

0

SparkyLinux kullanıcıları için yeni bir uygulama: Browsh

Debian GNU/Linux tabanlı Polonya kökenli dağıtım SparkyLinux, kullanıcıları için yeni bir uygulama duyurdu: Browsh. Browsh’un TTY’lere ve tarayıcılara dönüştürülmüş tamamen etkileşimli, gerçek zamanlı ve modern bir metin tabanlı tarayıcı olduğu söylenirken, tarayıcının, web sayfalarının ve web uygulamalarının tamamen metin tabanlı bir sürümünü oluşturmak için gerçek bir tarayıcı olarak kullanıma sunulduğu ifade ediliyor. Bunun bir terminalde veya aslında ironik bir şekilde başka bir tarayıcıda kolayca işlenebileceği anlamına geldiği belirtilirken, şu anda tarayıcı istemcisi ile terminal istemcisinin özellik eşliğine sahip olmadığının unutulmaması gerektiği ifade ediliyor. Thomas Buckley-Houston tarafından yazılan Browsh, GNU Lesser General Public License 2.1 ile lisanslanmış bulunuyor.

Continue Reading →

SparkyLinux kullanıcıları, Browsh‘u yüklemek için aşağıdaki komutlardan yararlanabilecekler:

sudo apt update
sudo apt install browsh

Konuyla ilgili ayrıntılı bilgi edinmek için sparkylinux.org üzerinde yayımlanan pavroo imzalı Browsh yazısını inceleyebilirsiniz.

0

Linux Mint 19.3 Linux Mint 20’ye nasıl yükseltilir?

Öncelikle şunu belirtelim: Linux Mint 19.3’ün hem 32 bit hem de 64 bit sürümleri Nisan 2023’e kadar desteklense de, Linux Mint 20 de dahil olmak üzere yeni Linux Mint sürümleri yalnızca 64 bit olarak kullanılabilecek. Bu nedenle, Linux Mint 20’ye yükseltmek için, Linux Mint 19.3’ün 64 bit sürümünü kullanıyor olmanız gerekiyor. hangi sürümü kullandığınızı anlamak için şu komutu çalıştırabilirsiniz: dpkg --print-architecture. Çıktı amd64 olarak dönerse, sistemi, Linux Mint 20’ye yükseltebilirsiniz. İ386 çıktısını alırsanız, 32 bit sürümünü kullandığınız anlamına gelir. Bu durumda yükseltme yapamazsınız ve Linux Mint 19.3 ile devam etmeniz gerekir. Linux Mint 20’ye yükseltmek için APT ve komut satırı deneyimine sahip olmanız gerekir. Şimdi çalışmaya başlayabiliriz. Öncelikle sisteminizde tüm güncellemelerin tam olarak yapılmış olması gerekir. Öncelikle Menü -> Yönetim -> Güncelleme Yöneticisi ile Güncelleme Yöneticisini açın. “Yenile” düğmesine basın. Yeni paketler çıkarsa, “Tümünü Seç” düğmesine basın ve ardından “Güncellemeleri Yükle” düğmesine basarak güncelleme işlemini gerçekleştirin. Yok, yeni paketler gelmezse, bu sisteminizin güncel olduğunu gösterir, devam edebilirsiniz.

Continue Reading →

Yükseltme sırasında bir sorun oluşursa, en son sistem anlık görüntüsünü geri yükleyerek zamanda geriye gidebilir ve tüm değişiklikleri geri alabilirsiniz. Bir sistem anlık görüntüsü oluşturmak için Timeshift’i “Menü -> Yönetim -> Timeshift” ile başlatıp, anlık görüntüler için bir hedef seçmek üzere sihirbazı izleyebilirsiniz. İlkin yükseltme aracını kurmanız gerekiyor. Bunun için terminale aşağıdaki kodu girin:

apt install mintupgrade

Şİmdi bir kontrol yapmamız gerekiyor. Bunun için terminale aşağıdaki kodu girin:

mintupgrade check

Ardından ekrandaki talimatları izleyin. Bu komut sistemi geçici olarak Linux Mint 20 depolarına yönlendirir ve yükseltmenin etkisini hesaplar. mintupgrade check komutuyla; yükseltmenin mümkün olup olmadığını ve varsa hangi paketlerin yükseltileceğini, yükleneceğini, kaldırılacağını ve saklanacağını öğrenrceksiniz. Artık paket yükseltmelerini indirmeye başlayabiliriz. Bunun için terminale aşağıdaki komutu girin:

mintupgrade download

Bu komutun aslında yükseltmenin kendisini gerçekleştirmez, yalnızca paketleri indirir. İndirme bittikten sonra yükseltmeleri uygulayabiliriz. Bu adım geri alınamaz. Bunu yaptıktan sonra, geri dönmenin tek yolu bir sistem anlık görüntüsünü geri yüklemektir. Yükseltmeleri uygulamak için terminale aşağıdaki komutu yazın:

mintupgrade upgrade

Bazı paketler artık Linux Mint 20’de mevcut değil veya Linux Mint 19.3 sürümünden daha düşük bir sürüme sahip. Düzgün çalışmalarını garanti etmek için indirgenmeleri gerekir. “Menü -> Yönetim -> Yazılım Kaynakları” ndan Yazılım Kaynakları aracını başlatın. “Bakım” sekmesini açın ve “Yabancı Paketleri Eski Sürüme Geç” seçeneğini tıklayın. Tüm yabancı paketleri seçin ve “Eski sürüme geçir” i tıklayın.

Şimdi de yabancı paketleri silmemiz gerekiyor. Bunun için “Menü -> Yönetim -> Yazılım Kaynakları” ndan Yazılım Kaynakları aracını başlatın. “Bakım” sekmesini açın ve “Yabancı Paketleri Kaldır” ı tıklayın. Kendiniz kurduğunuz paketler hariç (3. taraf kaynaklardan), tüm yabancı paketleri seçin ve “Kaldır” a tıklayın.

Yükseltme yapamıyorsanız, lütfen yeni bir kurulum yapın. Yükseltmelerle ilgili Clement Lefebvre’in yazdığı genel talimatları burada ve burada bulabilirsiniz.

0

LXTerminal 0.3.2 duyuruldu

LXDE masaüstü ortamı bünyesinde kullanıma sunulan bir terminal emülatörü olan LXTerminal’in 0.3.2 sürümü duyuruldu. Bunun bir güvenlik ve hata düzeltme güncellemesi olduğu belirtilirken, kullanılabilir olma özelliğini artırmak için eklenen küçük bir özelliğin de içerikte yer aldığı ifade ediliyor. Bunun, bir hata düzeltme güncellemesi olduğu belirtiliyor. 0.3.1 sürümünden bu yana bu yana yapılan değişiklikler için git günlüğüne bakılması öneriliyor. LXTerminal, Lubuntu gibi varsayılan olarak LXDE masaüstü ortamını kullanan sistemlerde varsayılan varsayılan terminal konsolu olarak geliyor. LXTerminal 0.3.2 hakkında ayrıntılı bilgi edinmek için sürüm duyurusunu inceleyebilirsiniz.

Continue Reading →

LXTerminal 0.3.2 edinmek için aşağıdaki linkten yararlanabilirsiniz.

0

15+ examples for Linux cURL command

In this tutorial, we will cover the cURL command in Linux. Follow along as we guide you through the functions of this powerful utility with examples to help you understand everything it’s capable of. The cURL command is used to download or upload data to a server, using one of its 20+ supported protocols. This data could be a file, email message, or web page. cURL is an ideal tool for interacting with a website or API, sending requests and displaying the responses to the terminal or logging the data to a file. Sometimes it’s used as part of a larger script, handing off the retrieved data to other functions for processing. Since cURL can be used to retrieve files from servers, it’s often used to download part of a website. It performs this function well, but sometimes the wget command is better suited for that job. We’ll go over some of the differences and similarities between wget and cURL later in this article. We’ll show you how to get started using cURL in the sections below.

Continue Reading →

Download a file

The most basic command we can give to cURL is to download a website or file. cURL will use HTTP as its default protocol unless we specify a different one. To download a website, just issue this command:

curl http://www.google.com

Of course, enter any website or page that you want to retrieve.

curl basic command

Doing a basic command like this with no extra options will rarely be useful, because this only tells cURL to retrieve the source code of the page you’ve provided.
curl output

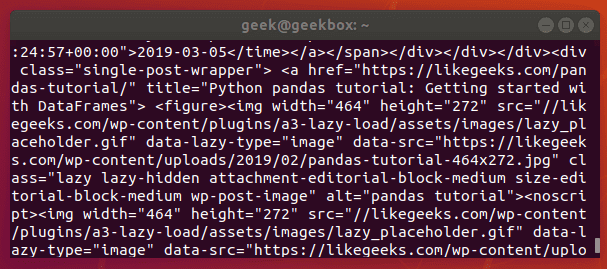
When we ran our command, our terminal is filled with HTML and other web scripting code – not something that is particularly useful to us in this form.

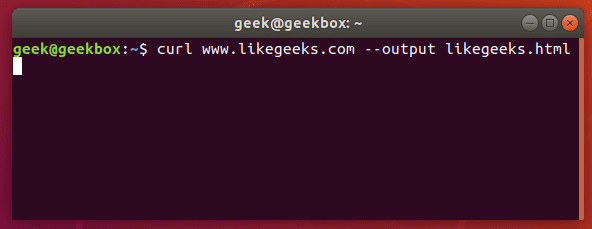
Let’s download the website as an HTML document instead, that way the content can be displayed. Add the –output option to cURL to achieve this.

curl www.likegeeks.com --output likegeeks.html
curl output switch

Now the website we downloaded can be opened and displayed in a web browser.

downloaded website

If you’d like to download an online file, the command is about the same. But make sure to append the –output option to cURL as we did in the example above.

If you fail to do so, cURL will send the binary output of the online file to your terminal, which will likely cause it to malfunction.

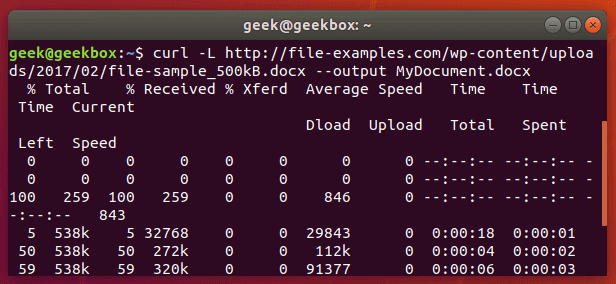
Here’s what it looks like when we initiate the download of a 500KB word document.
curl download document

The word document begins to download and the current progress of the download is shown in the terminal. When the download completes, the file will be available in the directory we saved it to.

In this example, no directory was specified, so it was saved to our present working directory (the directory from which we ran the cURL command).

Also, did you notice the -L option that we specified in our cURL command? It was necessary in order to download this file, and we go over its function in the next section.

Follow redirect

If you get an empty output when trying to cURL a website, it probably means that the website told cURL to redirect to a different URL. By default, cURL won’t follow the redirect, but you can tell it to with the -L switch.

curl -L www.likegeeks.com

curl follow redirect

In our research for this article, we found it was necessary to specify the -L on a majority of websites, so be sure to remember this little trick. You may even want to append it to the majority of your cURL commands by default.

Stop and resume download

If your download gets interrupted, or if you need to download a big file but don’t want to do it all in one session, cURL provides an option to stop and resume the transfer.

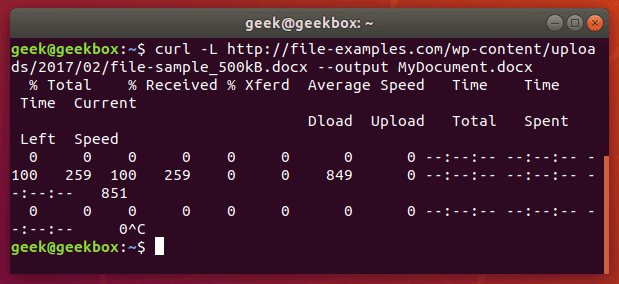
To stop a transfer manually, you can just end the cURL process the same way you’d stop almost any process currently running in your terminal, with a ctrl+c combination.
curl stop download

Our download has begun, but was interrupted with ctrl+c, now let’s resume it with the following syntax:

curl -C - example.com/some-file.zip --output MyFile.zip

The -C switch is what resumes our file transfer, but also notice that there is a dash (-) directly after it. This tells cURL to resume the file transfer, but to first look at the already downloaded portion in order to see the last byte downloaded and determine where to resume.
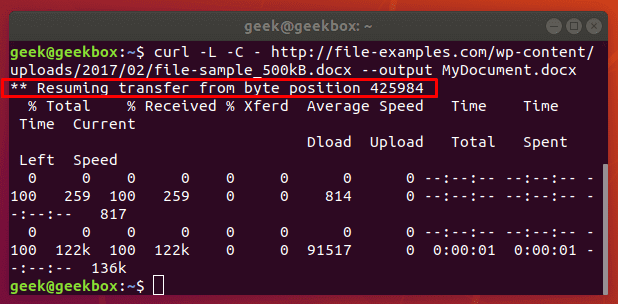
resume file download

Our file transfer was resumed and then proceeded to finish downloading successfully.

Specify timeout

If you want cURL to abandon what it’s doing after a certain amount of time, you can specify a timeout in the command. This is especially useful because some operations in cURL don’t have a timeout by default, so one needs to be specified if you don’t want it getting hung up indefinitely.

You can specify a maximum time to spend executing a command with the -m switch. When the specified time has elapsed, cURL will exit whatever it’s doing, even if it’s in the middle of downloading or uploading a file.

cURL expects your maximum time to be specified in seconds. So, to timeout after one minute, the command would look like this:

curl -m 60 example.com

Another type of timeout that you can specify with cURL is the amount of time to spend connecting. This helps make sure that cURL doesn’t spend an unreasonable amount of time attempting to contact a host that is offline or otherwise unreachable.

It, too, accepts seconds as an argument. The option is written as –connect-timeout.

curl --connect-timeout 60 example.com

Using a username and a password

You can specify a username and password in a cURL command with the -u switch. For example, if you wanted to authenticate with an FTP server, the syntax would look like this:

curl -u username:password ftp://example.com

curl authenticate

You can use this with any protocol, but FTP is frequently used for simple file transfers like this.

If we wanted to download the file displayed in the screenshot above, we just issue the same command but use the full path to the file.

curl -u username:password ftp://example.com/readme.txt
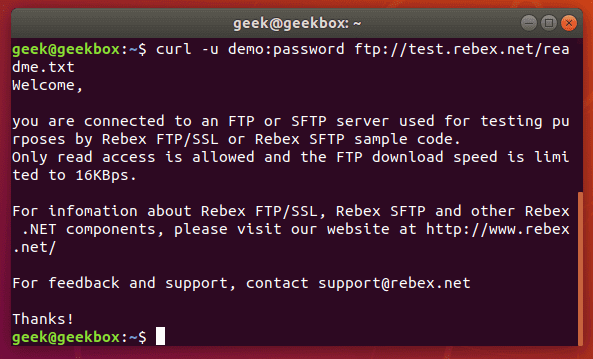
curl authenticate download

Use proxies

It’s easy to direct cURL to use a proxy before connecting to a host. cURL will expect an HTTP proxy by default, unless you specify otherwise.

Use the -x switch to define a proxy. Since no protocol is specified in this example, cURL will assume it’s an HTTP proxy.

curl -x 192.168.1.1:8080 http://example.com

This command would use 192.168.1.1 on port 8080 as a proxy to connect to example.com.

You can use it with other protocols as well. Here’s an example of what it’d look like to use an HTTP proxy to cURL to an FTP server and retrieve a file.

curl -x 192.168.1.1:8080 ftp://example.com/readme.txt

cURL supports many other types of proxies and options to use with those proxies, but expanding further would be beyond the scope of this guide. Check out the cURL man page for more information about proxy tunneling, SOCKS proxies, authentication, etc.

Chunked download large files

We’ve already shown how you can stop and resume file transfers, but what if we wanted cURL to only download a chunk of a file? That way, we could download a large file in multiple chunks.

It’s possible to download only certain portions of a file, in case you needed to stay under a download cap or something like that. The –range flag is used to accomplish this.
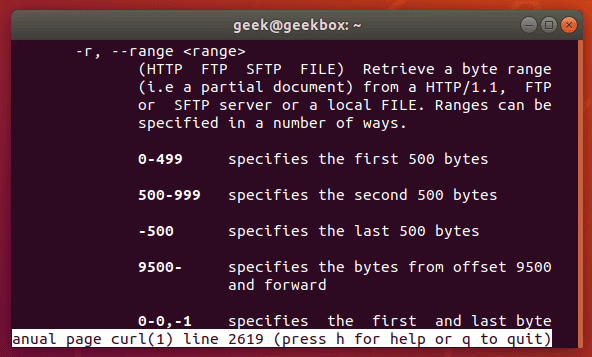
curl range man

Sizes must be written in bytes. So if we wanted to download the latest Ubuntu .iso file in 100 MB chunks, our first command would look like this:

curl --range 0-99999999 http://releases.ubuntu.com/18.04/ubuntu-18.04.3-desktop-amd64.iso ubuntu-part1

The second command would need to pick up at the next byte and download another 100 MB chunk.

curl --range 0-99999999 http://releases.ubuntu.com/18.04/ubuntu-18.04.3-desktop-amd64.iso ubuntu-part1

curl --range 100000000-199999999 http://releases.ubuntu.com/18.04/ubuntu-18.04.3-desktop-amd64.iso ubuntu-part2

Repeat this process until all the chunks are downloaded. The last step is to combine the chunks into a single file, which can be done with the cat command.

cat ubuntu-part? > ubuntu-18.04.3-desktop-amd64.iso

Client certificate

To access a server using certificate authentication instead of basic authentication, you can specify a certificate file with the –cert option.

curl --cert path/to/cert.crt:password ftp://example.com

cURL has a lot of options for the format of certificate files.
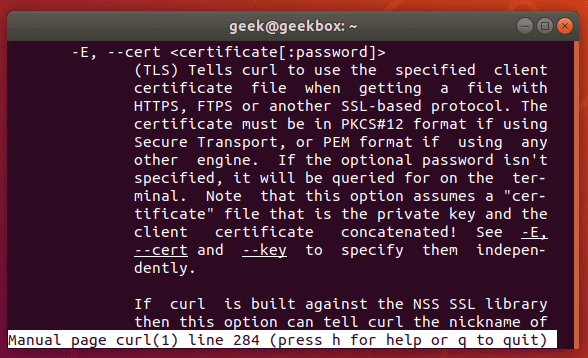
curl cert

There are more certificate related options, too: –cacert, –cert-status, –cert-type, etc. Check out the man page for a full list of options.

Silent cURL

If you’d like to suppress cURL’s progress meter and error messages, the -s switch provides that feature. It will still output the data you request, so if you’d like the command to be 100% silent, you’d need to direct the output to a file.

Combine this command with the -O flag to save the file in your present working directory. This will ensure that cURL returns with 0 output.

curl -s -O http://example.com

Alternatively, you could use the –output option to choose where to save the file and specify a name.

curl -s http://example.com --output index.html

curl silent

Get headers

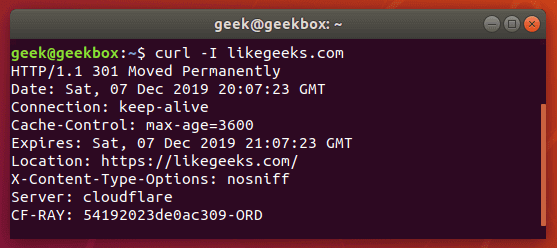
Grabbing the header of a remote address is very simple with cURL, you just need to use the -I option.

curl -I example.com
curl headers

If you combine this with the –L option, cURL will return the headers of every address that it’s redirected to.

curl -I -L example.com

Multiple headers

You can pass headers to cURL with the -H option. And to pass multiple headers, you just need to use the -H option multiple times. Here’s an example:

curl -H 'Connection: keep-alive' -H 'Accept-Charset: utf-8 ' http://example.com

Post (upload) file

POST is a common way for websites to accept data. For example, when you fill out a form online, there’s a good chance that the data is being sent from your browser using the POST method. To send data to a website in this way, use the -d option.

curl -d 'name=geek&location=usa' http://example.com

To upload a file, rather than text, the syntax would look like this:

curl -d @filename http://example.com

Use as many -d flags as you need in order to specify all the different data or filenames that you are trying to upload.

You can the -T option if you want to upload a file to an FTP server.

curl -T myfile.txt ftp://example.com/some/directory/

Send an email

Sending an email is simply uploading data from your computer (or another device) to an email server. Since cURL is able to upload data, we can use it to send emails. There are a slew of options, but here’s an example of how to send an email through an SMTP server:

curl smtp://mail.example.com --mail-from [email protected] --mail-rcpt [email protected] --upload-file email.txt

Your email file would need to be formatted correctly. Something like this:

cat email.txt

From: Web Administrator <[email protected]>

To: John Doe <[email protected]>

Subject: An example email

Date: Sat, 7 Dec 2019 02:10:15

John,

Hope you have a great weekend.

-Admin

As usual, more granular and specialized options can be found in the man page of cURL.

Read email message

cURL supports IMAP (and IMAPS) and POP3, both of which can be used to retrieve email messages from a mail server.

Login using IMAP like this:

curl -u username:password imap://mail.example.com

This command will list available mailboxes, but not view any specific message. To do this, specify the UID of the message with the –X option.

curl -u username:password imap://mail.example.com -X 'UID FETCH 1234'

Difference between cURL and wget

Sometimes people confuse cURL and wget because they’re both capable of retrieving data from a server. But this is the only thing they have in common.

We’ve shown in this article what cURL is capable of. wget provides a different set of functions. wget is the best tool for downloading websites and is capable of recursively traversing directories and links to download entire sites.

For downloading websites, use wget. If using some protocol other than HTTP or HTTPS, or for uploading files, use cURL. cURL is also a good option for downloading individual files from the web, although wget does that fine, too.

I hope you find the tutorial useful. Keep coming back.

0

How to write practical shell scripts

In the last post, we talked about regular expressions and we saw how to use them in sed and awk for text processing, and we discussed before Linux sed command and awk command. During the series, we wrote small shell scripts, but we didn’t mix things up, I think we should take a small step further and write a useful shell script. However, the scripts in this post will help you to empower your scriptwriting skills. You can send messages to someone by phone or email, but one method, not commonly used anymore, is sending a message directly to the user’s terminal. We are going to build a bash script that will send a message to a user who is logged into the Linux system. For this simple shell script, only a few functions are required. Most of the required commands are common and have been covered in our series of shell scripting; you can review the previous posts.

Continue Reading →

Sending Messages

First, we need to know who is logged in. This can be done using the who command which retrieves all logged in users.

who

shell scripts who command

To send a message you need the username and his current terminal.

You need to know if messages are allowed or not for that user using the mesg command.

mesg

mesg command

If the result shows “is y” that means messaging is permitted. If the result shows “is n”, that means messaging is not permitted.

To check any logged user message status, use the who command with -T option.

who -T

If you see a dash (-) that means messages are turned off and if you see plus sign (+) that means messages are enabled.

To allow messages, type mesg command with the “y” option like this

mesg y

allow messages

Sure enough, it shows “is y” which means messages are permitted for this user.

Of course, we need another user to be able to communicate with him so in my case I’m going to connect to my PC using SSH and I’m already logged in with my user, so we have two users logged onto the system.

Let’s see how to send a message.

Write Command

The write command is used to send messages between users using the username and current terminal.

For those users who logged into the graphical environment (KDE, Gnome, Cinnamon or any), they can’t receive messages. The user must be logged onto the terminal

We will send a message to testuser user from my user likegeeks like this:

write testuser pts/1

write command

Type the write command followed by the user and the terminal and hit Enter.

When you hit Enter, you can start typing your message. After finishing the message, you can send the message by pressing the Ctrl+D key combination which is the end of file signal. I recommend you to review the post about signals and jobs.

Receive message

The receiver can recognize which user on which terminal sends the message. EOF means that the message is finished.

I think now we have all the parts to build our shell script.

Creating The Send Script

Before we create our shell script, we need to determine whether the user we want to send a message to him is currently logged on the system, this can be done using the who command to determine that.

logged=$(who | awk -v IGNORECASE=1 -v usr=$1 '{ if ($1==usr) { print $1 }exit }')

We get the logged in users using the who command and pipe it to awk and check if it is matching the entered user.

The final output from the awk command is stored in the variable logged.

Then we need to check the variable if it contains something or not:

if [ -z $logged ]; then

echo "$1 is not logged on."

echo "Exit"

exit

fi

I recommend you to read the post about the if statement and how to use it Bash Script.

Check logged user

The logged variable is tested to check if it is a zero or not.

If it is zero, the script prints the message, and the script is terminated.

If the user is logged, the logged variable contains the username.

Checking If The User Accepts Messages

To check if messages are allowed or not, use the who command with -T option.

check=$(who -T | grep -i -m 1 $1 | awk '{print $2}')

if [ "$check" != "+" ]; then

echo "$1 disable messaging."

echo "Exit"

exit

fi

Check message allowed

Notice that we use the who command with -T. This shows a (+) beside the username if messaging is permitted. Otherwise, it shows a (-) beside the username, if messaging is not permitted.

Finally, we check for a messaging indicator if the indicator is not set to plus sign (+).

Checking If Message Was Included

You can check if the message was included or not like this:

if [ -z $2 ]; then

echo "Message not found"

echo "Exit"

exit

fi

Getting the Current Terminal

Before we send a message, we need to get the user current terminal and store it in a variable.

terminal=$(who | grep -i -m 1 $1 | awk '{print $2}')

Then we can send the message:

echo $2 | write $logged $terminal

Now we can test the whole shell script to see how it goes:

$ ./senderscript likegeeks welcome

Let’s see the other shell window:

Send message

Good!  You can now send simple one-word messages.

Sending a Long Message

If you try to send more than one word:

$ ./senderscript likegeeks welcome to shell scripting

One word message

It didn’t work. Only the first word of the message is sent.

To fix this problem, we will use the shift command with the while loop.

shift

while [ -n "$1" ]; do

message=$message' '$1

shift

done

And now one thing needs to be fixed, which is the message parameter.

echo $whole_message | write $logged $terminal

So now the whole script should be like this:

If you try now:

$ ./senderscript likegeeks welcome to shell scripting

Complete message

Awesome!! It worked. Again, I’m not here to make a script to send the message to the user, but the main goal is to review our shell scripting knowledge and use all the parts we’ve learned together and see how things work together.

Monitoring Disk Space

Let’s build a script that monitors the biggest top ten directories.

If you add -s option to the du command, it will show summarized totals.

$ du -s /var/log/

The -S option is used to show the subdirectories totals.

$ du -S /var/log/

du command

You should use the sort command to sort the results generated by the du command to get the largest directories like this:

$ du -S /var/log/ | sort -rn

sort command

The -n to sort numerically and the -r option to reverse the order so it shows the bigger first.

The N command is used to label each line with a number:

sed '{11,$D; =}' |

sed 'N; s/\n/ /' |

Then we can clean the output using the awk command:

awk '{printf $1 ":" "\t" $2 "\t" $3 "\n"}'

Then we add a colon and a tab so it appears much better.

$ du -S /var/log/ |

sort -rn |

sed '{11,$D; =}' |

# pipe the first result for another one to clean it

sed 'N; s/\n/ /' |

# formated printing using printf

awk '{printf $1 ":" "\t" $2 "\t" $3 "\n"}'

Format output with sed and awk

Suppose we have a variable called  MY_DIRECTORIES that holds 2 folders.

MY_DIRECTORIES=”/home /var/log”

We will iterate over each directory from MY_DIRECTORIES variable and get the disk usage using du command.

So the shell script will look like this:

Monitor disk usage

Good!! Both directories /home and /var/log are shown on the same report.

You can filter files, so instead of calculating the consumption of all files, you can calculate the consumption for a specific extension like *.log or whatever.

One thing I have to mention here, in production systems, you can’t rely on disk space report instead, you should use disk quotas.

Quota package is specialized for that, but here we are learning how bash scripts work.

Again the shell scripts we’ve introduced here is for showing you how shell scripting work, there are a ton of ways to implement any task in Linux.

My post is finished! I tried to reduce the post length and make everything as simple as possible, hope you like it.

Keep coming back. Thank you.

0

GNU/Linux’ta Glances sistem monitörünü kullanmak

Glances, ağ üzerinden veya yerel makinede bir web tarayıcısı aracılığıyla erişilebilen güçlü bir sistem izleme uygulamasıdır. CPU kullanımı, mevcut sistem belleği, takas alanı kullanımı, yük, disk giriş/çıkışı, dosya sistemi kapasitesi ve daha birçok şeyi izleyebilir. Glances uygulaması, çeşitli popüler GNU/Linux dağıtımlarının (Debian, Ubuntu, Arch Linux, Fedora, vb.) depolarında mevcuttur. Yükleme komutlarını vermek suretiyle kolayca yüklenebilir. Ayrıca, GitHub üzerinden Glances‘e ulaşmak mümkündür. Ubuntu’nun “Universe” yazılım deposu aracılığıyla da kurulum için hazır durumdadır. Uygulamayı sisteminize kurmak için öncelikle bir terminal penceresi açın.

Continue Reading →

Glances sistem monitörünü Debian üzerinde kurmak üzere aşağıdaki komutu verin:

sudo apt-get install glances

Ubuntu ve türevi sistemlerde ise aşağıdaki komutla bu işi kolaylıkla gerçekleştirebilirsiniz:

sudo apt install glances

Artık, ayrıntılı bir sistem izleme olanağına sahipsiniz. Güle güle kullanın.

0