
 In this tutorial, we will learn how to develop graphical user interfaces by writing some Python GUI examples using Tkinter package. Tkinter package is shipped with Python as a standard package, so we don’t need to install anything to use it. Tkinter package is a very powerful package. If you already have installed Python, you may use IDLE which is the integrated IDE that is shipped with Python, this IDE is written using Tkinter. Sounds Cool!! We will use Python 3.6, so if you are using Python 2.x, it’s strongly recommended to switch to Python 3.x unless you know the language changes so you can adjust the code to run without errors. I assume that you a little background about Python basics to help you understand what we are doing. We will start by creating a window then we will learn how to add widgets such as buttons, combo boxes, etc, then we will play with their properties, so let’s get started.
Create your first GUI application
First, we will import Tkinter package and create a window and set its title:
from tkinter import *
window = Tk()
window.title("Welcome to LikeGeeks app")
window.mainloop()
The result will be like this:
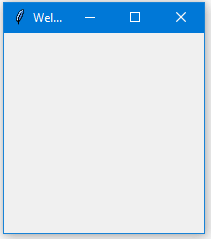
Awesome!! Our application just works.
The last line which calls mainloop function, this function calls the endless loop of the window, so the window will wait for any user interaction till we close it.
If you forget to call the mainloop function, nothing will appear to the user.
Create a label widget
To add a label to our previous example, we will create a label using the label class like this:
lbl = Label(window, text="Hello")
Then we will set its position on the form using the grid function and give it the location like this:
lbl.grid(column=0, row=0)
So the complete code will be like this:
from tkinter import *
window = Tk()
window.title("Welcome to LikeGeeks app")
lbl = Label(window, text="Hello")
lbl.grid(column=0, row=0)
window.mainloop()
And this is the result:
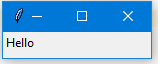
Without calling the grid function for the label, it won’t show up.
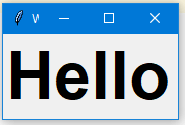
Set label font size
You can set the label font so you can make it bigger and maybe bold. You can also change the font style.
To do so, you can pass the font parameter like this:
lbl = Label(window, text="Hello", font=("Arial Bold", 50))
Note that the font parameter can be passed to any widget to change its font not labels only.
Great, but the window is so small, we can even see the title, what about setting the window size?
Setting window size
We can set the default window size using geometry function like this:
window.geometry('350x200')
The above line sets the window width to 350 pixels and the height to 200 pixels.
Let’s try adding more GUI widgets like buttons and see how to handle button click event.
Let’s start by adding the button to the window, the button is created and added to the window the same as the label:
btn = Button(window, text="Click Me")
btn.grid(column=1, row=0)
So our window will be like this:
from tkinter import *
window = Tk()
window.title("Welcome to LikeGeeks app")
window.geometry('350x200')
lbl = Label(window, text="Hello")
lbl.grid(column=0, row=0)
btn = Button(window, text="Click Me")
btn.grid(column=1, row=0)
window.mainloop()
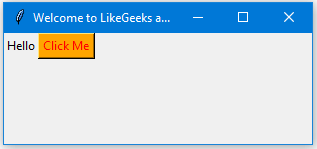
The result looks like this:
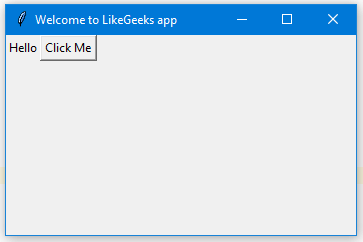
Note that we place the button on the second column of the window which is 1. If you forget and place the button on the same column which is 0, it will show the button only, since the button will be on the top of the label.
You can change foreground for a button or any other widget using fg property.
Also, you can change the background color for any widget using bg property.
btn = Button(window, text="Click Me", bg="orange", fg="red")
Now, if you tried to click on the button, nothing happens because the click event of the button isn’t written yet.
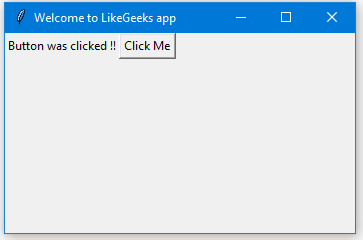
Handle button click event
First, we will write the function that we need to execute when the button is clicked:
def clicked():
lbl.configure(text="Button was clicked !!")
Then we will wire it with the button by specifying the function like this:
btn = Button(window, text=“Click Me”, command=clicked)
Note that, we typed clicked only not clicked() with parentheses.
Now the full code will be like this:
from tkinter import *
window = Tk()
window.title("Welcome to LikeGeeks app")
window.geometry('350x200')
lbl = Label(window, text="Hello")
lbl.grid(column=0, row=0)
def clicked():
lbl.configure(text="Button was clicked !!")
btn = Button(window, text="Click Me", command=clicked)
btn.grid(column=1, row=0)
window.mainloop()
And when we click the button, the result as expected:
Cool!!
Get input using Entry class (Tkinter textbox)
In the previous Python GUI examples, we saw how to add simple widgets, now let’s try getting the user input using Tkinter Entry class (Tkinter textbox).
You can create a textbox using Tkinter Entry class like this:
txt = Entry(window,width=10)
Then you can add it to the window using grid function as usual
So our window will be like this:
from tkinter import *
window = Tk()
window.title("Welcome to LikeGeeks app")
window.geometry('350x200')
lbl = Label(window, text="Hello")
lbl.grid(column=0, row=0)
txt = Entry(window,width=10)
txt.grid(column=1, row=0)
def clicked():
lbl.configure(text="Button was clicked !!")
btn = Button(window, text="Click Me", command=clicked)
btn.grid(column=2, row=0)
window.mainloop()
And the result will be like this:
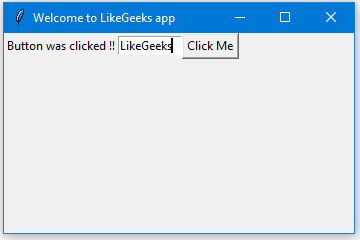
Now, if you click the button, it will show the same old message, what about showing the entered text on the Entry widget?
First, you can get entry text using get function. So we can write this code to our clicked function like this:
def clicked():
res = "Welcome to " + txt.get()
lbl.configure(text= res)
If you click the button and there is a text on the entry widget, it will show “Welcome to” concatenated with the entered text.
And this is the complete code:
from tkinter import *
window = Tk()
window.title("Welcome to LikeGeeks app")
window.geometry('350x200')
lbl = Label(window, text="Hello")
lbl.grid(column=0, row=0)
txt = Entry(window,width=10)
txt.grid(column=1, row=0)
def clicked():
res = "Welcome to " + txt.get()
lbl.configure(text= res)
btn = Button(window, text="Click Me", command=clicked)
btn.grid(column=2, row=0)
window.mainloop()
Run the above code and check the result:
Awesome!!
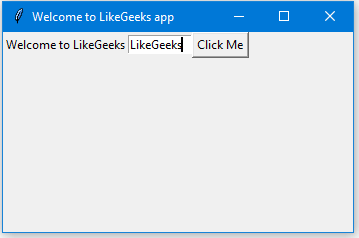
Every time we run the code, we need to click on the entry widget to set focus to write the text, what about setting the focus automatically?
Set focus to entry widget
That’s super easy, all we need to do is to call focus function like this:
txt.focus()
And when you run your code, you will notice that the entry widget has the focus so you can write your text right away.
Disable entry widget
To disable entry widget, you can set the state property to disabled:
txt = Entry(window,width=10, state='disabled')
Now, you won’t be able to enter any text.

Add a combobox widget
To add a combobox widget, you can use the Combobox class from ttk library like this:
from tkinter.ttk import *
combo = Combobox(window)
Then you can add your values to the combobox.
from tkinter import *
from tkinter.ttk import *
window = Tk()
window.title("Welcome to LikeGeeks app")
window.geometry('350x200')
combo = Combobox(window)
combo['values']= (1, 2, 3, 4, 5, "Text")
combo.current(1) #set the selected item
combo.grid(column=0, row=0)
window.mainloop()
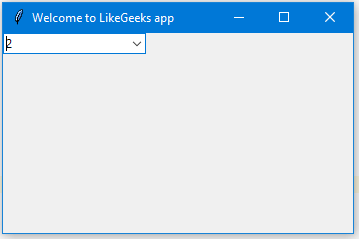
As you can see, we add the combobox items using the values tuble.
To set the selected item, you can pass the index of the desired item to the current function.
To get the select item, you can use the get function like this:
combo.get()
To create a checkbutton widget, you can use Checkbutton class like this:
chk = Checkbutton(window, text='Choose')
Also, you can set the checked state by passing the check value to the Checkbutton like this:
from tkinter import *
from tkinter.ttk import *
window = Tk()
window.title("Welcome to LikeGeeks app")
window.geometry('350x200')
chk_state = BooleanVar()
chk_state.set(True) #set check state
chk = Checkbutton(window, text='Choose', var=chk_state)
chk.grid(column=0, row=0)
window.mainloop()
Check the result:

Here we create a variable of type BooleanVar which is not a standard Python variable, it’s a Tkinter variable, and then we pass it to the Checkbutton class to set the check state as the highlighted line in the above example.
You can set the Boolean value to false to make it unchecked.
Also, you can use IntVar instead of BooleanVar and set the value to 0 or 1.
chk_state = IntVar()
chk_state.set(0) #uncheck
chk_state.set(1) #check
These examples give the same result as the BooleanVar.
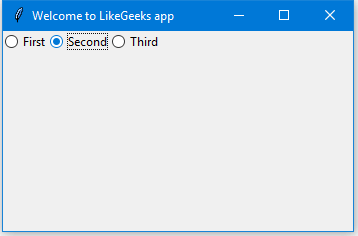
To add radio buttons, simply you can use RadioButton class like this:
rad1 = Radiobutton(window,text='First', value=1)
Note that you should set the value for every radio button with a different value, otherwise, they won’t work.
from tkinter import *
from tkinter.ttk import *
window = Tk()
window.title("Welcome to LikeGeeks app")
window.geometry('350x200')
rad1 = Radiobutton(window,text='First', value=1)
rad2 = Radiobutton(window,text='Second', value=2)
rad3 = Radiobutton(window,text='Third', value=3)
rad1.grid(column=0, row=0)
rad2.grid(column=1, row=0)
rad3.grid(column=2, row=0)
window.mainloop()
The result of the above code looks like this:
Also, you can set the command of any of these radio buttons to a specific function, so if the user clicks on any one of them, it runs the function code.
This is an example:
rad1 = Radiobutton(window,text='First', value=1, command=clicked)
def clicked():
# Do what you need
Pretty simple!!
To get the currently selected radio button or the radio button value, you can pass the variable parameter to the radio buttons and later you can get its value.
from tkinter import *
from tkinter.ttk import *
window = Tk()
window.title("Welcome to LikeGeeks app")
selected = IntVar()
rad1 = Radiobutton(window,text='First', value=1, variable=selected)
rad2 = Radiobutton(window,text='Second', value=2, variable=selected)
rad3 = Radiobutton(window,text='Third', value=3, variable=selected)
def clicked():
print(selected.get())
btn = Button(window, text="Click Me", command=clicked)
rad1.grid(column=0, row=0)
rad2.grid(column=1, row=0)
rad3.grid(column=2, row=0)
btn.grid(column=3, row=0)
window.mainloop()
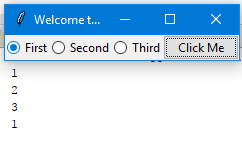
Every time you select a radio button, the value of the variable will be changed to the value of the selected radio button.
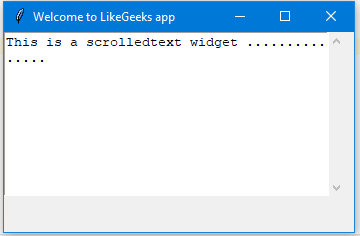
Add a ScrolledText widget (Tkinter textarea)
To add a ScrolledText widget, you can use the ScrolledText class like this:
from tkinter import scrolledtext
txt = scrolledtext.ScrolledText(window,width=40,height=10)
Here we specify the width and the height of the ScrolledText widget, otherwise, it will fill the entire window.
from tkinter import *
from tkinter import scrolledtext
window = Tk()
window.title("Welcome to LikeGeeks app")
window.geometry('350x200')
txt = scrolledtext.ScrolledText(window,width=40,height=10)
txt.grid(column=0,row=0)
window.mainloop()
The result as you can see:
Set scrolledtext content
To set scrolledtext content, you can use the insert method like this:
txt.insert(INSERT,'You text goes here')
Delete/Clear scrolledtext content
To clear the contents of a scrolledtext widget, you can use delete method like this:
txt.delete(1.0,END)
Great!!
Create a MessageBox
To show a message box using Tkinter, you can use messagebox library like this:
from tkinter import messagebox
messagebox.showinfo('Message title','Message content')
Pretty easy!!
Let’s show a message box when the user clicks a button.
from tkinter import *
from tkinter import messagebox
window = Tk()
window.title("Welcome to LikeGeeks app")
window.geometry('350x200')
def clicked():
messagebox.showinfo('Message title', 'Message content')
btn = Button(window,text='Click here', command=clicked)
btn.grid(column=0,row=0)
window.mainloop()
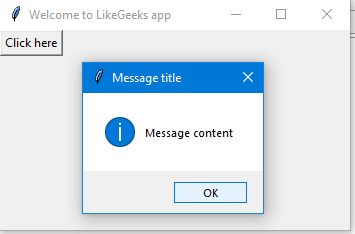
When you click the button, an info messagebox will appear.
Show warning and error messages
You can show a warning message or error message the same way. The only thing that needs to be changed is the message function
messagebox.showwarning('Message title', 'Message content') #shows warning message
messagebox.showerror('Message title', 'Message content') #shows error message
Show askquestion dialogs
To show a yes no message box to the user, you can use one of the following messagebox functions:
from tkinter import messagebox
res = messagebox.askquestion('Message title','Message content')
res = messagebox.askyesno('Message title','Message content')
res = messagebox.askyesnocancel('Message title','Message content')
res = messagebox.askokcancel('Message title','Message content')
res = messagebox.askretrycancel('Message title','Message content')
You can choose the appropriate message style according to your needs. Just replace the showinfo function line from the previous line and run it.
Also, you can check what button was clicked using the result variable
If you click OK or yes or retry, it will return True value, but if you choose no or cancel, it will return False.
The only function that returns one of three values is askyesnocancel function, it returns True or False or None.
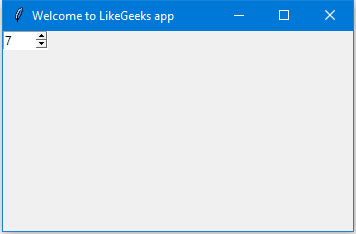
Add a SpinBox (numbers widget)
To create a Spinbox widget, you can use Spinbox class like this:
spin = Spinbox(window, from_=0, to=100)
Here we create a Spinbox widget and we pass the from_ and to parameters to specify the numbers range for the Spinbox.
Also, you can specify the width of the widget using the width parameter:
spin = Spinbox(window, from_=0, to=100, width=5)
Check the complete example:
from tkinter import *
window = Tk()
window.title("Welcome to LikeGeeks app")
window.geometry('350x200')
spin = Spinbox(window, from_=0, to=100, width=5)
spin.grid(column=0,row=0)
window.mainloop()
You can specify the numbers for the Spinbox instead of using the whole range like this:
spin = Spinbox(window, values=(3, 8, 11), width=5)
Here the Spinbox widget only shows these 3 numbers only 3, 8 and 11.
Set default value for Spinbox
To set the Spinbox default value, you can pass the value to the textvariable parameter like this:
var =IntVar()
var.set(36)
spin = Spinbox(window, from_=0, to=100, width=5, textvariable=var)
Now, if you run the program, it will show 36 as a default value for the Spinbox.
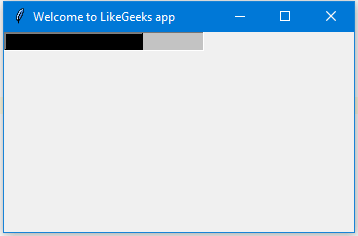
Add a Progressbar widget
To create a progress bar, you can use the progressbar class like this:
from tkinter.ttk import Progressbar
bar = Progressbar(window, length=200)
You can set the progress bar value like this:
bar['value'] = 70
You can set this value based on any process you want like downloading a file or completing a task.
Change Progressbar color
Changing Progressbar color is a bit tricky, but super easy.
First, we will create a style and set the background color and finally set the created style to the Progressbar.
Check the following example:
from tkinter import *
from tkinter.ttk import Progressbar
from tkinter import ttk
window = Tk()
window.title("Welcome to LikeGeeks app")
window.geometry('350x200')
style = ttk.Style()
style.theme_use('default')
style.configure("black.Horizontal.TProgressbar", background='black')
bar = Progressbar(window, length=200, style='black.Horizontal.TProgressbar')
bar['value'] = 70
bar.grid(column=0, row=0)
window.mainloop()
And the result will be like this:
Add a filedialog (file & directory chooser)
To create a file dialog (file chooser), you can use the filedialog class like this:
from tkinter import filedialog
file = filedialog.askopenfilename()
After you choose a file and click open, the file variable will hold that file path.
Also, you can ask for multiple files like this:
files = filedialog.askopenfilenames()
Specify file types (filter file extensions)
You can specify the file types for a file dialog using filetypes parameter, just specify the extensions in tubles.
file = filedialog.askopenfilename(filetypes = (("Text files","*.txt"),("all files","*.*")))
You can ask for a directory using askdirectory method:
dir = filedialog.askdirectory()
You can specify the initial directory for the file dialog by specifying the initialdir like this:
from os import path
file = filedialog.askopenfilename(initialdir= path.dirname(__file__))
Easy!!
Add a Menu bar
To add a menu bar, you can use menu class like this:
“crayon-5a6ed64ac76ec001310365″ class=”crayon-syntax crayon-theme-xcode crayon-font-monaco crayon-os-pc print-yes notranslate” data-settings=” minimize scroll-mouseover”
from tkinter import Menu
menu = Menu(window)
menu.add_command(label='File')
window.config(menu=menu)
First, we create a menu, then we add our first label, and finally, we assign the menu to our window.
You can add menu items under any menu by using add_cascade() function like this:
menu.add_cascade(label='File', menu=new_item)
So our code will be like this:
from tkinter import *
from tkinter import Menu
window = Tk()
window.title("Welcome to LikeGeeks app")
menu = Menu(window)
new_item = Menu(menu)
new_item.add_command(label='New')
menu.add_cascade(label='File', menu=new_item)
window.config(menu=menu)
window.mainloop()
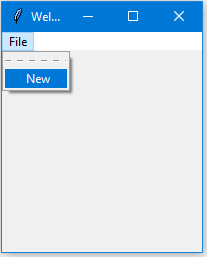
Using this way, you can add many menu items as you want.
from tkinter import *
from tkinter import Menu
window = Tk()
window.title("Welcome to LikeGeeks app")
menu = Menu(window)
new_item = Menu(menu)
new_item.add_command(label='New')
new_item.add_separator()
new_item.add_command(label='Edit')
menu.add_cascade(label='File', menu=new_item)
window.config(menu=menu)
window.mainloop()
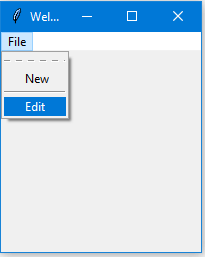
Here we add another menu item called Edit with a menu separator.
You may notice a dashed line at the beginning, well, if you click that line, it will show the menu items in a small separate window.
You can disable this feature by disabling the tearoff feature like this:
new_item = Menu(menu, tearoff=0)
Just replace the new_item in the above example with this one and it won’t show the dashed line anymore.
I don’t need to remind you that you can type any code that works when the user clicks on any menu item by specifying the command property.
new_item.add_command(label='New', command=clicked)
Add a Notebook widget (tab control)
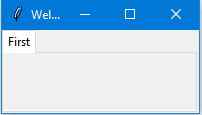
To create a tab control, there are 3 steps to do so.
- First, we create a tab control using Notebook class
- Create a tab using Frame class.
- Add that tab to the tab control.
- Pack the tab control so it becomes visible in the window.
from tkinter import *
from tkinter import ttk
window = Tk()
window.title("Welcome to LikeGeeks app")
tab_control = ttk.Notebook(window)
tab1 = ttk.Frame(tab_control)
tab_control.add(tab1, text='First')
tab_control.pack(expand=1, fill='both')
window.mainloop()
You can add many tabs as you want the same way.
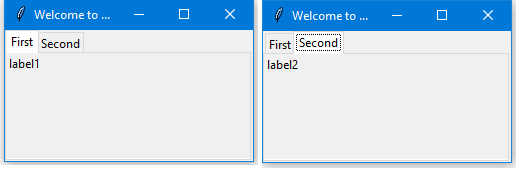
Add widgets to Notebooks
After creating tabs, you can put widgets inside these tabs by assigning the parent property to the desired tab.
from tkinter import *
from tkinter import ttk
window = Tk()
window.title("Welcome to LikeGeeks app")
tab_control = ttk.Notebook(window)
tab1 = ttk.Frame(tab_control)
tab2 = ttk.Frame(tab_control)
tab_control.add(tab1, text='First')
tab_control.add(tab2, text='Second')
lbl1 = Label(tab1, text= 'label1')
lbl1.grid(column=0, row=0)
lbl2 = Label(tab2, text= 'label2')
lbl2.grid(column=0, row=0)
tab_control.pack(expand=1, fill='both')
window.mainloop()
Add spacing for widgets (padding)
You can add padding for your controls to make it looks well organized using padx and pady properties.
Just pass padx and pady to any widget and give them a value.
lbl1 = Label(tab1, text= 'label1', padx=5, pady=5)
Just that simple!!
In this tutorial, we saw many Python GUI examples using Tkinter library and we saw how easy it’s to develop graphical interfaces using it.
This tutorial covers main aspects of Python GUI development not all of them. There is no tutorial or a book can cover everything.
I hope you find these examples useful. Keep coming back.
Thank you.