
 In the last post, we talked about regular expressions and we saw how to use them in sed and awk for text processing, and we discussed before Linux sed command and awk command. During the series, we wrote small shell scripts, but we didn’t mix things up, I think we should take a small step further and write a useful shell script. However, the scripts in this post will help you to empower your scriptwriting skills. You can send messages to someone by phone or email, but one method, not commonly used anymore, is sending a message directly to the user’s terminal. We are going to build a bash script that will send a message to a user who is logged into the Linux system. For this simple shell script, only a few functions are required. Most of the required commands are common and have been covered in our series of shell scripting; you can review the previous posts.
Sending Messages
First, we need to know who is logged in. This can be done using the who command which retrieves all logged in users.
who

To send a message you need the username and his current terminal.
You need to know if messages are allowed or not for that user using the mesg command.
mesg

If the result shows “is y” that means messaging is permitted. If the result shows “is n”, that means messaging is not permitted.
To check any logged user message status, use the who command with -T option.
who -T
If you see a dash (-) that means messages are turned off and if you see plus sign (+) that means messages are enabled.
To allow messages, type mesg command with the “y” option like this
mesg y
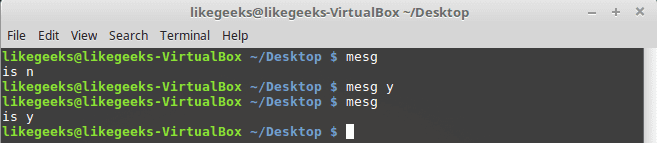
Sure enough, it shows “is y” which means messages are permitted for this user.
Of course, we need another user to be able to communicate with him so in my case I’m going to connect to my PC using SSH and I’m already logged in with my user, so we have two users logged onto the system.
Let’s see how to send a message.
Write Command
The write command is used to send messages between users using the username and current terminal.
For those users who logged into the graphical environment (KDE, Gnome, Cinnamon or any), they can’t receive messages. The user must be logged onto the terminal
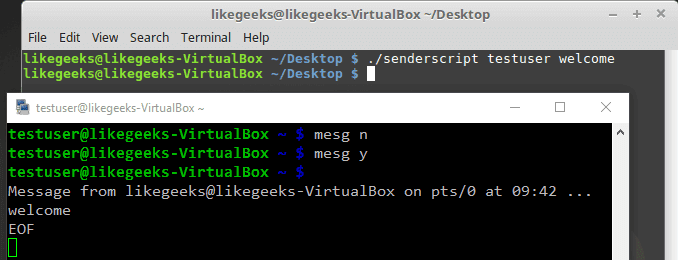
We will send a message to testuser user from my user likegeeks like this:
write testuser pts/1
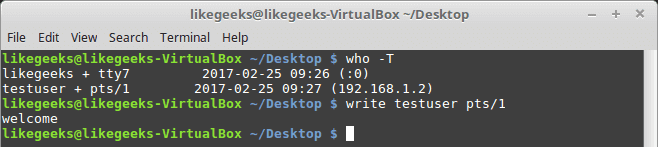
Type the write command followed by the user and the terminal and hit Enter.
When you hit Enter, you can start typing your message. After finishing the message, you can send the message by pressing the Ctrl+D key combination which is the end of file signal. I recommend you to review the post about signals and jobs.

The receiver can recognize which user on which terminal sends the message. EOF means that the message is finished.
I think now we have all the parts to build our shell script.
Creating The Send Script
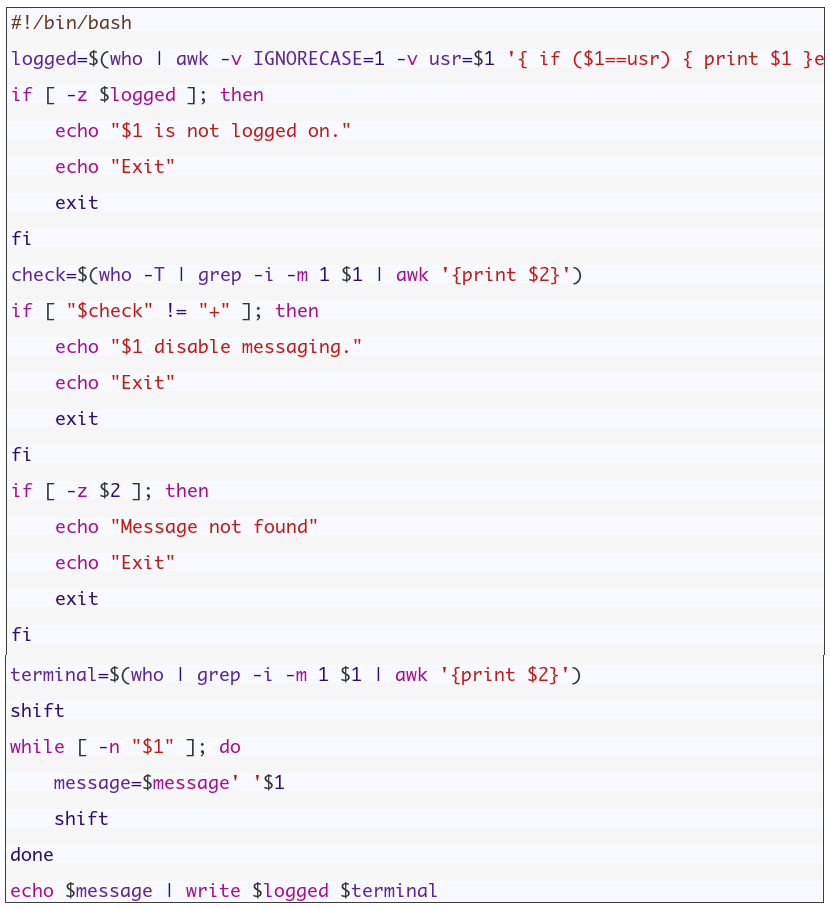
Before we create our shell script, we need to determine whether the user we want to send a message to him is currently logged on the system, this can be done using the who command to determine that.
logged=$(who | awk -v IGNORECASE=1 -v usr=$1 '{ if ($1==usr) { print $1 }exit }')
We get the logged in users using the who command and pipe it to awk and check if it is matching the entered user.
The final output from the awk command is stored in the variable logged.
Then we need to check the variable if it contains something or not:
if [ -z $logged ]; then
echo "$1 is not logged on."
echo "Exit"
exit
fi
I recommend you to read the post about the if statement and how to use it Bash Script.
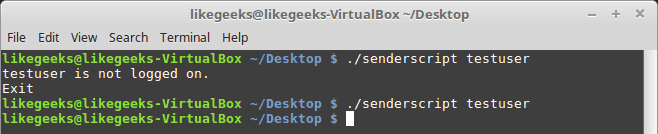
The logged variable is tested to check if it is a zero or not.
If it is zero, the script prints the message, and the script is terminated.
If the user is logged, the logged variable contains the username.
Checking If The User Accepts Messages
To check if messages are allowed or not, use the who command with -T option.
check=$(who -T | grep -i -m 1 $1 | awk '{print $2}')
if [ "$check" != "+" ]; then
echo "$1 disable messaging."
echo "Exit"
exit
fi
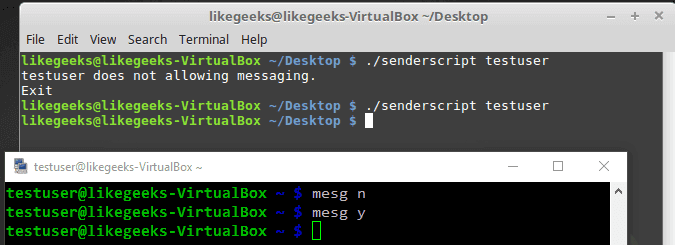
Notice that we use the who command with -T. This shows a (+) beside the username if messaging is permitted. Otherwise, it shows a (-) beside the username, if messaging is not permitted.
Finally, we check for a messaging indicator if the indicator is not set to plus sign (+).
Checking If Message Was Included
You can check if the message was included or not like this:
if [ -z $2 ]; then
echo "Message not found"
echo "Exit"
exit
fi
Getting the Current Terminal
Before we send a message, we need to get the user current terminal and store it in a variable.
terminal=$(who | grep -i -m 1 $1 | awk '{print $2}')
Then we can send the message:
echo $2 | write $logged $terminal
Now we can test the whole shell script to see how it goes:
$ ./senderscript likegeeks welcome
Let’s see the other shell window:
Good! You can now send simple one-word messages.
Sending a Long Message
If you try to send more than one word:
$ ./senderscript likegeeks welcome to shell scripting
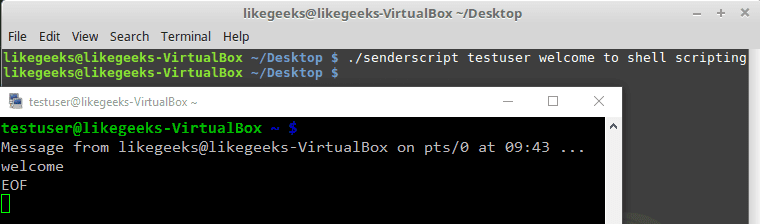
It didn’t work. Only the first word of the message is sent.
To fix this problem, we will use the shift command with the while loop.
shift
while [ -n "$1" ]; do
message=$message' '$1
shift
done
And now one thing needs to be fixed, which is the message parameter.
echo $whole_message | write $logged $terminal
So now the whole script should be like this:
If you try now:
$ ./senderscript likegeeks welcome to shell scripting

Awesome!! It worked. Again, I’m not here to make a script to send the message to the user, but the main goal is to review our shell scripting knowledge and use all the parts we’ve learned together and see how things work together.
Monitoring Disk Space
Let’s build a script that monitors the biggest top ten directories.
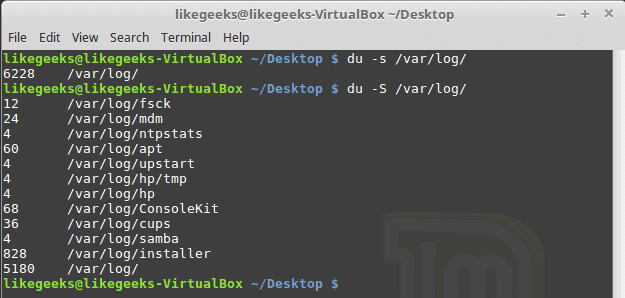
If you add -s option to the du command, it will show summarized totals.
$ du -s /var/log/
The -S option is used to show the subdirectories totals.
$ du -S /var/log/
You should use the sort command to sort the results generated by the du command to get the largest directories like this:
$ du -S /var/log/ | sort -rn
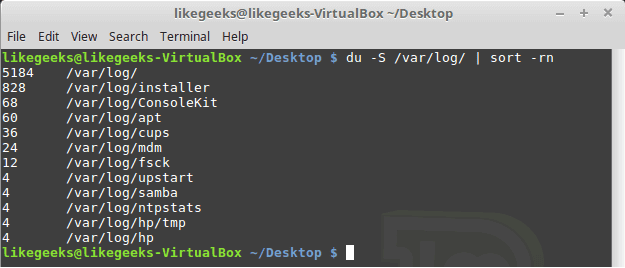
The -n to sort numerically and the -r option to reverse the order so it shows the bigger first.
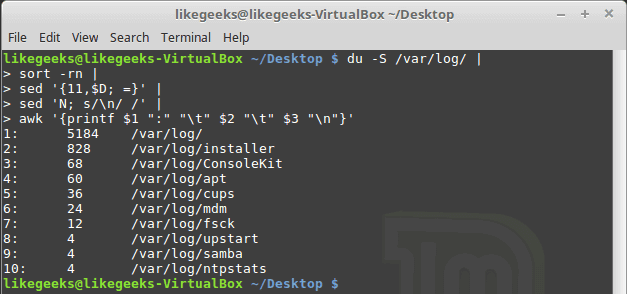
The N command is used to label each line with a number:
sed '{11,$D; =}' |
sed 'N; s/\n/ /' |
Then we can clean the output using the awk command:
awk '{printf $1 ":" "\t" $2 "\t" $3 "\n"}'
Then we add a colon and a tab so it appears much better.
$ du -S /var/log/ |
sort -rn |
sed '{11,$D; =}' |
# pipe the first result for another one to clean it
sed 'N; s/\n/ /' |
# formated printing using printf
awk '{printf $1 ":" "\t" $2 "\t" $3 "\n"}'
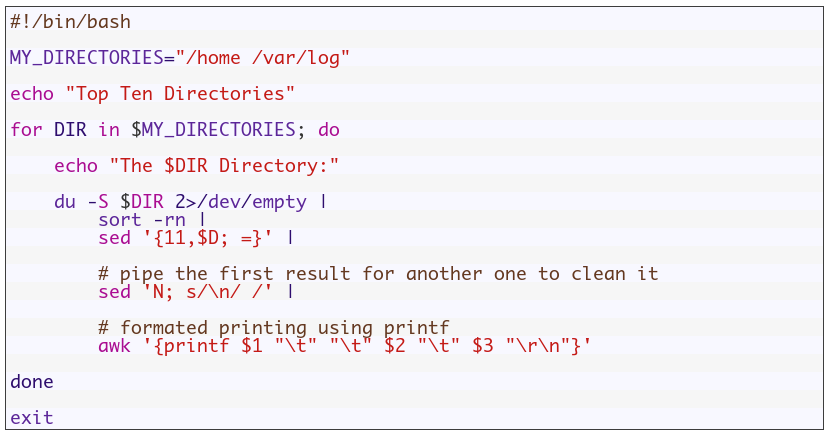
Suppose we have a variable called MY_DIRECTORIES that holds 2 folders.
MY_DIRECTORIES=”/home /var/log”
We will iterate over each directory from MY_DIRECTORIES variable and get the disk usage using du command.
So the shell script will look like this:
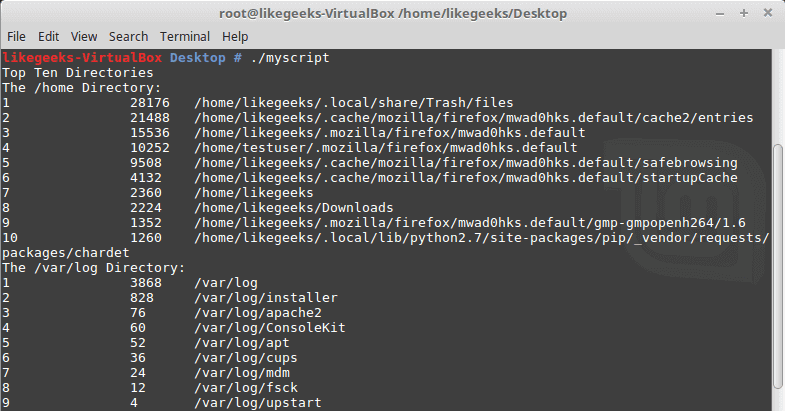
Good!! Both directories /home and /var/log are shown on the same report.
You can filter files, so instead of calculating the consumption of all files, you can calculate the consumption for a specific extension like *.log or whatever.
One thing I have to mention here, in production systems, you can’t rely on disk space report instead, you should use disk quotas.
Quota package is specialized for that, but here we are learning how bash scripts work.
Again the shell scripts we’ve introduced here is for showing you how shell scripting work, there are a ton of ways to implement any task in Linux.
My post is finished! I tried to reduce the post length and make everything as simple as possible, hope you like it.
Keep coming back. Thank you.

 Ubuntu’nun çekirdek ekibi, açılış zamanlarını hızlandırmak için
  İş yeri sohbeti, toplantılar, notlar ve eklentileri birleştiren bir platform olan Microsoft Teams’in
 Geliştiriciler, 2020’nin Nisan ayı sonuna doğru yayınlanması planlanan
  Aslında