


Linux çekirdeği resmi sitesi: https://www.kernel.org
Uzun süreli destek sürümü:
 4.1.47 2017-12-07
Değişiklik listesi…
Archive | GNU/Linux
Shell Scripting Part4 – Input, Output, and Redirection
 In the previous post, we talked about parameters and options in detail, today we will talk about something very important in shell scripting which are Input, Output, and Redirection. You can display the output from your shell scripts in two ways:
- Display output on the screen.
- Send output to a file.
Everything is a file in Linux and that includes input and output.
Each process can have 9 file descriptors opened at the same time. The file descriptors 0, 1, 2 are kept for the bash shell usage.
0 STDIN.
1 STDOUT.
2 STDERR.
You can use the above file descriptors to control input and output.
You need to fully understand these three because they are like the backbones of your shell scripting. So we are going to describe every one of them in detail.
STDIN
STDIN stands for standard input which is the keyboard by default.
You can replace the STDIN which is the keyboard and replace it with a file by using the input redirect symbol (<), it sends the data as keyboard typing. No magic!!
When you type the cat command without anything, it accepts input from STDIN. Any line you type, the cat command prints that line to the screen.
STDOUT
This stands for the standard output which is the screen by default.
You can redirect output to a file using the >> symbol.
If we have a file contains data, you can append data to it using this symbol like this:
pwd >> myfile
The output generated by pwd is appended to myfile without deleting the existed content.
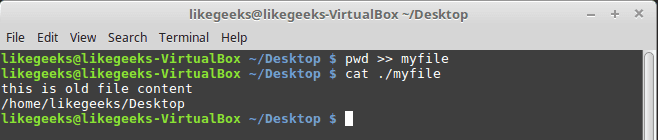
The following command tries to redirect the output to a file using > symbol.
ls –l xfile > myfile

I have no file called xfile on my PC, and that generates an error which is sent to STDERR.
STDERR
This file descriptor is the standard error output of the shell which is sent to the screen by default.
If you need to redirect the errors to a log file instead of sending it to the screen, you can redirect errors using the redirection symbol.
Redirecting Errors
We can redirect the errors by placing the file descriptor which is 2 before the redirection symbol like this:
ls -l xfile 2>myfile
cat ./myfile

As you can see, the error now is in the file and nothing on the screen.
Redirecting Errors and Normal Output
To redirect errors and the normal output, you have to precede each with the proper file descriptor like this:
ls –l myfile xfile anotherfile 2> errorcontent 1> correctcontent
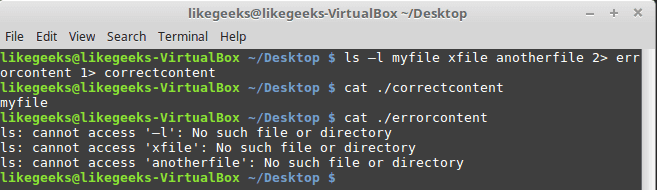
The ls command result is sent to the correctcontent file using the 1> symbol. And error messages were sent to the errorcontent file using the 2> symbol.
You can redirect normal output and errors to the same file using &> symbol like this:
ls –l myfile xfile anotherfile &> content
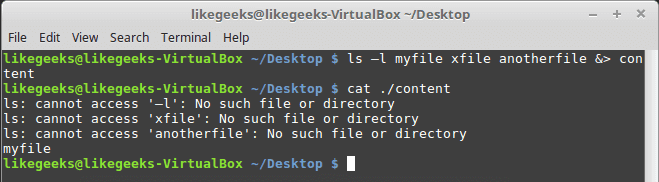
All errors and normal output are redirected to file named content.
Output Redirection
There are two ways for output redirection:
- Temporarily redirection.
- Permanently redirection.
Temporary Redirections
For temporary redirections, you can use the >&2 symbol like this:
#!/bin/bash
echo "Error message" >&2
echo "Normal message"

So if we run it, we will see both lines printed normally because as we know errors go to the screen by default.
You can redirect errors to a file like this:
./myscript 2> myfile
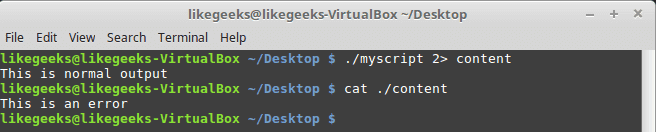
Shell scripting is Awesome! Normal output is sent to the screen, while the echo message which has >&2 symbol sends errors to the file.
Permanent Redirections
If you have much data that need to be redirected, you can have a permanent redirection using the exec command like this:
#!/bin/bash
exec 1>outfile
echo "Permanent redirection"
echo "from a shell to a file."
echo "without redirecting every line"
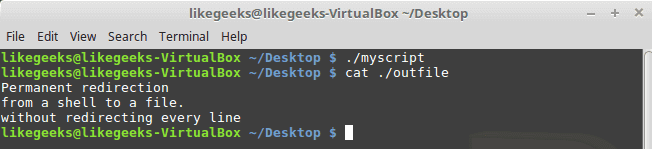
If we look at the file called outfile, we will see the output of the echo lines.
We redirect the STDOUT at the beginning, what about in the middle of a script like this:
#!/bin/bash
exec 2>myerror
echo "Script Begining ..."
echo "Redirecting Output"
exec 1>myfile
echo "Output goes to the myfile"
echo "Output goes to myerror file" >&2
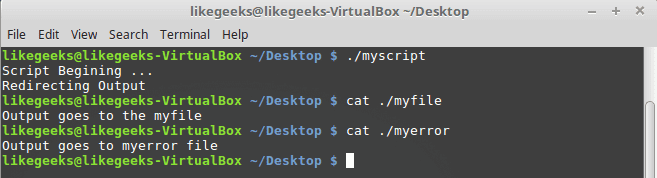
The exec command redirects all errors to the file myerror, and standard output is sent to the screen.
The statement exec 1>myfile is used to redirect output to the myfile file, and finally, errors go to myerror file using >&2 symbol.
Redirecting Input
You can redirect input to a file instead of STDIN using exec command like this:
exec 0< myfile
This command tells the shell to take the input from a file called myfile instead of STDIN and here is an example:
#!/bin/bash
exec 0< testfile
total=1
while read line
do
echo "#$total: $line"
total=$(( $total + 1 ))
done
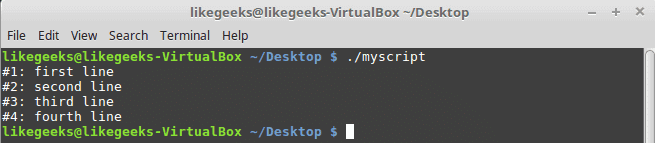
Shell scripting is easy.
You know how to use the read command to get user input. If you redirect the STDIN to a file, the read command will try to read from STDIN which points to the file.
Some Linux system administrators use this technique to read the log files for processing and we will discuss more ways to read the log on the upcoming posts in a professional way.
Creating Custom Redirection
You know that there are 9 file descriptors, you use only 3 of them for input, output, and error.
The remaining six file descriptors are available for use for input and output redirection.
The exec command is used to assign a file descriptor for output like this:
#!/bin/bash
exec 3>myfile
echo "This line appears on the screen"
echo "This line stored on myfile" >&3
echo "This line appears on the screen"
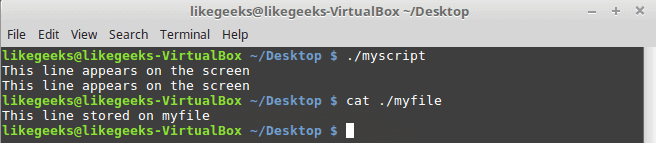
Creating Input File Descriptors
To redirect input file descriptors do the following:
1- Save the STDIN to another file descriptor.
2- Redirecting it to a file.
3- Revert STDIN to its original location.
Look at the following code to understand these steps:
#!/bin/bash
exec 7<&0
exec 0< myfile
total=1
while read line
do
echo "#$total: $line"
total=$(( $total + 1 ))
done
exec 0<&7
read -p "Finished? " res
case $res in
y) echo "Goodbye";;
n) echo "Sorry, this is the end.";;
esac
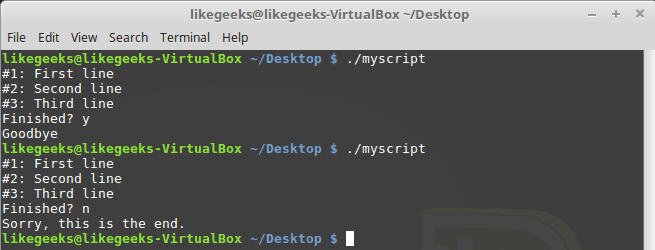
The STDIN is saved to file descriptor 7 and the STDIN is redirected to a file.
The STDIN reverted back to its original location after iterating over file lines.
The last read command just to make sure that STDIN is reverted back to and you can use the keyboard normally.
Close File Descriptors
The file descriptors are closed automatically when the script exits. If you want to close the file descriptor yourself, redirect the file descriptor to this symbol &- it will be closed.
#!/bin/bash
exec 3> myfile
echo "Testing ..." >&3
exec 3>&-
echo "Nothing works" >&3

As you can see, it gives error bad file descriptor because it is no longer exist.
lsof Command
The lsof command is used to list all the opened files on the system and background processes.
On many Linux systems like Fedora, the lsof command is located under /usr/sbin.
This is some of the important options for lsof command:
-p: for process ID.
-d: for the file descriptor.
You can get the process PID using $$ variable.
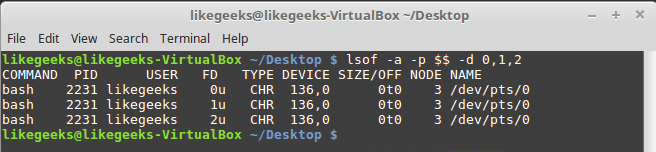
The -a is used to combine results of -p option and -d option.
Now, testing the command from a script:
#!/bin/bash
exec 4> myfile1
exec 5> myfile2
exec 6< myfile3
lsof -a -p $$ -d 0,1,2,4,5,6
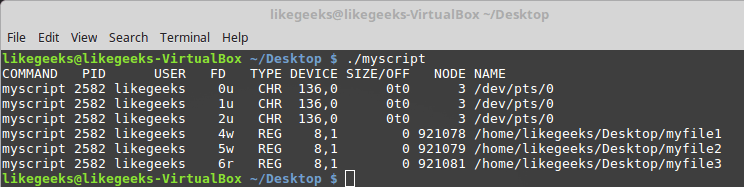
The shell script creates the file descriptors 4 and 5 for writing and 6 for reading.
Suppressing Command Output
Sometimes you don’t want to see any output. We redirect the output to the black hole which is /dev/null.
For example, we can suppress errors like this:
ls -al badfile anotherfile 2> /dev/null
And this idea is also used when you want to truncate a file without deleting it completely.
cat /dev/null > myfile
Now you understand the input, output, how to redirect them, how to create your own file descriptor, and redirect to it.
I hope you enjoy it. keep coming back.
Thank you.
Debian Installer Buster Alpha 2 duyuruldu
 Debian 10 Buster’in ikinci alpha sürümü, Cyril Brulebois tarafından duyuruldu. Debian Installer ekibinin Buster’in ikinci alpha sürümünü duyurmaktan memnuniyet duyduğunu söyleyen Brulebois; güvenlik yükseltmelerinin otomatik olarak yüklenmesini sağlamak istediklerini ifade etti. Bunun bir test sürümü olduğunun unutulmaması ve yalnızca test etmek amacıyla kullanılması gerektiği hatırlatılırken, test eden kullanıcıların tespit ettikleri hataları rapor etmeleri rica edildi. 4.13.0-1 Linux çekirdeği üzerine yapılandırılan sistemde, pek çok paketin günxcellenmiş olduğunu belirten Brulebois; sisteme ext4 64bit özelliği için destek eklendiğini söyledi. 75 dilin desteklendiği ve 25’inin tam çevirisinin tamamlandığı belirtilen sürümde, önemli oranda donanım desteği sağlandığı ifade ediliyor. Debian Installer Buster Alpha 2 hakkında geniş bilgi edinmek için sürüm duyurusunu inceleyebilirsiniz.
Debian Installer Buster Alpha 2 edinmek için aşağıdaki linklerden yararlanabilirsiniz.
Linux Bash Scripting Part3 – Parameters and Options
 So far you’ve seen how to write Linux bash scripts that do the job without user inputs. Today we will continue our series about Linux bash scripting. I recommend you to review the previous posts if you want to know what we are talking about: bash scripting part1 and bash scripting part2. Today we will know how to retrieve input from the user and deal with that input, so our script becomes more interactive. To pass data to your shell script, you should use command line parameters.
$ ./myscript 3 5
Here we send 2 parameters (3 and 5) to the script. So how to read these parameters in our bash script?
Read Parameters
The shell gives you some read to use variables to process input parameters:
- $0 is the script’s name.
- $1 is the 1st parameter.
- $2 is the 2nd parameter.
Until the 9th parameter which is $9.
Let’s see those variables in action:
#!/bin/bash
# Script name
echo $0
# 1st parameter
echo $1
# 2nd parameter
echo $2
# 3rd parameter
echo $3
Check the results of the following command:
./myscript 5 10 15
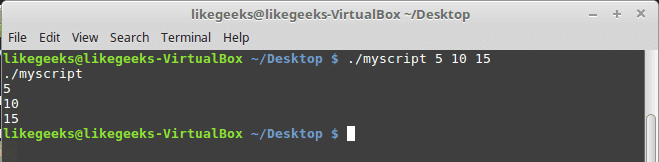
Here is another example of how we can use two parameters and calculate the sum of them.
#!/bin/bash
total=$(( $1 + $2 ))
echo First passed parameter is $1.
echo Second passed parameter is $2.
echo Total is $total.
$ ./myscript 5 10
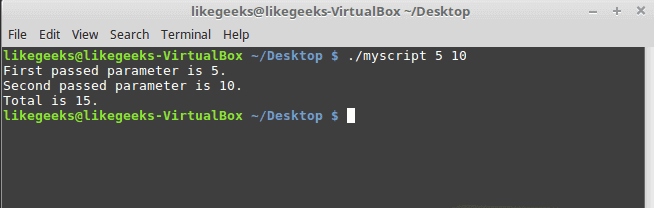
The parameters are not restricted to numbers, they could be strings like this:
#!/bin/bash
echo Hello $1, how do you do
./myscript Adam
And the result is as expected.

What if our parameter contains a space and we want to pass it as one value? I guess you know the answer from the previous posts. The answer is to use quotations.
If your script requires over nine parameters, you should use braces like this ${10}.
Check Parameters
If you don’t pass parameters and your code expecting it, your script will exit with an error.
That’s why we should an if statement to make sure that they exist.
#!/bin/bash
if [ -n "$1" ]
# If first parameter passed then print Hi
then
echo Hi $1.
else
echo "No parameters found. "
fi
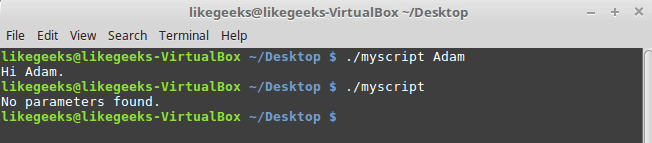
Counting Parameters
To get how many parameters passed, you can use this variable ($#).
#!/bin/bash
echo There were $# parameters passed.
./myscript 1 2 3 4 5

How awesome is Linux bash scripting? This variable also provides a geeky way to get the last parameter. Look at this trick:
#!/bin/bash
echo Last passed parameter is ${!#}

Grabbing All Parameters
The $* variable holds all the parameters as one value.
The $@ variable holds all the parameters as separate values, so you can iterate over them.
This code shows how to use them:
#!/bin/bash
echo "The first variable \$* method: $*"
echo "-----------"
echo "The second variable \$@ method: $@"
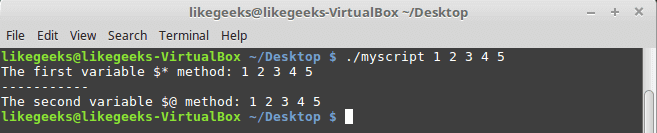
The same result, but if you want to know the difference look at the following example:
#!/bin/bash
total=1
for var in "$*"
do
echo "\$* =======> #$total = $var"
total=$(( $total + 1 ))
done
total=1
for var in "$@"
do
echo "\$@ =======> #$total = $var"
total=$(( $total + 1 ))
done
Check the result to see the difference:
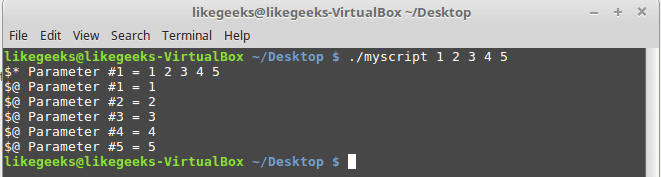
The result is pretty clear. You can use any one of them according to your needs.
Shift command
The shift command moves every parameter variable to the left:
variable $3 ==> variable $2.
variable $2 ==> variable $1.
variable $1 ==> dropped.
variable $0 ==> (the script name) as it is.
You can use the shift command to iterate over parameters like this:
#!/bin/bash
total=1
while [ -n "$1" ]
# while loop starts
do
echo "#$total = $1"
total=$(( $total + 1 ))
shift
done
Here, we have a while loop checking $1 length. If $1 becomes zero, the loop stops. And the shift command is shifting all passed parameters to the left.
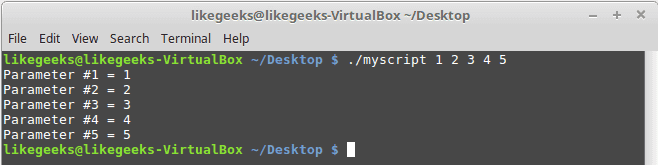
Careful when using shift command, the shifted parameter is gone and cannot be recovered.
Bash Scripting Options
Options are single letters with a dash before it.
#!/bin/bash
echo
while [ -n "$1" ]
# while loop starts
do
case "$1" in
# Message for -a option
-a) echo "-a option passed" ;;
# Message for -b option
-b) echo "-b option passed" ;;
# Message for -c option
-c) echo "-c option passed" ;;
# In case you typed a different option other than a,b,c
*) echo "Option $1 not recognized" ;;
esac
shift
done
$ ./myscript -op1 -op2 -op3 -op4
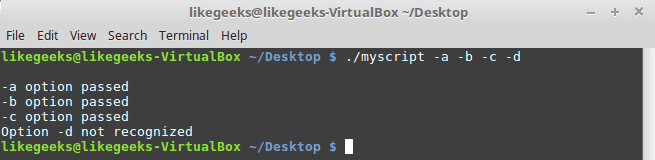
The code check for one of the correct options. If you typed one of them, the suitable commands will run.
Separate Options From Parameters
Sometimes you need to use options and parameters on the same script. You have to separate them. By doing this, you are telling the bash where are the parameters and where are the options.
The double dash (–) is used to end the options list. After the shell sees the double dash, the remaining inputs are treated as parameters and not as options.
#!/bin/bash
while [ -n "$1" ]
# while loop starts
do
case "$1" in
# Message for -a option
-a) echo "-a option passed" ;;
# Message for -b option
-b) echo "-b option passed";;
# Message for -c option
-c) echo "-c option passed" ;;
# The double dash which separates options from parameters
--) shift
# Exit the loop using break command
break ;;
*) echo "Option $1 not recognized";;
esac
shift
done
total=1
for param in $@
do
echo "#$total: $param"
total=$(( $total + 1 ))
done
$ ./myscript -a -b -c -- 5 10 15
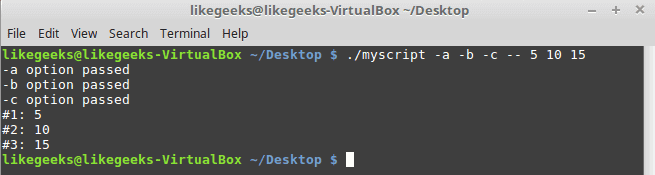
As you can see from the result, all the parameters after the double dash treated as parameters and not options.
Process Options With Values
When you dig deep onto Linux bash scripting, sometimes you need options with additional parameter values like this:
./myscript -a value1 -b -c value2
There should be a way to identify any additional parameter for the options and be able to process it.
#!/bin/bash
while [ -n "$1" ]
# while loop starts
do
case "$1" in
-a) echo "-a option passed";;
-b) param="$2"
echo "-b option passed, with value $param"
shift ;;
-c) echo "-c option passed";;
# The double dash makes them parameters
--) shift
break ;;
*) echo "Option $1 not recognized";;
esac
shift
done
total=1
for param in "$@"
do
echo "#$total: $param"
total=$(( $total + 1 ))
done
And if we run it with these options:
$ ./myscript -a -b test1 -d

From the results, you can see that we get the parameter for the -b option using the $2 variable.
Standard Options
When you start your Linux bash scripting, you are free to choose which letter is suitable for your option.
However, there are some letters that are commonly used in Linux programs.
And here is the list of the common options:
-a List all items.
-c Get count of items.
-d Output directory.
-e Expands items.
-f To specify a file.
-h To show help page.
-i To ignore character case.
-l To list a text.
-n To say no for a question.
-o To send output to a file or so.
-q Keep silent don’t ask the user.
-r To process something recursively.
-s Stealth mode.
-v Verbose mode.
-x Specify executable.
-y To say yes without prompting the user.
If you work with Linux, many of these options may look familiar to you.
it’s good to follow standards.
Getting User Input
Sometimes you need data from the user while the bash scripting is running.
The bash shell uses the read command for this purpose.
The read command reads input from standard input (the keyboard) or from a file descriptor and stores it in a variable:
#!/bin/bash
echo -n "What's your name: "
read name
echo "Hi $name,"
The -n option is used to disable the newline, so you can type your text in the same line.

You can specify multiple inputs like this:
#!/bin/bash
read -p "What's your name: " first last
echo "Your data for $last, $first…"

If you don’t specify variables for the read command, all incoming inputs are saved in REPLY variable.
#!/bin/bash
read -p "What's your name: "
echo Hello $REPLY,.

You can use the -t option to specify a timeout for input in seconds.
#!/bin/bash
if read -t 5 -p "What's your name: " name
then
echo "Hi $name, how are you?"
else
echo "You took much time!"
fi
If you do not enter data for five seconds the script will execute the else clause and print a sorry message.

Reading Password
In Linux bash scripting, sometimes you don’t want the user input to be displayed on the screen, like entering a password.
The -s option hides the data entered in the read command.
The data is actually printed on the screen, but the read command makes the text color as the background color of the shell.
#!/bin/bash
read -s -p "Enter password: " mypass
echo "Your password is $mypass? "

Read Files
The read command can read files one line on each call.
Now, if you want to get all file data, you can get the content using the cat command, then send it to the read command using while loop like this:
#!/bin/bash
count=1
# Get file content then pass to read command by iterating over lines using while command
cat myfile | while read line
do
echo "#$count: $line"
count=$(( $count + 1 ))
done
echo "Finished"
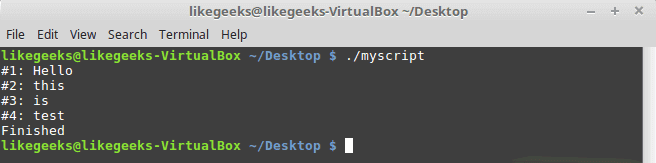
We just pass the file content to the while loop and iterate over every line and print the line number and the content, and each time you increase the count by one.
I hope you find this post interesting. Keep coming back.
Thank you.
 If you want to send or receive an email, you should have a mail server. In this post, we will discuss Linux mail server and how the SMTP (Simple Mail Transfer Protocol) works as well as other mail-related protocols, like Post Office Protocol (POP) and Internet Message Access Protocol (IMAP) and the relationship between them. SMTP defines how a mail is sent from one host to another, it is also system independent, which means the sender and receiver can have different operating systems. SMTP requires only that a server is able to send straight ASCII text to another server, and this is done by connecting to the server on port 25 which is the standard SMTP port. Most Linux distros today are shipped with two of the most common implementations of SMTP which are sendmail and Postfix. Sendmail is a famous and free mail server, but it has a little complex design and less secure. The Postfix took mail server implementation one step further, it was developed with security in mind.
ReactOS 0.4.7 duyuruldu
 Rus kökenli, Microsoft Windows NT platformunun tasarımını klonlayarak yapılandırılan, ancak açık kaynak kodlu bir sistem olan ReactOS‘un 0.4.7 sürümü duyuruldu. Kabuk iyileştirmeleriyle birlikte gelen yeni sürüm; çeşitli sürücü geliştirmeleri, geri dönüşüm kutusuna silme desteği, Wine Staging’e karşı DLL güncellemeleri ve tema iyileştirmeleri içeriyor. Ayrıca pek çok düzeltme içeren sürüm, pek çok donanım uyumluluğuna da sahip. ReactOS 0.4.7 hakkında bilgi edinmek için ilgili sürüm duyurusu ve değişiklikler sayfası incelenebilir.
ReactOS 0.4.7 edinmek için aşağıdaki linklerden yararlanabilirsiniz.
ROSA R10 duyuruldu
 Linux tabanlı çözümler geliştiren bir Rus şirketi olan ROSA tarafından geliştirilen ve Mandriva Linux’tan çatallanmış bir dağıtım olan ROSA’nın KDE 4 veya Plasma 5 Masaüstü masaüstü ortamlarıyla kullanıma sunulan Fresh R10 sürümü, Vladimir Potapov tarafından duyuruldu. Sistem kitaplıklarının ve yazılım paketlerinin en son sürümlerine güncellendiği belirtilen sistem, varsayılan olarak 4.9.60 LTS Linux çekirdeği üzerine yapılandırılmış bulunuyor. 4.13 gibi diğer çekirdekler ise özel depolardan edinilebiliyor. ROSA 2016.1’e dayanan ikinci sürüm olduğu belirtilen yeni sürümün, özellikle yeni yazılım sürümlerini denemek isteyen GNU/Linux kullanıcılarını hedef aldığı ifade ediliyor. OpenGL 4.5 ile 17.1.6 sürümüne güncellenen MESA dışında, NVIDIA sürücüleri de 384.90 ve deneysel 387.12 ile yeni sürümlerine güncellenmiş bulunuyorlar. ROSA R10 hakkında ayrıntılı bilgi edinmek için sürüm duyurusunu ya da sürüm notlarını inceleyebilirsiniz.
ROSA R10 edinmek için aşağıdaki linklerden yararlanabilirsiniz.
- İndirme sayfası
- ROSA.FRESH.KDE.R10.x86_64.iso (2,004MB, MD5, torrent)
- ROSA.FRESH.KDE.R10.x86_64.uefi.iso (2,022MB, MD5, torrent)
- ROSA.FRESH.PLASMA.R10.x86_64.iso (2,030MB, MD5, torrent)
- ROSA.FRESH.PLASMA.R10.x86_64.uefi.iso (2,043MB, MD5, torrent)