

Archive | GNU/Linux

How to write practical shell scripts

In the last post, we talked about regular expressions and we saw how to use them in sed and awk for text processing, and we discussed before Linux sed command and awk command. During the series, we wrote small shell scripts, but we didn’t mix things up, I think we should take a small step further and write a useful shell script. However, the scripts in this post will help you to empower your script writing skills. You can send messages to someone by phone or email, but one method, not commonly used anymore, is sending a message directly to the user’s terminal. We are going to build a bash script that will send a message to a user who is logged into the Linux system. For this simple shell script, only a few functions are required. Most of the required commands are common and have been covered in our series of shell scripting; you can review the previous posts.

Continue Reading →

First, we need to know who is logged in. This can be done using the who command which retrieves all logged in users.

$ who

shell scripts who command

To send a message you need the username and his current terminal.

You need to know if messages are allowed or not for that user using the mesg command.

$ mesg

shell scripts mesg command

If the result shows “is y” that means messaging is permitted. If the result shows “is n”, that means messaging is not permitted.

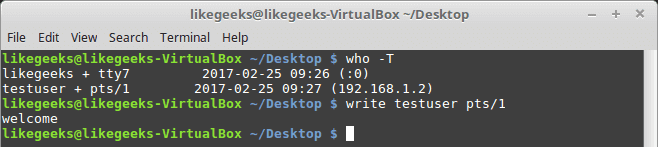
To check any logged user message status, use the who command with -T option.

$ who T

If you see a dash (-) that means messages are turned off and if you see plus sign (+) that means messages are enabled.

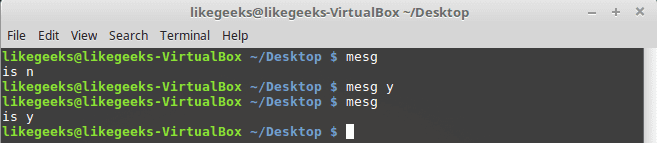
To allow messages, type mesg command with the “y” option like this:

$ mesg y
shell scripts allow messages

Sure enough, it shows “is y” which means messages are permitted for this user.

Of course, we need another user to be able to communicate with him so in my case I’m going to connect to my PC using SSH and I’m already logged in with my user, so we have two users logged onto the system.

Let’s see how to send a message.

Write Command

The write command is used to send messages between users using the username and current terminal.

For those users who logged into the graphical environment (KDE, Gnome, Cinnamon or any), they can’t receive messages. The user must be logged onto the terminal

We will send a message to testuser user from my user likegeeks like this:

$ write testuser pts/1
shell scripts write command

Type the write command followed by the user and the terminal and hit Enter.

When you hit Enter, you can start typing your message. After finishing the message, you can send the message by pressing the Ctrl+D key combination which is the end of file signal. I recommend you to review the post about signals and jobs.

shell scripts receive message

The receiver can recognize which user on which terminal sends the message. EOF means that the message is finished.

I think now we have all the parts to build our shell script.

Creating The Send Script

Before we create our shell script, we need to determine whether the user we want to send a message to him is currently logged on the system, this can be done using who command to determine that.

logged=$(who | grep -i -m 1 $1 | awk '{print $1}')

We get the logged user using the grep command. The -m 1 option is used in case there are multiple sessions opened for the same user.

If the user is not online, the grep command returns either nothing.

This output is piped to the awk command. The awk command returns only the first item. The final output from the awk command is stored in the variable logged_on.

Then we need to check the variable if it contains something or not:

if [ -z $logged ]

then

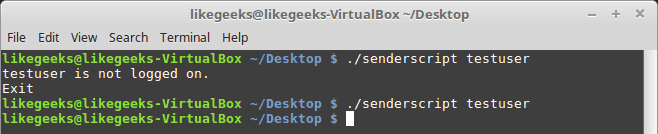
echo "$1 is not logged on."

echo "Exit"

exit

fi

I recommend you to read the post about the if statement and how to use it Bash Script.
shell scripts check logged user

The logged variable is tested to check if it is a zero or not.

If it is zero, the script prints the message, and the script is terminated.

If the user is logged, the logged_on variable contains the username.

Checking If The User Accepts Messages

To check if messages are allowed or not, use the who command with -T option.

check=$(who -T | grep -i -m 1 $1 | awk '{print $2}')

if [ "$check" != "+" ]

then

echo "$1 disable messaging."

echo "Exit"

exit

fi
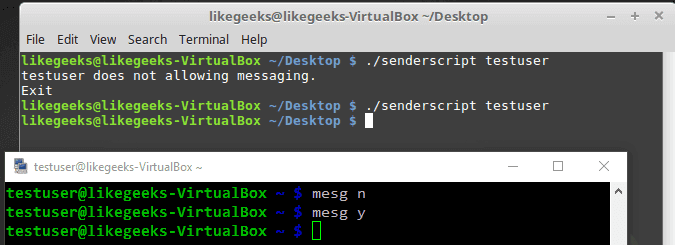
shell script check message allowed

Notice that we use the who command with -T. This shows a (+) beside the username if messaging is permitted. Otherwise, it shows a (-) beside the username, if messaging is not permitted.

Finally, we check for a messaging indicator if the indicator is not set to plus sign (+).

Checking If Message Was Included

You can check if the message was included or not like this:

if [ -z $2 ]

then

echo "Message not found"

echo "Exit"

exit

fi

Getting the Current Terminal

Before we send a message, we need to get the user current terminal and store it in a variable.

terminal=$(who | grep -i -m 1 $1 | awk '{print $2}')

Then we can send the message:

echo $2 | write $logged $terminal

Now we can test the whole shell script to see how it goes:

$ ./senderscript likegeeks welcome

Let’s see the other shell window:
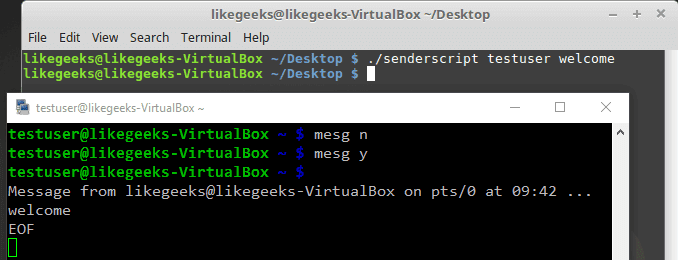
shell script send message

Good!  You can now send a simple one-word messages.

Sending a Long Message

If you try to send more than one word:

$ ./senderscript likegeeks welcome to shell scripting
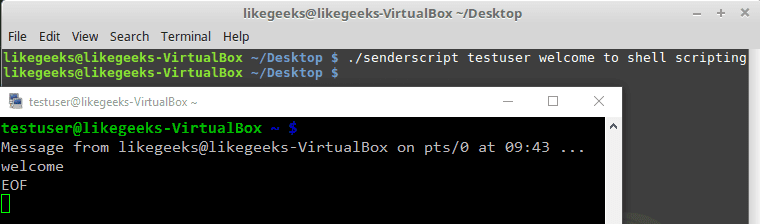
shell script oneword message

It didn’t work. Only the first word of the message is sent.

To fix this problem, we will use the shift command with the while loop.

shift

while [ -n "$1" ]

do

message=$message' '$1

shift

done

And now one thing needs to be fixed, which is the message parameter.

echo $whole_message | write $logged $terminal

So now the whole script should be like this:

#!/bin/bash

logged=$(who | grep -i -m 1 $1 | awk '{print $1}')

if [ -z $logged ]

then

echo "$1 is not logged on."

echo "Exit"

exit

fi

check=$(who -T | grep -i -m 1 $1 | awk '{print $2}')

if [ "$check" != "+" ]

then

echo "$1 disable messaging."

echo "Exit"

exit

fi

if [ -z $2 ]

then

echo "Message not found"

echo "Exit"

exit

fi

terminal=$(who | grep -i -m 1 $1 | awk '{print $2}')

shift

while [ -n "$1" ]

do

message=$message' '$1

shift

done

echo $message | write $logged $terminal

If you try now:

$ ./senderscript likegeeks welcome to shell scripting
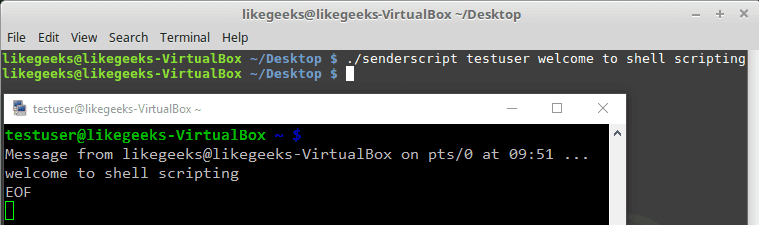
shell script complete message

Awesome!! It worked. Again, I’m not here to make a script to send the message to the user, but the main goal is to review our shell scripting knowledge and use all the parts we’ve learned together and see how things work together.

Monitoring Disk Space

Let’s build a script that monitors the biggest top ten directories.

If you add -s option to the du command, it will show summarized totals.

$ du -s /var/log/

The -S option is used to show the subdirectories totals.

$ du -S /var/log/
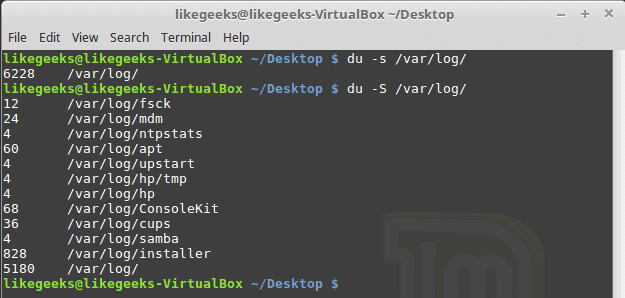
shell script du command

You should use the sort command to sort the results generated by the du command to get the largest directories like this:

$ du -S /var/log/ | sort -rn
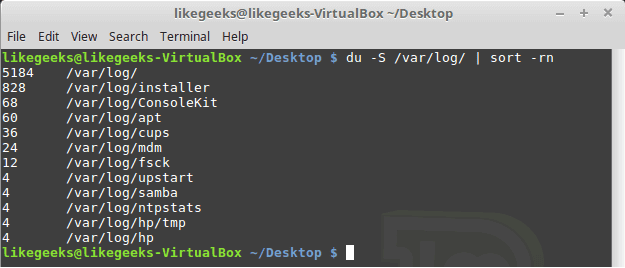
shell script sort command

The -n to sort numerically and the -r option to reverse the order so it shows the bigger first.

The N command is used to label each line with a number:

sed '{11,$D; =}' |

sed 'N; s/\n/ /' |

Then we can clean the output using the awk command:

awk '{printf $1 ":" "\t" $2 "\t" $3 "\n"}'

Then we add a colon and a tab so it appears much better.

$ du -S /var/log/ |

sort -rn |

sed '{11,$D; =}' |

# pipe the first result for another one to clean it

sed 'N; s/\n/ /' |

# formated printing using printf

awk '{printf $1 ":" "\t" $2 "\t" $3 "\n"}'
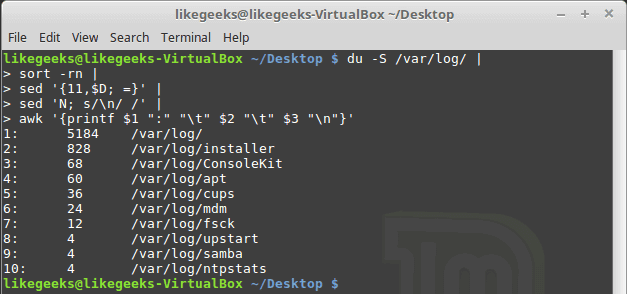
shell script format output with sed and awk

Suppose we have a variable called  MY_DIRECTORIES that holds 2 folders.

MY_DIRECTORIES=”/home /var/log”

We will iterate over each directory from MY_DIRECTORIES variable and get the disk usage using du command.

So the shell script will look like this:

#!/bin/bash

MY_DIRECTORIES="/home /var/log"

echo "Top Ten Directories"

for DIR in $MY_DIRECTORIES

do

echo "The $DIR Directory:"

du -S $DIR 2>/dev/empty |

sort -rn |

sed '{11,$D; =}' |

# pipe the first result for another one to clean it

sed 'N; s/\n/ /' |

# formated printing using printf

awk '{printf $1 "\t" "\t" $2 "\t" $3 "\r\n"}'

done

exit
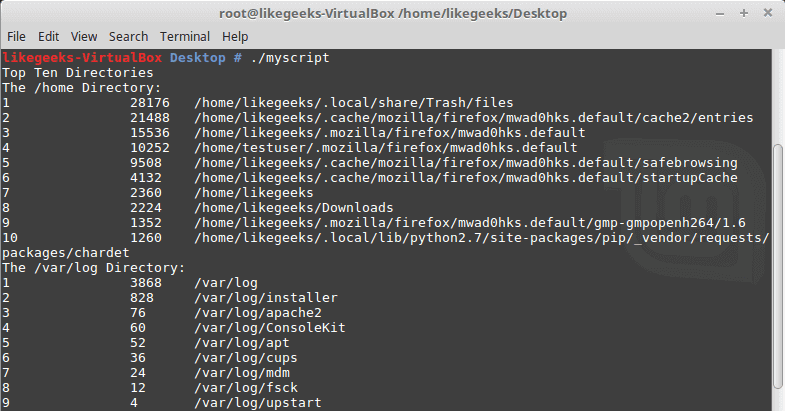
shell script monitor disk usage

Good!! Both directories /home and /var/log are shown on the same report.

You can filter files, so instead of calculating the consumption of all files, you can calculate the consumption for a specific extension like *.log or whatever.

One thing I have to mention here, in production systems, you can’t rely on disk space report instead, you should use disk quotas.

Quota package is specialized for that, but here we are learning how bash scripts work.

Again the shell scripts we’ve introduced here is for showing you how shell scripting work, there are a ton of ways to implement any task in Linux.

My post is finished for now. I tried to reduce the post length and make everything simple as possible, hope you like it.

Keep coming back. Thank you.

likegeeks.com

0

NAS4Free 11.1.0.4.5017 duyuruldu

FreeBSD’ye dayalı olarak gelen bir NAS (Network Attached Storage) dağıtımı olan NAS4Free‘nin 11.1.0.4.5017 sürümü duyuruldu. Çeşitli hataları giderilen sistem, FreeBSD 11.1’e dayalı olarak geliyor ve bazı webgui kodu geliştirmeleri içeriyor. Çevirileri de güncellenen sistemde; proftpd 1.3.6, sudo 1.8.21p2, rrdtool 1.7.0, tmux 2.6, tzdata 2017c, phpvirtualbox 5.2.x., e2fsprogs 1.43.7, iperf3 3.3, smartmontools 6.6, lighttpd 1.4.48, mDNSResponder 878.1.1, minidlna 1.2.1, devcpu-data 1.12, php 7.1.12, samba 4.6.11, nano 2.9.1, virtualbox-ose 5.2.2, dmidecode 3.1 ve syncthing 0.14.41 sürümlerine güncellenmiş bulunuyorlar. Ağa bağlı bir depolama alanı olarak NAS4Free; Windows, Apple ve UNIX benzeri sistemler arasında paylaşımı destekliyor. NAS4Free 11.1.0.4.5017 hakkında ayrıntılı bilgi edinmek için sürümler sayfasını inceleyebilirsiniz.

Continue Reading →

NAS4Free 11.1.0.4.5017 edinmek için aşağıdaki linkten yararlanabilirsiniz.

0

MX Linux 17 RC1 duyuruldu

Üçüncü beta sürümü 29 Kasım 2017‘de duyurulan antiX ile MEPIS Linux topluluğu arasında bir işbirliği girişimi olarak doğan, Debian “stable” versiyonu üzerine yapılandırılan ve varsayılan masaüstü ortamı olarak Xfce kullanan MX Linux‘un 17 sürümünün sürüm adayı duyuruldu. MX Linux 17 RC1’in duyurulmasından mutluluk duyulduğu belirtilirken, 4.13.0-1 Linux çekirdeği üzerine yapılandırılan sistemin, Debian’ın son versiyonu 9.3’e dayalı olarak geldiği ifade edildi. antiX projesinden güncel sistem değişiklikleri ve düzeltmeleri içeren sistemin bir test sürümü olduğunun unutulmaması ve yalnızca test etmek amacıyla kullanılması gerektiği hatırlatılırken, test eden kullanıcıların tespit ettikleri hataları rapor etmeleri rica ediliyor. MX Linux 17 RC1 hakkında ayrıntılı bilgi edinmek için sürüm duyurusunu inceleyebilirsiniz.

Continue Reading →

MX Linux 17 RC1 edinmek için aşağıdaki linkten yararlanabilirsiniz.

0

31+ Examples for sed Linux Command in Text Manipulation

In the previous post, we talked about bash functions and how to use them from the command line directly and we saw some other cool stuff. Today we will talk about a very useful tool for string manipulation called sed or sed Linux command. Sed is used to work with text files like log files, configuration files, and other text files. In this post, we are going to focus on sed Linux command which is used for text manipulation, which is a very important step in our bash scripting journey. Linux system provides some tools for text processing, one of those tools is sed. We will discuss the 31+ examples with pictures to show the output of every example.
Continue Reading →

The sed command is an interactive text editor like nano. Sed Linux command edits data based on the rules you provide, you can use it like this:

$ sed options file

You are not limited to use sed to manipulate files, you apply it to the STDIN directly like this:

$ echo "Welcome to LikeGeeks page" | sed 's/page/website/'

sed Linux command

The s command replaces the first text with the second text pattern. In this case, the string “website” was replaced with the word “page”, so the result will be as shown.

The above example was a very basic example to demonstrate the tool. We can use sed Linux command to manipulate files as well.

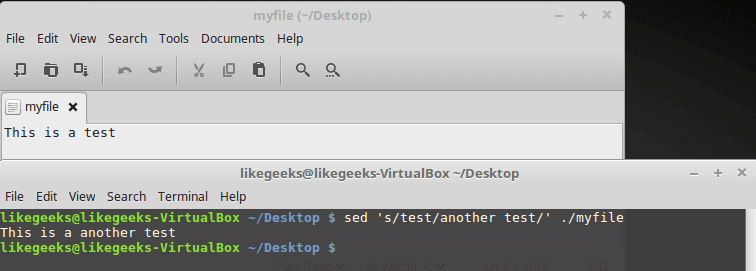
This is our file:

sed manipulate file

$ sed 's/test/another test' ./myfile

The results are printed to the screen instantaneously, you don’t have to wait for processing the file to the end.

If your file is huge enough, you will see the result before the processing is finished.

Sed Linux command doesn’t update your data. It only sends the changed text to STDOUT. The file still untouched. If you need to overwrite the existing content, you can check our previous post which was talking about redirections.

Using Multiple sed Linux Commands in The Command Line

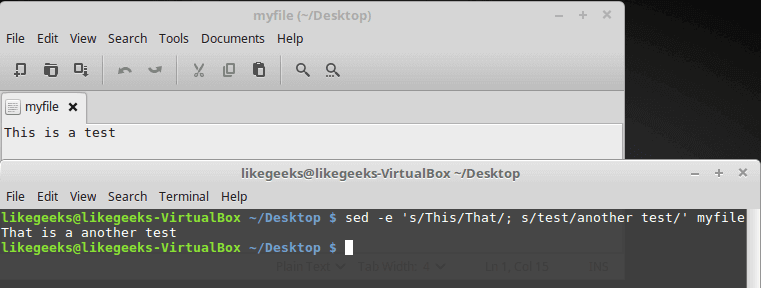
To run multiple sed commands, you can use the -e option like this:

$ sed -e 's/This/That/; s/test/another test/' ./myfile

sed multiple commands

Sed command must be separated by a semi colon without any spaces.

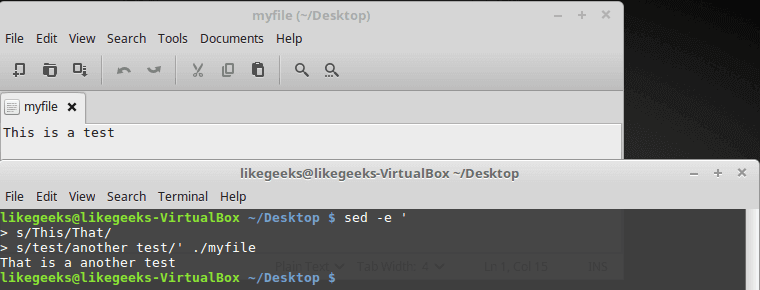
Also, you can use a single quotation to separate commands like this:

$ sed -e '

> s/This/That/

> s/test/another test/' myfile

sed separate commands

The same result, no big deal.

Reading Commands From a File

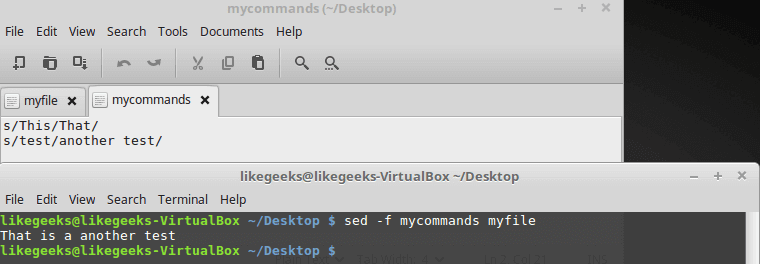
You can save your sed commands in a file and use them by specifying the file using -f option.

$ cat mycommands

s/This/That/

s/test/another test/

$ sed -f mycommands myfile

sed read commands from file

Substituting Flags

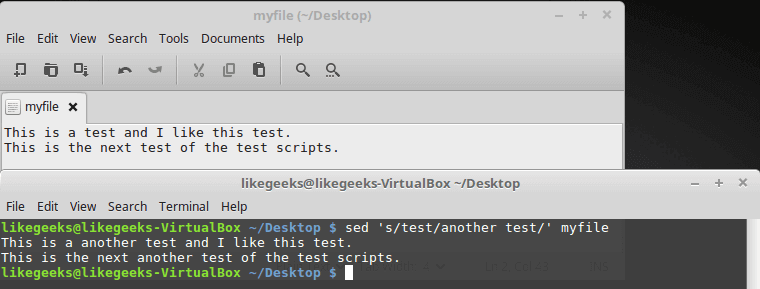
Look at the following example carefully:

$ cat myfile

$ sed 's/test/another test/' myfile

sed substitute flag

The above result shows the first occurrence in each line is only replaced. To substitute all occurrences of a pattern, use one of the following substitution flags.

The flags are written like this:

s/pattern/replacement/flags

There are four types of substitutions:

g, replace all occurrences.
A number, the occurrence number for the new text that you want to substitute.
p, print the original content.
w file: means write the results to a file.

You can limit your replacement by specifying the occurrence number that should be replaced like this:

$ sed 's/test/another test/2' myfile

sed number flag

As you can see, only the second occurrence on each line was replaced.

The g flag means global, which means a global replacement for all occurrences:

$ sed 's/test/another test/2' myfile

sed global flag

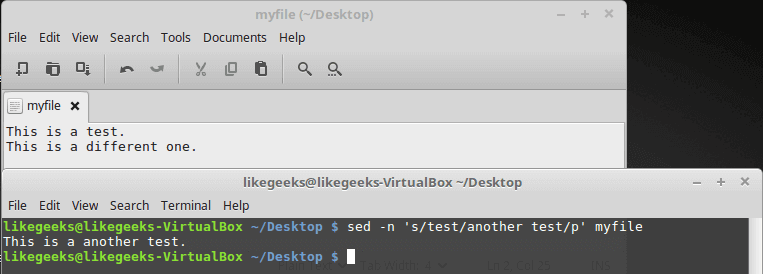
The p flag prints each line contains a pattern match, you can use the -n option to print the modified lines only.

$ cat myfile

$ sed -n 's/test/another test/p' myfile

sed supress lines

The w flag saves the output to a specified file:

$ sed 's/test/another test/w output' myfile

sed send output to file

The output is printed on the screen, but the matching lines are saved to the output file.

Replace Characters

Suppose that you want to search for bash shell and replace it with csh shell in the /etc/passwd file using sed, well, you can do it easily:

$ sed 's/\/bin\/bash/\/bin\/csh/' /etc/passwd

Oh!! that looks terrible.

Luckily, there is another way to achieve that. You can use the exclamation mark (!) as string delimiter like this:

$ sed 's!/bin/bash!/bin/csh!' /etc/passwd

Now it’s easier to read.

Limiting sed

Sed command processes your entire file. However, you can limit the sed command to process specific lines, there are two ways:

  • A range of lines.
  • A pattern that matches a specific line.

You can type one number to limit it to a specific line:

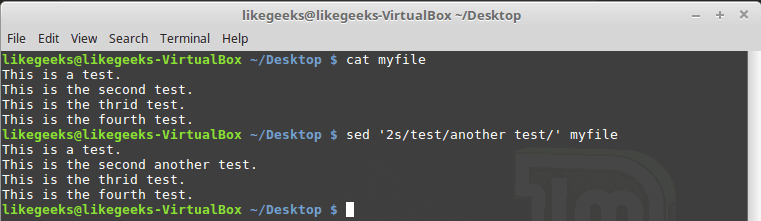
$ sed '2s/test/another test/' myfile

sed restricted

Only line two is modified.

What about using a range of lines:

$ sed '2,3s/test/another test/' myfile

sed replace range of lines

Also, we can start from a line to the end of the file:

$ sed '2,$s/test/another test/' myfile

sed replace to the end

Or you can use a pattern like this:

$ sed '/likegeeks/s/bash/csh/' /etc/passwd

sed pattern match

Awesome!!

You can use regular expressions to write this pattern to be more generic and useful.

Delete Lines

To delete lines, the delete (d) flag is your friend.

The delete flag deletes the text from the stream, not the original file.

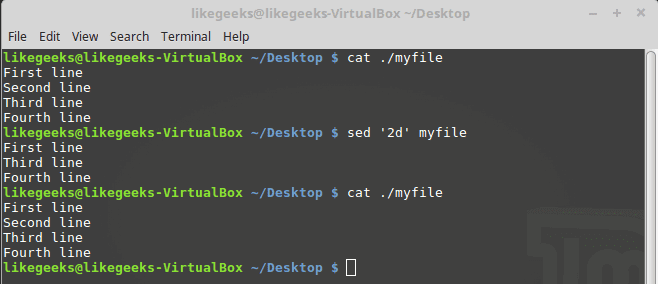
$ sed '2d' myfile

sed delete line

Here we delete the second line only from myfile.

What about deleting a range of lines?

$ sed '2,3d' myfile

sed delete multiple line

Here we delete a range of lines, the second and the third.

Another type of ranges:

$ sed '3,$d' myfile

sed delete to the end

Here we delete from the third line to the end of the file.

All these examples never modify your original file.

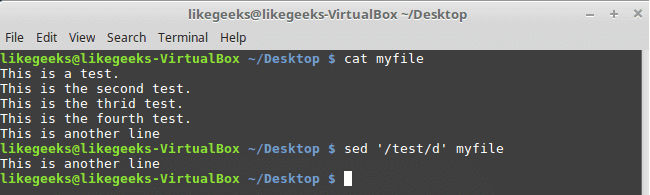
$ sed '/test 1/d' myfile

sed deletepattern match

Here we use a pattern to delete the line if matched on the first line.

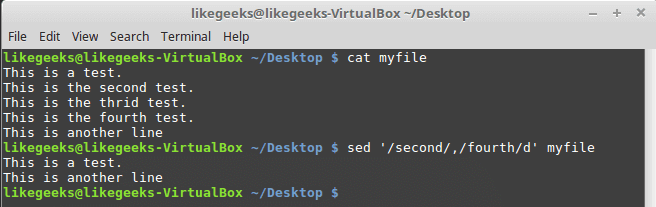
If you need to delete a range of lines, you can use two text patterns like this:

$ sed '/second/,/fourth/d' myfile

sed delete range of lines

The first to the third line deleted.

Insert and Append Text

You can insert or append text lines using the following flags:

  • The (i) flag.
  • The  (a) flag.

$ echo "Another test" | sed 'i\First test '

sed insert text

Here the text is added before the specified line.

$ echo "Another test" | sed 'a\First test '

sed append

Here the text is added after the specified line.

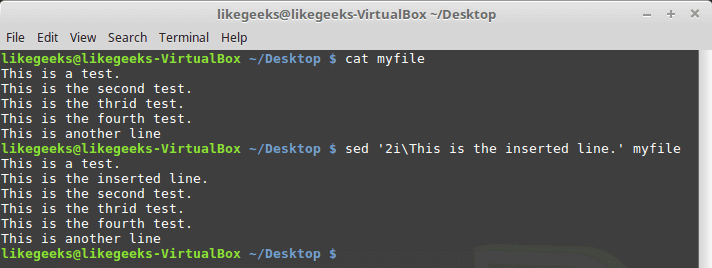
Well, what about adding text in the middle?

Easy, look at the following example:

$ sed '2i\This is the inserted line.' myfile

sed insert line

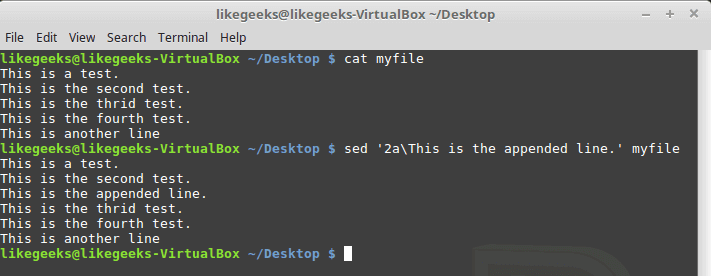
And the appending works the same way, but look at the position of the appended text:

$ sed '2a\This is the appended line.' myfile

sed append line

The same flags are used but with a location of insertion or appending.

Modifying Lines

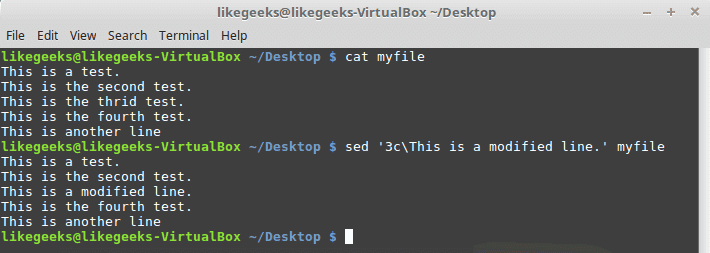
To modify a specific line, you can use the (c) flag like this:

$ sed '3c\This is a modified line.' myfile

sed modify line

You can use a regular expression pattern and all lines match that pattern will be modified.

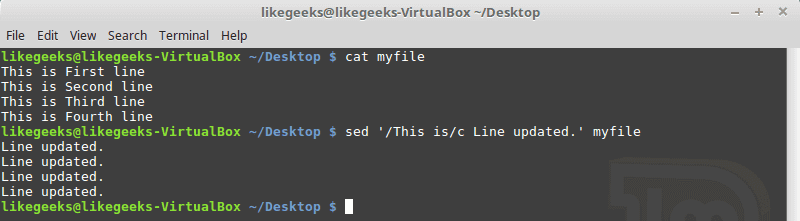
$ sed '/This is/c Line updated.' myfile

sed pattern match

Transform Characters

The transform flag (y) works on characters like this:

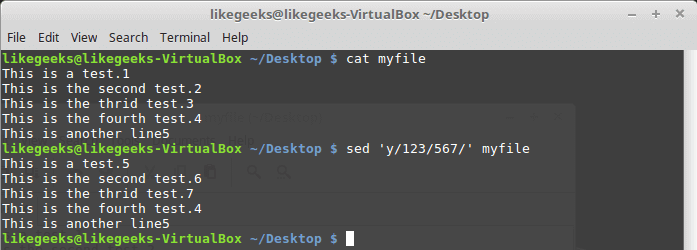
$ sed 'y/123/567/' myfile

sed transform character

The transformation is applied to all data and cannot be limited to a specific occurrence.

Print Line Numbers

You can print line number using the (=) sign like this:

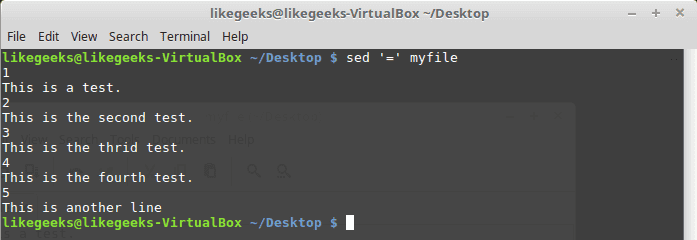
$ sed '=' myfile

sed line numbers

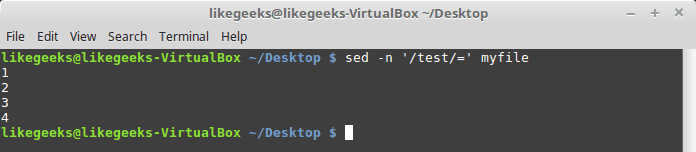
However, by using -n combined with the equal sign, the sed command displays the line number that contains matching.

$ sed -n '/test/=' myfile

sed hide lines

Read Data From a File

You can use the (r) flag to read data from a file.

You can define a line number or a text pattern for the text that you want to read.

$ cat newfile

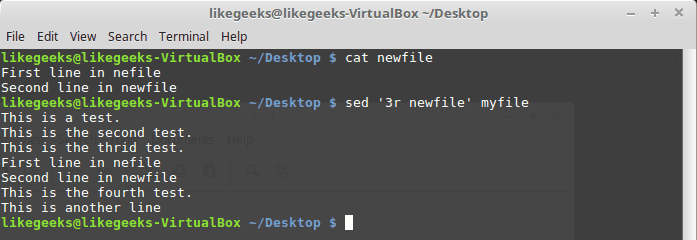
$ sed '3r newfile' myfile

sed read data from file

The content is just inserted after the third line as expected.

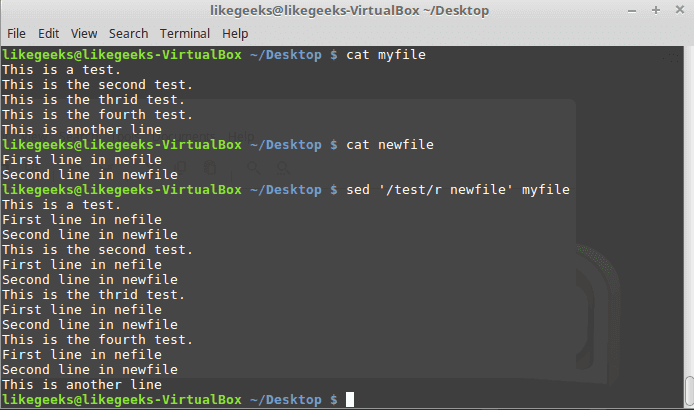
And this is using a text pattern:

$ sed '/test/r newfile' myfile

sed read match pattern

Cool right?

Useful Examples

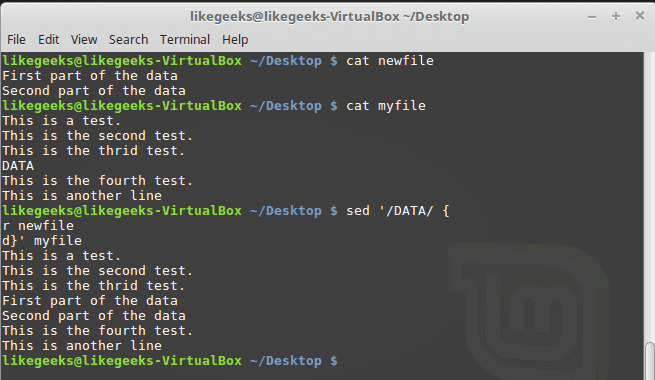
We have a file that contains a text with a placeholder and we have another file that contains the data that will be filled in that placeholder.

We will use the (r) and (d) flags to do the job.

The word DATA in that file is a placeholder for a real content which is stored in another file called data.

We will replace it with the actual content:

$ Sed '/DATA>/ {

r newfile

d}' myfile

sed repalce placeholder

Awesome!! as you can see, the placeholder location is filled with the data from the other file.

This is just a very small intro about sed command. Actually, sed Linux command is another world by itself.

The only limitation is your imagination.

I hope you enjoy what’ve introduced today about the string manipulation using sed Linux command.

Thank you.

likegeeks.com

0

Bash Scripting Part6 – Create and Use Bash Functions

Before we talk about bash functions, let’s discuss this situation. When writing bash scripts, you’ll find yourself that you are using the same code in multiple places. If you get tired of writing the same lines of code again and again in your bash script, it would be nice to write the block of code once and call it anywhere in your bash script. The bash shell allows you to do just that with Functions. Bash functions are blocks of code that you can reuse them anywhere in your code. Anytime you want to use this block of code in your script, you simply type the function name given to it. We are going to talk about how to create your own bash functions and how to use them in shell scripts.

Continue Reading →

Creating a function

You can create a function like this:

functionName {

}

Or like this:

functionName() {

}

The parenthesis on the second snippet is used to pass values to the function from outside of it, so these values can be used inside the function.

Using Functions

#!/bin/bash

function myfunc {

echo "Using functions"

}

total=1

while [ $total -le 3 ]

do

myfunc

total=$(( $total + 1 ))

done

echo "Loop finished"

myfunc

echo "End of the script"

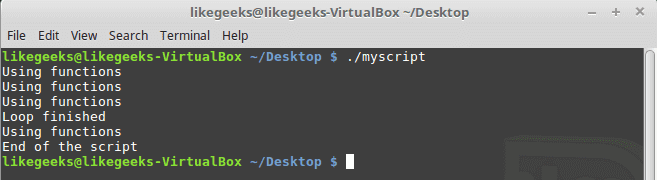
Here we’ve created a function called myfunc and in order to call it, we just typed its name.

bash functions

The function can be called many times as you want.

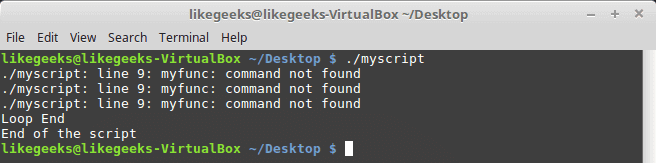
Notice: If you try to use a function which is not defined, what will happen?

#!/bin/bash

total=1

while [ $total -le 3 ]

do

myfunc

total=$(( $total + 1 ))

done

echo "Loop End"

function myfunc {

echo "Using function ..."

}

echo "End of the script"

bash functions call before declare

Oh, it’s an error because there no such function.

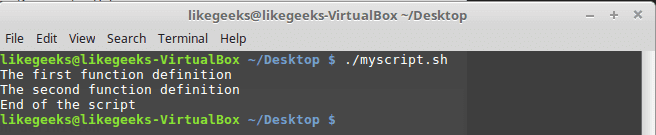
Another notice: bash function name must be unique. Otherwise, the new function will cancel the old function without any errors.

#!/bin/bash

function myfunc {

echo "The first function definition"

}

myfunc

function myfunc {

echo "The second function definition"

}

myfunc

echo "End of the script"

bash functions override definition

As you can see, the second function definition takes control from the first one without any error so take care when defining functions.

Using the return Command

The return command returns an integer from the function.

There are two ways of using return command; the first way is like this:

#!/bin/bash

function myfunc {

read -p "Enter a value: " value

echo "adding value"

return $(( $value + 10 ))

}

myfunc

echo "The new value is $?"

bash functions return command

The myfunc function adds 10 to the  $value variable then show the sum using the $? Variable.

Don’t execute any commands before getting the value of the function, because the variable $? returns the status of the last line.

This return method returns integers. what about returning strings?

Using Function Output

The second way of returning a value from a bash function is command substitution. This way, you can return anything from the function.

#!/bin/bash

function myfunc {

read -p "Enter a value: " value

echo $(( $value + 10 ))

}

result=$( myfunc)

echo "The value is $result"

bash functions output

Passing Parameters

We can deal with bash functions like small snippets that can be reused and that’s OK, but we need to make the function like an engine, we give it something and it returns a result based on what we provide.

You can use the environment variables to process the passed parameters to the function. The function name is declared as $0 variable, and the passed parameters are $1, $2, $3, etc.

You can get the number of passed parameters to the function using the ($#) variable.

We pass parameters like this:

myfunc $val1 10 20

The following example shows how to use the ($#) variable:

#!/bin/bash

function addnum {

if [ $# -gt 2 ]

then

# If parameters no equal 2

echo "Incorrect parameters passed"

else

# Otherwise add them

echo $(( $1 + $2 ))

fi

}

echo -n "Adding 10 and 15: "

value=$(addnum 10 15)

echo $value

echo -n "Adding three numbers: "

value=$(addnum 10 15 20)

echo $value

bash functions pass parameters

The addnum function gets the passed parameters count. If greater than 2 passed, it returns -1.

If there’s one parameter, the addnum function adds this parameter twice. If 2 parameters passed, the addnum function adds them together, and if you try to add three parameters it will return -1.

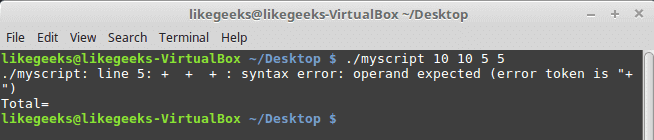
If you try to use the passed parameters inside the function, it fails:

#!/bin/bash

function myfunc {

echo $(( $1 + $2 + $3 + $4))

}

if [ $# -eq 4 ]

then

value=$( myfunc)

echo "Total= $value"

else

echo "Passed parameters like this: myfunc a b c d"

fi

bash functions unknown parameters

Instead, you have to send them to the function like this:

#!/bin/bash

function myfunc {

echo $(( $1 + $2 + $3 + $4))

}

if [ $# -eq 4 ]

then

value=$(myfunc $1 $2 $3 $4)

echo "Total= $value"

else

echo "Passed parameters like this: myfunc a b c d"

fi

bash functions parameters

Now it works!!

Processing Variables in Bash Functions

Every variable we use has a scope, the scope is variable visibility to your script.

You can define two types of variables:

  • Global
  • Local

Global Variables

They are visible and valid anywhere in the bash script. You can even get its value from inside the function.

If you declare a global variable within a function, you can get its value from outside the function.

Any variable you declare is a global variable by default. If you define a variable outside the function, you call it inside the function without problems:

#!/bin/bash

function myfunc {

input=$(( $input + 10 ))

}

read -p "Enter a number: " input

myfunc

echo "The new value is: $input"

bash functions global variables

If you change the variable value inside the function, the value will be changed outside of the function.

So how to overcome something like this? Use local variables.

Local Variables

If you will use the variable inside the function only, you can declare it as a local variable using the local keyword  like this:

local tmp=$(( $val + 10 ))

So if you have two variables, one inside the function and the other is outside the function and they have the identical name, they won’t affect each other.

#!/bin/bash

function myfunc {

local tmp=$[ $val + 10 ]

echo "The Temp from inside function is $tmp"

}

tmp=4

myfunc

echo "The temp from outside is $tmp"

bash functions local variables

When you use the $tmp variable inside the myfunc function, it doesn’t change the value of the $tmp which is outside the function.

Passing Arrays As Parameters

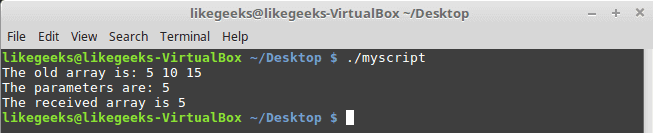
What will happen if you pass an array as a parameter to a function:

#!/bin/bash

function myfunc {

echo "The parameters are: $@"

arr=$1

echo "The received array is ${arr[*]}"

}

my_arr=(5 10 15)

echo "The old array is: ${my_arr[*]}"

myfunc $my_arr

bash functions pass arrays

The function only takes the first value of the array variable.

You should disassemble the array into its single values, then use these values as function parameters. Finally, pack them into an array in the function like this:

#!/bin/bash

function myfunc {

local new_arr

new_arr=("$@")

echo "Updated value is: ${new_arr[*]}"

}

my_arr=(4 5 6)

echo "Old array is ${my_arr[*]}"

myfunc ${my_arr[*]}

bash functions pass arrays solution

The array variable was rebuilt thanks to the function.

Recursive Function

This feature enables the function to call itself from within the function itself.

The classic example of a recursive function is calculating factorials. To calculate the factorial of 3, use the following equation:

3! = 1 * 2 * 3

Instead, we can use the recursive function like this:

x! = x * (x-1)!

So to write the factorial function using bash scripting, it will be like this:

#!/bin/bash

function fac_func {

if [ $1 -eq 1 ]

then

echo 1

else

local tmp=$(( $1 - 1 ))

local res=$(fac_func $tmp)

echo $(( $res * $1 ))

fi

}

read -p "Enter value: " val

res=$(fac_func $val)

echo "The factorial of $val is: $res"

bash recursive function

Using recursive bash functions is so easy!

Creating Libraries

Now we know how to write functions and how to call them, but what if you want to use these bash functions or blocks of code on different bash script files without copying and pasting it on your files.

You can create a library for your functions and point to that library from any file as you need.

By using the source command, you can embed the library file script inside your shell script.

The source command has an alias which is the dot. To source a file in a shell script, write the following line:

. ./myscript

Let’s assume that we have a file called myfuncs that contains the following:

function addnum {

echo $(( $1 + $2 + $3 + $4))

}

Now, we will use it in another bash script file like this:

#!/bin/bash

. ./myfuncs

result=$(addnum 10 10 5 5)

echo "Total = $result"

bash functions source command

Awesome!! We’ve used the bash functions inside our bash script file, we can also use them in our shell directly.

Use Bash Functions From Command Line

Well, that is easy, if you read the previous post which was about the signals and jobs you will have an idea about how to source our functions file in the .bashrc file and hence we can use the functions directly from the bash shell. Cool

Edit the .bashrc file and add this line:

. /home/likegeeks/Desktop/myfuncs

Make sure you type the correct path.

Now the function is available for us to use in the command line directly:

$ addnum 10 20

bash functions use from shell

Note: you may need to logout and login to use the bash functions from the shell.

Another note: if you make your function name like any of the built-in commands you will overwrite the default command so you should take care of that.

I hope you like the post. Keep coming back.

Thank you.

likegeeks.com

0