

Archive | GNU/Linux

Install, Configure and Use Linux NIS Server

The Linux NIS server (Network Information Service) is a server used for sharing critical data stored in flat files between systems on a network, it is often ideal to have a common repository (such as NIS) for storing user and group information that is traditionally stored in flat files like /etc/passwd. So what is the benefit of that? By making such files available via the NIS server, that would allow any remote NIS client machine to access or query the data in these shared files and use them as extensions to the local versions. NIS is not limited to sharing files. Any tabular file which at least has one column with a unique value can be shared via NIS like /etc/services file. The main benefit from using NIS server is that you keep your data and files, and if your data is updated, all updates be propagated to all users. Some users, especially windows users might think this is sort of Active Directory like service, but the Linux NIS server is older than Active Directory and not a replicate for it.

Continue Reading →

What is NIS?

The NIS is a database that contains a series of tables. Each table is created from text files like /etc/passwd, /etc/services and any other tabular files. Each table may contain one column or more with a unique key on each row.

You can think of it like any normal database.

You can query these tables in two ways:

  • Listing the entire table
  • Pulling a specific entry by searching

When a program makes a request to search for a user password details, the client checks the /etc/passwd file to check if the user doesn’t exist there; the client then asks the NIS server to search for it in the /etc/passwd table from the NIS server.

The following list is the list of services and tools that are used by NIS server:

ypserv: This service waits for queries and gives answers to NIS clients.

ypbind: This is client-side of NIS.

ypxfrd: This service is used for sending the NIS databases from master MIS servers to slave servers.

Linux NIS Servers

Linux NIS server types are:

  • Master server:: where all original files are stored.
  • Slave (secondary) server: it’s used for load balancing and helpful in case of master server failure.

You can have multiple secondary NIS servers if you need.

Primary and secondary NIS servers are kept synced and updated. This process is called server push.

NIS Domain Name

NIS domains are just like the domains of a domain controller in Windows, but the difference is that client can join the network without having to wait for admin acceptance.

Keep in mind that the names used for NIS domain names MUST be different from your DNS domain names.

Installing Master Linux NIS Server

On Red Hat based distros, you can install it like this:

$ dnf -y install ypserv

On Debian-based distros, you can install it like this:

$ apt-get -y install nis

After successful installation, you need to set the NIS domain name by using the domainname command.

Let’s name it nis.example.com

$ domainname nis.example.com

To persist our NIS domain name in Red hat based distros, we can create a variable called NISDOMAIN in the /etc/sysconfig/network file.

On Debian-based distros, you can achieve the same result by adding the domainname command with the correct value to one of the rc scripts which run at boot time.

Configuring NIS

As we mentioned earlier, the ypserv waits for queries and gives answers to NIS clients.

NIS is an RPC service, so you need to ensure that the rpcbind program is up and running before you attempt to start the Linux NIS server.

On new Linux distros that rely on systemd as the service manager, systemd will automatically take care of service intra-dependencies that exist between rpcbind and ypserv.

If your distro is not one of them, you can start rpcbind like this:

$ systemctl start rpcbind

On our distro which has systemd, we can start the service like this:

$ systemctl start ypserv

To confirm that the service is running, you can use the rpcinfo command.

$ rpcinfo -p | grep ypserv

Editing the Makefile

The make command is responsible for preparing the list of files that need compilation and the needed program for compilation for each of them.

The make command compiles a file called Makefile.

Taking this concept to work on NIS is straightforward. In this case, a series of text files need to be converted into database format. We want a tool that will re-convert any files that have been changed, we can use the make command.

The Makefile is in /var/yp directory. This file contains all the shared files by NIS server.

Let’s discuss the options in the Makefile.
NOPUSH Option

If you plan to have NIS slave servers, you will need to tell the master Linux NIS server to push the resulting maps to the slave servers. Change the NOPUSH variable to false if you want to have support for slave servers.

NOPUSH=true

Keep in mind that you need to list the hostnames of your slave servers in /var/yp/ypservers file and ensure to list a corresponding entry in the /etc/hosts file.

Min UIDs GIDs

Every user on Linux has a user id and group id, you can get your id by typing the id command and gid command respectively.

You can set the minimum permissions for the files that will be shared via NIS using MINUID and MINGID like this:

MINUID=500

MINGID=500

Merging Shadow Passwords with Real Ones

The Linux NIS server can be used to authenticate their users, NIS server will automatically take the encrypted field from the /etc/shadow file and merge it into the NIS shared copy of /etc/passwd.

This is done using MERGE_PASSWD option:

MERGE_PASSWD=true

Merging Group Shadow Passwords with Real Ones

The /etc/group file allows passwords to be applied to group settings. Since the /etc/group file needs to be publicly readable, most distros have taken to support shadow group files /etc/gshadow.

The option is called MERGE_GROUP:

MERGE_GROUP=true

Shared Entries

In Makefile, there is an option that specifies what is shared, it is (all) option

all: passwd group hosts services shadow networks

The option YPPWDDIR specifies the location of the passwd, group, and shadow files, so you don’t need to type the full path.

Initialize NIS Server Using ypinit

Once you’ve finished editing options in Makefile, you can initialize the NIS server like this:

$ /usr/lib64/yp/ypinit -m

The -m option is used to initialize the server as a master server.

Or if you are using a 32bit system the command will be:

$ /usr/lib/yp/ypinit

This tool will ask about the secondary NIS servers if you have any.

These entries will be stored in the /var/yp/ypservers file.

Congratulations, now your NIS server should work OK and your map will be on the secondary servers if you have any.

Configuring NIS Client

On Red Hat based distros, you can install NIS client like this:

$ dnf -y install ypbind

On Debian-based distros, you can install it like this:

$ apt-get install nis

The /etc/yp.conf file is the configuration for the client-side daemon.

You can start ypbind now:

$ systemctl start ypbind

$ systemctl enable ypbind

The/etc/nsswitch.conf File

This file contains entries of facilities and their corresponding files and services that the system will use for searching.

passwd: files nis

This entry means that search requests for password entries will first be done in the /etc/passwd file. If the requested entry isn’t found there, check NIS server.

NIS Tools

To work better with the Linux NIS server, there are some useful tools that can help you manage the information in the database.

ypcat: This tool is used to get data from the NIS server by extracting it from NIS map.

ypwhich: gets the name of the Linux NIS server that is responding to your requests.

ypmatch: rather than grabbing the entire map, or you can search by key to get a specific entry.

I hope you find the post useful and interesting. Keep coming back.

Thank you.

likegeeks.com

0

Linux Mint 18.3 Beta çıktı

Kod adı “Sylvia” olarak belirlenen Linux Mint 18.3’ün Beta sürümü çıktı ve indirilip test edilmek üzere yansılarda yerini aldı. Henüz resmi duyurusu yapılmamış olan sürümün bir test sürümü olduğunun unutulmaması ve yalnızca test etmek amacıyla kullanılması gerektiği hatırlatılırken, test eden kullanıcıların tespit ettikleri hataları rapor etmeleri rica edildi. Güncellenmiş yazılımlarla birlikte gelen ve masaüstü deneyimini daha da rahatlatmak için iyileştirmeler ve birçok yeni özellik içeren sürüm, Cinnamon ve MATE versiyonlarıyla test edilip onaylandı ve kullanıma sunuldu. Linux Mint 18.3 Beta hakkında ilk bilgiler, az önce Linux Mint Kasım ayı haberleri sayfasında yayımlandı. Gerekli bilgiyi buradan edinebilirsiniz.

Continue Reading →

Linux Mint 18.3 Beta edinmek için aşağıdaki linklerden yararlanabilirsiniz.

0

GNU Linux-libre 4.14-gnu duyuruldu

Bilindiği gibi, Linus Torvalds tarafından geliştirilen, Torvalds ve diğerleri tarafından dağıtılan Linux çekirdeği, özgür olmayan yazılımlar içeriyor. Kullanıcıların temel özgürlüklerine saygı duymayan ve özgür olmayan yazılımları teşvik eden bu çekirdek yerine, 100% özgür dağıtımları korumak amacıyla bir proje yürütülüyor. Başta ilk özgür GNU/Linux dağıtımı olan UTUTO ve diğer 100% özgür dağıtımlar gNewSense ve BLAG, projeye destek veriyorlar. Free Software Foundation Latin Amerika (FSFLA) şubesi de kullanıcıların temel özgürlüklerine saygı duyan ve özgür yazılımlar içeren bu projenin içinde bulunuyor. gNewSense’in öncülük ettiği projenin ürettiği GNU Linux-libre 4.14-gnu çekirdeği Alexandre Oliva tarafından duyuruldu. Yeni sürümün her zamankinden daha kapsamlı olarak geldiğini belirten Oliva; GNU Linux-libre ile herkesin özgür olmasını dilediğini ifade etti. Oliva; haberler için #linux-libre of irc.gnu.org (Freenode),  identi.ca ya da Twister üzerinden kendisinin (@lxoliva) izlenebileceğini söyledi. GNU Linux-libre 4.14-gnu hakkında ayrıntılı bilgi edinmek için sürüm duyurusunu inceleyebilirsiniz.

Continue Reading →

GNU Linux-libre 4.14-gnu edinmek için aşağıdaki linklerden yararlanabilirsiniz.

0

Bash Scripting Part2 – For and While Loops With Examples

In the previous post, we talked about how to write a bash script, and we saw how bash scripting is awesome. In this post, we will look at the for command, while command, and how to make loops to iterate over a series of values. The for command enables you to perform a loop on a list of items. This is often the fundamental format of the for command.
 

Continue Reading →

for myvar in vars

do

Code Here

done

In every loop, the variable myvar holds one of the values of the list. The loop iterates until the list is finished.

Iterating Over Simple Values

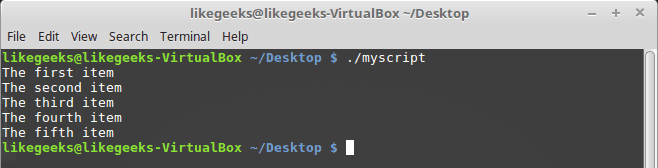
You can iterate over simple values like this:

#!/bin/bash

for var in first second third fourth fifth

do

echo The $var item

done

Check the results:

bash scripting for loop

Iterating Over Complex Values

Your list maybe contains a comma or two words, and you want to deal with them as one item on the list.

Check the following example:

#!/bin/bash

for var in first "the second" "the third" "I’ll do it"

do

echo "This is: $var"

done

We quote our strings with double quotations.

We play nice till now, we always do. Just keep reading and practicing.

bash scripting compelx for loop

Command Substitution

By using command substitution using this format $(Linux command) you can store the result in a variable for later use.

#!/bin/bash

my_file="myfile"

for var in $(cat $my_file)

do

echo " $var"

done

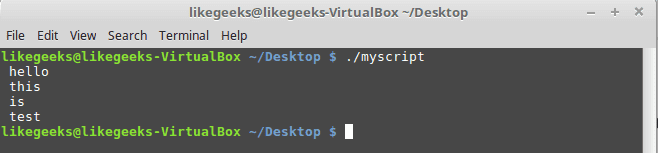
Here we get the file content using cat command. Notice that our file contains one word per line, not separated by spaces.

bash scripting loop from command

Here we get the content of the file using command substitution then iterate over the result, assuming that each line has one word.

What about having spaces in one of these lines?

In this case, every word will be considered a field. You need to tell the shell to consider new lines as a separator instead of spaces.

The Field Separator

By default, the following characters treated as fields.

  • Space
  • Tab
  • newline

If your text includes any of these characters, the shell will assume it’s a new field.

Well, you can change the internal field separator or IFS environment variable. like this:

IFS=$'\n'

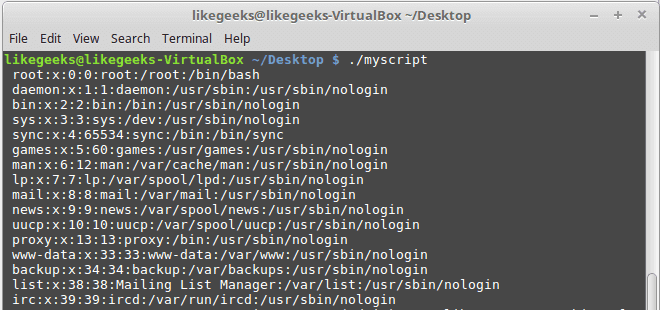
It will consider new lines as a separator instead of spaces.

#!/bin/bash

file="/etc/passwd"

IFS=$'\n'

for var in $(cat $file)

do

echo " $var"

done

You got it. Bash scripting is easy.

bash scripting passwd file

The separator is colons in /etc/passwd file which contains the user’s information, you can assign it like this:

IFS=:

Bash scripting is awesome, right?

Iterating Over Directory Files

If you want to list the files in /home directory, you can use the for loop like this:

#!/bin/bash

for obj in /home/likegeeks/*

do

if [ -d "$obj" ]

then

echo "$obj is a folder"

elif [ -f "$obj" ]

then

echo "$obj is a file"

fi

done

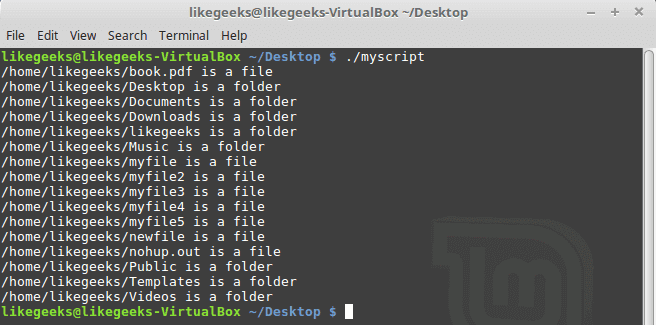
From the previous post, you should know the if statement and how to check for files and folders, so if you don’t know, I recommend you to review it bash script step by step.

bash scripting directory iteration

Here we use wildcard character which is the asterisk * and this is called in bash scripting file globbing which means All files with all names.

Notice that in the if statements here we quote our variables with quotations because maybe the file or the folder name contains spaces.

As you see the result, all files and directories in that folder are listed.

for Command C-Style

If you know C language, you may find that the for loop here is some weird because you are familiar with this syntax:

for (var= 0; var < 5; var++)

{

printf(“number is %d\n”, var);

}

Well, you can use the same syntax but with a little difference, here’s the syntax.

for (( variable = start ; condition ; iteration step))

So it looks like this:

for (( var = 1; var < 5; var++ ))

And this is an example:

#!/bin/bash

for (( var=1; var <= 10; var++ ))

do

echo "number is $var"

done

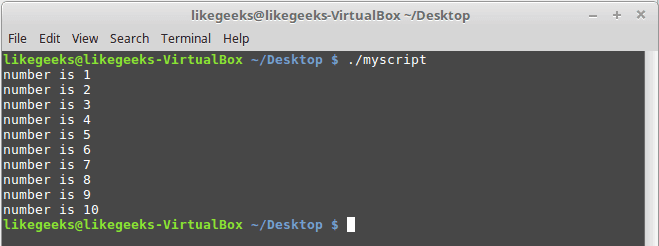
And this is the output:

bash scripting c-style

The while Command

The for loop is not the only way for looping in bash scripting. The while loop does the same job but it checks for a condition before every iteration.

The while loop command takes the following structure:

while condition

do

commands

done

and here is an example:

#!/bin/bash

number=10

while [ $number -gt 4 ]

do

echo $number

number=$[ $number - 1 ]

done

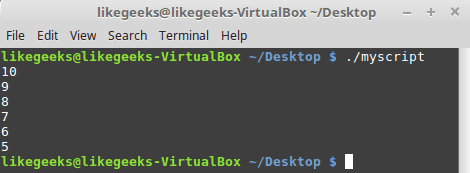
The script is simple; it starts with the while command to check if number is greater than zero, then the loop will run and the number value will be decreased every time by 1 and on every loop iteration it will print the value of number, Once the number value is zero the loop will exit.

bash scripting while loop

If we don’t decrease the value of var1, it will be the same value and the loop will be infinite.

Nesting Loops

You can type loops inside loops. This is called the nested loop.

Here’s an example of nested loops:

#!/bin/bash

for (( v1 = 1; v1 <= 5; v1++ ))

do

echo "Start $v1:"

for (( v2 = 1; v2 <= 5; v2++ ))

do

echo " Inner loop: $v2"

done

done

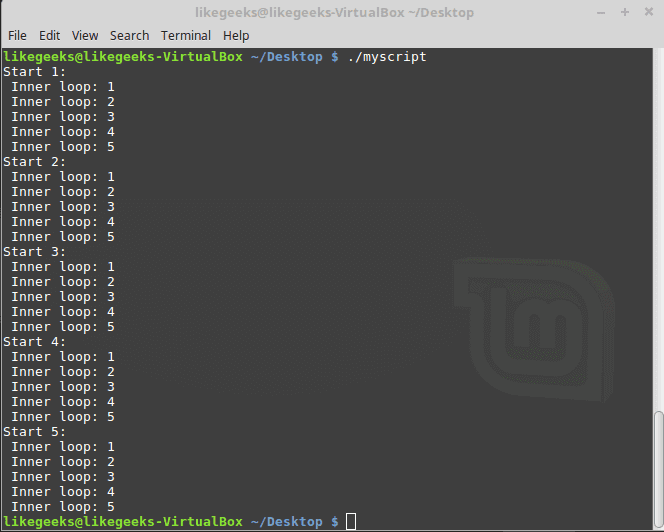
The outer loop hits first, then goes into the internal loop and completes it and go back to the outer loop and so on.

bash scripting nested loops

Iterate Over File Content

This is the most common usage for the for loop in bash scripting.

We can iterate over file content, for example, iterate over /etc/passwd file and see the output:

#!/bin/bash

IFS=$'\n'

for text in $(cat /etc/passwd)

do

echo "This line $text ++ contains"

IFS=:

for field in $text

do

echo " $field"

done

done

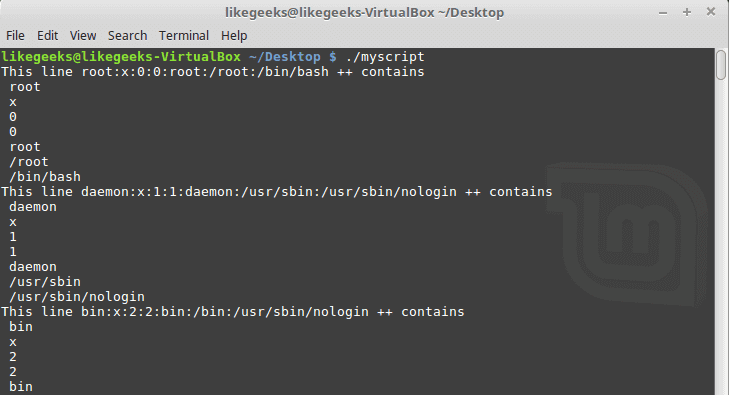
Here we have two loops, the first loop iterate over the lines of the file and the separator is the newline, the second iteration is over the words on the line itself and the separator is the colon :

bash scirpting file data

You can apply this idea when you have a CSV or any comma separated values file. The idea is the same; you just have to change the separator to fit your needs.

Controlling the Loop

Maybe after the loop starts you want to stop at a specific value, will you wait until the loop is finished? Of course no, there are two commands help us in this:

  • break command
  • continue command

The break Command

The break command is used to exit from any loop, like the while and the until loop

#!/bin/bash

for number in 10 11 12 13 14 15

do

if [ $number -eq 14 ]

then

break

fi

echo "Number: $number"

done

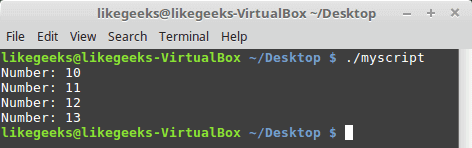
The loop runs until it reaches 14 then the break command exits the loop.

bash scirpting break command

And the same for the while loop:

#!/bin/bash

val=1

while [ $val -lt 5 ]

do

# Check number value

if [ $val -eq 4 ]

then

# The Code Breaks here <==

break

fi

# The Printed Message

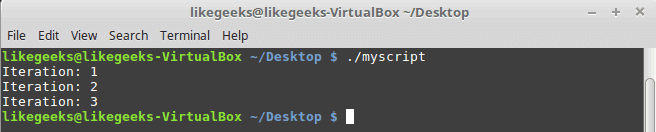
echo "Iteration: $val"

val=$(( $val + 1 ))

done

The break command exits the while loop and that happens when the execution reaches the if statement.

bash scripting break while

The continue command

You can use the continue command to stop executing the remaining commands inside a loop without exiting the loop.

Check the following example:

#!/bin/bash

# The loop starts here

for (( number = 1; number < 10; number++ ))

do

# Check if number greater than 0 and less than 5

if [ $number -gt 0 ] && [ $number -lt 5 ]

then

continue

fi

# The printed message

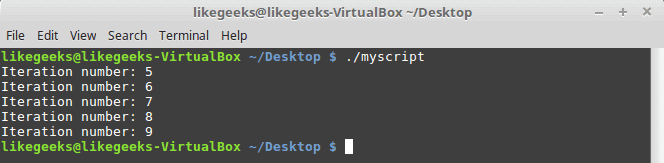
echo "Iteration number: $number"

done

When the if condition is true, the continue command runs each iteration, and lines after the continue command never run until the condition becomes false.

bash scripting continue command

Redirecting the Loop Output

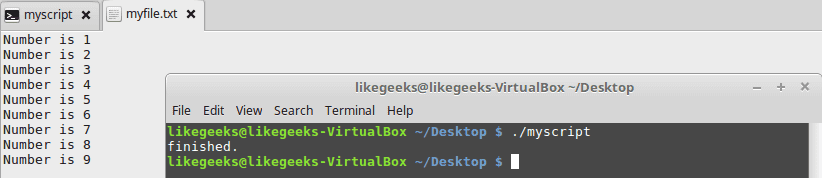
You can use the done command to send the loop output to a file like this:

#!/bin/bash

for (( var = 1; var < 10; var++ )) do echo "Number is $var" done > myfile.txt

echo "finished."#!/bin/bash

for (( var = 1; var < 10; var++ )) do echo "Number is $var" done > myfile.txt

echo "finished."

The shell creates the file myfile.txt and the output is redirected to the file, and if we check that file we will find our loop output inside it.

bash sciprintg process output

Let’s employ our bash scripting knowledge in something useful.

Useful Examples

Finding executables

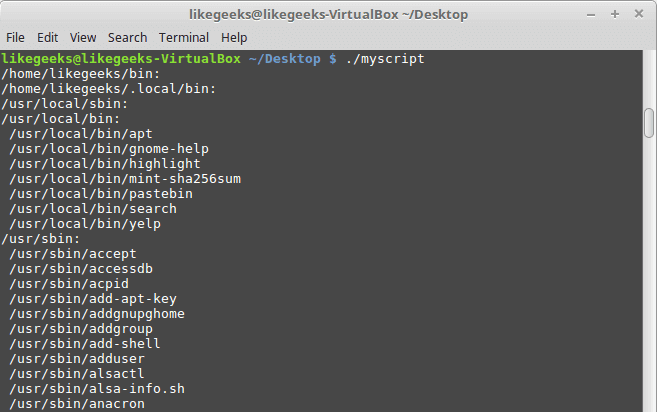
To get all executable files on your system, you can iterate over the directories in the PATH variable. We discussed for loop and if statements and file separator so our toolset is ready. Let’s combine them together and make something useful.

#!/bin/bash

IFS=:

for dir in $PATH

do

echo "$dir:"

for myfile in $dir/*

do

if [ -x $myfile ]

then

echo " $myfile"

fi

done

done

This is just awesome. We were able to get all the executables on the system that we can run.

bash scripting finding executables

Now nothing stops you except your imagination.

I hope you learn a new thing or at least review your knowledge if you forget it. My last word for you, keep reading and practicing.

Thank you.

likegeeks.com

0