
NumPy loadtxt tutorial (Load data from files)

In a previous tutorial, we talked about NumPy arrays and we saw how it makes the process of reading, parsing and performing operations on numeric data a cakewalk. In this tutorial, we will discuss the NumPy loadtxt method that is used to parse data from text files and store them in an n-dimensional NumPy array. Then we can perform all sorts of operations on it that are possible on a NumPy array. np.loadtxt offers a lot of flexibility in the way we read data from a file by specifying options such as the data type of the resulting array, how to distinguish one data entry from the others through delimiters, skipping/including specific rows, etc. We’ll look at each of those ways in the following tutorial.

Continue Reading →

Specifying the file path

Let’s look at how we can specify the path of the file from which we want to read data.

We’ll use a sample text file for our code examples, which lists the weights (in kg) and heights (in cm) of 100 individuals, each on a row.

I will use various variants in this file for explaining different features of the loadtxt function.

Let’s begin with the simplest representation of the data in a text file. We have 100 lines (or rows) of data in our text file, each of which comprises 2 floating-point numbers separated by a space.

The first number on each row represents the weight and the second number represents the height of an individual.

Here’s a little glimpse from the file:

110.90 146.03
44.83 211.82
97.13 209.30
105.64 164.21

This file is stored as `weight_height_1.txt`.
Our task is to read the file and parse the data in a way that we can represent in a NumPy array.
We’ll import the NumPy package and call the loadtxt method, passing the file path as the value to the first parameter filePath.

import numpy as np

data = np.loadtxt("./weight_height_1.txt")

Here we are assuming the file is stored at the same location from where our Python code will run (‘./’ represents current directory). If that is not the case, we need to specify the complete path of the file (Ex: “C://Users/John/Desktop/weight_height_1.txt”)

We also need to ensure each row in the file has the same number of values.

The extension of the file can be anything other than .txt as long as the file contains text, we can also pass a generator instead of a file path (more on that later)

The function returns an n-dimensional NumPy array of values found in the text.

Here our text had 100 rows with each row having 2 float values, so the returned object data will be a NumPy array of shape (100, 2) with the float data type.

You can verify this by checking ‘shape’ and ‘dtype’ attribute of the returned data:

print("shape of data:",data.shape)

print("datatype of data:",data.dtype)

Output:

Specifying delimiters

A delimiter is a character or a string of characters that separates individual values on a line.

For example, in our earlier file, we had the values separated by a space, so in that case, the delimiter was a space character (” “).

However, some other files may have a different delimiter, for instance, CSV files generally use comma (“,”) as a delimiter. Another file may have a semicolon as a delimiter.

So we need our data loader to be flexible enough to identify such delimiters in each row and extract the correct values from them.

This can be achieved by passing our delimiter as a parameter to the np.loadtxt function.

Let us consider another file ‘weight_height_2.txt’, it has the same data content as the previous one, but this time the values in each row are separated by a comma:

110.90, 146.03
44.83, 211.82
97.13, 209.30
…
…

We’ll call the np.loadtxt function the same way as before, except that now we pass an additional parameter – ‘delimiter’:

import numpy as np

data = np.loadtxt("./weight_height_2.txt", delimiter = ",")

This function will return the same array as before.

  • In the previous section, we did not pass delimiter parameter value because np.loadtxt() expects space “ “ to be the default delimiter
  • If the values on each row were separated by a tab, in that case, the delimiter would be specified by using the escape character “\t”

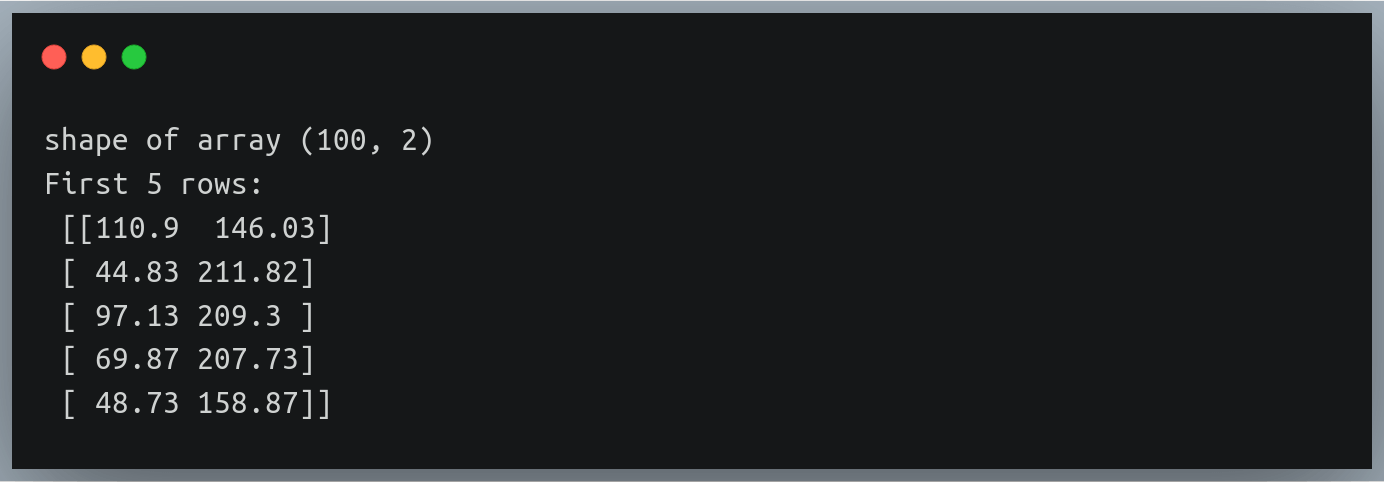
You can verify the results again by checking the shape of the data array and also printing the first few rows:

print("shape of array", data.shape)

print("First 5 rows:\n", data[:5])

Output:
Dealing with 2 delimiters

Now there may be a situation where there are more than 1 delimiters in a file.

For example, let’s imagine each of our lines contained a 3rd value representing the date of birth of the individual in dd-mm-yyyy format

110.90, 146.03, 3-7-1981
44.83, 211.82, 1-2-1986
97.13, 209.30, 14-2-1989
…

Now suppose we want to extract the dates, months and years as 3 different values into 3 different columns of our NumPy array. So should we pass “,” as the delimiter or should we pass “-”?

We can pass only 1 value to the delimiter parameter in the np.loadtxt method!

No need to worry, there is always a workaround. Let’s use a third file ‘./weight_height_3.txt’ for this example

We’ll use a naive approach first, which has the following steps:

  1. read the file
  2. eliminate one of the delimiters in each line and replace it with one common delimiter (here comma)
  3. append the line into a running list
  4. pass this list of strings to the np.loadtxt function instead of passing a file path.

Let’s write the code:

#reading each line from file and replacing "-" by ","
with open("./weight_height_3.txt") as f_input:

text = [l.replace("-", ",") for l in f_input]

#calling the loadtxt method with “,“ as delimiter
data = np.loadtxt(text, delimiter=",")

  • Note that we are passing a list of strings as input and not a file path.
  • When calling the function we still pass the delimiter parameter with the value “,” as we’ve replaced all instances of the second delimiter ‘-’ by a comma.
  • The returned NumPy array should now have 5 columns

You can once again validate the results by printing the shape and the first five lines:

print("Shape of data:", data.shape)

print("First five rows:\n",data[:5])

Output:
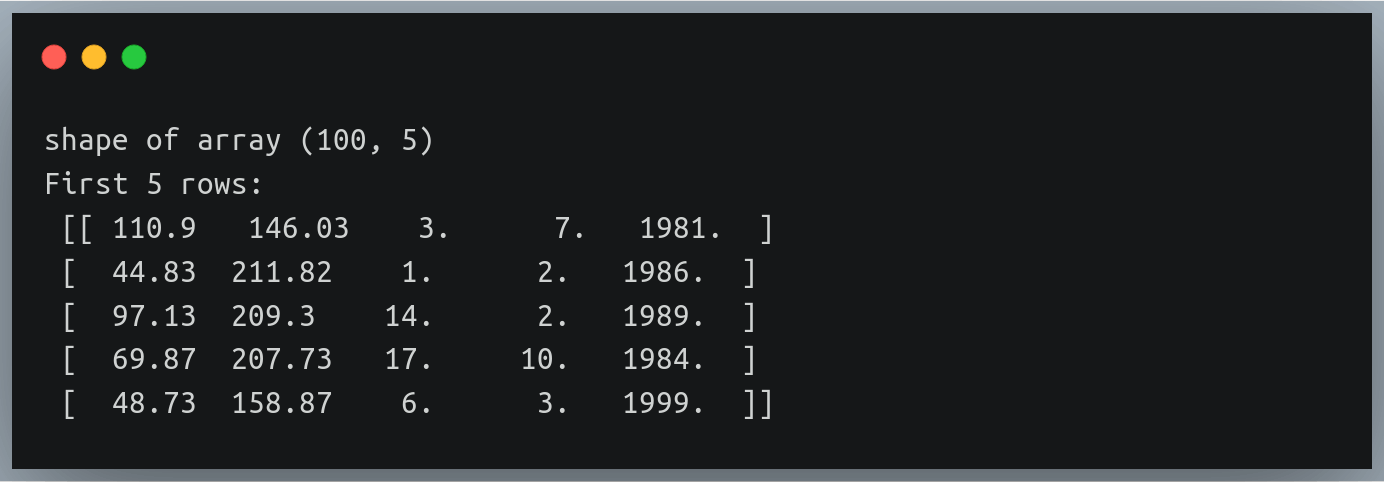
Notice how we have 3 additional columns in each row indicating the date, month and year of birth

Also notice the new values are all floating-point values; however date, month or year make more sense as integers!
We’ll look at how to handle such data type inconsistencies in the coming section.

A general approach for multiple delimiters

In this section, we will look at a general approach for working with multiple delimiters.

Also, we’ll learn how we can use generators instead of file paths – a more efficient solution for multiple delimiters, than the one we discussed in the previous section.

The problem with reading the entire file at once and storing them as a list of strings is that it doesn’t scale well. For instance, if there is a file with a million lines, storing them in a list all at once is going to consume unnecessary additional memory.

Hence we will use generators to get rid of any additional delimiter.
A generator ‘yields’ us a sequence of values on the fly i.e it will read the lines of a file as required instead of reading them all at once

So let’s first define a generator function that takes in a file path and a list of delimiters as a parameter.

def generate_lines(filePath, delimiters=[]):

with open(filePath) as f:

for line in f:

line = line.strip() #removes newline character from end

for d in delimiters:

line =line.replace(d, " ")

yield line

Here we are going through each of the delimiters one by one in each line and replacing them by a blank space ” ” which is the default delimiter in np.loadtxt function

We will now call this generator function and pass the returned generator object to the np.loadtxt method in place of the file path.

gen = generate_lines("./weight_height_3.txt", ["-",","])

data = np.loadtxt(gen)

Note that we did not need to pass any additional delimiter parameter, as our generator function replaced all instances of the delimiters in the passed list by a space, which is the default delimiter.

We can extend this idea and specify as many delimiters as needed.

Specifying the data type

Unless specified otherwise, the np.loadtxt function of the NumPy package assumes the values in the passed text file to be floating-point values by default.

So if you pass a text file that has characters other than numbers, the function will throw an error, stating it was expecting floating-point values.

We can overcome this by specifying the data type of the values in the text file using the datatypeparameter.

In the previous example, we saw the date, month and year were being interpreted as floating-point values, however, we know that these values can never exist in decimal form.

Let’s look at a new file ‘./weight_height_4.txt’ which has only 1 column for the date of birth of individuals in the dd-mm-yyyy format:

13-2-1991
17-12-1990
18-12-1986
…

So we’ll call the loadtxt method with “-” as the delimiter:

data = np.loadtxt("./weight_height_4.txt", delimiter="-")

print(data[:3])

print("datatype =",data.dtype)

If we look at the output of the above lines of code, we’ll see that each of the 3 values has been stored as floating-point values by default and the data type of the array is ‘float64’

We can alter this behavior by passing the value ‘int’ to the ‘dtype’ parameter. This will ask the function to store the extracted values as integers, and hence the data type of the array will also be int.

data = np.loadtxt("./weight_height_4.txt", delimiter="-", dtype="int")

print(data[:3])

print("datatype =",data.dtype)

Output:
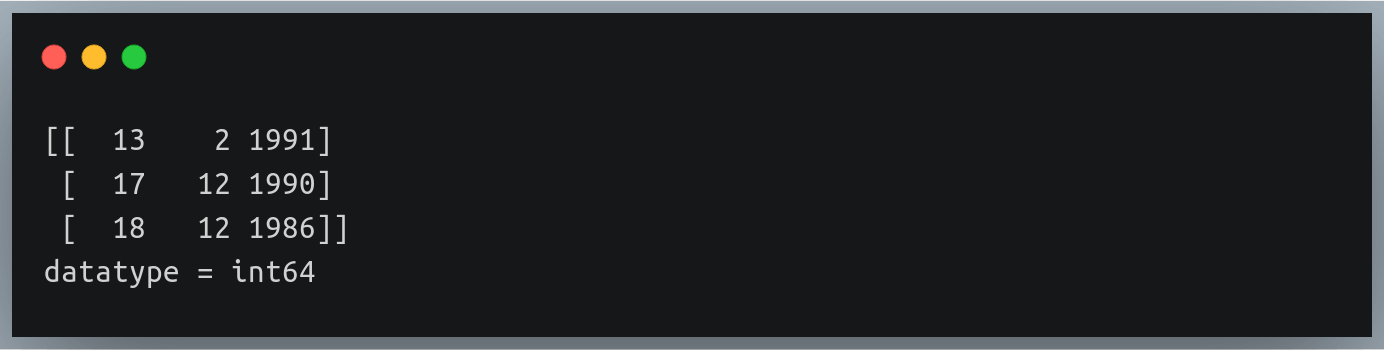
But what if there are columns with different data types?

Let’s say we have the first two columns having float values and the last column having integer values.

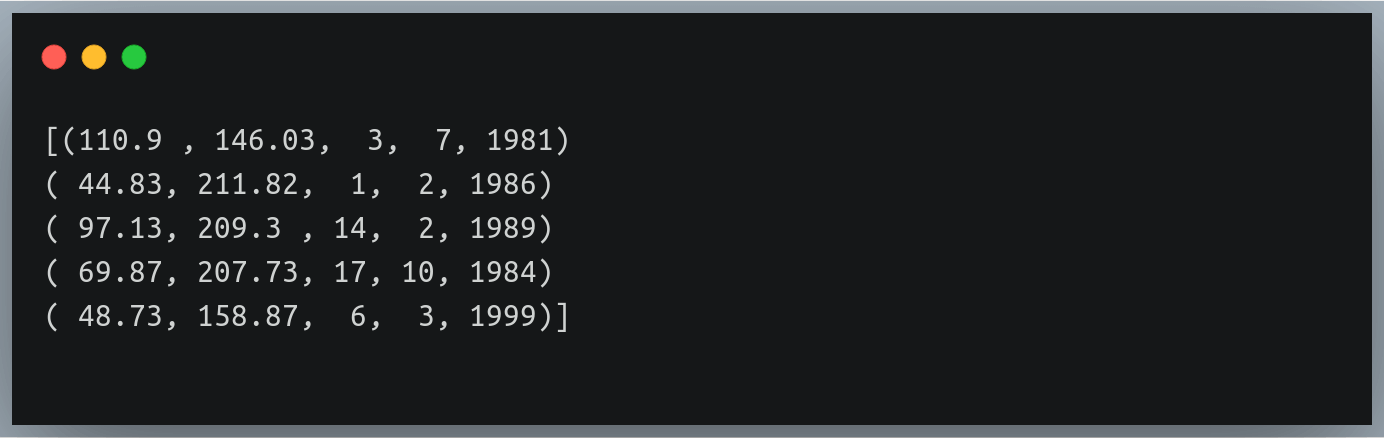
In that case, we can pass a comma-separated datatype string specifying the data type of each column (in order of their existence) to the dtype parameter.

However, in such a case the function will return a NumPy array of tuples of values since a NumPy array as a whole can have only 1 data type

Let’s try this on ‘weight_height_3.txt’ file where the first two columns (weight, height) had float values and the last 3 values (date, month, year) were integers:

Output:
Ignoring headers

In some cases (especially CSV files), the first line of the text file may have ‘headers’ describing what each column in the following rows represents. While reading data from such text files, we may want to ignore the first line because we cannot (and should not) store them in our NumPy array.

In such a case, we can use the ‘skiprows’ parameter and pass the value 1, asking the function to ignore the first 1 line(s) of the text file.

Let’s try this on a CSV file – ‘weight_height.csv’:

Weight (in Kg), Height (in cm)
73.847017017515,241.893563180437
68.7819040458903,162.310472521300
74.1101053917849,212.7408555565
…

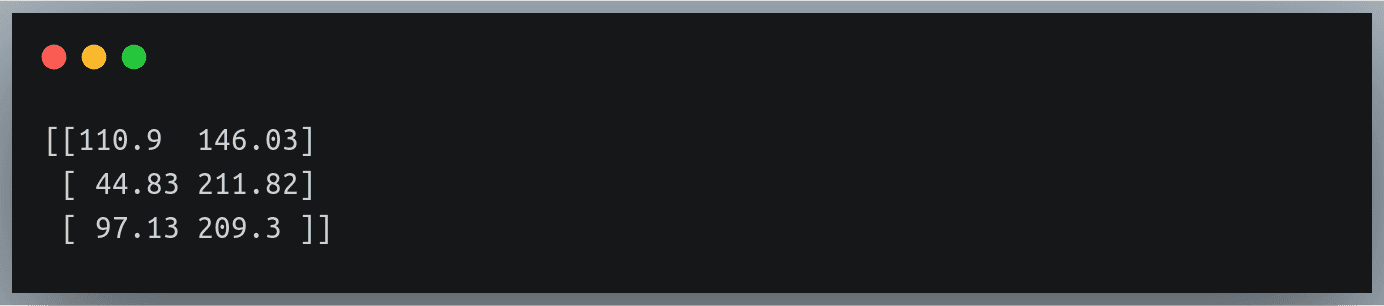
Now we want to ignore the header line i.e the first line of the file:

data = np.loadtxt("./weight_height.csv", delimiter=",", skiprows=1)

print(data[:3])

Output:
Likewise, we can pass any positive integer n to the skiprows parameter asking to ignore first n rows from the file.

Ignoring the first column

Sometimes, we may also want to skip the first column because we are not interested in it. For example, if our text file had the first column as “gender”, and if we don’t need to include the values of this column when extracting the data, we need a way to ask the function to do the same.

We do not have a skipcols parameter like skiprows in np.loadtxt function, using which, we could express this need. However, np.loadtxt has another parameter called ‘usecols’ where we specify the indices of the columns to be retained.

So if we want to skip the first column, we can simply supply the indices of all the columns except the first (remember indexing begins at zero)

Enough talking, let’s get to work!

Let’s look at the content of a new file ‘weight_height_5.txt’ which has an additional gender column that we want to ignore.

Male, 110.90, 146.03
Male, 44.83, 211.82
…
…
Female, 78.67, 158.74
Male, 105.64, 164.21

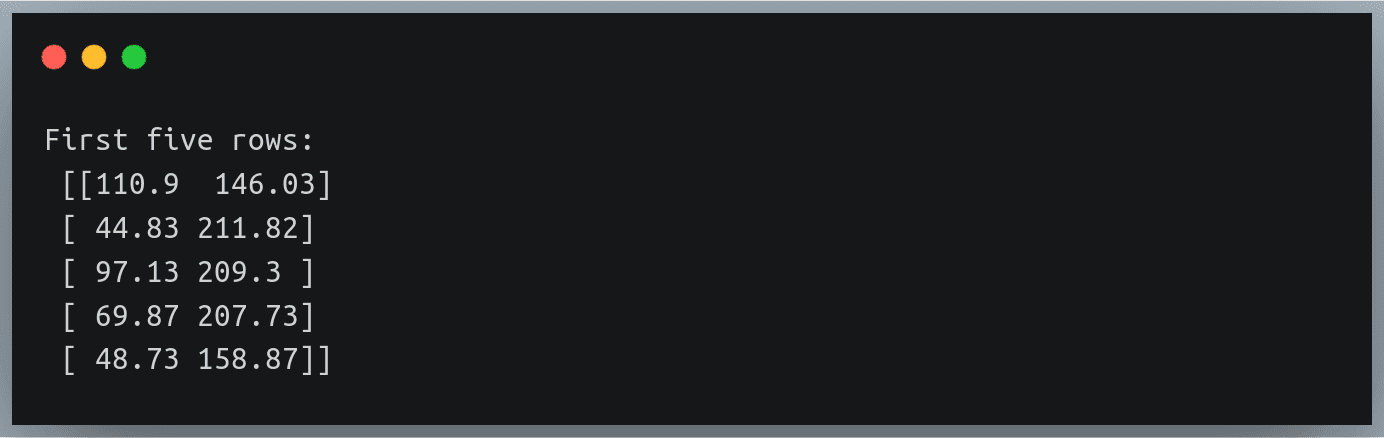
We’ll first determine the number of columns in the file from the first line and then pass a range of column indices excluding the first one:

with open("./weight_height_5.txt") as f:
#determining number of columns from the first line of text

n_cols = len(f.readline().split(","))

data = np.loadtxt("./weight_height_5.txt", delimiter=",",usecols=np.arange(1, n_cols))

print("First five rows:\n",data[:5])

Here we are supplying a range of values beginning from 1 (second column) and extending up to n_cols (the last column)

Output:
We can generalize the use of the usecols parameter by passing a list of indices of only those columns that we want to retain.

Load first n rows

Just as we can skip the first n rows using the skiprows parameter, we can also choose to load only the first n rows and skip the rest. This can be achieved using the max_rows parameter of the np.loadtxt method.

Let us suppose that we want to read only the first 10 rows from the text file ‘weight_height_2.txt’. We’ll call the np.loadtxt method along with the max_rows parameter and pass the value 10.

data = np.loadtxt("./weight_height_2.txt", delimiter=",",max_rows = 10)

print("Shape of data:",data.shape)

Output:
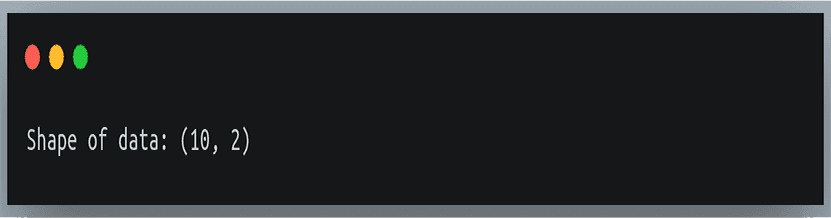
As we can see, the returned NumPy array has only 10 rows which are the first 10 rows of the text file.

If we use the max_rows parameter along with skiprowsparameter, then the specified number of rows will be skipped and next n rows will be extracted where n is the value we pass to max_rows.

Load specific rows

If we want the np.loadtxt function to load only specific rows from the text file, no parameter supports this feature.

However, we can achieve this by defining a generator that accepts row indices and returns lines at those indices. We’ll then pass this generator object to our np.loadtxt method.

Let’s first define the generator:

def generate_specific_rows(filePath, row_indices=[]):

with open(filePath) as f:

# using enumerate to track line no.
for i, line in enumerate(f):

#if line no. is in the row index list, then return that line
if i in row_indices:

yield line

Let’s now use the np.loadtxt function to read the 2nd, 4th and 100th line in the file ‘weight_height_2.txt’

gen = generate_specific_rows("./weight_height_2.txt",row_indices = [1, 3, 99])

data = np.loadtxt(gen, delimiter=",")

print(data)

This should return a NumPy array having 3 rows and 2 columns:

Skip the last row

If you want to exclude the last line of the text file, you can achieve this in multiple ways. You can either define another generator that yields lines one by one and stops right before the last one, or you can use an even simpler approach – just figure out the number of lines in the file, and pass 1 less than that count to the max_rows parameter.

But how will you figure out the number of lines?
Follow along!

with open("./weight_height_2.txt") as f:

n = len(list(f))

print("n =", n)

Now n contains the number of lines present in `weight_height_2.txt` file, that value should be 100.

We will now read the text file as we used to, using the np.loadtxt method along with the max_rows parameter with value n – 1.

data = np.loadtxt("./weight_height_2.txt", delimiter=",",max_rows=n - 1)

print("data shape =",data.shape)

Output:

As we can see, the original text file had 100 rows, but when we read data from the file, it’s shape is (99, 2) since it skipped the last row from the file.

Skip specific columns

Suppose you wanted to ignore some of the columns while loading data from a text file by specifying the indices of such columns.

While the np.loadtxt method provides a parameter to specify which columns to retain (usecols), it doesn’t offer a way to do the opposite i.e specify which columns to skip. However, we can always find a workaround!

We shall first define the indices of columns to be ignored, and then using them we will derive the list of indices to be retained as the two sets would be mutually exclusive.

We will then pass this derived indices list to the usecols parameter.

Here is pseudocode for the entire process:

  1. Find the number of columns in the file n_cols (explained in an earlier section)
  2. Define the list of indices to be ignored
  3. Create a range of indices from 0 to n_cols, and eliminate the indices of step 2 from this range
  4. Pass this new list to usecols parameter in np.loadtxt method

Let’s create a wrapper function loadtext_without_columns that implements all the above steps:

def loadtext_without_columns(filePath, skipcols=[], delimiter=","):

with open(filePath) as f:

n_cols = len(f.readline().split(delimiter))

#define a range from 0 to n_cols
usecols = np.arange(0, n_cols)

#remove the indices found in skipcols
usecols = set(usecols) - set(skipcols)

#sort the new indices in ascending order
usecols = sorted(usecols)

#load the file and retain indices found in usecols
data = np.loadtxt(filePath, delimiter = delimiter, usecols = usecols)

return data

To test our code, we will work with a new file `weight_height_6.txt` which has 5 columns – the first two columns indicate width and height and the remaining 3 indicate the date, month and year of birth of the individuals.

All the values are separated by a single delimiter – comma:

110.90, 146.03, 3,7,1981
44.83, 211.82, 1,2,1986
97.13, 209.30, 14,2,1989
…
…
105.64, 164.21, 3,6,2000

Suppose we were not interested in the height and the date of birth of the individual, and so we wanted to skip the columns at positions 1 and 2.

Let’s call our wrapper function specifying our requirements:

data = loadtext_without_columns("./weight_height_6.txt",skipcols = [1, 2], delimiter = ",")

# print first 5 rows
print(data[:5])

Output:
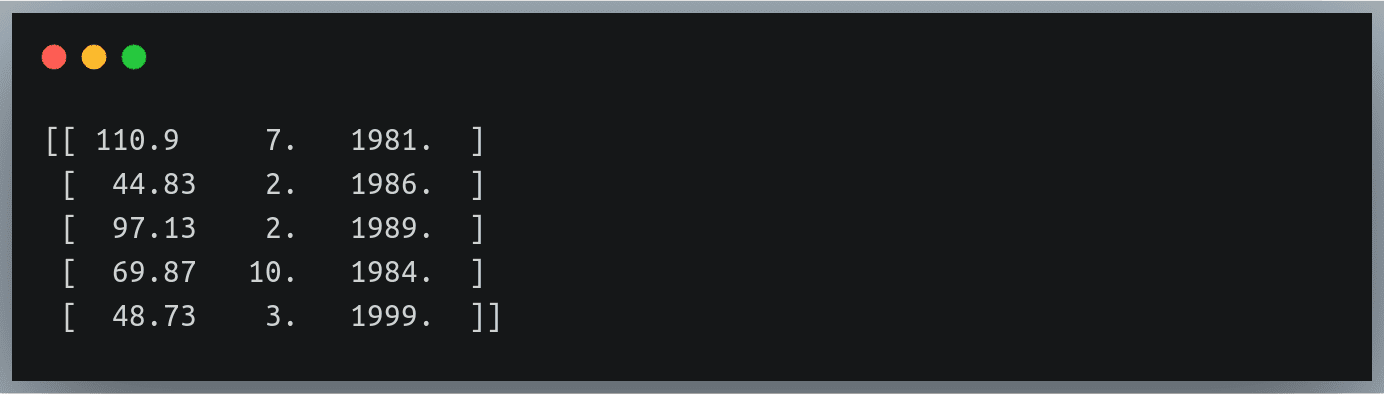
We can see that our wrapper function only returns 3 columns – weight, month and year. It has ensured that the columns we specified have been skipped!

Load 3D arrays

So far we’ve been reading the contents of the file as a 2D NumPy array. This is the default behavior of the np.loadtxt method, and there’s no additional parameter that we can specify to interpret the read data as a 3D array.

So the simplest approach to solve this problem would be to read the data as a NumPy array and use NumPy’s reshape method to reshape the data in any shape of any dimension that we desire.

We just need to be careful that if we want to interpret it as a multidimensional array, we should make sure it is stored in the text file in an appropriate manner and that after reshaping the array, we’d get what we actually desired.

Let us take an example file – ‘weight_height_7.txt’.

This is the same file as ‘weight_height_2.txt’. The only difference is that this file has 90 rows, and each 30-row block represents a different section or class to which individuals belong.

So there are a total of 3 sections (A, B and C) – each having 30 individuals whose weights and heights are listed on a new row.

The section names are denoted with a comment just before the beginning of each section (you can check this at lines 1, 32 and 63).

The comment statements begin with ‘#’ and these lines are ignored by np.loadtxt when reading the data. We can also specify any other identifier for comment lines using the parameter ‘comments’

Now when you read this file, and print its shape, it would display (90,2) because that is how np.loadtxt reads the data – it arranges a multi-row data into 2D arrays.

But we know that there is a logical separation between each group of 30 individuals, and we would want the shape to be (3, 30, 2) – where the first dimension indicates the sections, the second one represents each of the individuals in that section and the last dimension indicates the number of values associated to each of these individuals (here 2 for weight & height).

Using NumPy reshape method

So we want our data to be represented as a 3D array.

We can achieve this by simply reshaping the returned data using NumPy’s reshape method.

data = np.loadtxt("./weight_height_7.txt",delimiter=",")

print("Current shape = ",data.shape)

Settingsdata = data.reshape(3,30,2)

print("Modified shape = ",data.shape)

print("fifth individual of section B - weight, height =",data[1,4,:])

Output:
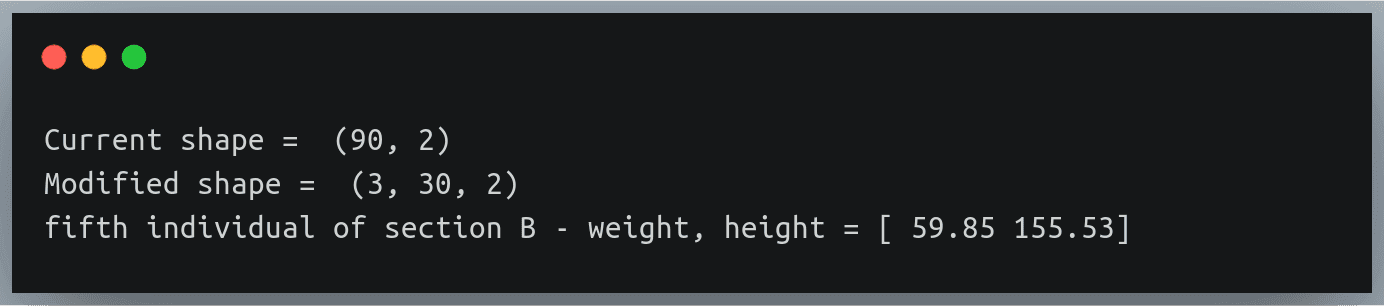
Notice how we are printing the details of a specific individual using 3 indices

The returned result belongs to the 5th individual of section B – this can be validated from the text:
…
#section B
100.91, 155.55
72.93, 150.38
116.68, 137.15
86.51, 172.15
59.85, 155.53
…

Comparison with alternatives

While numpy.loadtxt is an extremely useful utility for reading data from text files, it is not the only one!

There are many alternatives out there that can do the same task as np.loadtxt, many of these are better than np.loadtxt in many aspects. Let’s briefly look at 3 such alternative functions.

numpy.genfromtxt

  1. This is the most discussed and the most used method alongside np.loadtxt
  2. There’s no major difference between the two, the only one that stands out is np.genfromtxt’s ability to smoothly handle missing values.
  3. In fact, NumPy’s documentation describes np.loadtxt as “an equivalent function (to np.genfromtxt) when no data is missing.
  4. So the two are almost similar methods, except that np.genfromtxt can do more sophisticated processing of the data in a text file.

numpy.fromfile

  1. np.fromfile is commonly used when working with data stored in binary files, with no delimiters.
  2. It can read plain text files but does so with a lot of issues (go ahead and try reading the files we discussed using np.fromfile)
  3. While it is faster in execution time than np.loadtxt, but it is generally not a preferred choice when working with well-structured data in a text file.
  4. Besides NumPy’s documentation mentions np.loadtxt as a ‘more flexible (than np.fromfile) way of loading data from a text file.

pandas.read_csv

  1. pandas.read_csv is the most popular choice of Data Scientists, ML Engineers, Data Analysts, etc. for reading data from text files.
  2. It offers way more flexibility than np.loadtxt or np.genfromtxt.
  3. Although you cannot pass a generator to pandas.read_csv as we did.
  4. In terms of speed of execution, however, pandas.read_csv do better than np.loadtxt

Handling Missing Values

As discussed in our section comparing np.loadtxt with other options, np.genfromtxt handles missing values by default. We do not have any direct way of handling missing values in np.loadtxt

Here we’ll look at an indirect (and a slightly sophisticated) way of handling missing values with the np.loadtxt method.

The converters parameter:

  • np.loadtxt has a converters parameter that is used to specify the preprocessing (if any) required for each of the columns in the file.
  • For example, if the text file stores the height column in centimeters and we want to store them as inches, we can define a converter for the heights column.
  • The converters parameter accepts a dictionary where the keys are column indices and the values are methods that accept the column value, ‘convert’ it and return the modified value.

How can we use converters to handle missing values?

  • We need to first decide the default datatype i.e the value to be used to fill in the positions where the actual values are missing. Let’s say we want to fill in the missing height and weight values with 0, so our fill_value will be 0.
  • Next, we can define a converter for each column in the file, which checks if there is some value or an empty string in that column and if it’s an empty string, it will fill it with our fill_value.
  • To do this, we’ll have to find the number of columns in the text file, and we have already discussed how to achieve this in an earlier section.

We’ll use the file ‘weight_height_8.txt’ which is the same as ‘weight_height_2.txt’ but has several missing values.

, 146.03
44.83, 211.82
97.13,
69.87, 207.73
, 158.87
99.25, 195.41
…

Let’s write the code to fill in these missing values’ positions with 0.

# finding number of columns in the file
with open("./weight_height_8.txt") as f:

n_cols = len(f.readline().split(","))

print("Number of columns", n_cols)

# defining converters for each of the column (using 'dictionary
# comprehension') to fill each missing value with fill_value

fill_value = 0

converters = {i: lambda s: float(s.strip() or fill_value) for i in range(2)}

data = np.loadtxt("./weight_height_8.txt", delimiter=",",converters = converters)

print("data shape =",data.shape)

print("First 5 rows:\n",data[:5])

Output:
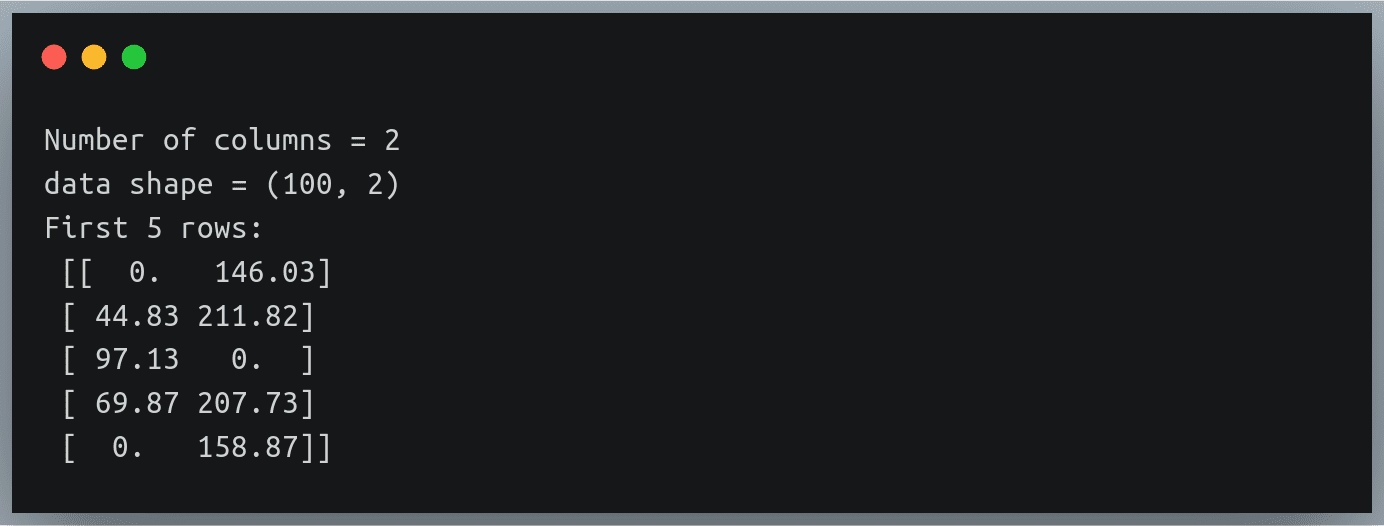
The missing height and weight values have been correctly replaced with a 0. No magic!

Conclusion

numpy.loadtxt is undoubtedly one of the most standard choices for reading a well-structured data stored in a text file. It offers us great flexibility in choosing various options for specifying the way we want to read the data, and wherever it doesn’t – remember there’s always a workaround!

0

Caesar Cipher in Python (Text encryption tutorial)

Cryptography deals with encrypting or encoding a piece of information (in a plain text) into a form that looks gibberish and makes little sense in ordinary language. This encoded message(also called ciphertext) can then be decoded back into a plain text by the intended recipient using a decoding technique (often along with a private key) communicated to the end-user. Caesar Cipher is one of the oldest encryption technique that we will focus on in this tutorial, and will implement the same in Python. Although Caesar Cipher is a very weak encryption technique and is rarely used today, we are doing this tutorial to introduce our readers, especially the newcomers, to encryption. Consider this as the ‘Hello World’ of Cryptography.

Continue Reading →

What is Caesar Cipher?

Caesar Cipher is a type of substitution cipher, in which each letter in the plain text is replaced by another letter at some fixed positions from the current letter in the alphabet.

For example, if we shift each letter by 3 positions to the right, each of the letters in our plain text will be replaced by a letter at 3 positions to the right of the letter in the plain text. Let us see this in action – let’s encrypt the text “HELLO WORLD” using a right shift of 3.

So the letter H will be replaced by K, E will be replaced by H, and so on. The final encrypted message for HELLO WORLD will be KHOOR ZRUOG. That gibberish doesn’t make sense, does it?

Note that the letters on the edge i.e. X, Y, Z wrap around and are replaced by A, B, C respectively, in case of the right shift. Similarly the letters in the beginning – A, B, C, etc. will be wrapped around in case of left shifts.

The Caesar Cipher encryption rule can be expressed mathematically as:

c = (x + n) % 26

Where c is the encoded character, x is the actual character, and n is the number of positions we want to shift the character x by. We’re taking mod with 26 because there are 26 letters in the English alphabet.

Caesar Cipher in Python

Before we dive into defining the functions for the encryption and decryption process of Caesar Cipher in Python, we’ll first look at two important functions that we’ll use extensively during the process – chr() and ord().
It is important to realize that the alphabet as we know them is stored differently in a computer’s memory. The computer doesn’t understand any of our English language’s alphabet or other characters by itself.

Each of these characters is represented in computer memory using a number called ASCII code (or its extension – the Unicode) of the character, which is an 8-bit number and encodes almost all the English language’s characters, digits, and punctuations.
For instance, the uppercase ‘A’ is represented by the number 65, ‘B’ by 66, and so on. Similarly, lowercase characters’ representation begins with the number 97.

As the need to incorporate more symbols and characters of other languages arose, the 8 bit was not sufficient, so a new standard – Unicode – was adopted, which represents all the characters used in the world using 16 bits.
ASCII is a subset of Unicode, so the ASCII encoding of characters remains the same in Unicode. That means ‘A’ will still be represented using the number 65 in Unicode.
Note that the special characters like space ” “, tabs “\t”, newlines “\n”, etc. are also represented in memory by their Unicode.

We’ll look at 2 built-in functions in Python that are used to find the Unicode representation of a character and vice-versa.

The ord() function

The ord() method is used to convert a character to its numeric representation in Unicode. It accepts a single character and returns the number representing its Unicode. Let’s look at an example.

c_unicode = ord("c")

A_unicode = ord("A")

print("Unicode of 'c' =", c_unicode)

print("Unicode of 'A' =", A_unicode)

Output:

The chr() function

Just like how we could convert a character into its numeric Unicode using ord() method, we do the inverse i.e. find the character represented by a number using chr() method.
The chr() method accepts a number representing the Unicode of a character and returns the actual character corresponding to the numeric code. Let’s first look at a few examples:

character_65 = chr(65)

character_100 = chr(100)

print("Unicode 65 represents", character_65)

print("Unicode 100 represents", character_100)

character_360 = chr(360)

print("Unicode 360 represents", character_360)

Output:

Notice how the German letter Ü (U umlaut) is also represented in Unicode, by the number 360.

We can also apply a chained operation(ord followed by chr) to get the original character back.

c = chr(ord("Ũ"))

print(c)

Output: Ũ

Encryption for Capital Letters

Now that we understand the 2 fundamental methods we’ll use, let’s implement the encryption technique for capital letters in Python. We shall encrypt only the uppercase characters in the text and will leave the remaining ones unchanged.
Let’s first look at the step-by-step process of encrypting the capital letters:

  1. Define the shift value i.e. the number of positions we want to shift from each character.
  2. Iterate over each character of the plain text:
    1. If the character is upper-case:
      1. Calculate the position/index of the character in the 0-25 range.
      2. Perform the positive shift using the modulo operation.
      3. Find the character at the new position.
      4. Replace the current capital letter by this new character.
    2. Else, If the character is not upper-case, keep it with no change.

Let us now look at the code:

shift = 3 # defining the shift count

text = "HELLO WORLD"

encryption = ""

for c in text:

# check if character is an uppercase letter
if c.isupper():

# find the position in 0-25
c_unicode = ord(c)

c_index = ord(c) - ord("A")

# perform the shift
new_index = (c_index + shift) % 26

# convert to new character
new_unicode = new_index + ord("A")

new_character = chr(new_unicode)

# append to encrypted string
encryption = encryption + new_character

else:

# since character is not uppercase, leave it as it is
encryption += c

print("Plain text:",text)

print("Encrypted text:",encryption)

Output:

As we can see the encrypted text for “HELLO WORLD” is “KHOOR ZRUOG”, and it matches with the one we arrived at manually in the Introduction section
Also notice that the space character has not been encrypted, and it continues to be a space in the encrypted version.

Decryption for Capital Letters

Now that we’ve figured out the encryption for plain text capital letters using Ceaser Cipher, let’s look at how we will decrypt the ciphertext into plain text.

Earlier we looked at the mathematic formulation of the encryption process. Let’s now check out the same for the decryption process.

x = (c - n) % 26

The meaning of the notations remain the same as in the previous formula
If any value becomes negative after subtraction, the same can be taken care of by the modulo operator and the values will be wrapped around

Let us look at the step-by-step implementation of the decryption process, which will be more or less the reverse of the encryption:

  • Define the number of shifts
  • Iterate over each character in the encrypted text:
    • If the character is an uppercase letter:
      1. Calculate the position/index of the character in the 0-25 range.
      2. Perform the negative shift using the modulo operation.
      3. Find the character at the new position.
      4. Replace the current encrypted letter by this new character (which will also be an uppercase letter).
      5. Else, if the character is not capital, keep it unchanged.

Let’s write the code for the above procedure:

shift = 3 # defining the shift count

encrypted_text = "KHOOR ZRUOG"

plain_text = ""

for c in encrypted_text:

# check if character is an uppercase letter
if c.isupper():

# find the position in 0-25
c_unicode = ord(c)

c_index = ord(c) - ord("A")

# perform the negative shift
new_index = (c_index - shift) % 26

# convert to new character
new_unicode = new_index + ord("A")

new_character = chr(new_unicode)

# append to plain string
plain_text = plain_text + new_character

else:

# since character is not uppercase, leave it as it is
plain_text += c

print("Encrypted text:",encrypted_text)

print("Decrypted text:",plain_text)

Output:

Notice how we have successfully recovered the original text “HELLO WORLD” from its encrypted form.

Encrypting numbers and punctuation

Now that we’ve seen how we can encode and decode capital letters of the English alphabet using Caesar Cipher, it begs an important question – What about the other characters?
What about the numbers? What about the special characters and the punctuation?

Well, the original Caesar Cipher algorithm was not supposed to deal with anything other than the 26 letters of the alphabet – either in uppercase or lowercase.
So a typical Caesar Cipher would not encrypt punctuation or numbers and would convert all the letters to either lowercase or uppercase and encode only those characters.

But we can always extend an existing good solution and tweak them to suit our needs – that’s true for any kind of challenge in software engineering.
So we’ll try to encode uppercase and lowercase characters the way we did in the previous section, we’ll ignore the punctuations for now, and then we’ll also encode the numbers in the text.

For numbers, we can do the encryption in one of the two ways:

  1. Shift the digit value by the same amount as you shift the letters of the alphabet, i.e. for a shift of 3 – digit 5 becomes 8, 2 becomes 5, 9 becomes 2, and so on.
  2. Make the numbers part of the alphabet, i.e. z or Z will be followed by 0,1,2… up to 9 and this time our divider for modulo operation will be 36 instead of 26.

We’ll implement our solution using the first strategy. Also this time, we’ll implement our solution as a function that accepts the shift value (which serves as the key in Caesar Cipher) as a parameter.
We’ll implement 2 functions – cipher_encrypt() and cipher_decrypt()
Let’s get our hands dirty!

The solution

# The Encryption Function
def cipher_encrypt(plain_text, key):

encrypted = ""

for c in plain_text:

if c.isupper(): #check if it's an uppercase character

c_index = ord(c) - ord('A')

# shift the current character by key positions
c_shifted = (c_index + key) % 26 + ord('A')

c_new = chr(c_shifted)

encrypted += c_new

elif c.islower(): #check if its a lowecase character

# subtract the unicode of 'a' to get index in [0-25) range
c_index = ord(c) - ord('a')

c_shifted = (c_index + key) % 26 + ord('a')

c_new = chr(c_shifted)

encrypted += c_new

elif c.isdigit():

# if it's a number,shift its actual value
c_new = (int(c) + key) % 10

encrypted += str(c_new)

else:

# if its neither alphabetical nor a number, just leave it like that
encrypted += c

return encrypted

# The Decryption Function
def cipher_decrypt(ciphertext, key):

decrypted = ""

for c in ciphertext:

if c.isupper():

c_index = ord(c) - ord('A')

# shift the current character to left by key positions to get its original position
c_og_pos = (c_index - key) % 26 + ord('A')

c_og = chr(c_og_pos)

decrypted += c_og

elif c.islower():

c_index = ord(c) - ord('a')

c_og_pos = (c_index - key) % 26 + ord('a')

c_og = chr(c_og_pos)

decrypted += c_og

elif c.isdigit():

# if it's a number,shift its actual value
c_og = (int(c) - key) % 10

decrypted += str(c_og)

else:

# if its neither alphabetical nor a number, just leave it like that
decrypted += c

return decrypted

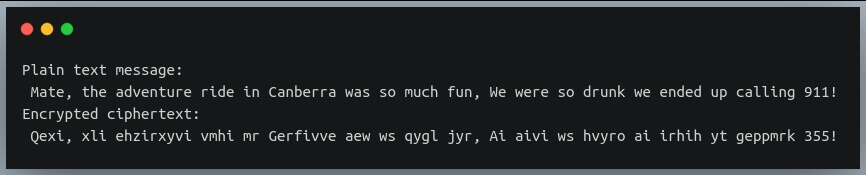
Now that we’ve defined our 2 functions, let’s first use the encryption function to encrypt a secret message a friend is sharing via text message to his buddy.

plain_text = "Mate, the adventure ride in Canberra was so much fun, We were so drunk we ended up calling 911!"

ciphertext = cipher_encrypt(plain_text, 4)

print("Plain text message:\n", plain_text)

print("Encrypted ciphertext:\n", ciphertext)

Output:

Notice how everything except punctuation and spaces has been encrypted.

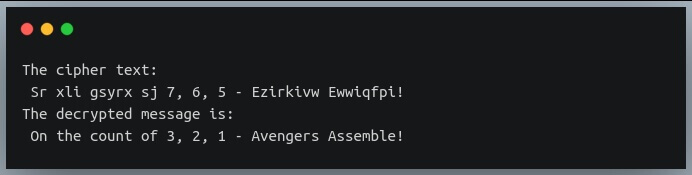
Now let us look at a ciphertext that Colonel Nick Fury was sending on his pager: ‘Sr xli gsyrx sj 7, 6, 5 – Ezirkivw Ewwiqfpi!‘
Turns out it’s Caesar’s ciphertext and fortunately, we got our hands on the key to this ciphertext!
Let’s see if we can unearth the hidden message.

ciphertext = "Sr xli gsyrx sj 7, 6, 5 - Ezirkivw Ewwiqfpi!"

decrypted_msg = cipher_decrypt(ciphertext, 4)

print("The cipher text:\n", ciphertext)

print("The decrypted message is:\n",decrypted_msg)

Output:

Way to go, Avengers!

Using a lookup table

At this stage, we have understood the encryption and decryption process of the Caesar Cipher, and have implemented the same in Python.

Now we will look at how it can be made more efficient and more flexible.
Specifically, we’ll focus on how we can avoid the repeated computations of the shifted positions for each letter in the text during the encryption and decryption process, by building a lookup table ahead of time.

We’ll also look at how we can accommodate any set of user-defined symbols and not just the letters of the alphabet in our encryption process.
We’ll also merge the encryption and decryption process into 1 function and will accept as a parameter which of the two processes the user wants to execute.

What is a lookup table?

A lookup table is simply a mapping of the original characters and the characters they should translate to in an encrypted form.
So far we have been iterating over each of the letters in the string and computing their shifted positions.
This is inefficient because our character set is limited, and most of them occur more than once in the string.
So computing their encrypted equivalence each time they occur is not efficient, and it becomes costly if we are encrypting a very long text with hundreds of thousands of characters in it.

We can avoid this by computing the shifted positions of each of the characters in our character set only once, before starting the encryption process.
So if there are 26 uppercase and 26 lowercase letters, we’d need only 52 computations once and some space in memory to store this mapping.
Then during the encryption and decryption process, all we’d have to do is perform a ‘lookup’ in this table – an operation that is faster than performing a modulo operation each time.

Creating a lookup table

Python’s string module provides an easy way not just to create a lookup table, but also to translate any new string based on this table.

Let’s take an example where we want to create a table of the first five lowercase letters and their indices in the alphabet.
We’d then use this table to translate a string where each of the occurrences of ‘a’, ‘b’, ‘c’, ‘d’ and ‘e’ are replaced by ‘0’, ‘1’, ‘2’, ‘3’ and ‘4’ respectively; and the remaining characters are untouched.

We will use the maketrans() function of the str module to create the table.
This method accepts as its first parameter, a string of characters for which translation is needed, and another string parameter of the same length that contains the mapped characters for each character in the first string.

Let’s create a table for a simple example.

table = str.maketrans("abcde", "01234")

The table is a Python dictionary, that has the characters’ Unicode values as keys, and their corresponding mappings as values.
Now that we have our table ready, we can translate strings of any length using this table.
Fortunately, the translation is also handled by another function in the str module, called translate.

Let’s use this method to convert our text using our table.

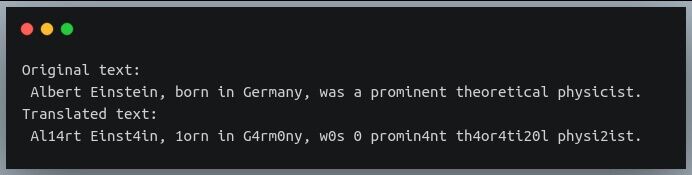
text = "Albert Einstein, born in Germany, was a prominent theoretical physicist."

translated = text.translate(table)

print("Original text:/n", text)

print("Translated text:/n", translated)

Output:

As you can see, each instance of the first 5 lowercase letters have been replaced by their relative indices

We’ll now use the same technique to create a lookup table for Caesar Cipher, based on the key provided.

Implementing the encryption

Let’s create a function caesar_cipher() that accepts a string to be encrypted/decrypted, the ‘character set’ showing which characters in the string should be encrypted (this will default to lowercase letters),
the key, and a boolean value showing if decryption has performed or otherwise(encryption).

import string

def cipher_cipher_using_lookup(text, key, characters = string.ascii_lowercase, decrypt=False):

if key < 0:

print("key cannot be negative")

return None

n = len(characters)

if decrypt==True:

key = n - key

table = str.maketrans(characters, characters[key:]+characters[:key])

translated_text = text.translate(table)

return translated_text

Now that’s one powerful function out there!

The whole shifting operation has been reduced to a slicing operation.
Also, we are using string.ascii_lowercase attribute – it is a string of characters from ‘a’ to ‘z’.
Another important feature we’ve achieved here is that the same function achieves both encryption and decryption, this can be done by changing the value of the ‘key’ parameter.
The slicing operation along with this new key ensures the character set has been left-shifted – something we do in the decryption of a right shift Caesar ciphertext.

Let’s validate if this works by using an earlier example.
We’ll encrypt only capital letters of the text and will supply the same to the ‘characters’ parameter.
We’ll encrypt the text: “HELLO WORLD! Welcome to the world of Cryptography!”

text = "HELLO WORLD! Welcome to the world of Cryptography!"

encrypted = cipher_cipher_using_lookup(text, 3, string.ascii_uppercase, decrypt=False)

print(encrypted)

Output:

Check how the “KHOOR ZRUOG” part matches to encryption of “HELLO WORLD” with key 3 in our first example.
Also, note that we are specifying the character set to be uppercase letters using string.ascii_uppercase

We can check if decryption works properly, by using the same encrypted text we got in our previous result.
If we can recover our original text back, that means our function works perfectly.

text = "KHOOR ZRUOG! Zelcome to the world of Fryptography!"

decrypted = cipher_cipher_using_lookup(text, 3, string.ascii_uppercase, decrypt=True)

print(decrypted)

Output:

Notice how we have set the ‘decrypt’ parameter in our function to True.
Since we have recovered our original text back, it’s a sign our encryption-decryption algorithm using a lookup table is works well!

Let’s now see if we can extend the character set to include not just lowercase/uppercase characters but also digits and punctuations.

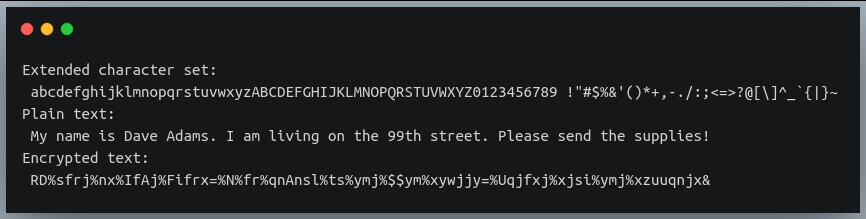
character_set = string.ascii_lowercase + string.ascii_uppercase + string.digits + " "+ string.punctuation

print("Extended character set:\n", character_set)

plain_text = "My name is Dave Adams. I am living on the 99th street. Please send the supplies!"

encrypted = cipher_cipher_using_lookup(plain_text, 5, character_set, decrypt=False)

print("Plain text:\n", plain_text)

print("Encrypted text:\n", encrypted)

Output:

Here we included all the characters we discussed so far (including space character) in the character set to be encoded.
As a result, everything (even the spaces) in our plain text has been replaced by another symbol!
The only difference here is that the wrap-around doesn’t happen individually for lowercase or uppercase characters, but it happens as a whole for the entire character set.
That means ‘Y’ with a shift of 3 will not become ‘B’, but will be encoded to ‘1’.

Negative shift

So far we’ve been doing ‘positive’ shifts or ‘right shifts’ of the characters in the encryption process. And the decryption process for the same involved doing a ‘negative’ shift or ‘left shift’ of the characters.
But what if we want to perform the encryption process with a negative shift? Would our encryption-decryption algorithm change?
Yes, it will, but only slightly. The only change we need for a left shift is to make the sign of the key negative, the rest of the process shall remain the same and will achieve the result of a left shift in encryption and a right shift in the decryption process.

Let us try this by modifying our previous function by adding one more parameter – ‘shift_type’ to our function cipher_cipher_using_lookup().

import string

def cipher_cipher_using_lookup(text, key, characters = string.ascii_lowercase, decrypt=False, shift_type="right"):

if key < 0:

print("key cannot be negative")

return None

n = len(characters)

if decrypt==True:

key = n - key

if shift_type=="left":

# if left shift is desired, we simply inverse they sign of the key
key = -key

table = str.maketrans(characters, characters[key:]+characters[:key])

translated_text = text.translate(table)

return translated_text

Let us test this modified method on a simple text.

text = "Hello World !"

encrypted = cipher_cipher_using_lookup(text, 3, characters = (string.ascii_lowercase + string.ascii_uppercase), decrypt = False, shift_type="left")

print("plain text:", text)

print("encrypted text with negative shift:",encrypted)

Output:

Notice how each of the characters in our plain text has been shifted to the left by 3 positions.
Let’s now check the decryption process using the same string.

text = "Ebiil Tloia !"

decrypted = cipher_cipher_using_lookup(text, 3, characters = (string.ascii_lowercase + string.ascii_uppercase), decrypt = True, shift_type="left")

print("encrypted text with negative shift:", text)

print("recovered text:",decrypted)

Output:

So we could encrypt and decrypt a text using a lookup table and a negative key.

File encryption

In this section, we’ll look at using Caesar Cipher to encrypt a file.
Not that it’s a great choice of encryption (we’ll soon learn why) but it helps you understand the general process of how files are encrypted using any of the algorithms.

Note that we can only encrypt plain text files, and not binary files because we know the character set for plain text files.
So, you can encrypt a file using one of the following 2 approaches:

  1. Read the whole file into a string, encrypt the string and dump it into another file.
  2. Iteratively read the file one line at a time, encrypt the line, and write it to another text file.

We’ll go with the second approach because the first one is feasible only for small files whose content can fit into memory easily.
So let’s define a function that accepts a file and encrypts it using Caesar Cipher with a right shift of 3. We’ll use the default character set of lower case letters.

def fileCipher(fileName, outputFileName, key = 3, shift_type = "right", decrypt=False):

with open(fileName, "r") as f_in:

with open(outputFileName, "w") as f_out:

# iterate over each line in input file
for line in f_in:

#encrypt/decrypt the line
lineNew = cipher_cipher_using_lookup(line, key, decrypt=decrypt, shift_type=shift_type)

#write the new line to output file
f_out.write(lineNew)

print("The file {} has been translated successfully and saved to {}".format(fileName, outputFileName))

The function accepts the input file name, output file name, and, the encryption/decryption parameters we saw in the last section.

Let’s encrypt a file ‘milky_way.txt‘ (has the introductory paragraph of the ‘Milky Way’ page on Wikipedia).
We will output the encrypted file to ‘milky_way_encrypted.txt‘

Let’s encrypt it using the function we defined above:

inputFile = "./milky_way.txt"

outputFile = "./milky_way_encrypted.txt"

fileCipher(inputFile, outputFile, key=3, shift_type="right", decrypt = False)

Output:

Let’s check how our encrypted file ‘milky_way_encrypted.txt‘ looks like now:

Tkh Mlonb Wdb lv wkh jdodab wkdw frqwdlqv rxu Srodu Sbvwhp, zlwk wkh qdph ghvfulelqj wkh jdodab'v dsshdudqfh iurp Eduwk: d kdcb edqg ri
oljkw vhhq lq wkh qljkw vnb iruphg iurp vwduv wkdw fdqqrw eh lqglylgxdoob glvwlqjxlvkhg eb wkh qdnhg hbh.
Tkh whup Mlonb Wdb lv d...
…
…

So our function correctly encrypts the file.
As an exercise, you can try the decryption functionality by passing the encrypted file path as an input and setting the ‘decrypt’ parameter to True.
See if you’re able to recover the original text.

Make sure you don’t pass the same file path as both input and output, which would lead to undesired results as the program would do read and write operation on the same file simultaneously.

Multiple shifts (Vigenère Cipher)

So far, we’ve used a single shift value (key) to shift all the characters of the strings by the same no. of positions.
We can also try a variant of this, where we will not use 1 key, but a sequence of keys that are used to perform different shifts at different positions in the text.

For instance, let us say we use a sequence of 4 keys: [1,5,2,3] With this method, our 1st character in the text will be shifted by a 1 position, the second character will be shifted by 5 positions,
the 3rd character by 2 positions, the 4th character by 3 positions; and then again the 5th character will be shifted by 1 position, and so on.
This is an improved version of Caesar Cipher and is called the Vigenère Cipher.

Let us implement the Vigenère Cipher.

def vigenere_cipher(text, keys, decrypt=False):

# vigenere cipher for lowercase letters
n = len(keys)

translatedText =""

i = 0 #used to record the count of lowercase characters processed so far

# iterate over each character in the text
for c in text:

#translate only if c is lowercase
if c.islower():

shift = keys[i%n] #decide which key is to be used

if decrypt == True:

# if decryption is to be performed, make the key negative
shift = -shift

# Perform the shift operation

shifted_c = chr((ord(c) - ord('a') + shift)%26 + ord('a'))

translatedText += shifted_c

i += 1

else:

translatedText += c

return translatedText

The function performs both encryption and decryption, depending on the value of the boolean parameter ‘decrypt’.
We are keeping the count of the total lowercase letters encoded/decoded using the variable i, we use this with modulo operator to determine which key from the list to be used next.
Notice that we have made the shift operation very compact, this is equivalent to the multi-step process of converting between Unicode and character values and computation of the shift we had seen earlier.

Let us test this function using another plain text:

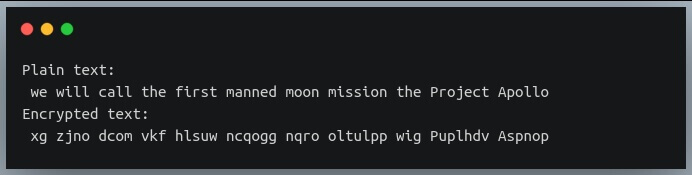
text = "we will call the first manned moon mission the Project Apollo"

encrypted_text = vigenere_cipher(text, [1,2,3])

print("Plain text:\n", text)

print("Encrypted text:\n", encrypted_text)

Output:

Here we are performing the encryption using the keys [1,2,3] and as expected the first character ‘w’ has been shifted by 1 position to ‘x’,
the second character ‘e’ has been shifted by 2 positions to ‘g’, the third character ‘w’ is shifted by 3 positions to ‘z’.
This process repeats with subsequent characters.
Go ahead and perform the decryption process with the same keys and see if you can recover the original statement back.

Why Caesar Cipher is weak?

As simple as it is to understand and implement the Caesar Cipher, it makes it easier for anybody to figure out the decryption without a lot of effort.
Caesar Cipher is a substitution cipher technique where each character in the text is replaced by some fixed character.

If someone identifies the regularity and pattern in the occurrence of certain characters in a ciphertext, they would quickly identify that Caesar Cipher has been used to encrypt the text.
Once you’re convinced that Caesar Cipher technique has been used to encrypt a text, then recovering the original text without the possession of the key is a cakewalk.
A simple BruteForce algorithm figures out the original text in a limited amount of time.

BruteForce Attack

Breaking a ciphertext encoded using Caesar Cipher is only about trying out all the possible keys.
This is feasible because there can only be a limited number of keys that can generate a unique ciphertext.

For instance, if the ciphertext has all the lowercase text encoded, all we have to do is run the decryption step with key values 0 to 25.
Even if the user had supplied a key greater than 25, it would produce a ciphertext that is the same as one of those generated using keys between 0 to 25.

Let’s check out a ciphertext that has all its lowercase characters encoded, and see if we can extract a sensible text from it using a BruteForce attack.
The text at our hand is:

"ks gvozz ohhoqy hvsa tfca hvs tfcbh oh bccb cb Tisgrom"

Let’s first define the decrypt function that accepts a ciphertext and a key, and decrypts all its lowercase letters.

def cipher_decrypt_lower(ciphertext, key):

decrypted = ""

for c in ciphertext:

if c.islower():

c_index = ord(c) - ord('a')

c_og_pos = (c_index - key) % 26 + ord('a')

c_og = chr(c_og_pos)

decrypted += c_og

else:

decrypted += c

return decrypted

Now we have our text but we don’t know the key i.e. the shift value. Let’s write a Brute force attack, that tries all the keys from 0 to 25 and displays each of the decrypted strings:

cryptic_text = "ks gvozz ohhoqy hvsa tfca hvs tfcbh oh bccb cb Tisgrom"

for i in range(0,26):

plain_text = cipher_decrypt_lower(cryptic_text, i)

print("For key {}, decrypted text: {}".format(i, plain_text))

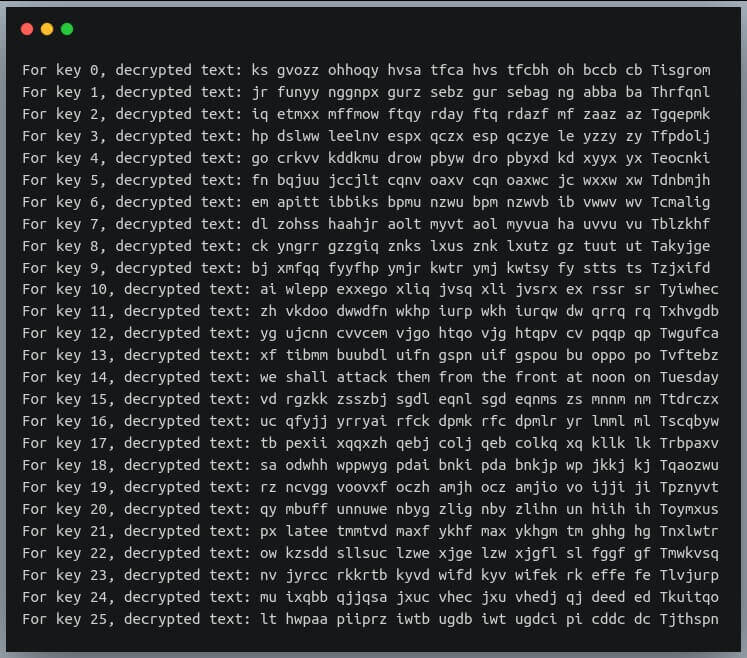
Output:

The output lists all the strings that can be generated from decryption.
If you look at it closely, the string with key 14 is a valid English statement and hence is the correct choice.

Now you know how to break a Caesar Cipher encrypted text.
We could use other, stronger variants of Caesar Cipher, like using multiple shifts (Vigenère cipher), but even in those cases, determined attackers can figure out the correct decryption easily.
So the Caesar Cipher algorithm is relatively much weaker than the modern encryption algorithms.

Conclusion

In this tutorial, we learned what Caesar Cipher is, how it is easy to implement it in Python, and how its implementation can be further optimized using what we call ‘lookup tables’.
We wrote a Python function to implement a generic Caesar Cipher encryption/decryption algorithm that takes various user inputs as the parameter without assuming much.

We then looked at how we can encrypt a file using Caesar Cipher, and then how Caesar Cipher can be strengthened using multiple shifts.
Finally, we looked at how vulnerable Caesar Cipher to BruteForce attacks.

0

R programlama dili Debian 10 Buster’e nasıl yüklenir?

İstatistiksel hesaplama ve grafikler için yazılım ortamı olup aynı zamanda bir programlama dili olan R, GNU Genel Kamu Lisansı ile lisanslanmış, özgür bir yazılımdır. Yeni Zelanda Auckland Üniversitesinden Ross Ihaka ve Robert Gentleman tarafından ortaya çıkarılan R, hâlihazırda R Geliştirme çekirdek ekibi tarafından geliştirilmektedir. S programlama diline benzeyen R, S’in uyarlaması olarak değerlendirilebilir. R, komut satırı arayüzü kullanıyor olsa da değişik grafik kullanıcı arayüzleri de bulunmaktadır. Bu yazıda, R’yi Debian 10’a yükleme konusunu ele alacağız.

Continue Reading →

Öncelikle aşağıdaki komutları çalıştırarak sistemin güncel olduğundan emin olmalıyız:

apt update
apt upgrade

Şimdi aşağıdaki komutu kullanarak GPG anahtarını eklememiz gerekiyor:

sudo apt-key adv --keyserver keys.gnupg.net --recv-key 'E19F5F87128899B192B1A2C2AD5F960A256A04AF'

Ardından, aşağıdaki komut çalıştırılarak depo eklenmelidir:

sudo add-apt-repository 'deb https://cloud.r-project.org/bin/linux/debian stretch-cran35/'

Artık R programlama dilini yükleyebiliriz. Bunun için;

sudo apt update
sudo apt install r-base

komutlarını vermeliyiz. Şimdi de yüklediğimiz R sürümünü yazdırarak kurulumu doğrulayalım:

R --version

Şuna benzer bir çıktı almanız gerekiyor:

$ R --version

R version 3.6.4 (2020-03-16) -- "Holding the Windsock"
Copyright (C) 2020 The R Foundation for Statistical Computing
Platform: x86_64-pc-linux-gnu (64-bit)

Son olarak CRAN’dan R paketlerinin kurulması gerekiyor. Bunun için;

sudo apt install build-essential

komutuyla gerekli araçları yükleyelim. Ardından, R konsolunu root olarak açalım:

sudo -i R

Ve mesela stringr paketini kuralım:

install.packages("stringr")

Kurulum biraz zaman alacaktır, ancak tamamlandığında, aşağıdakini yazarak kütüphaneyi yükleyelim:

library(stringr)

CRAN paketleri sayfasında daha fazla R paketi bulabilir ve

install.packages ()

komutu ile kurabilirsiniz.

0