
Tag Archives | linux

Linux find command tutorial (with examples)

When it comes to locating files or directories on your system, the find command on Linux is unparalleled. It’s simple to use, yet has a lot of different options that allow you to fine-tune your search for files. Read on to see examples of how you can wield this command to find anything on your system. Every file is only a few keystrokes away once you know how to use the find command in Linux. You can tell the find command to look specifically for directories with the -type d option. This will make find command only search for matching directory names and not file names. Since hidden files and directories in Linux begin with a period, we can specify this search pattern in our search string in order to recursively list hidden files and directories.

Continue Reading →

Find a directory

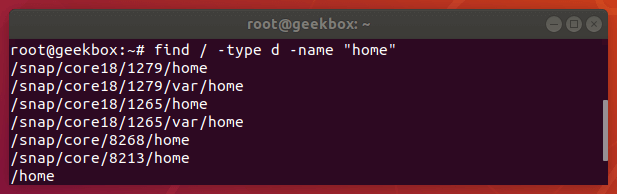
You can tell the find command to look specifically for directories with the -type d option. This will make find command only search for matching directory names and not file names.

find /path/to/search -type d -name "name-of-dir"
Find directory

Find hidden files

Since hidden files and directories in Linux begin with a period, we can specify this search pattern in our search string in order to recursively list hidden files and directories.

find /path/to/search -name ".*"

Find files of a certain size or greater than X

The -size option on find allows us to search for files of a specific size. It can be used to find files of an exact size, files that are larger or smaller than a certain size, or files that fit into a specified size range. Here are some examples:

Search for files bigger than 10MB in size:

find /path/to/search -size +10M

Search for files smaller than 10MB in size:

find /path/to/search -size -10M

Search for files that are exactly 10MB in size:

find /path/to/search -size 10M

Search for files that are between 100MB and 1GB in size:

find /path/to/search -size +100M -size -1G

Find from a list of files

If you have a list of files (in a .txt file, for example) that you need to search for, you can search for your list of files with a combination of the find and grep commands. For this command to work, just make sure that each pattern you want to search for is separated by a new line.

find /path/to/search | grep -f filelist.txt

The -f option on grep means “file” and allows us to specify a file of strings to be matched with. This results in the find command returning any file or directory names that match those in the list.

Find not in a list

Using that same list of files we mentioned in the previous example, you can also use find to search for any files that do not fit the patterns inside the text file. Once again, we’ll use a combination of the find and grep command; we just need an additional option specified with grep:

find /path/to/search | grep -vf filelist.txt

The -v option on grep means “inverse match” and will return a list of files that don’t match any of the patterns specified in our list of files.

Set the maxdepth

The find command will search recursively by default. This means that it will search the specified directory for the pattern you specified, as well as any and all subdirectories within the directory you told it to search.

For example, if you tell find to search the root directory of Linux (/), it will search the entire hard drive, no matter how many subdirectories of subdirectories exist. You can circumvent this behavior with the -maxdepth option.

Specify a number after -maxdepth to instruct find on how many subdirectories it should recursively search.

Search for files only in the current directory and don’t search recursively:

find . -maxdepth 0 -name "myfile.txt"

Search for files only in the current directory and one subdirectory deeper:

find . -maxdepth 1 -name "myfile.txt"

Find empty files (zero-length)

To search for empty files with find, you can use the -empty flag. Search for all empty files:

find /path/to/search -type f -empty

Search for all empty directories:

find /path/to/search -type d -empty

It is also very handy to couple this command with the -delete option if you’d like to automatically delete the empty files or directories that are returned by find.

Delete all empty files in a directory (and subdirectories):

find /path/to/search -type f -empty -delete

Find largest directory or file

If you would like to quickly determine what files or directories on your system are taking up the most room, you can use find to search recursively and output a sorted list of files and/or directories by their size.

How to show the biggest file in a directory:

find /path/to/search -type f -printf "%s\t%p\n" | sort -n | tail -1

Notice that the find command was sorted to two other handy Linux utilities: sort and tail. Sort will put the list of files in order by their size, and tail will output only the last file in the list, which is also the largest.

You can adjust the tail command if you’d like to output, for example, the top 5 largest files:

find /path/to/search -type f -printf "%s\t%p\n" | sort -n | tail -5

Alternatively, you could use the head command to determine the smallest file(s):

find /path/to/search -type f -printf "%s\t%p\n" | sort -n | head -5

If you’d like to search for directories instead of files, just specify “d” in the type option. How to show the biggest directory:

find /path/to/search -type d -printf "%s\t%p\n" | sort -n | tail -1

Find setuid set files

Setuid is an abbreviation for “set user ID on execution” which is a file permission that allows a normal user to run a program with escalated privileges (such as root).

This can be a security concern for obvious reasons, but these files can be easy to isolate with the find command and a few options.

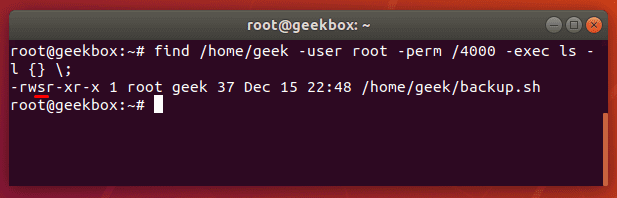
The find command has two options to help us search for files with certain permissions: -user and -perm. To find files that are able to be executed with root privileges by a normal user, you can use this command:

find /path/to/search -user root -perm /4000
Find suid files

In the screenshot above, we included the -exec option in order to show a little more output about the files that find returns with. The whole command looks like this:

find /path/to/search -user root -perm /4000 -exec ls -l {} \;

You could also substitute “root” in this command for any other user that you want to search for as the owner. Or, you could search for all files with SUID permissions and not specify a user at all:

find /path/to/search -perm /4000

Find sgid set files

Finding files with SGID set is almost the same as finding files with SUID, except the permissions for 4000 need to be changed to 2000:

find /path/to/search -perm /2000

You can also search for files that have both SUID and SGID set by specifying 6000 in the perms option:

find /path/to/search -perm /6000

List files without permission denied

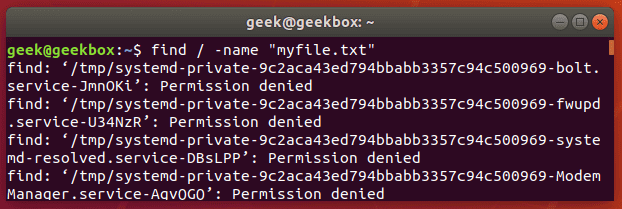
When searching for files with the find command, you must have read permissions on the directories and subdirectories that you’re searching through. If you don’t, find will output an error message but continue to look throughout the directories that you do have permission on.
Permission denied

Although this could happen in a lot of different directories, it will definitely happen when searching your root directory.

That means that when you’re trying to search your whole hard drive for a file, the find command is going to produce a ton of error messages.

To avoid seeing these errors, you can redirect the stderr output of find to stdout, and pipe that to grep.

find / -name "myfile.txt" 2>%1 | grep -v "Permission denied"

This command uses the -v (inverse) option of grep to show all output except for the lines that say “Permission denied.”

Find modified files within the last X days

Use the -mtime option on the find command to search for files or directories that were modified within the last X days. It can also be used to search for files older than X days, or files that were modified exactly X days ago.

Here are some examples of how to use the -mtime option on the find command:

Search for all files that were modified within the last 30 days:

find /path/to/search -type f -mtime -30

Search for all files that were modified more than 30 days ago:

find /path/to/search -type f -mtime +30

Search for all files that were modified exactly 30 days ago:

find /path/to/search -type f -mtime 30

If you want the find command to output more information about the files it finds, such as the modified date, you can use the -exec option and include an ls command:

find /path/to/search -type f -mtime -30 -exec ls -l {} \;

Sort by time

To sort through the results of find by modified time of the files, you can use the -printf option to list the times in a sortable way, and pipe that output to the sort utility.

find /path/to/search -printf "%T+\t%p\n" | sort

This command will sort the files older to newer. If you’d like the newer files to appear first, just pass the -r (reverse) option to sort.

find /path/to/search -printf "%T+\t%p\n" | sort -r

Difference between locate and find

The locate command on Linux is another good way to search for files on your system. It’s not packed with a plethora of search options like the find command is, so it’s a bit less flexible, but it still comes in handy.

locate myfile.txt

The locate command works by searching a database that contains all the names of the files on the system. The database that it searches through is updated with the upatedb command.

Since the locate command doesn’t have to perform a live search of all the files on the system, it’s much more efficient than the find command. But in addition to the lack of options, there’s another drawback: the database of files only updates once per day.

You can update this database of files manually by running the updatedb command:

updatedb

The locate command is particularly useful when you need to search the entire hard drive for a file, since the find command will naturally take a lot longer, as it has to traverse every single directory in real-time.

If searching a specific directory, known to not contain a large number of subdirectories, it’s better to stick with the find command.

CPU load of find command

When searching through loads of directories, the find command can be resource-intensive. It should inherently allow more important system processes to have priority, but if you need to ensure that the find command takes up fewer resources on a production server, you can use the ionice or nice command.

Monitor CPU usage of the find command:

top

Reduce the Input/Output priority of find command:

ionice -c3 -n7 find /path/to/search -name "myfile.txt"

Reduce the CPU priority of find command:

nice -n 19 find /path/to/search -name "myfile.txt"

Or combine both utilities to really ensure low I/O and low CPU priority:

nice -n ionice -c2 -n7 find /path/to/search -name "myfile.txt"

I hope you find the tutorial useful. Keep coming back.

0

SSH port forwarding (tunneling) in Linux

In this tutorial, we will cover SSH port forwarding in Linux. This is a function of the SSH utility that Linux administrators use to create encrypted and secure relays across different systems. SSH port forwarding, also called SSH tunneling, is used to create a secure connection between two or more systems. Applications can then use these tunnels to transmit data. Your data is only as secure as its encryption, which is why SSH port forwarding is a popular mechanism to use. Read on to find out more and see how to setup SSH port forwarding on your own systems. To put it simply, SSH port forwarding involves establishing an SSH tunnel between two or more systems and then configuring the systems to transmit a specified type of traffic through that connection.

Continue Reading →

What is SSH port forwarding?

To put it simply, SSH port forwarding involves establishing an SSH tunnel between two or more systems and then configuring the systems to transmit a specified type of traffic through that connection.

There are a few different things you can do with this: local forwarding, remote forwarding, and dynamic port forwarding. Each configuration requires its own steps to setup, so we will go over each of them later in the tutorial.

Local port forwarding is used to make an external resource available on the local network. An SSH tunnel is established to a remote system, and traffic from the local network can use that tunnel to transmit data back and forth, accessing the remote system and network as if it was a part of the local network.

Remote port forwarding is the exact opposite. An SSH tunnel is established but the remote system is able to access your local network.

Dynamic port forwarding sets up a SOCKS proxy server. You can configure applications to connect to the proxy and transmit all data through it. The most common use for this is for private web browsing or to make your connection seemingly originate from a different country or location.

SSH port forwarding can also be used to setup a virtual private network (VPN). You’ll need an extra program for this called sshuttle. We cover the details later in the tutorial.

Why use SSH port forwarding?

Since SSH creates encrypted connections, this is an ideal solution if you have applications that transmit data in plaintext or use an unencrypted protocol. This holds especially true for legacy applications.

It’s also popular to use it for connecting to a local network from the outside. For example, an employee using SSH tunnels to connect to a company’s intranet.

You may be thinking this sounds like a VPN. The two are similar, but creating ssh tunnels is for specific traffic, whereas VPNs are more for establishing general connections.

SSH port forwarding will allow you to access remote resources by just establishing an SSH tunnel. The only requirement is that you have SSH access to the remote system and, ideally, public key authentication configured for password-less SSHing.

How many sessions are possible?

Technically, you can specify as many port forwarding sessions as you’d like. Networks use 65,535 different ports, and you are able to forward any of them that you want.

When forwarding traffic, be cognizant of the services that use certain ports. For example, port 80 is reserved for HTTP. So you would only want to forward traffic on port 80 if you intend to forward web requests.

The port you forward on your local system doesn’t have to match that of the remote server. For example, you can forward port 8080 on localhost to port 80 on the remote host.

If you don’t care what port you are using on the local system, select one between 2,000 and 10,000 since these are rarely used ports. Smaller numbers are typically reserved for certain protocols.

Local forwarding

Local forwarding involves forwarding a port from the client system to a server. It allows you to configure a port on your system so that all connections to that port will get forwarded through the SSH tunnel.

Use the -L switch in your ssh command to specify local port forwarding. The general syntax of the command is like this:

ssh -L local_port:remote_ip:remote_port [email protected]

Check out the example below:

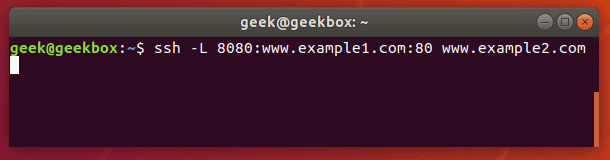
ssh -L 80:example1.com:80 example2.com

local port forwarding

This command would forward all requests to example1.com to example2.com. Any user on this system that opens a web browser and attempts to navigate to example1.com will, in the background, have their request sent to example2.com instead and display a different website.

Such a command is useful when configuring external access to a company intranet or other private network resources.

Test SSH port forwarding

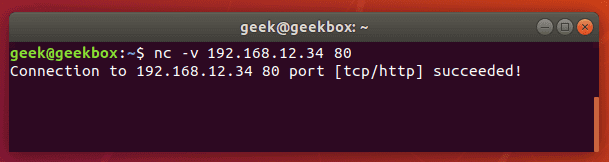
To see if your port forwarding is working correctly, you can use the netcat command. On the client machine (the system where you ran the ssh -L command), type the netcat command with this syntax:

nc -v remote_ip port_number

Test port forwarding using netcat

If the port is forwarded and data is able to traverse the connection successfully, netcat will return with a success message. If it doesn’t work, the connection will time out.

If you’re having trouble getting the port forwarding to work, make sure you’re able to ssh into the remote server normally and that you have configured the ports correctly. Also, verify that the connection isn’t being blocked by a firewall.

Persistent SSH tunnels (Using Autossh)

Autossh is a tool that can be used to create persistent SSH tunnels. The only prerequisite is that you need to have public key authentication configured between your systems, unless you want to be prompted for a password every time the connection dies and is reestablished.

Autossh may not be installed by default on your system, but you can quickly install it using apt, yum, or whatever package manager your distribution uses.

sudo apt-get install autossh

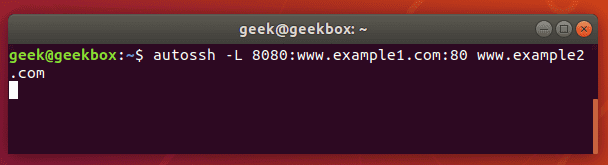
The autossh command is going to look pretty much identical to the ssh command we ran earlier.

autossh -L 80:example1.com:80 example2.com

Persistent SSH port forwarding autossh

Autossh will make sure that tunnels are automatically re-established in case they close because of inactivity, remote machine rebooting, network connection being lost, etc.

Remote forwarding

Remote port forwarding is used to give a remote machine access to your system. For example, if you want a service on your local computer to be accessible by a system(s) on your company’s private network, you could configure remote port forwarding to accomplish that.

To set this up, issue an ssh command with the following syntax:

ssh -R remote_port:local_ip:local_port [email protected]

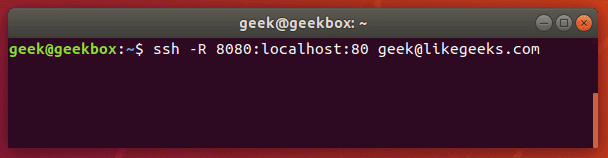
If you have a local web server on your computer and would like to grant access to it from a remote network, you could forward port 8080 (common http alternative port) on the remote system to port 80 (http port) on your local system.

ssh -R 8080:localhost:80 [email protected]

Remote port forwarding

Dynamic forwarding

SSH dynamic port forwarding will make SSH act as a SOCKS proxy server. Rather than forwarding traffic on a specific port (the way local and remote port forwarding do), this will forward traffic across a range of ports.

If you have ever used a proxy server to visit a blocked website or view location-restricted content (like viewing stuff on Netflix that isn’t available in your country), you probably used a SOCKS server.

It also provides privacy, since you can route your traffic through a SOCKS server with dynamic port forwarding and prevent anyone from snooping log files to see your network traffic (websites visited, etc).

To set up dynamic port forwarding, use the ssh command with the following syntax:

ssh -D local_port [email protected]

So, if we wanted to forward traffic on port 1234 to our SSH server:

ssh -D 1234 [email protected]

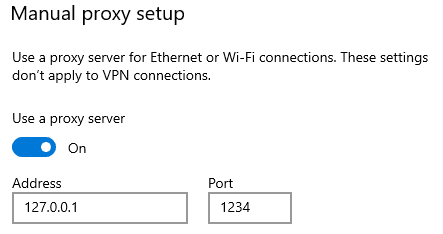
Once you’ve established this connection, you can configure applications to route traffic through it. For example, on your web browser:

Socks proxy

Type the loopback address (127.0.0.1) and the port you configured for dynamic port forwarding, and all traffic will be forwarded through the SSH tunnel to the remote host (in our example, the likegeeks.com SSH server).

Multiple forwarding

For local port forwarding, if you’d like to setup more than one port to be forwarded to a remote host, you just need to specify each rule with a new -L switch each time. The command syntax is like this:

ssh -L local_port_1:remote_ip:remote_port_1 -L local_port_2:remote_ip:remote_port2 [email protected]

For example, if you want to forward ports 8080 and 4430 to 192.168.1.1 ports 80 and 443 (HTTP and HTTPS), respectively, you would use this command:

ssh -L 8080:192.168.1.1:80 -L 4430:192.168.1.1:443 [email protected]

For remote port forwarding, you can setup more than one port to be forwarded by specifying each new rule with the -R switch. The command syntax is like this:

ssh -R remote_port1:local_ip:local_port1 remote_port2:local_ip:local_port2 [email protected]

List port forwarding

You can see what SSH tunnels are currently established with the lsof command.

lsof -i | egrep '\<ssh\>'

SSH tunnels

In this screenshot, you can see that there are 3 SSH tunnels established. Add the -n flag to have IP addresses listed instead of resolving the hostnames.

lsof -i -n | egrep '\<ssh\>'

SSH tunnels n flag

Limit forwarding

By default, SSH port forwarding is pretty open. You can freely create local, remote, and dynamic port forwards as you please.

But if you don’t trust some of the SSH users on your system, or you’d just like to enhance security in general, you can put some limitations on SSH port forwarding.

There are a couple of different settings you can configure inside the sshd_config file to put limitations on port forwarding. To configure this file, edit it with vi, nano, or your favorite text editor:

sudo vi /etc/ssh/sshd_config

PermitOpen can be used to specify the destinations to which port forwarding is allowed. If you only want to allow forwarding to certain IP addresses or hostnames, use this directive. The syntax is as follows:

PermitOpen host:port

PermitOpen IPv4_addr:port

PermitOpen [IPv6_addr]:port

AllowTCPForwarding can be used to turn SSH port forwarding on or off, or specify what type of SSH port forwarding is permitted. Possible configurations are:

AllowTCPForwarding yes #default setting

AllowTCPForwarding no #prevent all SSH port forwarding

AllowTCPForwarding local #allow only local SSH port forwarding

AllowTCPForwarding remote #allow only remote SSH port forwarding

To see more information about these options, you can check out the man page:

man sshd_config

Low latency

The only real problem that arises with SSH port forwarding is that there is usually a bit of latency. You probably won’t notice this as an issue if you’re doing something minor, like accessing text files or small databases.

The problem becomes more apparent when doing network intensive activities, especially if you have port forwarding set up as a SOCKS proxy server.

The reason for the latency is because SSH is tunneling TCP over TCP. This is a terribly inefficient way to transfer data and will result in slower network speeds.

You could use a VPN to prevent the issue, but if you are determined to stick with SSH tunnels, there is a program called sshuttle that corrects the issue. Ubuntu and Debian-based distributions can install it with apt-get:

sudo apt-get install sshuttle

If you package manager on your distribution doesn’t have sshuttle in its repository, you can clone it from GitHub:

git clone https://github.com/sshuttle/sshuttle.git

cd sshuttle

./setup.py install

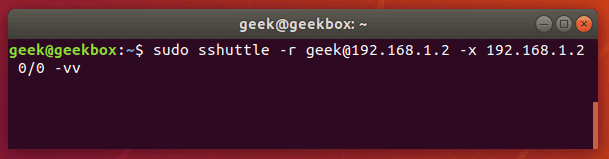
Setting up a tunnel with sshuttle is different from the normal ssh command. To setup a tunnel that forwards all traffic (akin to a VPN):

sudo sshuttle -r user@remote_ip -x remote_ip 0/0 -vv

sshuttle command

Break the connection with a ctrl+c key combination in the terminal. Alternatively, to run the sshuttle command as a daemon, add the -D switch to your command.

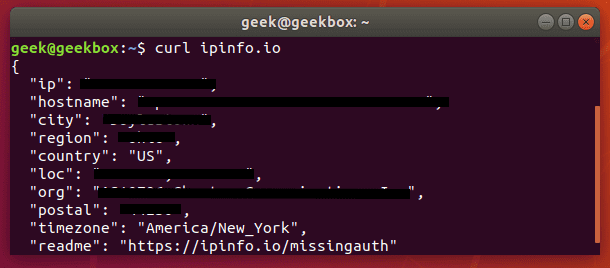
Want to make sure that the connection was established and the internet sees you at the new IP address? You can run this curl command:

curl ipinfo.io

curl IP address

I hope you find the tutorial useful. Keep coming back.

0

15+ examples for Linux cURL command

In this tutorial, we will cover the cURL command in Linux. Follow along as we guide you through the functions of this powerful utility with examples to help you understand everything it’s capable of. The cURL command is used to download or upload data to a server, using one of its 20+ supported protocols. This data could be a file, email message, or web page. What is cURL command? cURL is an ideal tool for interacting with a website or API, sending requests and displaying the responses to the terminal or logging the data to a file. Sometimes it’s used as part of a larger script, handing off the retrieved data to other functions for processing. Since cURL can be used to retrieve files from servers, it’s often used to download part of a website. It performs this function well, but sometimes the wget command is better suited for that job. We’ll go over some of the differences and similarities between wget and cURL later in this article. We’ll show you how to get started using cURL in the sections below.
Continue Reading →

Download a file

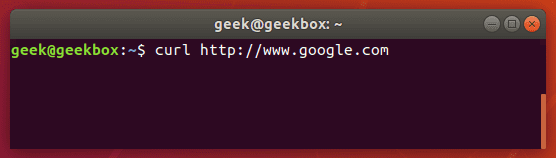
The most basic command we can give to cURL is to download a website or file. cURL will use HTTP as its default protocol unless we specify a different one. To download a website, just issue this command:

curl http://www.google.com

Of course, enter any website or page that you want to retrieve.

curl basic command

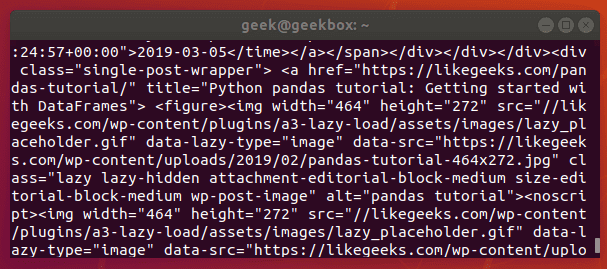
Doing a basic command like this with no extra options will rarely be useful, because this only tells cURL to retrieve the source code of the page you’ve provided.

curl output

When we ran our command, our terminal is filled with HTML and other web scripting code – not something that is particularly useful to us in this form.

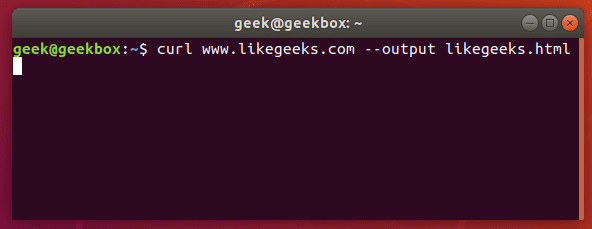
Let’s download the website as an HTML document instead, that way the content can be displayed. Add the –output option to cURL to achieve this.
curl output switch

Now the website we downloaded can be opened and displayed in a web browser.

downloaded website

If you’d like to download an online file, the command is about the same. But make sure to append the –output option to cURL as we did in the example above.

If you fail to do so, cURL will send the binary output of the online file to your terminal, which will likely cause it to malfunction.

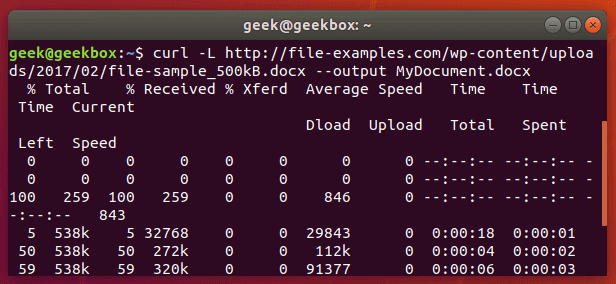
Here’s what it looks like when we initiate the download of a 500KB word document.

curl download document

The word document begins to download and the current progress of the download is shown in the terminal. When the download completes, the file will be available in the directory we saved it to.

In this example, no directory was specified, so it was saved to our present working directory (the directory from which we ran the cURL command).

Also, did you notice the -L option that we specified in our cURL command? It was necessary in order to download this file, and we go over its function in the next section.

Follow redirect

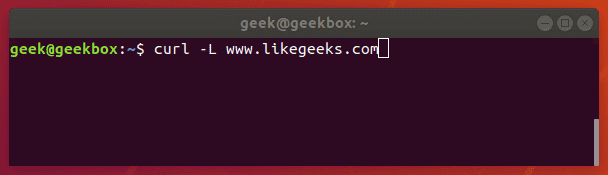
If you get an empty output when trying to cURL a website, it probably means that the website told cURL to redirect to a different URL. By default, cURL won’t follow the redirect, but you can tell it to with the -L switch.

curl -L www.likegeeks.com

curl follow redirect

In our research for this article, we found it was necessary to specify the -L on a majority of websites, so be sure to remember this little trick. You may even want to append it to the majority of your cURL commands by default.

Stop and resume download

If your download gets interrupted, or if you need to download a big file but don’t want to do it all in one session, cURL provides an option to stop and resume the transfer.

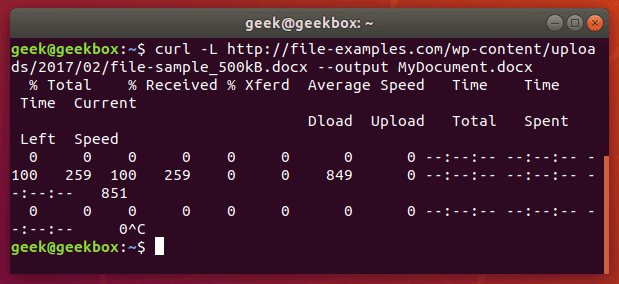
To stop a transfer manually, you can just end the cURL process the same way you’d stop almost any process currently running in your terminal, with a ctrl+c combination.

curl stop download

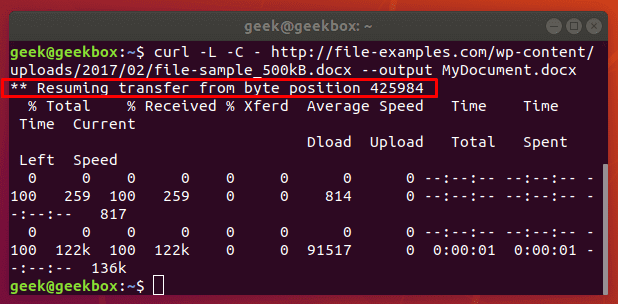
Our download has begun, but was interrupted with ctrl+c, now let’s resume it with the following syntax:

curl -C - example.com/some-file.zip --output MyFile.zip

The -C switch is what resumes our file transfer, but also notice that there is a dash (-) directly after it. This tells cURL to resume the file transfer, but to first look at the already downloaded portion in order to see the last byte downloaded and determine where to resume.

resume file download

Our file transfer was resumed and then proceeded to finish downloading successfully.

Specify timeout

If you want cURL to abandon what it’s doing after a certain amount of time, you can specify a timeout in the command. This is especially useful because some operations in cURL don’t have a timeout by default, so one needs to be specified if you don’t want it getting hung up indefinitely.

You can specify a maximum time to spend executing a command with the -m switch. When the specified time has elapsed, cURL will exit whatever it’s doing, even if it’s in the middle of downloading or uploading a file.

cURL expects your maximum time to be specified in seconds. So, to timeout after one minute, the command would look like this:

curl -m 60 example.com

Another type of timeout that you can specify with cURL is the amount of time to spend connecting. This helps make sure that cURL doesn’t spend an unreasonable amount of time attempting to contact a host that is offline or otherwise unreachable.

It, too, accepts seconds as an argument. The option is written as –connect-timeout.

curl --connect-timeout 60 example.com

Using a username and a password

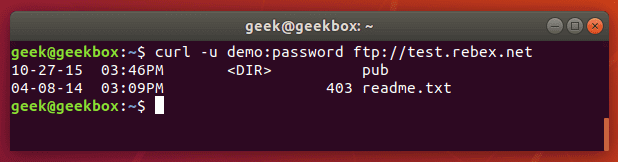
You can specify a username and password in a cURL command with the -u switch. For example, if you wanted to authenticate with an FTP server, the syntax would look like this:

curl -u username:password ftp://example.com

curl authenticate

You can use this with any protocol, but FTP is frequently used for simple file transfers like this.

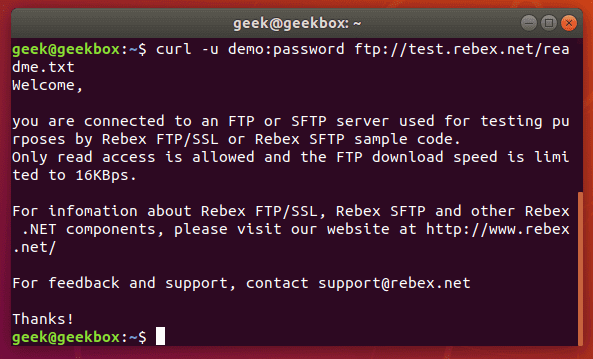
If we wanted to download the file displayed in the screenshot above, we just issue the same command but use the full path to the file.

curl -u username:password ftp://example.com/readme.txt

curl authenticate download

Use proxies

It’s easy to direct cURL to use a proxy before connecting to a host. cURL will expect an HTTP proxy by default, unless you specify otherwise.

Use the -x switch to define a proxy. Since no protocol is specified in this example, cURL will assume it’s an HTTP proxy.

curl -x 192.168.1.1:8080 http://example.com

This command would use 192.168.1.1 on port 8080 as a proxy to connect to example.com.

You can use it with other protocols as well. Here’s an example of what it’d look like to use an HTTP proxy to cURL to an FTP server and retrieve a file.

curl -x 192.168.1.1:8080 ftp://example.com/readme.txt

cURL supports many other types of proxies and options to use with those proxies, but expanding further would be beyond the scope of this guide. Check out the cURL man page for more information about proxy tunneling, SOCKS proxies, authentication, etc.

Chunked download large files

We’ve already shown how you can stop and resume file transfers, but what if we wanted cURL to only download a chunk of a file? That way, we could download a large file in multiple chunks.

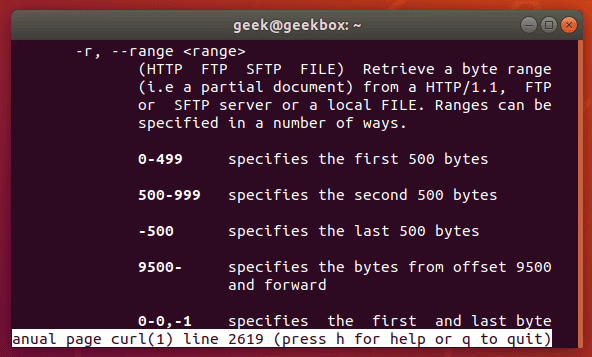
It’s possible to download only certain portions of a file, in case you needed to stay under a download cap or something like that. The –range flag is used to accomplish this.

curl range man

Sizes must be written in bytes. So if we wanted to download the latest Ubuntu .iso file in 100 MB chunks, our first command would look like this:

curl --range 0-99999999 http://releases.ubuntu.com/18.04/ubuntu-18.04.3-desktop-amd64.iso ubuntu-part1

The second command would need to pick up at the next byte and download another 100 MB chunk.

curl --range 0-99999999 http://releases.ubuntu.com/18.04/ubuntu-18.04.3-desktop-amd64.iso ubuntu-part1

curl --range 100000000-199999999 http://releases.ubuntu.com/18.04/ubuntu-18.04.3-desktop-amd64.iso ubuntu-part2

Repeat this process until all the chunks are downloaded. The last step is to combine the chunks into a single file, which can be done with the cat command.

cat ubuntu-part? > ubuntu-18.04.3-desktop-amd64.iso

Client certificate

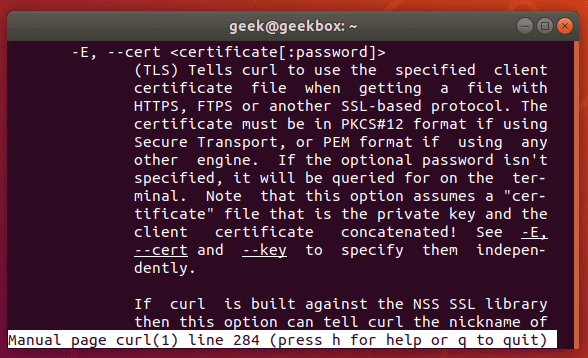
To access a server using certificate authentication instead of basic authentication, you can specify a certificate file with the –cert option.

curl --cert path/to/cert.crt:password ftp://example.com

cURL has a lot of options for the format of certificate files.

curl cert

There are more certificate related options, too: –cacert, –cert-status, –cert-type, etc. Check out the man page for a full list of options.

Silent cURL

If you’d like to suppress cURL’s progress meter and error messages, the -s switch provides that feature. It will still output the data you request, so if you’d like the command to be 100% silent, you’d need to direct the output to a file.

Combine this command with the -O flag to save the file in your present working directory. This will ensure that cURL returns with 0 output.

curl -s -O http://example.com

Alternatively, you could use the –output option to choose where to save the file and specify a name.

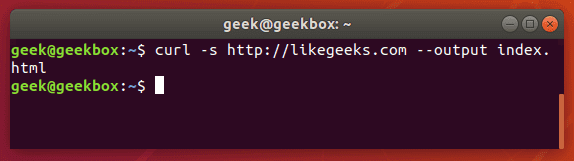
curl -s http://example.com --output index.html

curl silent

Get headers

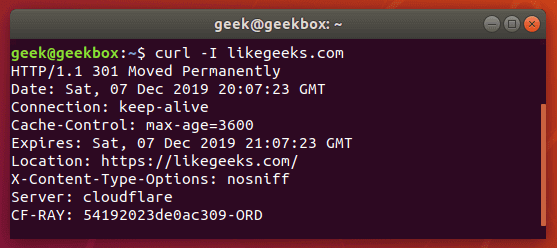
Grabbing the header of a remote address is very simple with cURL, you just need to use the -I option.

curl -I example.com

curl headers

If you combine this with the –L option, cURL will return the headers of every address that it’s redirected to.

curl -I -L example.com

Multiple headers

You can pass headers to cURL with the -H option. And to pass multiple headers, you just need to use the -H option multiple times. Here’s an example:

curl -H 'Connection: keep-alive' -H 'Accept-Charset: utf-8 ' http://example.com

Post (upload) file

POST is a common way for websites to accept data. For example, when you fill out a form online, there’s a good chance that the data is being sent from your browser using the POST method. To send data to a website in this way, use the -d option.

curl -d 'name=geek&location=usa' http://example.com

To upload a file, rather than text, the syntax would look like this:

curl -d @filename http://example.com

Use as many -d flags as you need in order to specify all the different data or filenames that you are trying to upload.

You can the -T option if you want to upload a file to an FTP server.

curl -T myfile.txt ftp://example.com/some/directory/

Send an email

Sending an email is simply uploading data from your computer (or another device) to an email server. Since cURL is able to upload data, we can use it to send emails. There are a slew of options, but here’s an example of how to send an email through an SMTP server:

curl smtp://mail.example.com --mail-from [email protected] --mail-rcpt [email protected] --upload-file email.txt

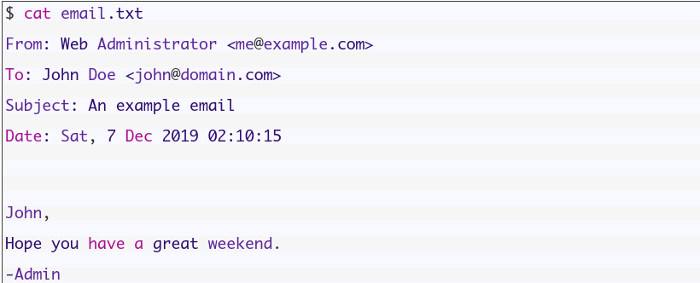
Your email file would need to be formatted correctly. Something like this:

As usual, more granular and specialized options can be found in the man page of cURL.

Read email message

cURL supports IMAP (and IMAPS) and POP3, both of which can be used to retrieve email messages from a mail server.

Login using IMAP like this:

curl -u username:password imap://mail.example.com

This command will list available mailboxes, but not view any specific message. To do this, specify the UID of the message with the –X option.

curl -u username:password imap://mail.example.com -X 'UID FETCH 1234'

Difference between cURL and wget

Sometimes people confuse cURL and wget because they’re both capable of retrieving data from a server. But this is the only thing they have in common.

We’ve shown in this article what cURL is capable of. wget provides a different set of functions. wget is the best tool for downloading websites and is capable of recursively traversing directories and links to download entire sites.

For downloading websites, use wget. If using some protocol other than HTTP or HTTPS, or for uploading files, use cURL. cURL is also a good option for downloading individual files from the web, although wget does that fine, too.

I hope you find the tutorial useful. Keep coming back.

0

Grep command in Linux (With Examples)

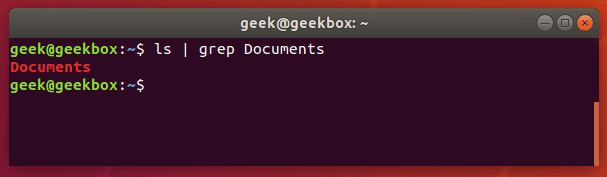
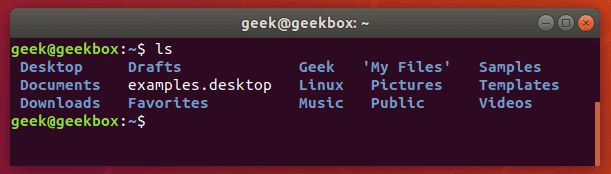
In this tutorial, you will learn how to use the very essential grep command in Linux. We’re going to go over why this command is important to master, and how you can utilize it in your everyday tasks at the command line. Let’s dive right in with some explanations and examples. Why do we use grep? Grep is a command line tool that Linux users use to search for strings of text. You can use it to search a file for a certain word or combination of words or you can pipe the output of other Linux commands to grep, so grep can show you only the output that you need to see. Let’s look at some really common examples. Say that you need to check the contents of a directory to see if a certain file exists there. That’s something you would use the “ls” command for. But, to make this whole process of checking the directory’s contents even faster, you can pipe the output of the ls command to the grep command. Let’s look in our home directory for a folder called Documents.
Continue Reading →

ls without grep

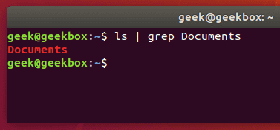
And now let’s try checking the directory again, but this time using grep to check specifically for the Documents folder.

ls | grep Documents

ls grep

As you can see in the screenshot above, using the grep command saved us time by quickly isolating the word we searched for from the rest of the unnecessary output that the ls command produced.

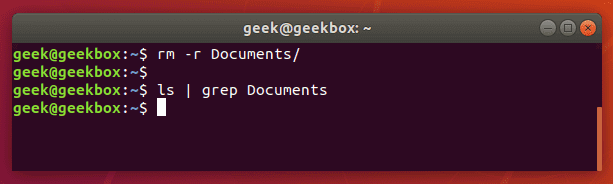
If the Documents folder didn’t exist, grep wouldn’t return any output. So if nothing is returned by grep, that means that it couldn’t find the word you are searching for.

grep no results

Find a string

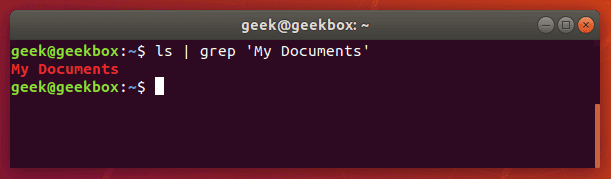
If you need to search for a string of text, rather than just a single word, you will need to wrap the string in quotes. For example, what if we needed to search for the “My Documents” directory instead of the single-worded “Documents” directory?

ls | grep 'My Documents'

grep for string

Grep will accept both single quotes and double quotes, so wrap your string of text with either.

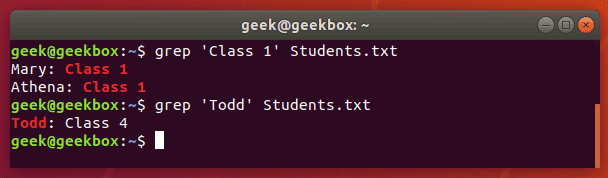
While grep is often used to search the output piped from other command line tools, you can also use it to search documents directly. Here’s an example where we search a text document for a string.

grep 'Class 1' Students.txt

grep for string in document

Find multiple strings

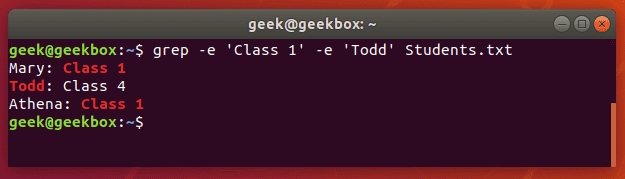
You can also use grep to find multiple words or strings. You can specify multiple patterns by using the -e switch. Let’s try searching a text document for two different strings:

grep -e 'Class 1' -e Todd Students.txt

grep multiple strings

Notice that we only needed to use quotes around the strings that contained spaces.

Difference between grep, egrep fgrep, pgrep, zgrep

Various grep switches were historically included in different binaries. On modern Linux systems, you will find these switches available in the base grep command, but it’s common to see distributions support the other commands as well.

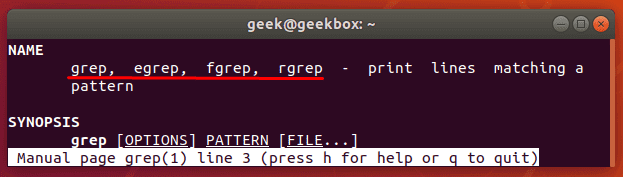
From the man page for grep:

grep commands

egrep is the equivalent of grep -E

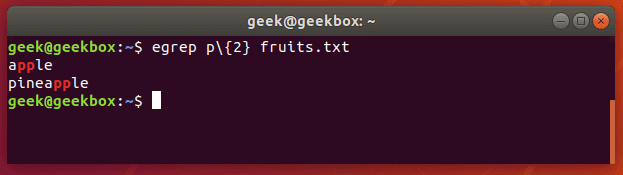
This switch will interpret a pattern as an extended regular expression. There’s a ton of different things you can do with this, but here’s an example of what it looks like to use a regular expression with grep.

Let’s search a text document for strings that contain two consecutive ‘p’ letters:

egrep p\{2} fruits.txt
or
grep -E p\{2} fruits.txt

egrep example

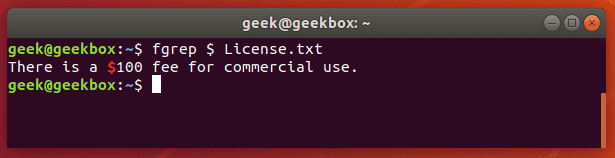
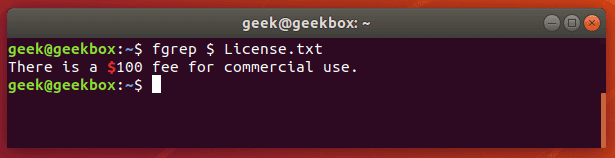
fgrep is the equivalent of grep -F

This switch will interpret a pattern as a list of fixed strings, and try to match any of them. It’s useful when you need to search for regular expression characters. This means you don’t have to escape special characters like you would with regular grep.

fgrep example

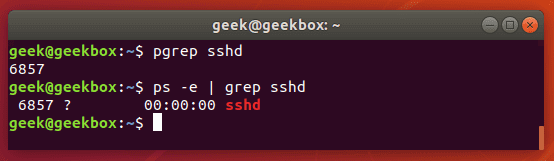
pgrep is a command to search for the name of a running process on your system and return its respective process IDs. For example, you could use it to find the process ID of the SSH daemon:

pgrep sshd

fgrep example

This is similar in function to just piping the output of the ‘ps’ command to grep.

prgrep vs ps

You could use this information to kill a running process or troubleshoot issues with the services running on your system.

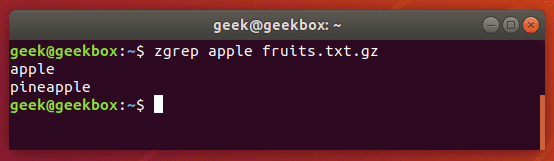
zgrep is used to search compressed files for a pattern. It allows you to search the files inside of a compressed archive without having to first decompress that archive, basically saving you an extra step or two.

zgrep apple fruits.txt.gz

zgrep example

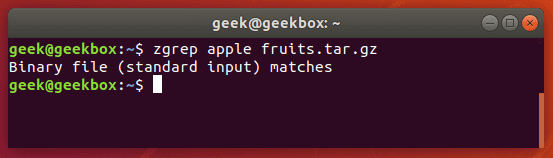
zgrep also works on tar files, but only seems to go as far as telling you whether or not it was able to find a match.

zgrep tar file

We mention this because files compressed with gzip are very commonly tar archives.

Difference between find and grep

For those just starting out on the Linux command line, it’s important to remember that find and grep are two commands with two very different functions, even though they are both used to “find” something that the user specifies.

It’s handy to use grep to find a file when you use it to search through the output of the ls command, like we showed in the first examples of the tutorial.

However, if you need to search recursively for the name of a file – or part of the file name if you use a wildcard (asterisk) – you’re much ahead to use the ‘find’ command.

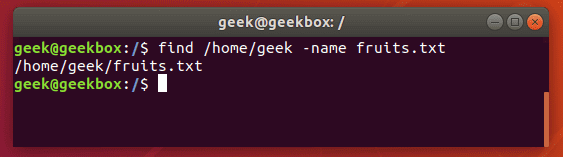
find /path/to/search -name name-of-file

find command

The output above shows that the find command was able to successfully locate the file we searched for.

Search recursively

You can use the -r switch with grep to search recursively through all files in a directory and its subdirectories for a specified pattern.

grep -r pattern /directory/to/search

If you don’t specify a directory, grep will just search your present working directory. In the screenshot below, grep found two files matching our pattern, and returns with their file names and which directory they reside in.

recursive grep

Catch space or tab

As we mentioned earlier in our explanation of how to search for string, you can wrap text inside quotes if it contains spaces. The same method will work for tabs, but we’ll explain how to put a tab in your grep command in a moment.
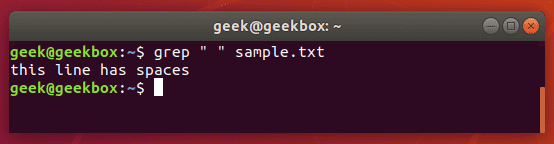
Put a space or multiple spaces inside quotes to have grep search for that character.

grep " " sample.txt

grep spaces

There are a few different ways you can search for a tab with grep, but most of the methods are experimental or can be inconsistent across different distributions.

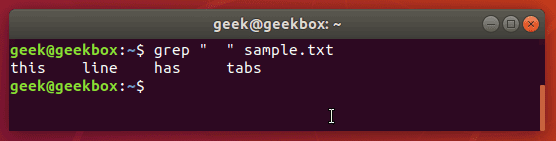
The easiest way is to just search for the tab character itself, which you can produce by hitting ctrl+v on your keyboard, followed by tab.

Normally, pressing tab in a terminal window tells the terminal that you want to auto-complete a command, but pressing the ctrl+v combination beforehand will cause the tab character to be written out as you’d normally expect it to in a text editor.

grep " " sample.txt

grep tabs

Knowing this little trick is especially useful when greping through configuration files in Linux, since tabs are frequently used to separate commands from their values.

Using regular expressions

Grep’s functionality is further extended by using regular expressions, allowing you more flexibility in your searches. Several exist, and we will go over some of the most commons ones in the examples below:

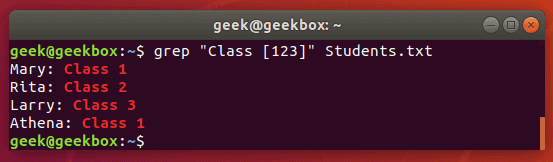
[ ] brackets are used to match any of a set of characters.

grep "Class [123]" Students.txt

grep brackets

This command will return any lines that say ‘Class 1’, ‘Class2’, or ‘Class 3’.

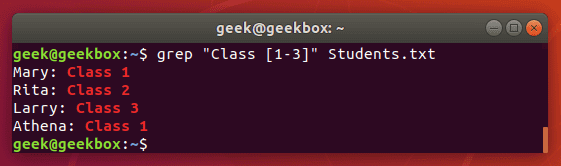
[-] brackets with hyphen can be used to specify a range of characters, either numerical or alphabetical.

grep "Class [1-3]" Students.txt

grep brackets hyphen

We get the same output as before, but the command is much easier to type, especially if we had a bigger range of numbers or letters.

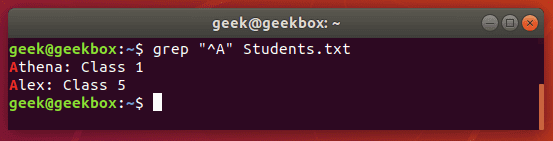
^ caret is used to search for a pattern that only occurs at the beginning of a line.

grep "^Class" Students.txt

grep caret

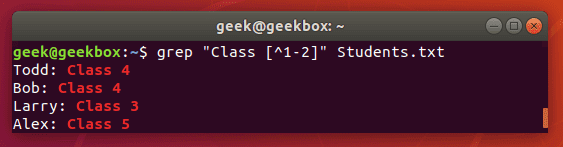
[^] brackets with caret are used to exclude characters from a search pattern.

grep "Class [^1-2]" Students.txt

grep brackets caret

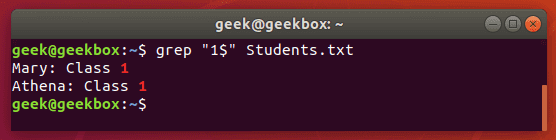
$ dollar sign is used to search for a pattern that only occurs at the end of a line.

grep "1$" Students.txt

grep dollar

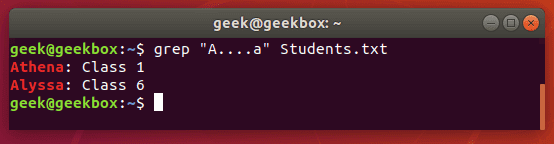
. dot is used to match any one character, so it’s a wildcard but only for a single character.

grep "A….a" Students.txt

grep dot

Grep gz files without unzipping

As we showed earlier, the zgrep command can be used to search through compressed files without having to unzip them first.

zgrep word-to-search /path/to/file.gz

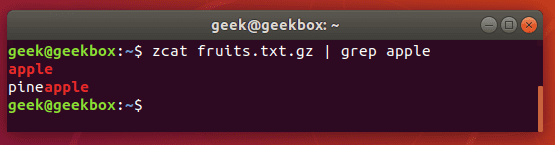
You can also use the zcat command to display the contents of a gz file, and then pipe that output to grep to isolate the lines containing your search string.

zcat file.gz | grep word-to-search

zcat

Grep email addresses from a zip file

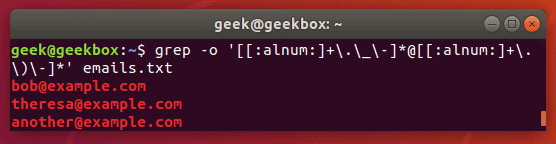
We can use a fancy regular expression to extract all the email addresses from a zip file.

grep -o '[[:alnum:]+\.\_\-]*@[[:alnum:]+\.\_\-]*' emails.txt

The -o flag will extract the email address only, rather than showing the entire line that contains the email address. This results in a cleaner output.

grep emails

As with most things in Linux, there is more than one way to do this. You could also use egrep and a different set of expressions. But the example above works just fine and is a pretty simple way to extract the email addresses and ignore everything else.

Grep IP addresses

Greping for IP addresses can get a little complex because we can’t just tell grep to look for 4 numbers separated by dots – well, we could, but that command has the potential to return invalid IP addresses as well.

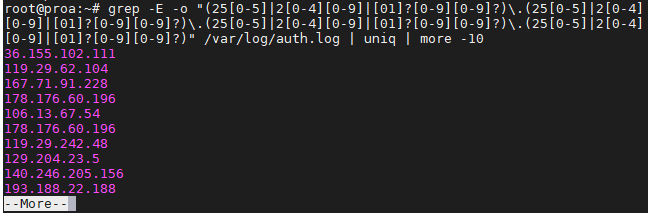
The following command will find and isolate only valid IPv4 addresses:

grep -E -o "(25[0-5]|2[0-4][0-9]|[01]?[0-9][0-9]?)\.(25[0-5]|2[0-4][0-9]|[01]?[0-9][0-9]?)\.(25[0-5]|2[0-4][0-9]|[01]?[0-9][0-9]?)\.(25[0-5]|2[0-4][0-9]|[01]?[0-9][0-9]?)" /var/log/auth.log

We used this on our Ubuntu server just to see where the latest SSH attempts have been made from.

grep IP addresses

To avoid repeat information and having your screen flooded, you may want to pipe your grep commands to “uniq” and “more” as we did in the screenshot above.

Grep or condition

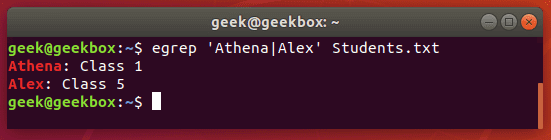
There are a few different ways you can use an or condition with grep, but we will show you the one that requires the least amount of keystrokes and is easiest to remember:

grep -E 'string1|string2' filename
or, technically using egrep is even less keystrokes:
egrep 'string1|string2' filename

grep or condition

Ignore case sensitivity

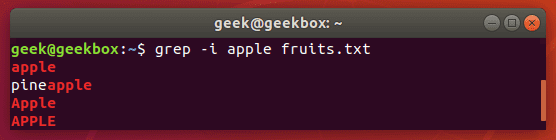
By default, grep is case sensitive, which means you have to be precise in the capitalization of your search string. You can avoid this by telling grep to ignore the case with the -i switch.

grep -i string filename

grep ignore case

Search with case sensitive

What if we want to search for a string where the first can be uppercase or lowercase, but the rest of the string should be lowercase? Ignoring case with the -i switch won’t work in this case, so a simple way to do it would be with brackets.

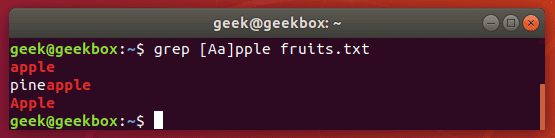
grep [Ss]tring filename

This command tells grep to be case sensitive except for the first letter.

grep case sensitive

Grep exact match

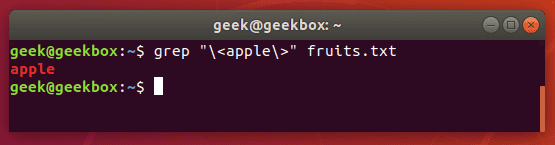
In our examples above, whenever we search our document for the string “apple”, grep also returns “pineapple” as part of the output. To avoid this, and search for strictly “apple”, you can use this command:

grep "\<apple\>" fruits.txt

exact match

You can also use the -w switch, which will tell grep that the string must match the whole line. Obviously, this will only work in situations where you’re not expecting the rest of the line to have any text at all.

Exclude pattern

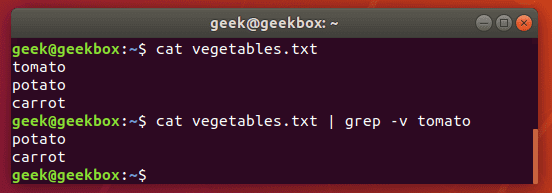
To see the contents of a file but exclude patterns from the output, you can use the -v switch.

grep -v string-to-exclude filename

exclude pattern

As you can see in the screenshot, the string we excluded is no longer shown when we run the same command with the -v switch.

Grep and replace

A grep command piped to sed can be used to replace all instances of a string in a file. This command will replace “string1” with “string2” in all files relative to the present working directory:

grep -rl 'string1' ./ | xargs sed -i 's/string1/string2/g'

Grep with line number

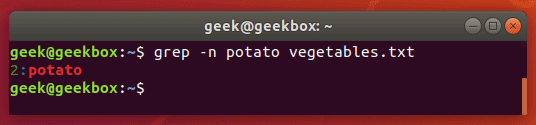
To show the number of a line that your search string is found on, use the -n switch.

grep -n string filename

show line numbers

Show lines before and after

If you need a little more context to the grep output, you can show one line before and after your specified search string with the -c switch:

grep -c 1 string filename

Specify the number of lines you wish to show – we did only 1 line in this example.

line before and after

Sort the result

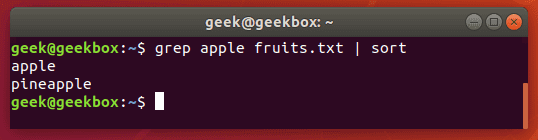
Pipe grep’s output to the sort command to sort your results in some kind of order. The default is alphabetical.

grep string filename | sort

line before and after

I hope you find the tutorial useful. Keep coming back.

0

Understanding Linux runlevels the right way

You can think of Linux runlevels as different “modes” that the operating system runs in. Each of these modes, or runlevels, has its own list of processes and services that are either turned on or off. From the time Linux boots up, it’s always in some runlevel. This runlevel may change as you continue to use your computer, depending on what kind of services the operating system needs access to. For example, running your Linux machine with a graphical user interface will necessitate a different runlevel than if you were only running the command line on your system. This is because the graphical user interface will need access to various services that the command line simply does not. In order for the system to determine which services are needed to be switched on (or off), it changes the runlevel as needed.

Continue Reading →

Importance of Linux runlevels

You may have used Linux for years without realizing that there are different runlevels. That’s because it’s not something most server administrators will need to configure often.

However, Linux runlevels do give administrators increased control over the systems they manage.

The runlevel a system is in can be changed (which we will see how to do later in the article), as can the services which run inside the runlevels. This allows us complete control over what services our systems have access to at any given time.

How many runlevels are in Linux?

There are seven different runlevels in Linux, numbered from zero to six. Various distributions may use the seven runlevels differently, so it’s not very easy to compile a definitive list of what the runlevels do.

Instead, you would need to check how the runlevels work on the specific distribution that you are using. For the most part, the list below represents how Linux distributions generally configure runlevels:

Runlevel 0 shuts down the system.

Runlevel 1 is a single-user mode, which is used for maintenance or administrative tasks. You may also see this mode referred to as runlevel S (the S stands for single-user).

Runlevel 2 is a multi-user mode. This runlevel does not use any networking services.

Runlevel 3 is a multi-user mode with networking. This is the normal runlevel you are used to if you use a system that doesn’t boot into a GUI (graphical user interface).

Runlevel 4 is not used. The user can customize this runlevel for their own purposes (which we will cover how to do later in the article).

Runlevel 5 is the same as runlevel 3, but it also starts a display manager. This is the runlevel you are used to if you use a system that boots into a GUI.

Runlevel 6 reboots the system.

What is my current runlevel?

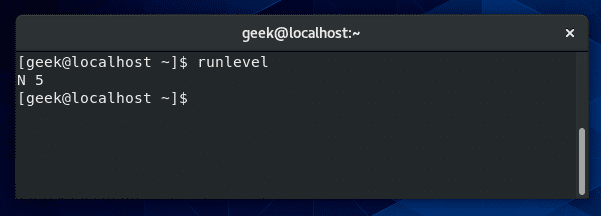
You can see your current runlevel on most distributions by simply typing “runlevel” in the terminal.

Current runlevel

When you enter the “runlevel” command, it’ll give you two different numbers. The first number is the previous runlevel your system was running, and the second number is the current runlevel of your system.

In the screenshot above, the “N” is short for “none”, meaning that the system was not in any different runlevel previously. The “5” means our system is currently in runlevel 5.

We are running CentOS in this example, which booted directly into a graphical interface, hence why the system went straight to runlevel 5.

How to change the current runlevel?

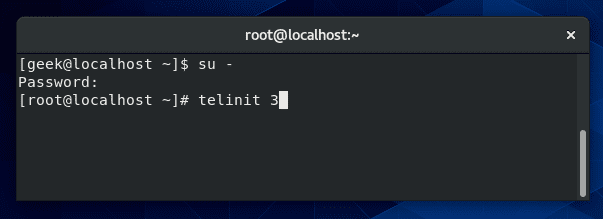
You can change the current runlevel of your system using the “telinit” command. For example, to change to runlevel 3 on CentOS, you would type:

telinit 3

Change the current runlevel

Keep in mind that you must be the root user to execute this command. Be aware that runlevels work differently on Debian and Ubuntu – for example, Ubuntu will boot into runlevel 5 even without starting a GUI.

If you follow the example above, your screen may go blank. This is because you’re left at the – now empty – tty. Just do Alt+F1 (or some other function key) on your keyboard to be taken to a working terminal.

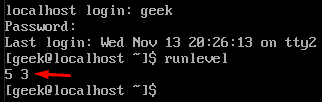
If we use the “runlevel” command again, we’ll see that we are now in runlevel 3, and the previous runlevel is listed as 5 since we just changed from it.

runlevel command

Linux systemd targets vs runlevels

In recent years, systemd has come to replace the long-standing “System V init” (runlevels) system. It still works in basically the same way, but uses some new commands and commonly refers to “runlevels” as “targets” instead.

Runlevel 0 = poweroff.target (runlevel0.target)

Runlevel 1 = rescue.target (runlevel1.target)

Runlevel 2 = multi-user.target (runlevel2.target)

Runlevel 3 = multi-user.target (runlevel3.target)

Runlevel 4 = multi-user.target (runlevel4.target)

Runlevel 5 = graphical.target (runlevel5.target)

Runlevel 6 = reboot.target (runlevel6.target)

We’ll continue going over systemd and the commands you’ll need to know as this tutorial progresses.

How to change the default runlevel at startup?

There are a lot of reasons why you may wish to boot into a different runlevel. For example, it’s common for system administrators to boot into the command line, and only start a graphical interface when deemed necessary.

For this functionality, you would want to make sure your default runlevel is set to 3, and not 5.

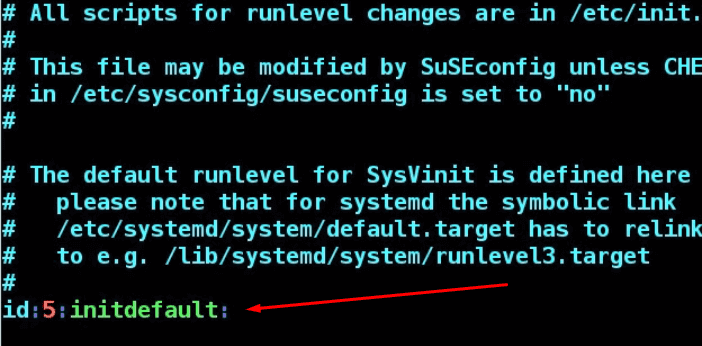
In the past, one was required to edit the /etc/inittab file to define the default runlevel at startup. You may still find this to be the case on some distributions.

If working with an operating system that has not been upgraded for a few years, you’ll still find this method to be relevant for you.

vi /etc/inittab

inittab file

In the screenshot above, runlevel 5 is currently set to the default runlevel for the startup.

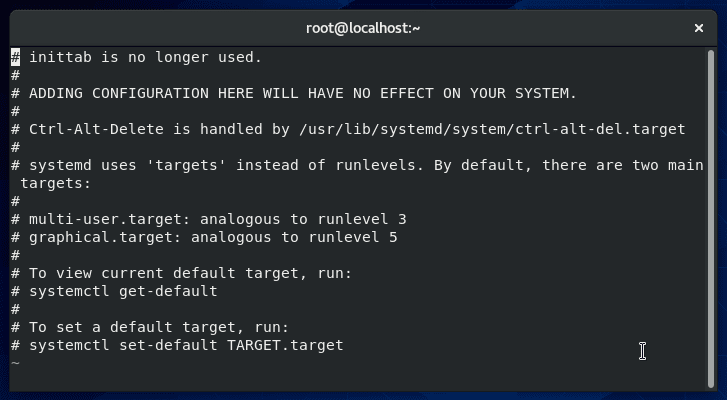
As of 2016, most major Linux distributions have phased out the /etc/inittab file, in favor of systemd targets – we’ll cover the differences later in this article.

You may find that your system doesn’t have the /etc/inittab file at all, or your inittab file may advise you to use systemd instead like, in this screenshot from our CentOS system.

systemd

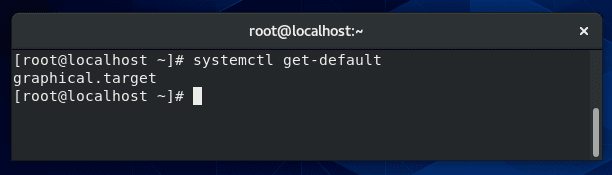
To check the current default target of your system:

systemctl get-default

Current default target

In the screenshot above, the reply back from the system is “graphical.target”. As you can probably guess, this is the equivalent to runlevel 5.

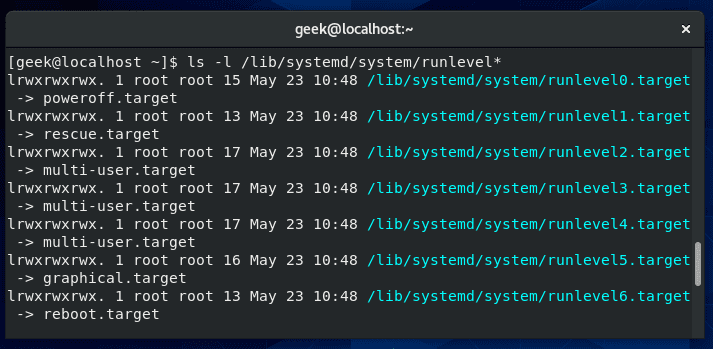
To see the other available targets, and the runlevels they are associated with, type:

ls -l /lib/systemd/system/runlevel*

Available target runlevels

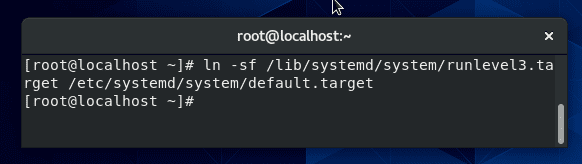
These symbolic links tell us that the systemd targets pretty much operate the same way runlevels do. So, how can we change the default runlevel (or target) at startup? We need to create a new symbolic link, like this:

ln -sf /lib/systemd/system/runlevel3.target /etc/systemd/system/default.target

Default target

This command will change our default runlevel to 3, so the next time we reboot, our system will be in runlevel 3 instead of 5. If you wanted a different runlevel, you would just substitute a different number in place of the “3” in the command.

For reference, the -f switch in that command indicates that the target file should be removed, before creating the new link. You could also just remove it first with a simple rm command.

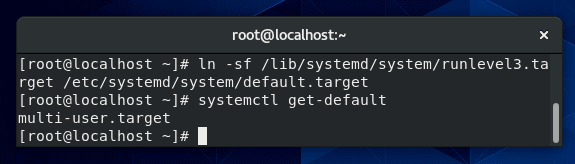
You can confirm that the change was made successfully with the “systemctl get-default” command again.

Default target

This command will change our default runlevel to 3, so the next time we reboot, our system will be in runlevel 3 instead of 5. If you wanted a different runlevel, you would just substitute a different number in place of the “3” in the command.

For reference, the -f switch in that command indicates that the target file should be removed, before creating the new link. You could also just remove it first with a simple rm command.

You can confirm that the change was made successfully with the “systemctl get-default” command again.

get-default command

Runlevel 3 vs runlevel 5

The two runlevels you will hear about and work with the most are going to be 3 and 5. It basically boils down to this: runlevel 3 is a command line, and runlevel 5 is a graphical user interface.

Of course, not every distribution follows this convention, and your system could be configured by an admin so that these runlevels have even more differences.

But, in general, that’s how it works. If you want to see exactly what services are enabled at both of these runlevels, we cover that in the next section.

List services that are enabled at a particular runlevel

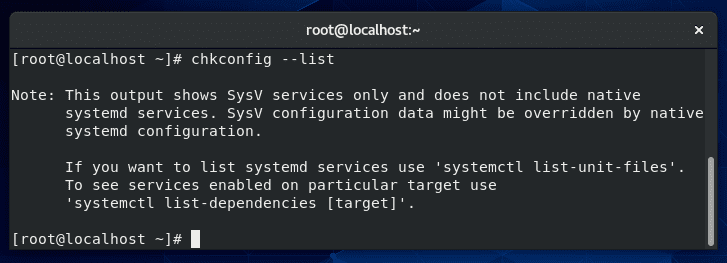
Up till recent years, “chkconfig –list” was the command to list the services that would be enabled at different runlevels. If your operating system is up to date, that command may give you an error or defer you over to systemd.

chkconfig command

If we want to see what services will be started when we boot into graphical mode (runlevel 5), we can run this command:

get-default command

Runlevel 3 vs runlevel 5

The two runlevels you will hear about and work with the most are going to be 3 and 5. It basically boils down to this: runlevel 3 is a command line, and runlevel 5 is a graphical user interface.

Of course, not every distribution follows this convention, and your system could be configured by an admin so that these runlevels have even more differences.

But, in general, that’s how it works. If you want to see exactly what services are enabled at both of these runlevels, we cover that in the next section.

List services that are enabled at a particular runlevel

Up till recent years, “chkconfig –list” was the command to list the services that would be enabled at different runlevels. If your operating system is up to date, that command may give you an error or defer you over to systemd.

chkconfig command

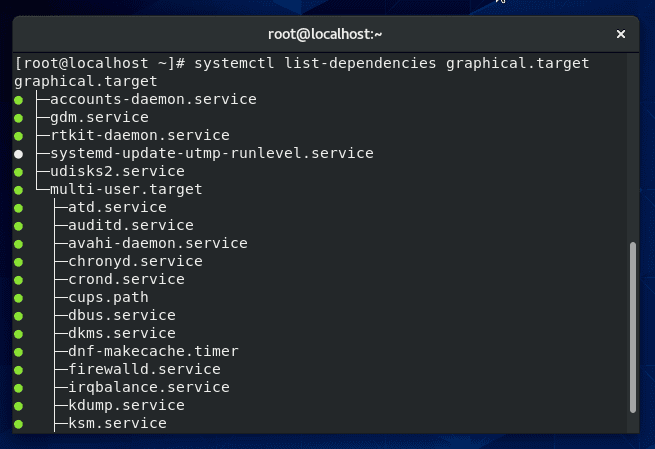
If we want to see what services will be started when we boot into graphical mode (runlevel 5), we can run this command:

systemctl list-dependencies graphical.target

List services

To see the services that run by default on other runlevels, just replace “graphical.target” with the name of the target you need to see.

Under which runlevel will a process run?

If you’d like to see which runlevel(s) a specific service runs at, you can use this command:

systemctl show -p WantedBy [name of service]
For example, if you wanted to see at which runlevel the SSH daemon will run, you would type:
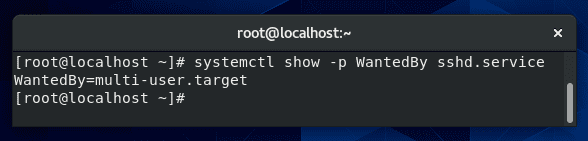
systemctl show -p WantedBy sshd.service

Runlevel for a service

According to the output in the above screenshot, the SSH service will start on runlevels 2, 3, and 4 (multi-user.target)

How to change the runlevel of an application?

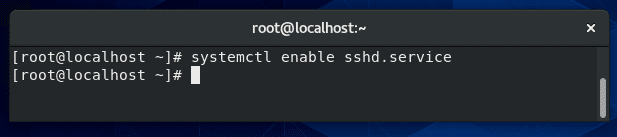
As seen above, our SSH service is only running at runlevels 2-4 (multi-user.target). What if we also want it to start when we boot into a graphical interface – runlevel 5 (graphical.target)? We could apply that configuration with the following command:

systemctl enable sshd.service

Enable service at startup

Security issues with runlevels in Linux

As we said earlier in this article, the point of Linux runlevels is to give an administrator control over what services run under certain conditions. Having this type of granular control over your system enhances security since you can be sure that there are no extraneous services running.

The problem can arise when an administrator is unaware of exactly what services are running, therefore doesn’t bother to secure those attack surfaces.

You can use the methods in this guide to configure your default runlevel and to control which applications are running. These practices will not only free up system resources, but also keep your server more secure.

Remember to only use the runlevel you need. For example, there is no sense in starting runlevel 5 (graphical interface) if you only plan to use the terminal.

Changing to a different runlevel will introduce multiple new services, some of which may run completely in the background and you may forget to secure them.

Which runlevel is the best for me?

Determining which runlevel is the best for you all depends on the situation. Generally, you are probably going to be using runlevels 3 and 5 on a regular basis.

If you are comfortable with the command line and don’t need a graphical interface, runlevel 3 (on most distributions) is going to be best for you.

This will keep unnecessary services from running. On the other hand, if you want more of a desktop experience and a graphical interface to use various apps, etc, then runlevel 5 will be your preferred runlevel.

If you need to perform maintenance on a production server, runlevel 1 suits that situation well. This is used to ensure that you are the only one on the server (the network service is not even started), and you can perform your maintenance uninterrupted.

In rare cases, you may even need to use runlevel 4. This would only be in particular situations where you or the system administrator has a custom configured runlevel. We will cover how to do that in the next section.

As you have probably assumed, you won’t (and can’t) run your system in runlevels 0 or 6, but it’s possible to switch to them just to reboot or power off. Doing so shouldn’t ordinarily be necessary since there are other commands that do that for us.

Can we create a new runlevel in Linux?

It is possible to create a new runlevel in Linux, but it’s extremely unlikely that you would ever need to do that. If you were determined to do it anyway, you can start by copying one of the existing systemd targets, and then editing it with your own customizations.

The targets are located in:

/usr/lib/systemd/system
If you wanted to base your new runlevel/target off of graphical.target (runlevel 5), copy that directory to your new target directory.
cp /usr/lib/systemd/system/graphical.target /usr/lib/systemd/system/mynew.target
After that, create a new “wants” directory, like so:
mkdir /etc/systemd/system/mynew.target.wants

And then symlink the additional services from /usr/lib/systemd/system that you want to enable for your new runlevel.

I hope you find the tutorial useful. Keep coming back.

0

10+ examples for killing a process in Linux

In this tutorial, we will talk about killing a process in Linux with multiple examples. In most cases, it’s as simple as typing “kill” command followed by the process ID (commonly abbreviated as PID).

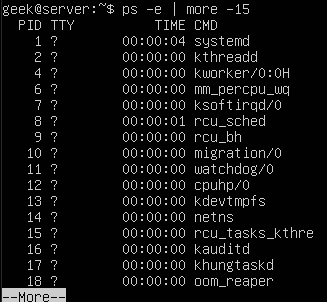
In the screenshot above, we’ve killed a process with the ID of 1813. If you are a Windows user, it may help to think of the ‘kill’ command as Linux’s equivalent of the ‘End task’ button inside of the Windows task manager. The “ps -e” command will list everything running on your system. Even with a minimal installation, the command will probably output more than 80 results, so it’s much easier to pipe the command to ‘grep’ or ‘more’.

Continue Reading →

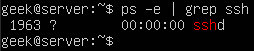
ps -e | grep name-of-process

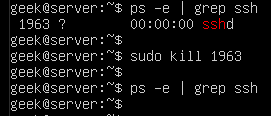
In the screenshot below, we check to see if SSH is running on the system.

Check if process is running

This also gives us the PID of the SSH daemon, which is 1963.

Pipe to ‘more’ if you want to look through your system’s running processes one-by-one.

List running processes

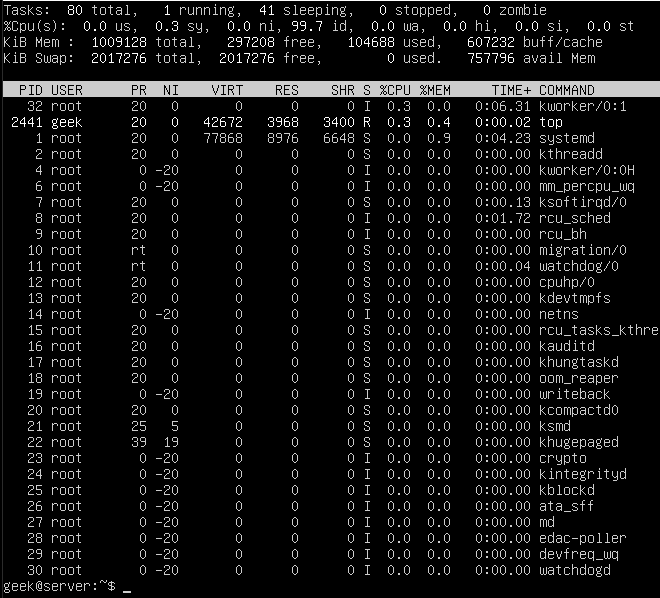
You can also make use of the ‘top’ command in order to see a list of running processes. This is useful because it will show you how many system resources that each process is using.
List processes using top command

The PID, User, and name of the resource are all identified here, which is useful if you decide to kill any of these services later.

Pay attention to the %CPU and %MEM columns, because if you notice an unimportant process chewing up valuable system resources, it’s probably beneficial to kill it!

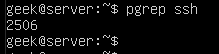
Another very efficient away of obtaining the corresponding process ID is to use the ‘pgrep’ command. The only argument you need to supply is the name (or part of the name) of the running process.

Here’s what it looks like when we search for SSH. As you can see, it returns a process ID of 2506.

Using pgrep

Kill a process by PID

Now that we know the PID of the SSH daemon, we can kill the process with the kill command.

sudo kill 1963

Kill process by ID

You can issue a final ‘ps’ command, just to ensure that the process was indeed killed.

ps -e | grep ssh

The results come up empty, meaning that the process was shut down successfully. If you notice that the process is continuing to run – which should not normally happen – you can try sending a different kill signal to the process, as covered in the next session.

Note: It’s not always necessary to use ‘sudo’ or the root user account to end a process. In the former example, we were terminating the SSH daemon, which is run under the root user, therefore we must have the appropriate permissions to end the process.

Default signal sent by the kill command

By default, the kill command will send a SIGTERM signal to the process you specify.

This should allow the process to terminate gracefully, as SIGTERM will tell the process to perform its normal shutdown procedures – in other words, it doesn’t force the process to end abruptly.

This is a good thing because we want our processes to shut down the way they are intended.

Sometimes, though, the SIGTERM signal isn’t enough to kill a process. If you run the kill command and notice that the process is still running, the process may still be going through its shutdown process, or it may have become hung up entirely.

Force killing

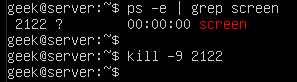
To force the process to close and forego its normal shutdown, you can send a SIGKILL signal with the -9 switch, as shown here:

kill -9 processID

Force process killing

It can be tempting to always append the -9 switch on your kill commands since it always works. However, this isn’t the recommended best practice. You should only use it on processes that are hung up and refusing to shut down properly.

When possible, use the default SIGTERM signal. This will prevent errors in the long run, since it gives the process a chance to close its log files, terminate any lingering connections, etc.

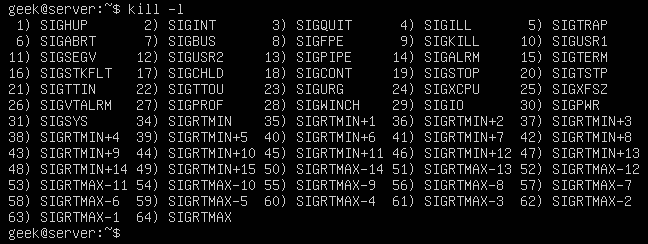
Apart from the SIGTERM and SIGKILL signals, there is a slew of other signals that kill can send to processes, all of which can be seen with the -l switch.

Kill signals

The numbers next to the names are what you would specify in your ‘kill’ command. For example, kill -9 is SIGKILL, just like you see in the screenshot above.

For everyday operations, SIGTERM and SIGKILL are probably the only signals you will never need to use. Just keep the others in mind in case you have a weird circumstance where a process recommends terminating it with a different signal.

How to kill all processes by name?

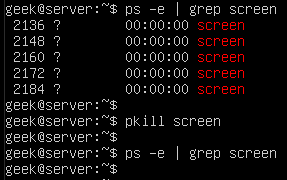
You can also use the name of a running process, rather than the PID, with the pkill command. But beware, this will terminate all the processes running the under the specified name, since kill won’t know which specific process you are trying to terminate.

pkill name-of-process

Check out the example below where we terminate five processes with a single pkill command.

Kill a process using pkill

In this example, we had wanted to only terminate one of those screen sessions, it would’ve been necessary to specify the PID and use the normal ‘kill’ command. Otherwise, there is no way to uniquely specify the process that we wish to end.

How to kill all processes by a user?

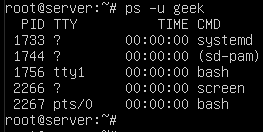
You can also use the pkill command to terminate all processes that are running by a Linux user. First, to see what processes are running under a specific user, use the ps command with a -u switch.

ps -u username

List processes running by a user

That screenshot shows us that there are currently 5 services running under the user ‘geek’. If you need to terminate all of them quickly, you can do so with pkill.

pkill -u username

pkill command

How to kill a nohup process?

The nohup process is killed in the same way as any other running process. Note that you can’t grep for “nohup” in the ps command, so you’ll need to search for the running process using the same methods as shown above.

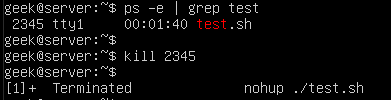
In this example, we find a script titled ‘test.sh’ which has been executed with the nohup command. As you’ll see, finding and ending it is much the same as the examples above.

Kill nohup process

The only difference with the output is that we are notified that the process was terminated. That’s not part of kill, but rather a result from running the script in the background (the ampersand in this example) and being connected to the same tty from which the script was initiated.

nohup ./test.sh &

How to run a process in the background?

The kill command is an efficient way to terminate processes you have running in the background. You’ve already learned how to kill processes in this tutorial, but knowing how to run a process in the background is an effective combination for use with kill command.

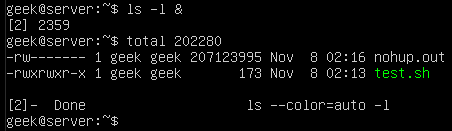
You can append an ampersand (&) to your command in order to have it executed in the background. This is useful for commands or scripts that will take a while to execute, and you wish to do other tasks in the meantime.
Run a process in background using ampersand

Here we have put a simple ‘ls’ command into the background. Since it’s the type of command which takes very little time to execute, we’re given more output about it finishing its job directly after.

The output in our screenshot says “Done”, meaning that the job in the background has completed successfully. If you were to kill the job instead, it would show “terminated” in the output.

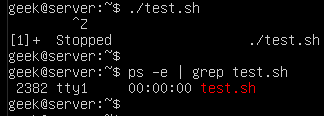
You can also move a job to the background by pressing Ctrl+Z on your keyboard. The ^Z in this screenshot indicates that Ctrl+Z was pressed and the test.sh script has been moved into the background.

Run a process in background using CTRL+Z

You can see test.sh continuing to run in the background by issuing a ps command.

ps -e | grep test.sh

List background processes

Using screen command

Another way to run a process in the background is to use the ‘screen’ command. This works by creating what basically amounts to a separate terminal window (or screen… hence the name).

Each screen that you create will be given its own process ID, which means that it’s an efficient way of creating background processes that can be later ended using the kill command.

Screen isn’t included on all Linux installs by default, so you may have to install it, especially if you’re not running a distribution meant specifically for servers.

On Ubuntu and Debian-based distributions, it can be installed with the following command:

sudo apt-get install screen

Once screen command is installed, you can create a new session by just typing ‘screen’.

screen

But, before you do that, it’s good to get in the habit of specifying names for your screens. That way, they are easy to look up and identify later. All you need in order to specify a name is the -S switch.

screen -S my-screen-name

Let’s make a screen called “testing” and then try to terminate it with the ‘kill’ command. We start like this:

Screen command

After typing this command and pressing enter, we’re instantly taken to our newly created screen. This is where you could start the process that you wish to have running in the background.

This is especially handy if you are SSH’d into a server and need a process to continue running even after you disconnect.

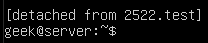
With your command/script running, you can disconnect from the screen by pressing Ctrl+A, followed by D (release the Ctrl and A key before pressing the D key).

Disconnect from screen

As you can see, screen command has listed the process ID as soon as we detached the screen. Of course, we can terminate this screen (and the command/script running inside of it), by using the kill command.

You can easily look up the process ID of your screen sessions by using this command:

screen -ls

List screen sessions

If we hadn’t named our screen session by using the -S switch, only the process ID itself would be listed. To reattach to the any of the screens listed, you can use the -r switch:

screen -r name-of-screen
or
screen -r PID

Reattach screen process

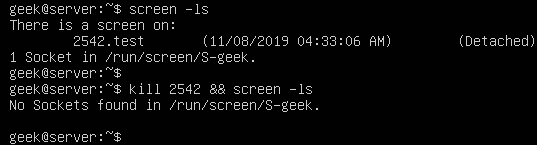
In the screenshot below, we are killing the screen session we created (along with whatever is being run inside of it), and then issuing another screen -ls command in order to verify that the process has indeed ended.
Kill screen session

How to kill a background process?

In one of our examples in the previous section, we put our tesh.sh script to run in the background. Most background processes, especially simple commands, will terminate without any hassle.

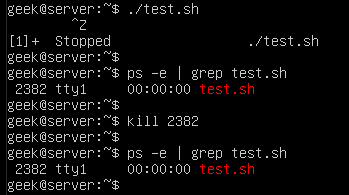
However, just like any process, one in the background may refuse to shut down easily. Our test.sh script has a PID of 2382, so we’ll issue the following command:

kill 2383

In the screenshot, though, you’ll notice that the script has ignored our kill command:

Process killing ignored

As we’ve learned already, kill -9 is the best way to kill a process that is hung up or refusing to terminate.

Force killing

How to kill stopped processes?

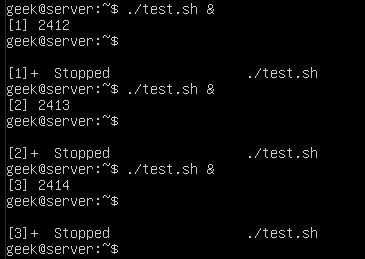
It can be useful to kill all your stopped background jobs at once if they have accumulated and are no longer useful to you. For the sake of example, we’re running three instances of our test.sh script in the background and they’ve been stopped:

./test.sh &

Stop a process

You can see these processes with the ps command:

ps -e | grep test.sh

List processes

Or, to just get a list of all the stopped jobs on the system, you can run the jobs command:

jobs

List stopped processes

The easiest way to kill all the stopped jobs is with the following command:

kill `jobs -ps`

Or use the -9 switch to make sure the jobs terminate immediately:

kill -9 `jobs -ps`

Kill stopped processes

The jobs -ps command will list all jobs’ PIDs running in the background, which is why we’re able to combine its output with the kill command in order to end all the stopped processes.
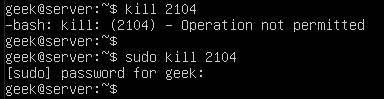
Kill operation not permitted

If you are getting an “operation not permitted” error when trying to kill a process, it’s because you don’t have the proper permissions. Either log in to the root account or use ‘sudo’ (on Debian distributions) before your kill command.

sudo kill PID

sudo kill permission

I hope you find the tutorial useful. Keep coming back.

0

15+ examples for listing users in Linux

In this post, you will learn about listing users in Linux. Besides this, you will know other tricks about Linux users’ characteristics. There are 2 types of users in Linux, system users who are created by default with the system. On the other hand, there are regular users who are created by system administrators and can log in to the system and use it. Before we start listing users, we need to know where are these users saved on Linux? The users are stored in a text file on the system called the passwd file. This file is located in the /etc directory. The file is located on the following path:

Continue Reading →

/etc/passwd

In this file, you can find all the information about the users in the system.

List all users

Listing users is a the first step to manage them. This way we will know how many they are and who they are. In Linux, almost everything can be done in various ways and this is no exception.

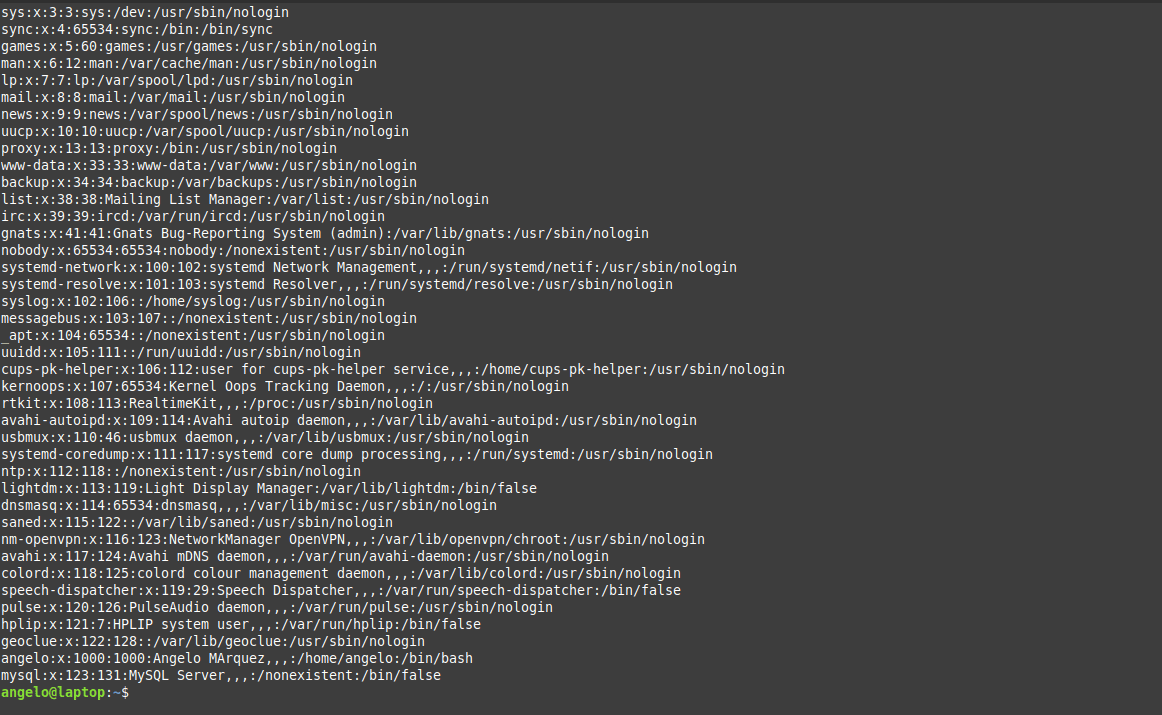
To list all users, you can use the cat command:

cat /etc/passwd

list all users in Linux

As you can see in the image, there is all the information about the users.

1- In the first field, you will see the user name.

2- Then, a representation of the encrypted password (The x character). The encrypted password is stored in /etc/shadow file.

3- The UID or the user ID.

4- The next field refers to the primary group of the user.

5- Then, it shows user ID info such as the address, email, etc.

6- After this, you will see the home directory of the user.

7- The last field is the shell used by that user.

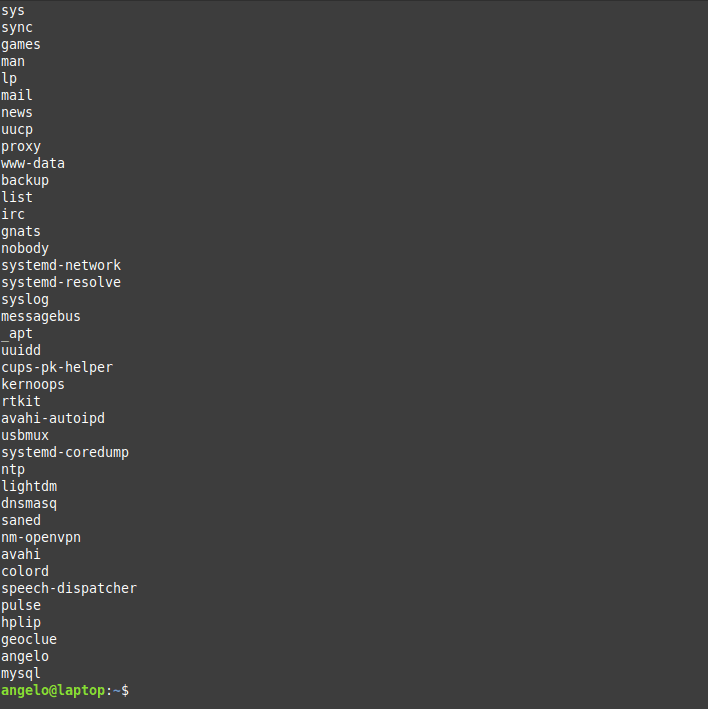
However, although the information is quite useful but if you only want to list users’ names in a basic way, you can use this command:

cut -d: -f1 /etc/passwd

Listing users in Linux

Now we have the names only by printing the first field of te file only.

List & sort users by name

The above command serves the purpose of listing users on Linux. But what about listing the users in alphabetical order?

To do this, we will use the previous command, but we will add the sort command.

So, the command will be like this:

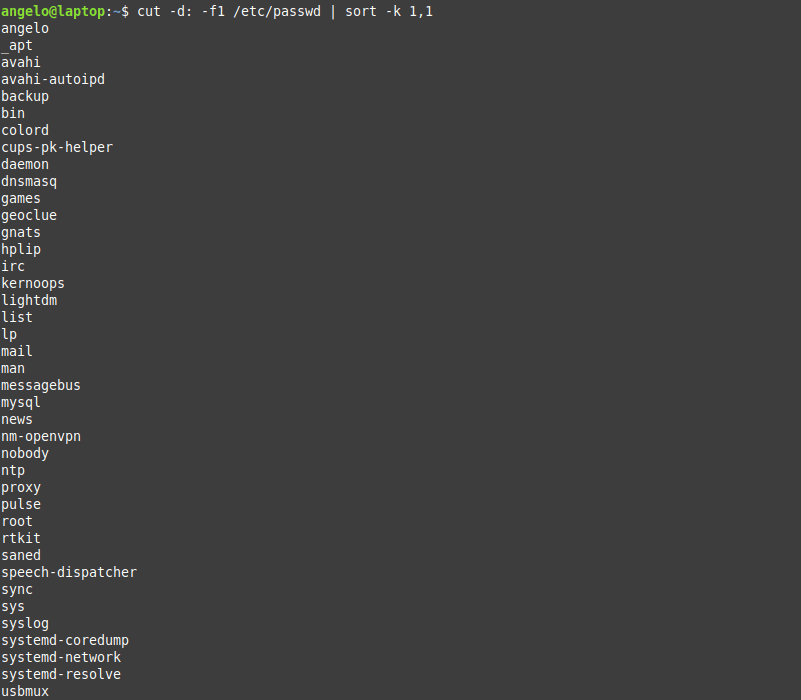
cut -d: -f1 /etc/passwd | sort

Sort by name

As you can see in the image, the users are shown sorted.

Linux list users without password

It is important to know users who have no password and to take appropriate action. To list users who do not have a password, just use the following command:

sudo getent shadow | grep -Po '^[^:]*(?=:.?:)'

User with no password

The used regex will list all users with no password.

List users by disk usage

If you have a big directory and you want to know which user is flooding it, you can use the du command to get the disk usage.

With this, you can detect which of these users are misusing the disk space.

For it, it is enough to use the following command:

sudo du -smc /home/* | sort -n

List users by disk usage

In this way, you will have the users ordered by the disk usage for the /home directory.

We used the -n for the sort command to sort the output by numbers.

List the currently logged users

To list the currently logged in users, we have several ways to do it. The first method we can use the users command:

users

Users currently logged

It will list the users with open sessions in the system.

But this information is a little basic however, we have another command that gives more details. The command is simply w.

w

Using the w command to list users currently logged

With this command, we can have more information such as the exact time when the session was started and the terminal session he has available.

Finally, there is a command called who. It is available to the entire Unix family. So you can use it on other systems like FreeBSD.

who

The who command

With who command, we also have some information about currently logged in users. Of course, we can add the option -a and show all the details.

who -a

The who command with options

So, this way you know everything about the logged in users.

Linux list of users who recently logged into the system

We saw how to get the currently logged in users, what about listing the login history of users?

You can use the last command to get more info about the logins that took place:

last

The last command

Or the logins of a particular user

last [username]

For example:

last angelo

last command with specific user

These are the user login activity and when it was started and how long it took.

List users’ logins on a specific date or time

What about listing users’ logins on a specific date or time? To achieve this, we use the last command but with the -t parameter:

last -t YYMMDDHHMMSS
For example:
last -t 20190926110509

List users by a specific date

And now all you have to do is choose an exact date & time to list who logged on that time.

List all users in a group

There are 2 ways to list the members of a group in Linux, the easiest and most direct way is to get the users from the /etc/group file like this:

cat /etc/group | grep likegeeks

This command will list users in the likegeeks group.

The other way is by using commands like the members command in Debian based distros. However, it is not installed by default in Linux distributions.
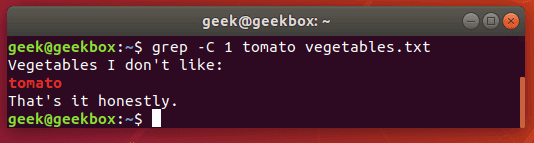
To install it in Ubuntu / Linux Mint 19, just use APT:

sudo apt install members

Or in the case of CentOS:
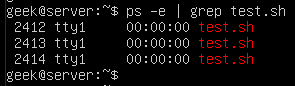
sudo dnf install members

Once it’s installed, you can run the command then the name of the group you want to list the users to:
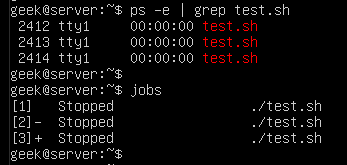
members [group_name]

For example:
members avahi

Using the members command

This way you can list users for a group in a Debian based distro. What about a RedHat based distro like CentOS?

You can use the following command:

getent group likegeeks

List users with UID

In Unix systems, each user has a user identifier or ID. It serves to manage and administer accounts internally in the operating system.

Generally, UIDs from 0 to 1000 are for system users. And thereafter for regular users. Always on Unix systems, UID zero belongs to the root users (You can have more than one user with UID of zero).
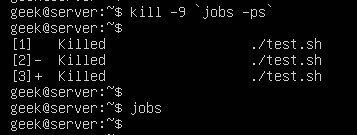
So now we will list the users with their respective UID using awk.

The command that performs the task is the following:

awk -F: '{printf "%s:%s\n",$1,$3}' /etc/passwd

List users with the UID

As you can see, each user with his UID.

List root users

In a Unix-like system like Linux, there is usually only one root user. If there are many, how to list them?

To do this, we can use this command:

grep 'x:0:' /etc/passwd

root users in the system

Here we are filtering the file to get users with UID of zero (root users).

Another way by checking the /etc/group file:

grep root /etc/group

The root users in Linux

Here we are getting users in the group root from the /etc/group file.

Also, you can check if any user can execute commands as root by checking the /etc/sudoers file:

cat /etc/sudoers

Get the total number of users

To get the total number of users in Linux, you can count lines in /etc/passwd file using the wc command like this:

cut -d: -f1 /etc/passwd | wc -l

List total number of users in Linux

Great! 43 users. But this includes system and regular users. What about getting the number of regular users only?

Easy! Since we know from above that regular users have UID of 1000 or greater, we can use awk to get them:

awk -F: '$3 >= 1000 {print $1}' /etc/passwd

List regular users

Cool!

List sudo users

Linux systems have a utility called sudo that allows you to execute commands as if you were another user who is usually the root user.

This should be handled with care in a professional environment.

Also, it is very important to know which users can run the sudo command. For this, it is enough to list the users that belong to the sudo group.

members sudo

sudo group users

Users in this group can execute commands as super users.

List users who have SSH access

SSH allows users to access remote computers over a network. It is quite secure and was born as a replacement for Telnet.

On Linux by default, all regular users can log in and use SSH. If you want to limit this, you can use the SSH configuration file (/etc/ssh/ssh_config) and add the following directive:

AllowUsers user1 user2 user3
Also, you can allow groups instead of allowing users only using the AllowGroups directive:
AllowGroups group1 group2 group3

These directives define who can access the service. Don’t forget to restart the SSH service.

List users who have permissions to a file or directory

We can give more than one user permission to access or modify files & directories in two ways.

The first method is by adding users to the group of the file or the directory.

This way, we can list the group members using the members utility as shown above.

Okay, but what if we just want this user to have access to this specific file only (Not all the group permissions)?

Here we can set the ACL for this file using setfacl command like this:

setfacl -m u:newuser:rwx myfile

Here we give the user called newser the permission for the file called myfile the permissions of read & write & execute.

Now the file can be accessed or modified by the owner and the user called newuser. So how to list them?

We can list them using the getfacl command like this:

getfacl myfile

This command will list all users who have permissions for the file with their corresponding permissions.

List locked (disabled) users

In Linux, as a security measure, we can lock users. This as a precaution if it is suspected that the user is doing things wrong and you don’t want to completely remove the user and just lock him for investigation.

To lock a user, you can use the following command:

usermod -L myuser

Now the user named myuser will no longer to able to login or use the system.

To list all locked users of the system, just use the following command:

cat /etc/passwd | cut -d : -f 1 | awk '{ system("passwd -S " $0) }' | grep locked

This will print all locked users including system users. What about listing regular users only?

As we saw above, using awk we can get locked regular users like this:

awk -F: '$3 >= 1000 {print $1}' /etc/passwd | cut -d : -f 1 | awk '{ system("passwd -S " $0) }' | grep locked

Very easy!

Listing remote users (LDAP)

Okay, now can list all system users (local users), but what about remote users or LDAP users? Well, we can use a tool like ldapsearch, but is there any other way?

Luckily yes! You can list local & remote users with one command called getent

getent passwd

This command lists both local system users and LDAP or NIS users or any other network users.

You can pipe the results of this command to any of the above-mentioned commands the same way.

Also, the getent command can list group accounts like this:

getent group

You can check the man page of the command to know the other databases the command can search in.

Conclusion

Listing users in the Linux system was fun! Besides this, we have learned some tips about users and how to manage them in different ways.

Finally, this knowledge will allow a better administration of the users of the system.

I hope you find the tutorial useful. keep coming back.

0