


Linux çekirdeği resmi sitesi: https://www.kernel.org
Uzun süreli destek sürümü:
4.14.144 2019-09-16
Değişiklik listesi…
Tag Archives | linux
Kernel’in 4.9.193 uzun süreli destek sürümü duyuruldu
Linux çekirdeği resmi sitesi: https://www.kernel.org
Uzun süreli destek sürümü:
4.9.193 2019-09-16
Değişiklik listesi…
Kernel’in 4.4.193 uzun süreli destek sürümü duyuruldu
Linux çekirdeği resmi sitesi: https://www.kernel.org
Uzun süreli destek sürümü:
4.4.193 2019-09-16
Değişiklik listesi…
Recover deleted files on Linux (Beginners Tutorial)
 Have you ever deleted any important files by mistake? Who doesn’t! Okay, but can I recover them? In this post, you will learn how to recover deleted files on Linux using various programs on different file systems. You will see how to recover deleted files from SD cards, HDDs, and deleted partitions on different Linux file systems such as EXT3, EXT4 and even from Windows file systems such as FAT32 & NTFS. This is quite a problem. Often, Linux users frequently install several systems at the same time and they may delete a partition bu mistake during the installation process. However, how to recover files from those deleted partitions? For this, we need to recover the partition using a tool called TestDisk. Testdisk is a powerful partition analysis and data recovery utility. It is shipped with a large number of Linux distributions such as Debian and Ubuntu. On the other hand, the application is cross-platform and supports a large number of partition tables such as Intel, MSDOS, and Mac. These are the most popular partition tables. Also, it supports many file systems such as NTFS, EXT4 and other nonpopular file systems such as BeOS and ReiserFS.
Recover files from deleted partition
When a file is deleted, the list of clusters occupied by the file is deleted, marking those sectors available for the use. If the clusters have not been overwritten, TestDisk can recover the files.
First, start the application like this:
$ testdisk
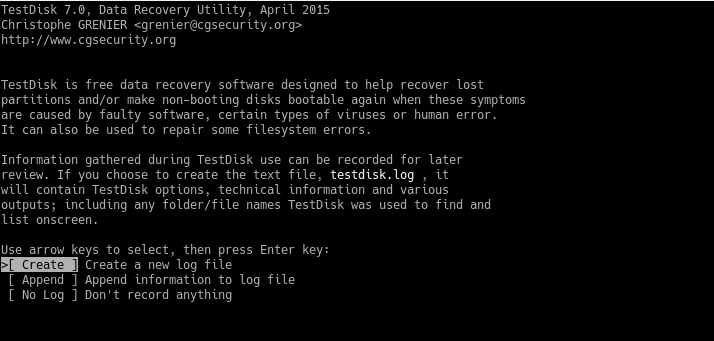
Next, you have the option to create a new file for the logs. If you want to create one, choose the create option and press Enter. If you don’t want a log file, select the No Log option.
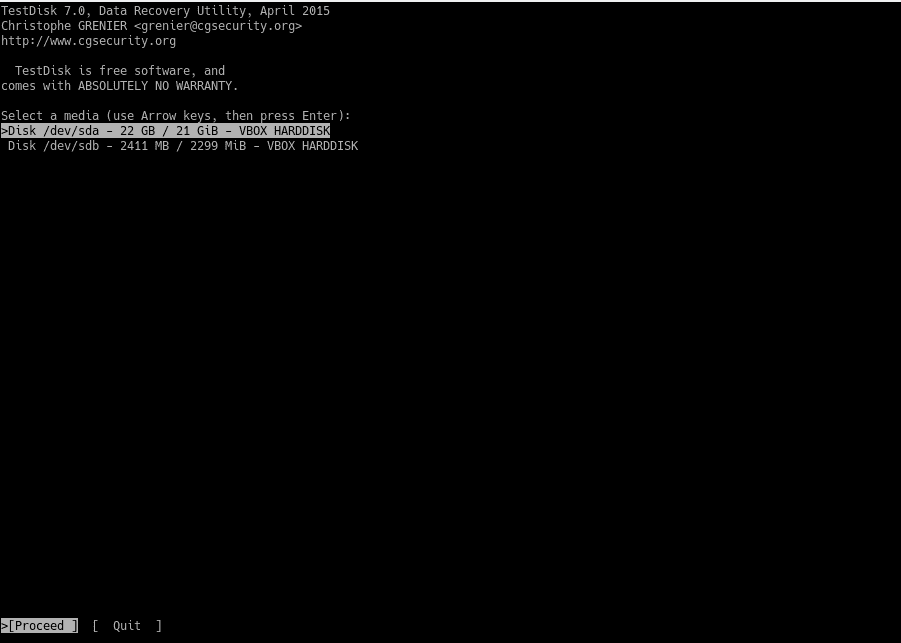
Next, the disks or partitions recognized by the system will be scanned. In this particular case, sda is the partition we want to recover.
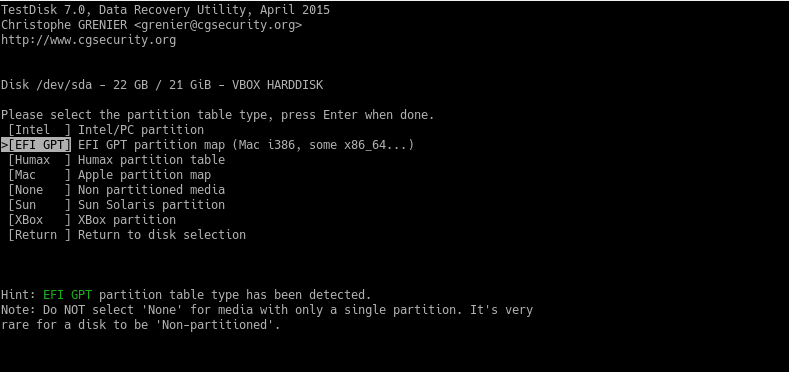
TestDisk recognizes various types of partition tables. It is usually Intel. Unless you are using a specialized one.
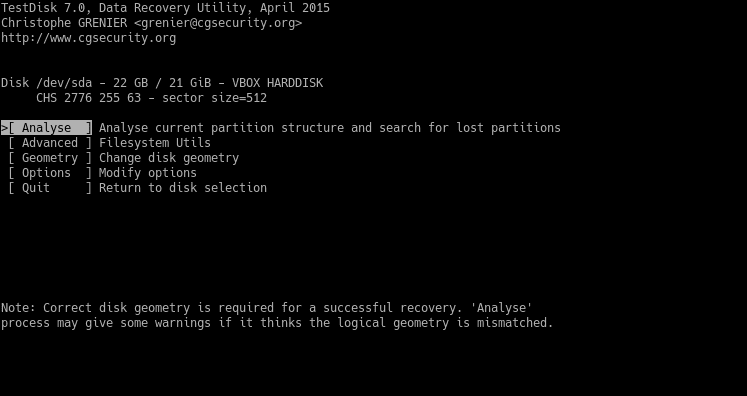
In the next screen, you will see a series of options that the program has. For this particular case, we need to choose the Analyse option.
With this option, the program will exhaustively analyze the disk to find the structure.
Then, it will ask about the type of search you wish to do. Usually, choose the Quick Search option.
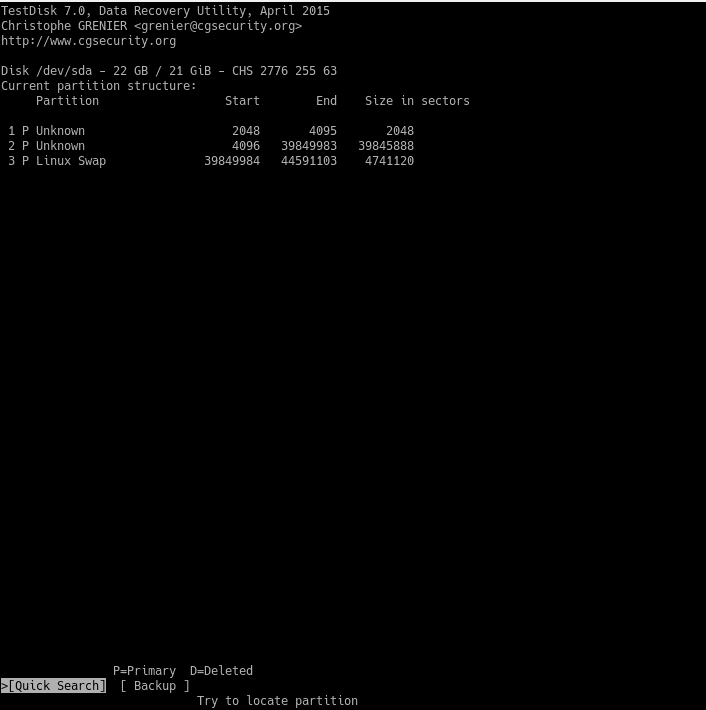
If you are lucky, you will see the deleted partition. If not, you will have to choose a deeper search.
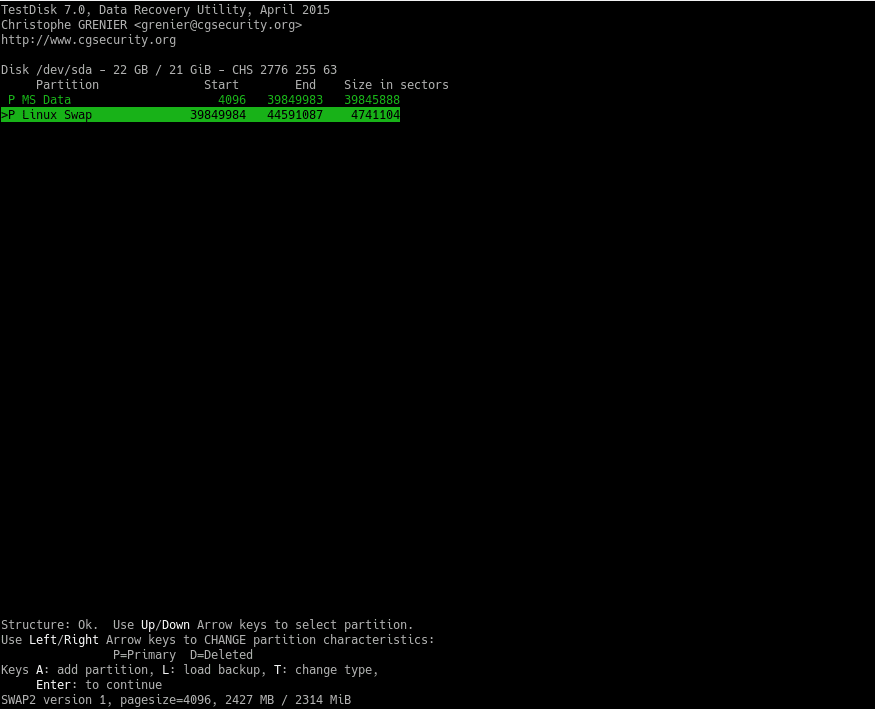
Then, choose the Write option to write the partition table. When finished, restart the system and you will have your partition back!
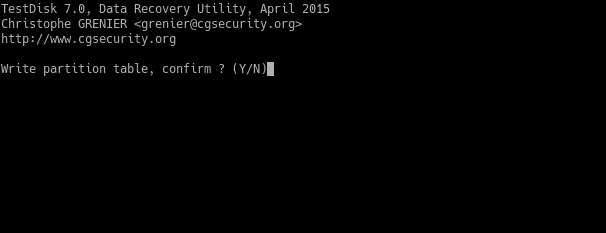
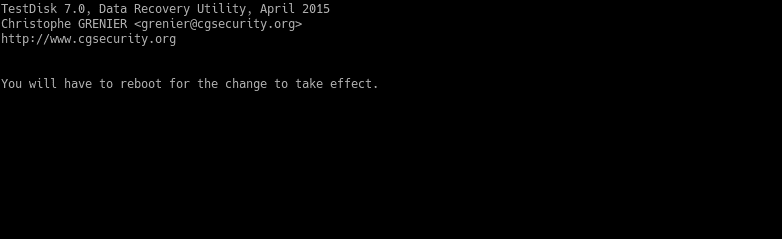
Note that during these steps, it may take a long time. It depends on the disk size.
According to the type of file system, this partition may have, particular instructions will be followed. They will be detailed later.
Recover deleted files from an external drive
Now let us imagine we have an external flash drive and by mistake, you have deleted some files from it. How to restore them?
Thanks to TestDisk, the process becomes quite similar to that of a deleted partition. But there are some differences.
To start the program we will use the testdisk command. Also, we can add the flash drive as a parameter like this:
$ sudo testdisk /dev/sdb
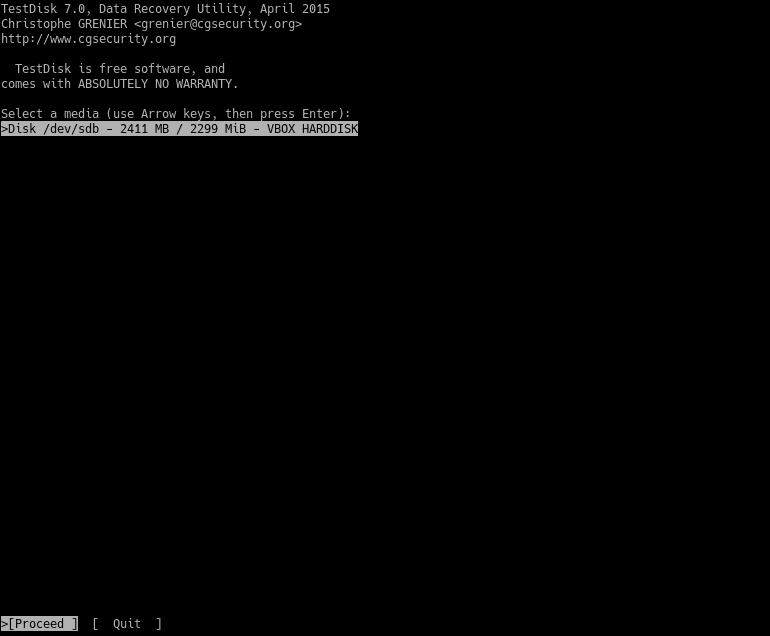
Next, select proceed. Then, choose the partition table type.
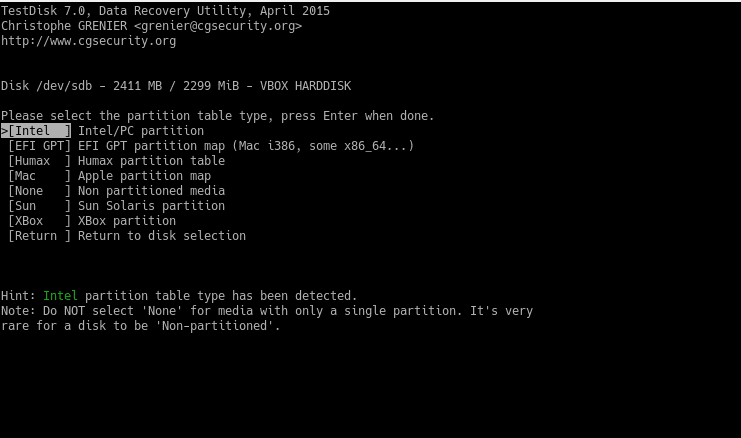
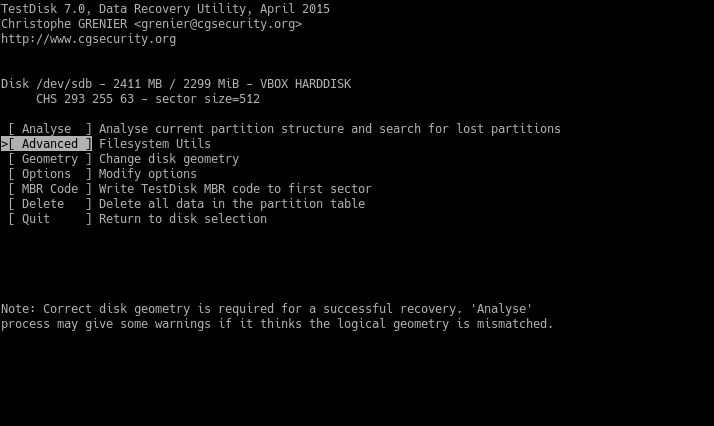
Then, select the Advanced options to recover files.
The next step is selecting the partition and the Undelete option.
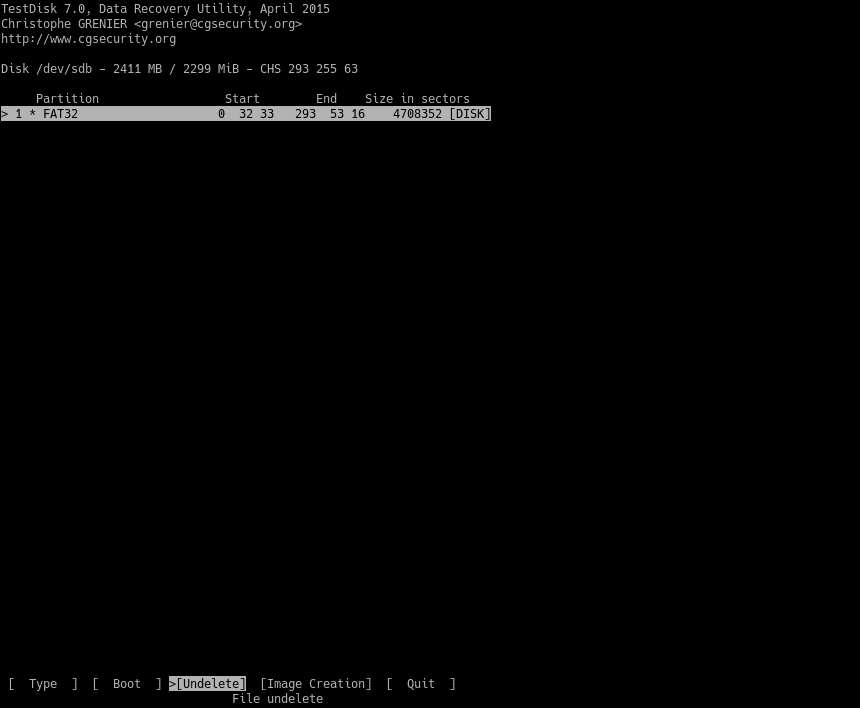
Then, you will see all the deleted files on the partition.
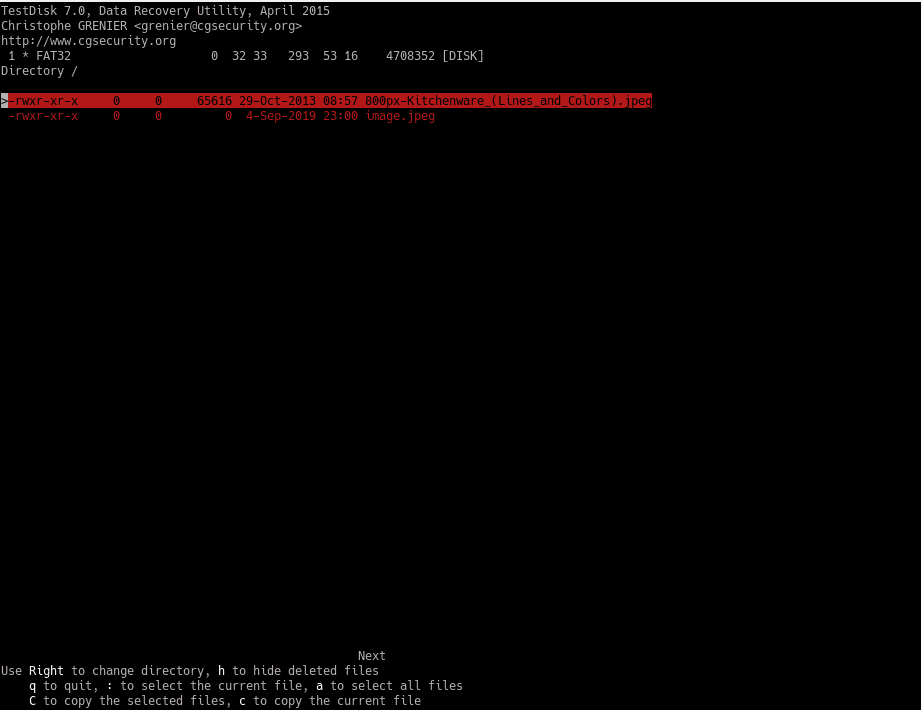
Now, select the destination folder to place the recovered files. You need to press C on the first option to place the files on the current directory.
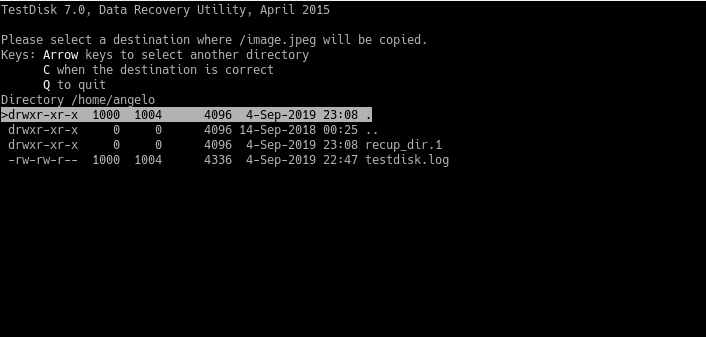
Finally, you will see this message:
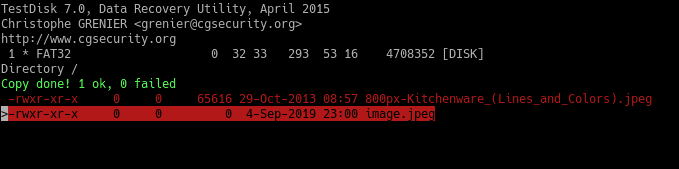
Congratulations! Files restored.
Recover deleted files from SD card
Usually, on an SD card, it is common to notice that they are used for multimedia files. Therefore, it is advisable to use a more specialized program for these files.
In this case, we will use the application called Photorec that comes incorporated in TestDisk.
First, insert the SD card on the PC. Next, run photorec as root:
$ sudo photorec [device]
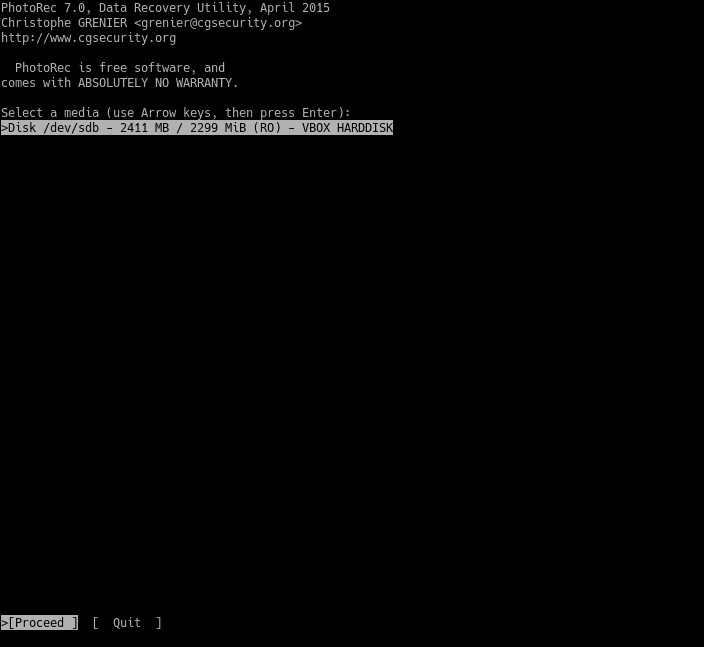
Then, you will see the following image. Select the media and proceed and press Enter.
Next, select the partition. And select Options and press enter.
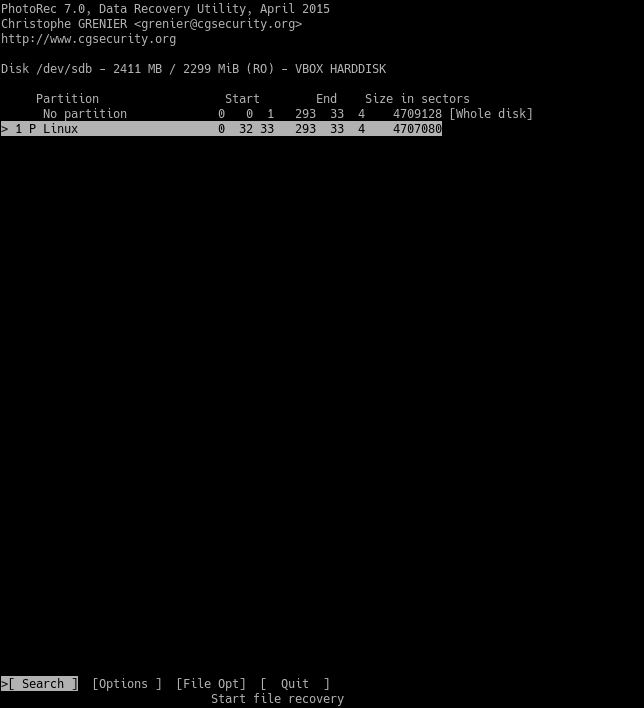
There you will see the recovery options that will be performed on the SD card.
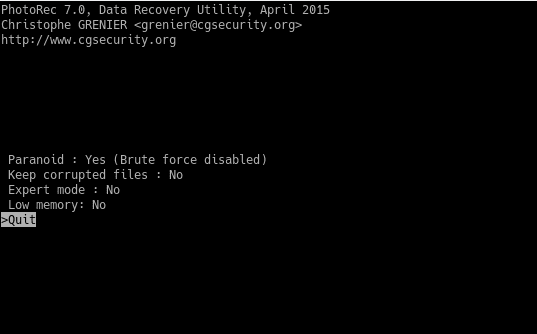
Press q to return to the previous screen. And there it is necessary to choose the types of files that we want to recover. This is achieved by selecting the File Opt option.
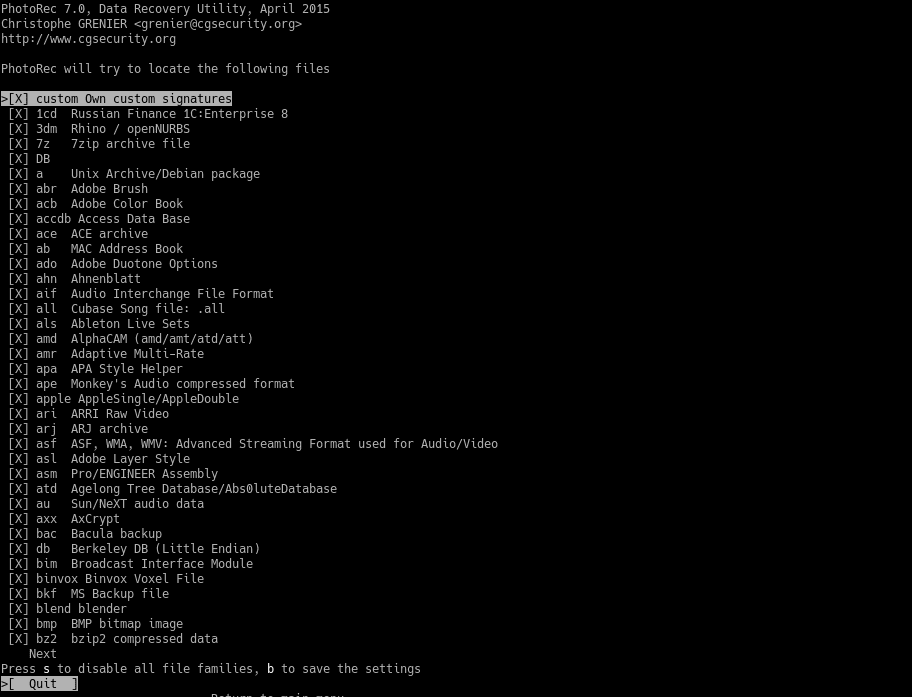
Press the s key to select and deselect all formats. You can also select the types of files you want to recover using the right key. To save the selected options press the b key. Return to the main menu using the q key.
Then, on the main menu, choose the Search option to start the process. And choose the file system.
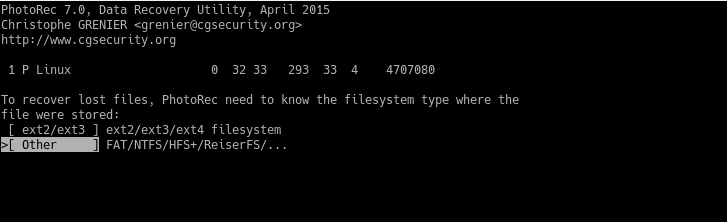
You will then be presented with two options. Free and Whole. Normally, Free is enough. If you want to do a deep analysis, choose Whole but keep in mind that it will slow down the process.
Now, it is necessary to choose the location where the files will be saved. To do this, press the c key.
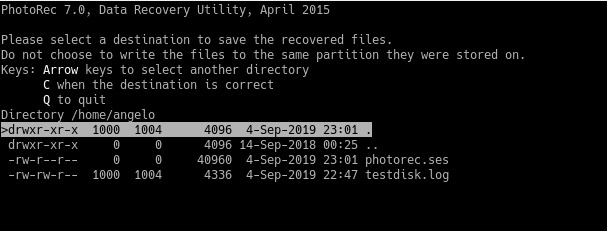
After choosing the destination, the recovery process will start. Remember that the system will collapse and freeze. So be patient.
In the end, you will see a message informing you of everything that has happened.
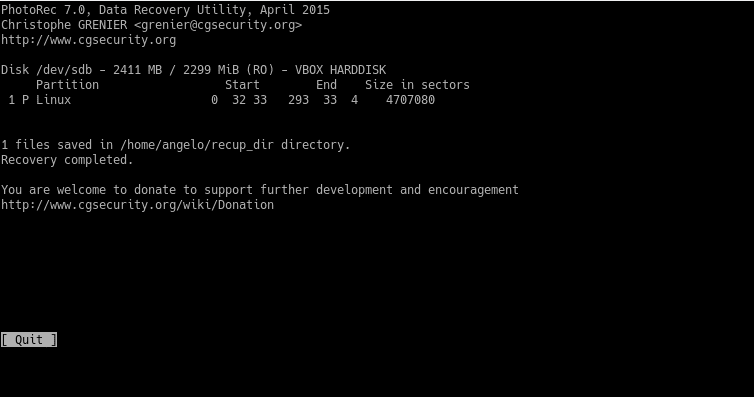
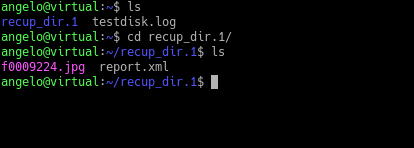
Next, check the results.
Recover deleted files from NTFS
NTFS is a Windows file system. If you are one of those who use both systems on the computer, then you may need to restore deleted files from a Windows partition with this file system.
To do this, we have a tool called ntfsundelete that is quite simple to use.
First, you need to scan the disk or partition. For example:
$ sudo ntfsundelete /dev/sda1
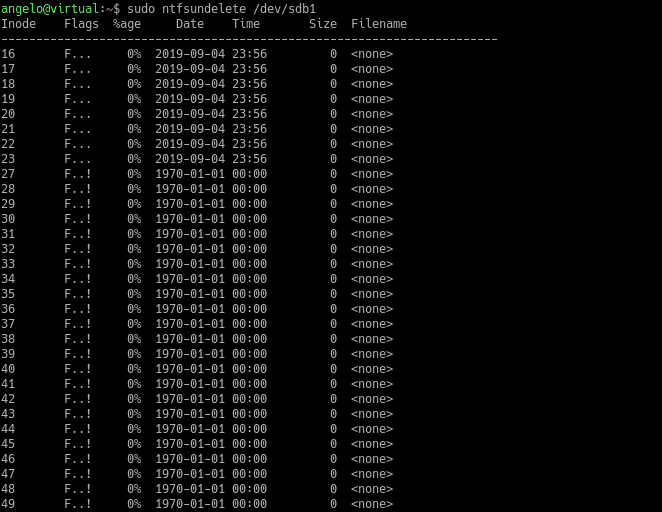
Then, we will be able to recover the deleted file with the following command:
$ sudo ntfsundelete [HD_Or_partition] -u -m [filename]
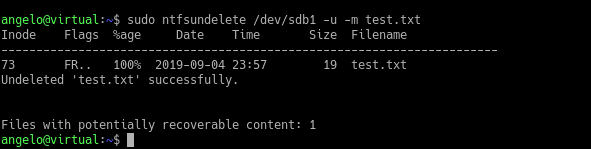
The recovered files now belong to the root user. The last step is to change the permissions and owners of the files using the chown command.
Recover Files from FAT32
Another common Windows file system is FAT32. You can recover files from FAT32 is by using TestDisk.
So again run testdisk as root user and pass the disk as a parameter:
$ sudo testdisk [partition/HD]
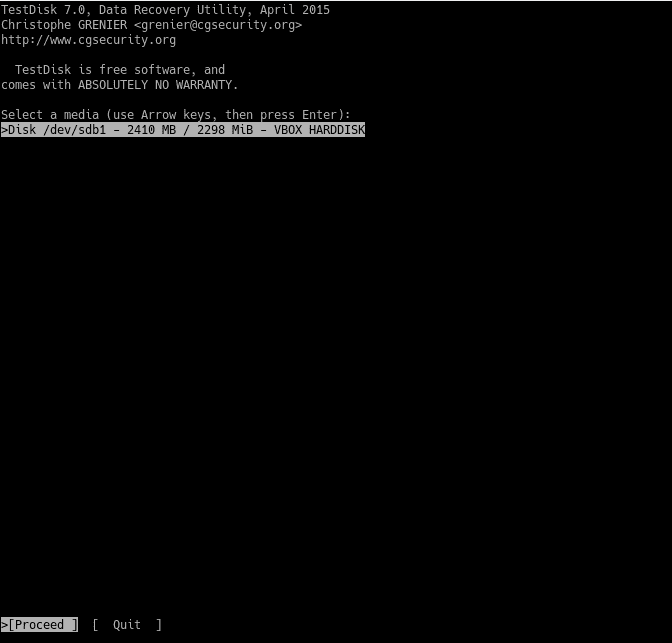
Then continue the steps as described above to restore of the files.
Recover on memory files (Using inode)
If you delete a file that is used by another process, you can restore it from the memory using inode.
To do this, some initial conditions must be established. First, the deleted file MUST remain open by another process. Then you have to verify the process and finally recover it and change its permissions.
In this case, I will create a file called example.txt using the nano editor and add some text:
$ nano example.txt
Then save the changes and open another terminal window and use the file. For example, with the less command.
$ less example.txt
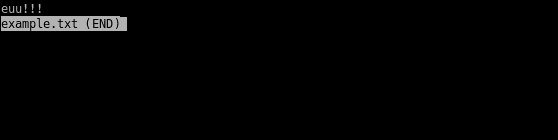
Open another terminal session, delete the file and make sure it’s deleted:
$ rm example.txt
$ ls example.txt

As you can see, the file no longer exists. But we will be able to recover it. To do this, let’s get the number of the process associated with the inode of the file.
$ lsof | grep example.txt

You will notice the process and command that is using the file (the less command). From that image, we have to pay attention to the second and fourth values. These are the PID of the process and the descriptor of the file respectively.
Then, recover it with the following command:
$ ls -l /proc/2325/fd/4

Then copy it to whatever location you want and that is enough to recover it.
$ sudo cp /proc/2325/fd/4 .
Next, check the results and open the file:
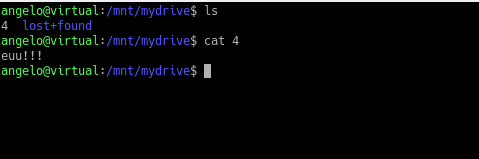
This way we can recover a deleted file that still on memory and used by a process with the inode.
Recover Deleted Files from EXT4 (Using extundelete)
EXT4 is the default file system on most Linux distributions. It is quite fast and with technical features that are very well taken advantage of by the Linux kernel.
One of the used tools to recover files from EXT4 filesystem is extundelete.
Extundelete is an open-source application that allows recovering deleted files from a partition or a disk with EXT3 or EXT4 file system. It is simple to use and comes by default installed on most Linux distributions.
To recover a certain file, just use the following command:
$ sudo extundelete [device] -restore-file [pathfile]
For example:
$ sudo extundelete /dev/sdb1 -restore-file home/angelo/other.txt
If you want to recover all the files in a folder, use the wildcard character:
$ extundelete /dev/sda6 -restore-file home/angelo/*
But if you want to restore all files on the partition or disk, the next command would suffice:
$ extundelete /dev/sda6 -restore-all
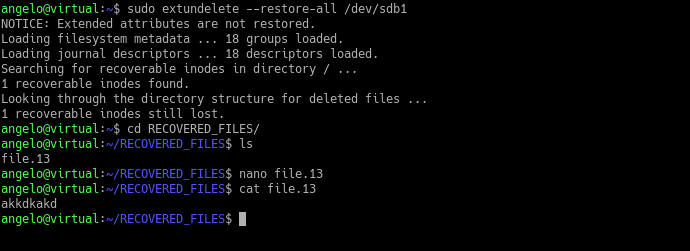
So, the recovered files will be on the RECOVERED_FILES directory. So this way, you can recover deleted files using extundelete.
Using debugfs
It is also possible to use the debugfs tool to recover deleted files. This tool also uses the inode number of the deleted file. However, it only works on EXT4 file systems.
Its operation is quite simple, too. First, you have to enter the partition or device.
$ debugfs [device]
For example,
$ sudo debugfs /dev/sdb1
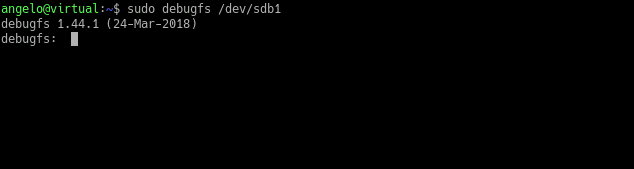
Then, after a while, you will be able to login to the debugfs console to search for recently deleted files.
$ debugfs: lsdel
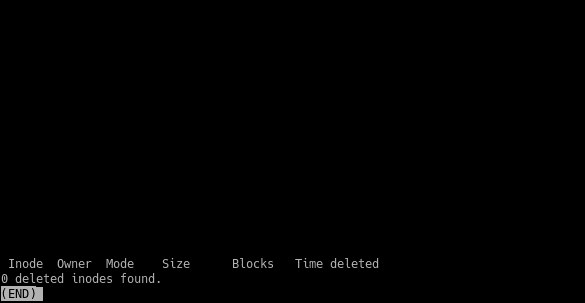
In the first column, you will see the inode number of the deleted files in that device. Then, restore it with the following command:
$ debugfs mi
And that is it. It is quite easy.
Using ext4magic
Another alternative way to recover deleted files on a disk with an Ext4 file system is to use Ext4magic. This application is also quite simple to use.
The most basic syntax of the application is the following:
$ sudo ext4magic [device] -f [folder_to_scan] -r -d [output_folder]
If I wanted to recover the deleted files from a folder called files, the command would be similar to this one:
$ sudo ext4magic /dev/sdb1 -r -d files
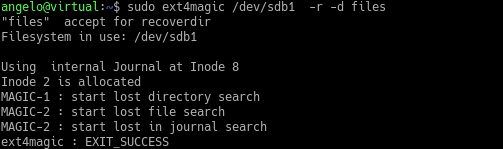
That is how easy it is to use ext4magic. All this thanks to the fact that Ext4 is a community and open source file system.
Recover overwritten files (Using Scalpel)
Scapel is another open-source tool that allows you to recover files from formatted drives, overwritten files and even damaged drives. It is well known for its speed and efficiency. In this sense, it emerges as an alternative to consider.
Scalpel carves files without the help of filesystems. It tries to extract headers and footers of files and tries to guess the entire file structure using some well-designed algorithms.
Like TestDisk, it is available in the official repositories of most Linux distributions. Therefore, its installation is reduced to the use of the terminal and the package manager of the distribution.
The fastest and easiest way to use Scapel is as follows:
$ scalpel [device] -o [output_folder]
The output_folder where scapel will place all recovered files. Note that Scalpel will create the output directory itself.
But how does Scapel know which files to recover? Well, that is defined in the application configuration file.
This configuration file is usually located at the following location:
/etc/scalpel/scalpel.conf
And you can open it with your favorite text editor and there you will only have to uncomment the lines to define the file formats to search.
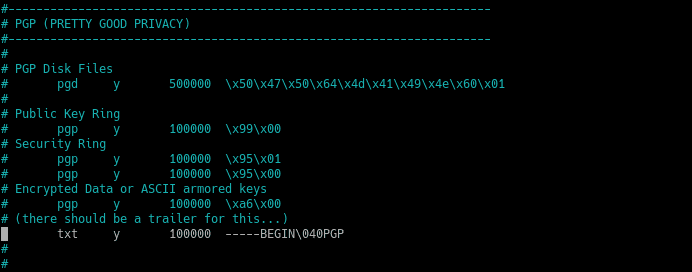
The file formats you uncomment, Scalpel will search for it.
Next, run the full Scalpel command and in the output folder, you will see the recovered files.
$ sudo scalpel /dev/sdb1 -o recovered_files1
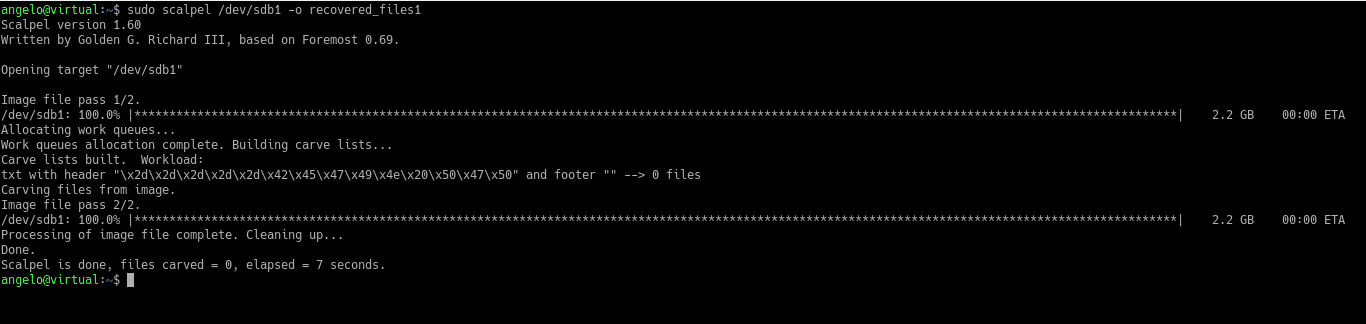
Sometimes, Scalpel restores parts of the file. That depends on the health of the drive and how much data has been corrupted.
Also, there are many craving algorithms you can use, but we discussed here the basic way of craving data.
Recover files from a non-bootable system
This is a delicate case because we need to access from a Live cd of Ubuntu or another similar Linux distribution. Once we have boot, we could use TestDisk to try to recover the data.
In this case, we would have to use an external drive where to save the data. On the other hand, in case TestDisk can’t do the job, we can also try extundelete or ext4magic as long as the partition is Ext4.
If it does not work, you could try regenerating the partition using TestDisk as explained above.
Conclusion
It is possible to delete files accidentally. The idea is to know the appropriate tools and techniques to recover these files.
In this post, we have covered several circumstances and different file systems that could help avoid such problems.
Keep coming back.
Thank you.

How to write practical shell scripts
 In the last post, we talked about regular expressions and we saw how to use them in sed and awk for text processing, and we discussed before Linux sed command and awk command. During the series, we wrote small shell scripts, but we didn’t mix things up, I think we should take a small step further and write a useful shell script. However, the scripts in this post will help you to empower your scriptwriting skills. You can send messages to someone by phone or email, but one method, not commonly used anymore, is sending a message directly to the user’s terminal. We are going to build a bash script that will send a message to a user who is logged into the Linux system. For this simple shell script, only a few functions are required. Most of the required commands are common and have been covered in our series of shell scripting; you can review the previous posts.
Sending Messages
First, we need to know who is logged in. This can be done using the who command which retrieves all logged in users.
who

To send a message you need the username and his current terminal.
You need to know if messages are allowed or not for that user using the mesg command.
mesg

If the result shows “is y” that means messaging is permitted. If the result shows “is n”, that means messaging is not permitted.
To check any logged user message status, use the who command with -T option.
who -T
If you see a dash (-) that means messages are turned off and if you see plus sign (+) that means messages are enabled.
To allow messages, type mesg command with the “y” option like this
mesg y
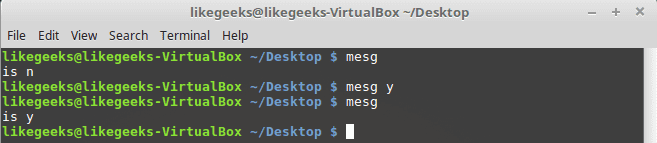
Sure enough, it shows “is y” which means messages are permitted for this user.
Of course, we need another user to be able to communicate with him so in my case I’m going to connect to my PC using SSH and I’m already logged in with my user, so we have two users logged onto the system.
Let’s see how to send a message.
Write Command
The write command is used to send messages between users using the username and current terminal.
For those users who logged into the graphical environment (KDE, Gnome, Cinnamon or any), they can’t receive messages. The user must be logged onto the terminal
We will send a message to testuser user from my user likegeeks like this:
write testuser pts/1
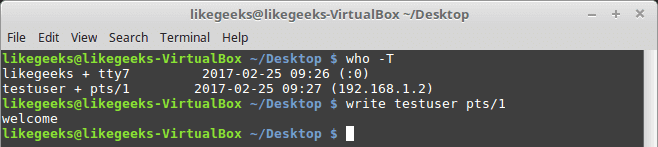
Type the write command followed by the user and the terminal and hit Enter.
When you hit Enter, you can start typing your message. After finishing the message, you can send the message by pressing the Ctrl+D key combination which is the end of file signal. I recommend you to review the post about signals and jobs.

The receiver can recognize which user on which terminal sends the message. EOF means that the message is finished.
I think now we have all the parts to build our shell script.
Creating The Send Script
Before we create our shell script, we need to determine whether the user we want to send a message to him is currently logged on the system, this can be done using the who command to determine that.
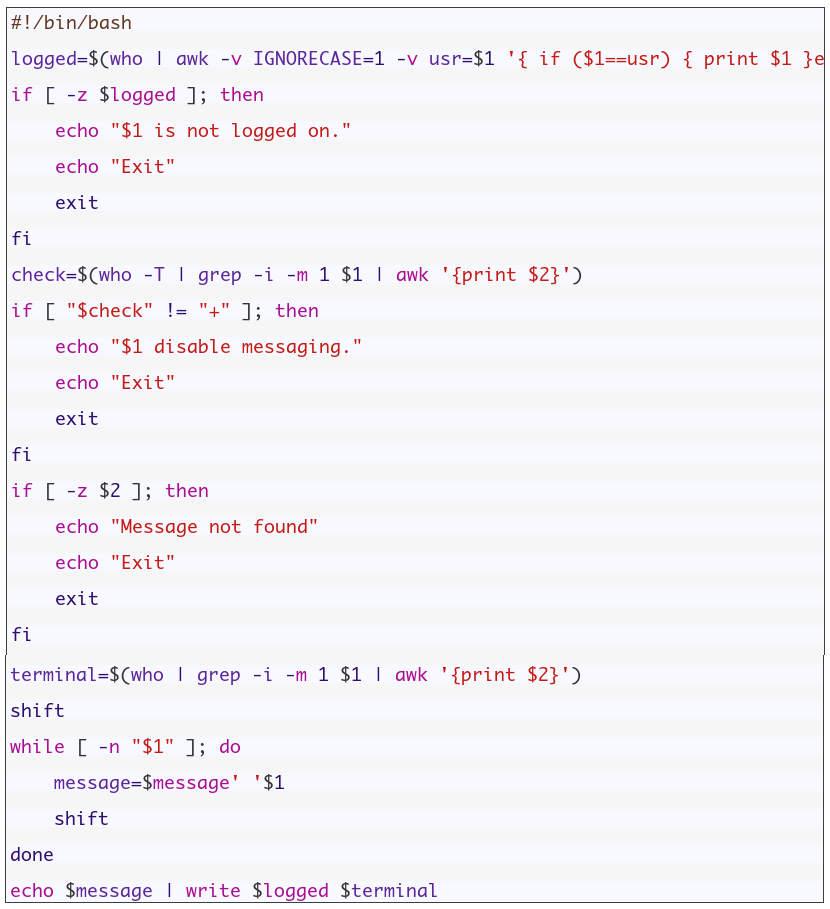
logged=$(who | awk -v IGNORECASE=1 -v usr=$1 '{ if ($1==usr) { print $1 }exit }')
We get the logged in users using the who command and pipe it to awk and check if it is matching the entered user.
The final output from the awk command is stored in the variable logged.
Then we need to check the variable if it contains something or not:
if [ -z $logged ]; then
echo "$1 is not logged on."
echo "Exit"
exit
fi
I recommend you to read the post about the if statement and how to use it Bash Script.
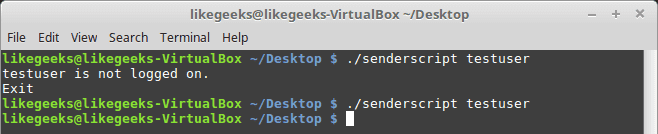
The logged variable is tested to check if it is a zero or not.
If it is zero, the script prints the message, and the script is terminated.
If the user is logged, the logged variable contains the username.
Checking If The User Accepts Messages
To check if messages are allowed or not, use the who command with -T option.
check=$(who -T | grep -i -m 1 $1 | awk '{print $2}')
if [ "$check" != "+" ]; then
echo "$1 disable messaging."
echo "Exit"
exit
fi
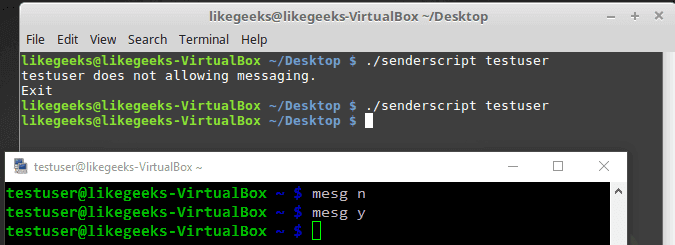
Notice that we use the who command with -T. This shows a (+) beside the username if messaging is permitted. Otherwise, it shows a (-) beside the username, if messaging is not permitted.
Finally, we check for a messaging indicator if the indicator is not set to plus sign (+).
Checking If Message Was Included
You can check if the message was included or not like this:
if [ -z $2 ]; then
echo "Message not found"
echo "Exit"
exit
fi
Getting the Current Terminal
Before we send a message, we need to get the user current terminal and store it in a variable.
terminal=$(who | grep -i -m 1 $1 | awk '{print $2}')
Then we can send the message:
echo $2 | write $logged $terminal
Now we can test the whole shell script to see how it goes:
$ ./senderscript likegeeks welcome
Let’s see the other shell window:
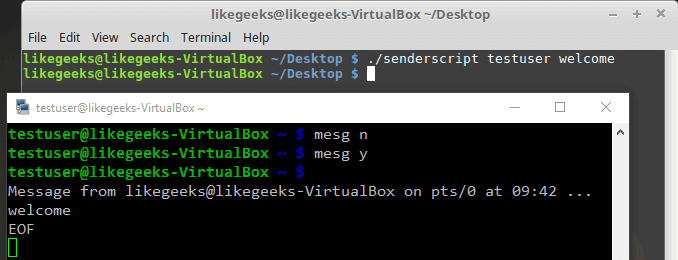
Good! You can now send simple one-word messages.
Sending a Long Message
If you try to send more than one word:
$ ./senderscript likegeeks welcome to shell scripting
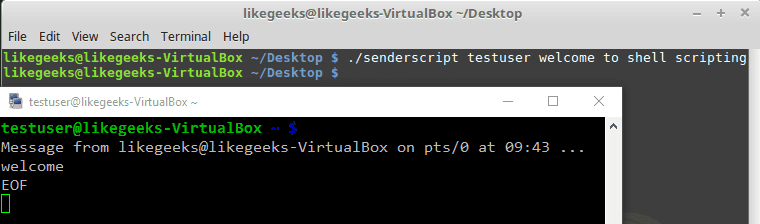
It didn’t work. Only the first word of the message is sent.
To fix this problem, we will use the shift command with the while loop.
shift
while [ -n "$1" ]; do
message=$message' '$1
shift
done
And now one thing needs to be fixed, which is the message parameter.
echo $whole_message | write $logged $terminal
So now the whole script should be like this:
If you try now:
$ ./senderscript likegeeks welcome to shell scripting
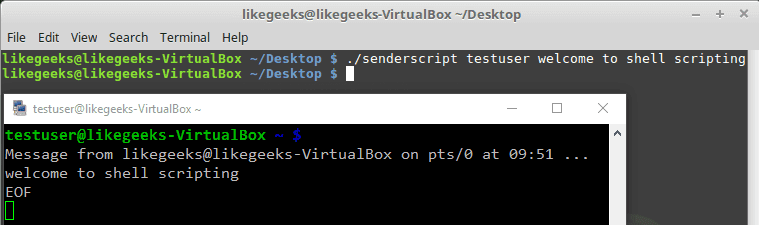
Awesome!! It worked. Again, I’m not here to make a script to send the message to the user, but the main goal is to review our shell scripting knowledge and use all the parts we’ve learned together and see how things work together.
Monitoring Disk Space
Let’s build a script that monitors the biggest top ten directories.
If you add -s option to the du command, it will show summarized totals.
$ du -s /var/log/
The -S option is used to show the subdirectories totals.
$ du -S /var/log/
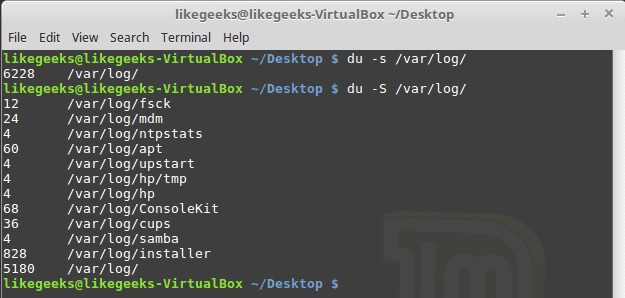
You should use the sort command to sort the results generated by the du command to get the largest directories like this:
$ du -S /var/log/ | sort -rn
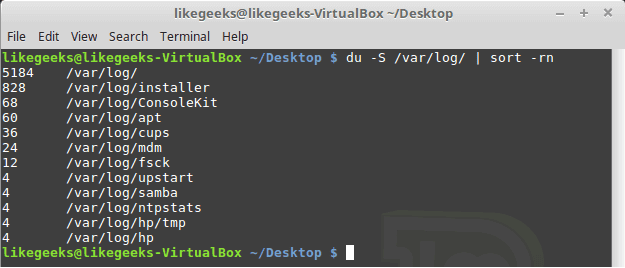
The -n to sort numerically and the -r option to reverse the order so it shows the bigger first.
The N command is used to label each line with a number:
sed '{11,$D; =}' |
sed 'N; s/\n/ /' |
Then we can clean the output using the awk command:
awk '{printf $1 ":" "\t" $2 "\t" $3 "\n"}'
Then we add a colon and a tab so it appears much better.
$ du -S /var/log/ |
sort -rn |
sed '{11,$D; =}' |
# pipe the first result for another one to clean it
sed 'N; s/\n/ /' |
# formated printing using printf
awk '{printf $1 ":" "\t" $2 "\t" $3 "\n"}'
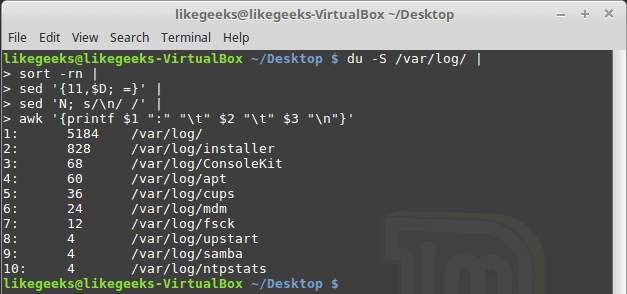
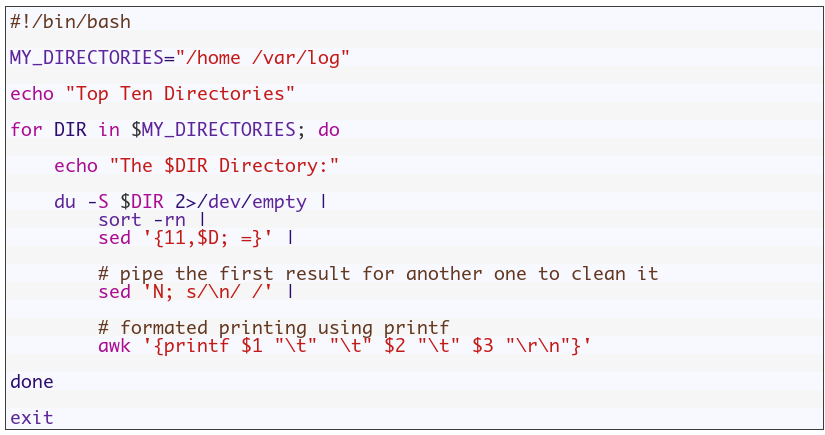
Suppose we have a variable called MY_DIRECTORIES that holds 2 folders.
MY_DIRECTORIES=”/home /var/log”
We will iterate over each directory from MY_DIRECTORIES variable and get the disk usage using du command.
So the shell script will look like this:
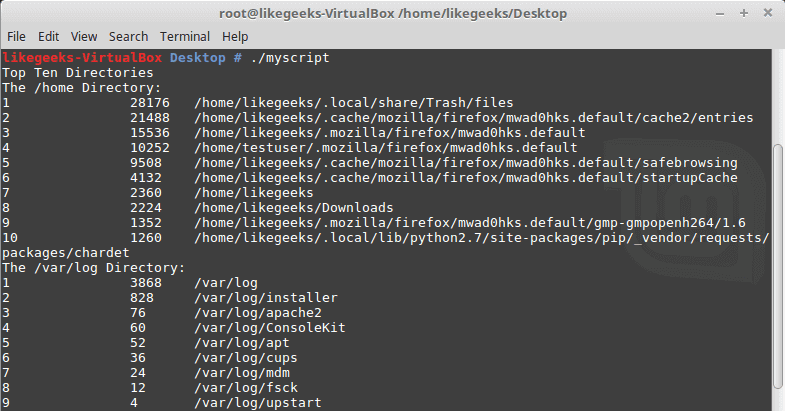
Good!! Both directories /home and /var/log are shown on the same report.
You can filter files, so instead of calculating the consumption of all files, you can calculate the consumption for a specific extension like *.log or whatever.
One thing I have to mention here, in production systems, you can’t rely on disk space report instead, you should use disk quotas.
Quota package is specialized for that, but here we are learning how bash scripts work.
Again the shell scripts we’ve introduced here is for showing you how shell scripting work, there are a ton of ways to implement any task in Linux.
My post is finished! I tried to reduce the post length and make everything as simple as possible, hope you like it.
Keep coming back. Thank you.
Catfish 1.4.10 duyuruldu
 En iyi Linux grafiksel dosya arama yardımcı programı olan Catfish‘in 1.4.10 sürümü duyuruldu. Yepyeni bir tercihler iletişim kutusu ile gelen sürüm, bu iletişim kutusunda; pencere düzeni, görüntüleme seçenekleri, özel dizinleri hariç tutma ve bir dosyayı açtıktan sonra Catfish’i kapatmak için bir seçenek içeriyor. Catfish’in önceki sürümlerinde performansı artırmak için çeşitli dizinler (/dev, ~/.cache, ~/.gvfs) hariç tutulduğu hatırlatılırken, bu sayede, kullanıcıların aramalarını daha da hızlandırabildikleri ifade edildi. Simgelerin artık sonuçlarda her zaman tutarlı bir boyutta görüntülendiği belirtilirken, önceleri, bazı simgelerin görsel akışı kırarak diğerlerinden çok daha büyük gösterildiği hatırlatıldı. Catfish 1.4.10 hakkında ayrıntılı bilgi edinmek için sürüm duyurusunu inceleyebilirsiniz.
Catfish 1.4.10 edinmek için aşağıdaki linklerden yararlanabilirsiniz.

SysVinit 2.96 duyuruldu
 Aslında Miquel van Smoorenburg tarafından yazılmış olan System V tarzı init programlarının bir koleksiyonu olan SysVinit‘in 2.96 sürümü, Jesse Smith tarafından duyuruldu. System V başlangıç araçları (SysVinit) tarafından kullanılan komut dosyaları içerir. Bu, Linux için init programını (çekirdeğin ilklendirilmesi bittiğinde çalıştırılan ilk işlem) ve ayrıca hizmetleri başlatmak ve durdurmak ve bunları yapılandırmak için bazı altyapıyı içeren geleneksel hizmet yönetimi paketidir. Unix tarzı bilgisayar işletim sistemlerinde, init (başlatma), bilgisayar sisteminin başlatılması sırasında başlatılan ilk işlemdir. Init, sistem kapatılana kadar çalışmaya devam eden bir servistir. Diğer tüm işlemlerin doğrudan veya dolaylı atasıdır ve artık tüm süreçleri otomatik olarak benimser. SysVinit 2.96 hakkında bilgi edinmek için bu gönderiyi inceleyebilirsiniz.
SysVinit 2.96 edinmek için aşağıdaki linkten yararlanabilirsiniz.