
Tag Archives | ssh

SSH port forwarding (tunneling) in Linux

In this tutorial, we will cover SSH port forwarding in Linux. This is a function of the SSH utility that Linux administrators use to create encrypted and secure relays across different systems. SSH port forwarding, also called SSH tunneling, is used to create a secure connection between two or more systems. Applications can then use these tunnels to transmit data. Your data is only as secure as its encryption, which is why SSH port forwarding is a popular mechanism to use. Read on to find out more and see how to setup SSH port forwarding on your own systems. To put it simply, SSH port forwarding involves establishing an SSH tunnel between two or more systems and then configuring the systems to transmit a specified type of traffic through that connection.

Continue Reading →

What is SSH port forwarding?

To put it simply, SSH port forwarding involves establishing an SSH tunnel between two or more systems and then configuring the systems to transmit a specified type of traffic through that connection.

There are a few different things you can do with this: local forwarding, remote forwarding, and dynamic port forwarding. Each configuration requires its own steps to setup, so we will go over each of them later in the tutorial.

Local port forwarding is used to make an external resource available on the local network. An SSH tunnel is established to a remote system, and traffic from the local network can use that tunnel to transmit data back and forth, accessing the remote system and network as if it was a part of the local network.

Remote port forwarding is the exact opposite. An SSH tunnel is established but the remote system is able to access your local network.

Dynamic port forwarding sets up a SOCKS proxy server. You can configure applications to connect to the proxy and transmit all data through it. The most common use for this is for private web browsing or to make your connection seemingly originate from a different country or location.

SSH port forwarding can also be used to setup a virtual private network (VPN). You’ll need an extra program for this called sshuttle. We cover the details later in the tutorial.

Why use SSH port forwarding?

Since SSH creates encrypted connections, this is an ideal solution if you have applications that transmit data in plaintext or use an unencrypted protocol. This holds especially true for legacy applications.

It’s also popular to use it for connecting to a local network from the outside. For example, an employee using SSH tunnels to connect to a company’s intranet.

You may be thinking this sounds like a VPN. The two are similar, but creating ssh tunnels is for specific traffic, whereas VPNs are more for establishing general connections.

SSH port forwarding will allow you to access remote resources by just establishing an SSH tunnel. The only requirement is that you have SSH access to the remote system and, ideally, public key authentication configured for password-less SSHing.

How many sessions are possible?

Technically, you can specify as many port forwarding sessions as you’d like. Networks use 65,535 different ports, and you are able to forward any of them that you want.

When forwarding traffic, be cognizant of the services that use certain ports. For example, port 80 is reserved for HTTP. So you would only want to forward traffic on port 80 if you intend to forward web requests.

The port you forward on your local system doesn’t have to match that of the remote server. For example, you can forward port 8080 on localhost to port 80 on the remote host.

If you don’t care what port you are using on the local system, select one between 2,000 and 10,000 since these are rarely used ports. Smaller numbers are typically reserved for certain protocols.

Local forwarding

Local forwarding involves forwarding a port from the client system to a server. It allows you to configure a port on your system so that all connections to that port will get forwarded through the SSH tunnel.

Use the -L switch in your ssh command to specify local port forwarding. The general syntax of the command is like this:

ssh -L local_port:remote_ip:remote_port [email protected]

Check out the example below:

ssh -L 80:example1.com:80 example2.com
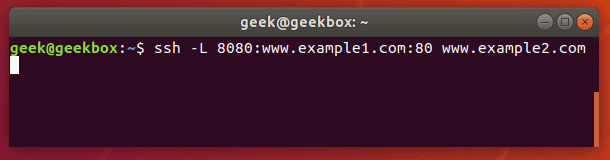
local port forwarding

This command would forward all requests to example1.com to example2.com. Any user on this system that opens a web browser and attempts to navigate to example1.com will, in the background, have their request sent to example2.com instead and display a different website.

Such a command is useful when configuring external access to a company intranet or other private network resources.

Test SSH port forwarding

To see if your port forwarding is working correctly, you can use the netcat command. On the client machine (the system where you ran the ssh -L command), type the netcat command with this syntax:

nc -v remote_ip port_number
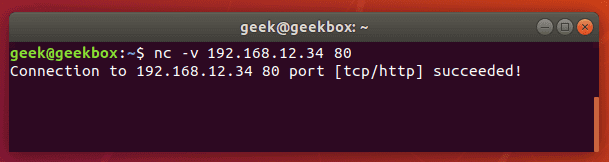
Test port forwarding using netcat

If the port is forwarded and data is able to traverse the connection successfully, netcat will return with a success message. If it doesn’t work, the connection will time out.

If you’re having trouble getting the port forwarding to work, make sure you’re able to ssh into the remote server normally and that you have configured the ports correctly. Also, verify that the connection isn’t being blocked by a firewall.

Persistent SSH tunnels (Using Autossh)

Autossh is a tool that can be used to create persistent SSH tunnels. The only prerequisite is that you need to have public key authentication configured between your systems, unless you want to be prompted for a password every time the connection dies and is reestablished.

Autossh may not be installed by default on your system, but you can quickly install it using apt, yum, or whatever package manager your distribution uses.

sudo apt-get install autossh

The autossh command is going to look pretty much identical to the ssh command we ran earlier.

autossh -L 80:example1.com:80 example2.com
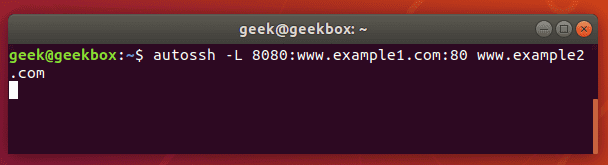
Persistent SSH port forwarding autossh

Autossh will make sure that tunnels are automatically re-established in case they close because of inactivity, remote machine rebooting, network connection being lost, etc.

Remote forwarding

Remote port forwarding is used to give a remote machine access to your system. For example, if you want a service on your local computer to be accessible by a system(s) on your company’s private network, you could configure remote port forwarding to accomplish that.

To set this up, issue an ssh command with the following syntax:

ssh -R remote_port:local_ip:local_port [email protected]

If you have a local web server on your computer and would like to grant access to it from a remote network, you could forward port 8080 (common http alternative port) on the remote system to port 80 (http port) on your local system.

ssh -R 8080:localhost:80 [email protected]
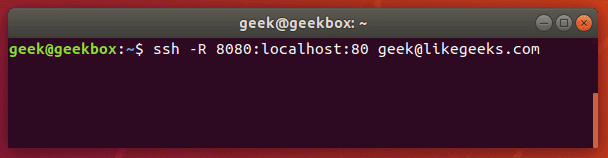
Remote port forwarding

Dynamic forwarding

SSH dynamic port forwarding will make SSH act as a SOCKS proxy server. Rather than forwarding traffic on a specific port (the way local and remote port forwarding do), this will forward traffic across a range of ports.

If you have ever used a proxy server to visit a blocked website or view location-restricted content (like viewing stuff on Netflix that isn’t available in your country), you probably used a SOCKS server.

It also provides privacy, since you can route your traffic through a SOCKS server with dynamic port forwarding and prevent anyone from snooping log files to see your network traffic (websites visited, etc).

To set up dynamic port forwarding, use the ssh command with the following syntax:

ssh -D local_port [email protected]

So, if we wanted to forward traffic on port 1234 to our SSH server:

ssh -D 1234 [email protected]

Once you’ve established this connection, you can configure applications to route traffic through it. For example, on your web browser:
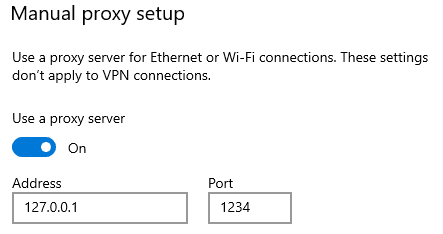
Socks proxy

Type the loopback address (127.0.0.1) and the port you configured for dynamic port forwarding, and all traffic will be forwarded through the SSH tunnel to the remote host (in our example, the likegeeks.com SSH server).

Multiple forwarding

For local port forwarding, if you’d like to setup more than one port to be forwarded to a remote host, you just need to specify each rule with a new -L switch each time. The command syntax is like this:

ssh -L local_port_1:remote_ip:remote_port_1 -L local_port_2:remote_ip:remote_port2 [email protected]

For example, if you want to forward ports 8080 and 4430 to 192.168.1.1 ports 80 and 443 (HTTP and HTTPS), respectively, you would use this command:

ssh -L 8080:192.168.1.1:80 -L 4430:192.168.1.1:443 [email protected]

For remote port forwarding, you can setup more than one port to be forwarded by specifying each new rule with the -R switch. The command syntax is like this:

ssh -R remote_port1:local_ip:local_port1 remote_port2:local_ip:local_port2 [email protected]

List port forwarding

You can see what SSH tunnels are currently established with the lsof command.

lsof -i | egrep '\<ssh\>'

SSH tunnels

In this screenshot, you can see that there are 3 SSH tunnels established. Add the -n flag to have IP addresses listed instead of resolving the hostnames.

lsof -i -n | egrep '\<ssh\>'

SSH tunnels n flag

Limit forwarding

By default, SSH port forwarding is pretty open. You can freely create local, remote, and dynamic port forwards as you please.

But if you don’t trust some of the SSH users on your system, or you’d just like to enhance security in general, you can put some limitations on SSH port forwarding.

There are a couple of different settings you can configure inside the sshd_config file to put limitations on port forwarding. To configure this file, edit it with vi, nano, or your favorite text editor:

sudo vi /etc/ssh/sshd_config

PermitOpen can be used to specify the destinations to which port forwarding is allowed. If you only want to allow forwarding to certain IP addresses or hostnames, use this directive. The syntax is as follows:

PermitOpen host:port

PermitOpen IPv4_addr:port

PermitOpen [IPv6_addr]:port

AllowTCPForwarding can be used to turn SSH port forwarding on or off, or specify what type of SSH port forwarding is permitted. Possible configurations are:

AllowTCPForwarding yes #default setting

AllowTCPForwarding no #prevent all SSH port forwarding

AllowTCPForwarding local #allow only local SSH port forwarding

AllowTCPForwarding remote #allow only remote SSH port forwarding

To see more information about these options, you can check out the man page:

man sshd_config

Low latency

The only real problem that arises with SSH port forwarding is that there is usually a bit of latency. You probably won’t notice this as an issue if you’re doing something minor, like accessing text files or small databases.

The problem becomes more apparent when doing network intensive activities, especially if you have port forwarding set up as a SOCKS proxy server.

The reason for the latency is because SSH is tunneling TCP over TCP. This is a terribly inefficient way to transfer data and will result in slower network speeds.

You could use a VPN to prevent the issue, but if you are determined to stick with SSH tunnels, there is a program called sshuttle that corrects the issue. Ubuntu and Debian-based distributions can install it with apt-get:

sudo apt-get install sshuttle

If you package manager on your distribution doesn’t have sshuttle in its repository, you can clone it from GitHub:

git clone https://github.com/sshuttle/sshuttle.git

cd sshuttle

./setup.py install

Setting up a tunnel with sshuttle is different from the normal ssh command. To setup a tunnel that forwards all traffic (akin to a VPN):

sudo sshuttle -r user@remote_ip -x remote_ip 0/0 -vv
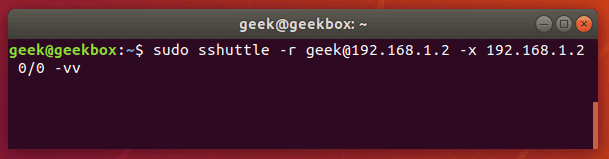
sshuttle command

Break the connection with a ctrl+c key combination in the terminal. Alternatively, to run the sshuttle command as a daemon, add the -D switch to your command.

Want to make sure that the connection was established and the internet sees you at the new IP address? You can run this curl command:

curl ipinfo.io
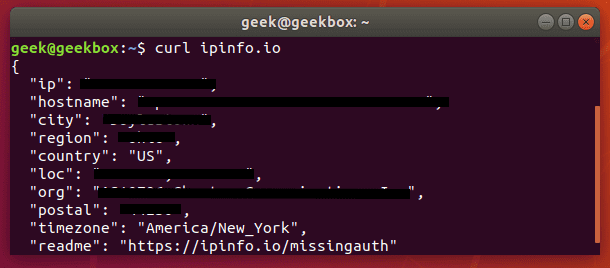
curl IP address

I hope you find the tutorial useful. Keep coming back.

0

Raspberry Digital Signage 12.1 duyuruldu

Raspberry Pi üzerinde tasarlanmış bir işletim sistemi olan Raspberry Digital Signage‘in (RDS) 12.1 sürümü duyuruldu.Web sayfalarını, internet üzerinden, yerel ağdan veya dahili (SD-kart içeren) kaynaklardan veren sistem; belirli bir (web) kaynağından tam ekran bir tarayıcı görüntüsü görüntülüyor. Debian 10 Buster tabanlı Raspbian‘a dayalı olarak gelen yeni sürüm; geliştirilmiş HTML5 yetenekleri, Adobe Flash desteği ve H264 / AVC video hızlandırma özelliği ve en etkin Chromium kurulumu ile geliyor. Sistem; varsayılan olarak WordPress kurulumu ile geliyor. SSH ve VNC uzaktan yönetim sistemleri de bulunan sistem; HTML5 videolarını pürüzsüz oynatabiliyor. Sistem; bazı iyileştirmeler ve kod ile hata düzeltmeleri içeriyor. Raspberry Digital Signage 12.1 hakkında ayrıntılı bilgi edinmek için sürüm duyurusunu inceleyebilirsiniz.

Raspberry Digital Signage 12.1 edinmek için aşağıdaki linkten yararlanabilirsiniz.

0

Raspberry Digital Signage 12.0 duyuruldu

Raspberry Pi üzerinde tasarlanmış bir işletim sistemi olan Raspberry Digital Signage‘in (RDS) 12.0 sürümü duyuruldu. Web sayfalarını, internet üzerinden, yerel ağdan veya dahili (SD-kart içeren) kaynaklardan veren sistem; belirli bir (web) kaynağından tam ekran bir tarayıcı görüntüsü görüntülüyor. Debian 10 Buster tabanlı Raspbian‘a dayalı olarak gelen yeni sürüm; geliştirilmiş HTML5 yetenekleri, Adobe Flash desteği ve H264 / AVC video hızlandırma özelliği ve en etkin Chromium kurulumu ile geliyor. Sistem; varsayılan olarak WordPress kurulumu ile geliyor. SSH ve VNC uzaktan yönetim sistemleri de bulunan sistem; HTML5 videolarını pürüzsüz oynatabiliyor. Sistem; bazı iyileştirmeler ve kod ile hata düzeltmeleri içeriyor. Raspberry Digital Signage 12.0 hakkında ayrıntılı bilgi edinmek için sürüm duyurusunu inceleyebilirsiniz.

Continue Reading →

Raspberry Digital Signage 12.0 edinmek için aşağıdaki linkten yararlanabilirsiniz.

0

The MagPi magazine 84 duyuruldu

The MagPi magazine 84 duyuruldu. Bilgi işlem gücünü dünyanın her yerindeki insanların ellerine vermeyi amaçlayan İngiltere merkezli bir yardım kuruluşu olan Raspberry Pi Vakfı tarafından çıkarılan The MagPi magazin’in 84 no’lu nüshasının tüm içeriğine buradan ulaşabilirsiniz. Dergi; The best summer projects, Build a low-cost robot, The Smart Home Herb Garden, Race around with the Marvin Go-Kart project, Get retro with PIC-20, Set up SSH on a Raspberry Pi, Use CircuitPython to control servos, Build Demolition Man’s swear fine machine, Learn Lua with PICO-8, Build a squeeze controller racing game, 10 projects to upgrade with Raspberry Pi 4, Plus! Win one of three Raspberry Pi 4 Desktop Kits ve daha fazlasını ele alınıyor.

Continue Reading →

The MagPi magazine 84edinmek için buradan yararlanabilirsiniz. Dilerseniz, buradan satın alabilir, böylelikle vakfın çalışmalarına katkıda bulunabilirsiniz.

0

SSH * Warning!

Değerli dostumuz @caylakpenguen, yine ilginç bir konuya değinmiş. Dostumuz, bu kez, sunucu sahibi çoğu kullanıcı için vazgeçilmez olan SSH ile ilgili bir ayrıntıya değinmiş. Bu ilginç yazıyı buraya almayı uygun gördük. Dostumuz şöyle diyor: “Merhabalar. Bir arkadaşımın isteği üzerine bu yazıyı yazmaktayım. Bilindiği gibi sunucumuza bağlanmak için çeşitli araçlar kullanıyoruz. ssh da bunlardan biri. Windows kullanan kişiler genekde Putty ile bağlantı sağlıyorlar. Biz Linux sevenler olarak klasik olarak konsol ile sunucumuza ssh ile bağlanıyoruz. Putty’e ihtiyacımız yok yani.

Continue Reading →

Uyarı Ekranı:

Ssh bağlatısı yaparken karşımıza bazan bu uyarı ekranı gelebilmektedir.
─[caylak@rihanna]─[~]
└──╼ $ssh 16
@@@@@@@@@@@@@@@@@@@@@@@@@@@@@@@@@@@@@@@@@@@@@@@@@@@@@@@@@@@
@ WARNING: REMOTE HOST IDENTIFICATION HAS CHANGED! @
@@@@@@@@@@@@@@@@@@@@@@@@@@@@@@@@@@@@@@@@@@@@@@@@@@@@@@@@@@@
IT IS POSSIBLE THAT SOMEONE IS DOING SOMETHING NASTY!
Someone could be eavesdropping on you right now (man-in-the-middle attack)!
It is also possible that a host key has just been changed.
The fingerprint for the ECDSA key sent by the remote host is
SHA256:pztxkusZaJ24MxQiNdwXdyDo8zJLqy11wJqtS8A10WA.
Please contact your system administrator.
Add correct host key in /home/caylak/.ssh/known_hosts to get rid of this message.
Offending ECDSA key in /home/caylak/.ssh/known_hosts:108
remove with:
ssh-keygen -f "/home/caylak/.ssh/known_hosts" -R "192.168.0.100"
ECDSA host key for 192.168.0.100 has changed and you have requested strict checking.
Host key verification failed.
┌─[✗]─[caylak@rihanna]─[~]
└──╼ $

Bu ekran çıktısının anlamı bağlanamaya çalıştığımız sistemin ssh-key parmak izinin daha önce bağlanmış olduğumuz sistemin parmak izi ile aynı olmadığını belirtmek ve belkide bize (man-in-the-middle attack) yapılmaya çalışıldığı yönünde uyarmayı amaçlamaktadır. Bu uyarı tamamen güvenlik amaçlı bir uyarıdır. Akabinde sistemimiz bağlantıyı gerçekleştirmez.

Niçin Ssh yapamıyorum?

Linux ve *nix sistemlerde ssh bağlatısı sağlandığında karşı sunucunun ssh-key (fingerprint) parmak izi “.ssh/know_hosts” dosyasına kaydedilir. Akabinde biz aynı sunucuya yeniden bağlanmak istediğimizde “.ssh/know_hosts” dosyasında kayıtlı olan örneği ile karşılaştırılır eğer eşleme sağlanamaz ise durum ekrana basılır ve ssh bağlanma işlemi sonlandırılır.

Bağlanmak için Ne yapmalıyız?

Bağlanmak istediğimiz Hedef sisteme eğer güveniyorsak, Ekran çıktısında belirtilen işlemi yapmanız yeterlidir.

ssh-keygen -f “/home/caylak/.ssh/known_hosts” -R “192.168.0.100”

┌─[caylak@rihanna]─[~]
└──╼ $ssh-keygen -f "/home/caylak/.ssh/known_hosts" -R "192.168.0.100"
# Host 192.168.0.100 found: line 108
/home/caylak/.ssh/known_hosts updated.
Original contents retained as /home/caylak/.ssh/known_hosts.old
┌─[caylak@rihanna]─[~]
└──╼ $

UYARI!
İkinci bir yöntem ise “/home/caylak/.ssh/known_hosts” dosyasını silmektir ( Önerilmez).

rm -f /home/caylak/.ssh/known_hosts

Devamında hedef sisteme yeniden bağlanmayı deneyebilirsiniz.

Fakat bu kez de know_hosts dosyasından parmak izini kaldırdığımız için sistemimiz bizi uyaracak ve onay vermemizi isteyecektir yes yazarak onay vermelisiniz.

┌─[caylak@rihanna]─[~]
└──╼ $ssh 16
The authenticity of host '192.168.0.100 (192.168.0.100)' can't be established.
ECDSA key fingerprint is SHA256:pztxkusZaJ24MxQiNdwXdyDo8zJLqy11wJqtS8A10WA.
Are you sure you want to continue connecting (yes/no)? yes

akabinde sisteminiz ssh bağlantısını sağlayacaktır.

[caylak@rihanna]─[~]
└──╼ $ssh 16
The authenticity of host '192.168.0.100 (192.168.0.100)' can't be established.
ECDSA key fingerprint is SHA256:pztxkusZaJ24MxQiNdwXdyDo8zJLqy11wJqtS8A10WA.
Are you sure you want to continue connecting (yes/no)? yes
Warning: Permanently added '192.168.0.100' (ECDSA) to the list of known hosts.
Welcome to Ubuntu 16.04.3 LTS (GNU/Linux 4.4.0-87-generic i686)

* Documentation: https://help.ubuntu.com
* Management: https://landscape.canonical.com
* Support: https://ubuntu.com/advantage

248 packages can be updated.
151 updates are security updates.

Last login: Sun Apr 22 21:03:35 2018
ubuntu@ubuntu:~$

faydalı olması dileği ile…

caylak.truvalinux.org

0

Rsync 3.1.3 sürümüne güncellendi

Uzak noktalar arasındaki verileri eşleştirme noktasında daha dar bir erişim bantı kullanılmasına olanak sağlayan Rsync‘in 3.1.3 sürümü duyuruldu. xattr isimlerinin kullanılmasıyla ilgili protokolde, meydana gelen bir arabellek taşmasının düzeltildiği bildirilirken, bir yedekleme başarısız olduğunda rsync’in bir hata döndüreceği ifade ediliyor. Unix, GNU/Linux ve ayrıca Windows sistemleri üzerinde kullanılabilen yazılım, genellikle yedekleme ve sekronizasyon işlemlerinde dosyaların kopyalanması için tercih edilir. Tüm bir dizini ya da dosya sistemini yedekleme olanağı sağlayan Rsync; GNU Genel Kamu Lisansı altında kullanıma sunulan özgür bir yazılımdır. Daemon modunda, rsync SSH veya RSH gibi uzak bir kabuk yoluyla veya yerel rsync protokolü üzerinden dosya hizmeti sağlayan Rsync; standart 873 TCP portunu dinler. Rsync 3.1.3 hakkında ayrıntılı bilgi edinmek için haberler sayfasını inceleyebilirsiniz.

Continue Reading →

Rsync 3.1.3 edinmek için aşağıdaki linklerden yararlanabilirsiniz.

0

Configure and Use Linux-PAM

In the previous post, we talked about Linux iptables firewall, and some people asked about authentication. Today we will talk about the powerful framework in Linux used for authentication which is Linux-PAM. PAM or Pluggable Authentication Modules are the management layer that sits between Linux applications and the Linux native authentication system. There are many programs on your system that use PAM modules like su, passwd, ssh and login and other services, we will discuss some of them. PAM main focus is to authenticate your users. Authentication in Linux is done by matching the encrypted password in /etc/shadow file with the entered one. We have many services on our systems that require authentication like SSH, FTP, TELNET, IMAP and many other services, so we will have a lot of authentication files besides /etc/shadow file to maintain, and it could be a serious problem if there is any inconsistent data between these authentication files. Here comes PAM. Linux-PAM offers a unified login system for your services.
Continue Reading →

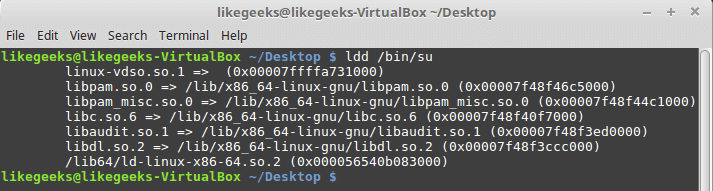
To check if your program uses Linux-PAM or not:

$ ldd /bin/su

linux PAM check pam usability

You should see libpam.so library.

Linux-PAM Configuration

The configuration of Linux-PAM is in the directory /etc/pam.d/.

Some PAM modules require configuration files with the PAM configuration to operate. You can find the configuration files in /etc/security

If PAM is misconfigured, this could lead to serious problems.

PAM Services

The four types of PAM services:

  • Authentication service modules.
  • Account management modules.
  • Session management modules.
  • Password management modules.

Any application requires authentication can register with PAM using a service name.

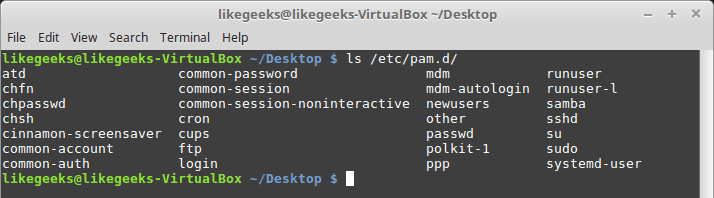
You can list Linux services that use Linux-PAM.

$ ls /etc/pam.d/

Linux PAM services

If you open any service file, you will see that the file is divided into three columns. The first column is management group, the second column is for control flags and the third column is the module (so file) used.

$ cat /etc/pam.d/sshd

account required pam_nologin.so

The account is the management group, required is the control flag and the used module is pam_nologin.so.

You may find a fourth column which is for module parameters.

Management Groups

There are four Management Groups you will see in PAM services files:

  • Auth Group: it can validate users
  • Account Group: controls the access to the service like how many times you should use this service.
  • Session Group: responsible for the service environment.
  • Password Group: for password updating.

Control Flags

We have four control flags in services files:

  • Requisite: the strongest flag. If the requisite not found or failed to load, it will stop loading other modules and return failure.
  • Required: The same as requisite, but if the module failed to load for any reason, it continues loading other modules and returns failure at the end of execution.
  • Sufficient: if the module return success, the processing of other modules no longer needed.
  • Optional: In the case of failure, the stack of modules continues execution and the return code is ignored.

Modules Order

The order is important because each module depends on the previous module on the stack.

If you try a configuration like the following to log in:

auth required pam_unix.so

auth optional pam_deny.so

That will work correctly, but what will happen if we change the order like this:

auth optional pam_deny.so

auth required pam_unix.so

No one can log in, so the order matters.

PAM Modules

There are PAM built-in modules on your system that you should know about, so you can use them perfectly.

pam_succeed_if Module

This module allows access for the specified groups. You can validate user accounts like this:

auth required pam_succeed_if.so gid=1000,2000

The above line states that only users in the group whose ID 1000 or 2000 are allowed to log in.

You can use uid as user id instead.

auth requisite pam_succeed_if.so uid >= 1000

In this example, any user id greater than or equal 1000 can log in.

You can also use it with ingroup parameter like this:

auth required pam_succeed_if.so user ingroup mygroup

Only people in the group named mygroup can log in.

pam_nologin Module

This module allows root only to log in if /etc/nologin file is available.

auth required pam_nologin.so

You can modify login service file with this line and create /etc/nologin file, so root only can log in.

This module used with auth, account management groups.

pam_access Module

This module works like the pam_succeed_if module except the pam_access module checks logging from networked hosts, while the pam_succeed_if module doesn’t care.

account required pam_access.so accessfile=/etc/security/access.conf

You can type your rules in the /etc/security/access.conf file like this:

+:mygroup

-:ALL:ALL

The above rules state that only mygroup users are allowed to log in while others can’t.

Where plus sign means allow and minus sign means deny.

This module is used with auth, account, session, password management groups.

pam_deny Module

The module is used to restricting access. It will always return a non-OK.

You can use it at the end of your module stack to protect yourself from any misconfiguration.

If you use it at the beginning of module stack, your service will be disabled:

auth required pam_deny.so

auth required pam_unix.so

This module is used with auth, account, session, password management groups.

pam_unix Module

This module is used to check user’s credentials against /etc/shadow file.

auth required pam_unix.so

You will see this module used in many services in your system.

This module is used with auth, session, password management groups.

pam_localuser Module

This module is used to check if the user is listed in /etc/passwd.

account sufficient pam_localuser.so

This module is used with auth, session, password, account management groups.

pam_mysql Module

Instead of checking user’s credentials against/etc/shadow, you can use a MySQL database as a backend using the pam_mysql module.

It can be used like this:

auth sufficient pam_mysql.so user=myuser passwd=mypassword host=localhost db=mydb table=users usercolumn=username passwdcolumn=password

The parameters for pam_mysql is used to validate the user.

You can install if it is not on your system like this:

$ yum install libpam-mysql

This module is used with auth, session, password, account management groups.

pam_cracklib module

Strong passwords are a must these days. This module ensures that you will use strong passwords.

password required pam_cracklib.so retry=4 minlen=12 difok=6

This example ensures that:

Password minimum length = 12

Four times to pick a string password, otherwise, it will exit.

Your new password must have 6 new characters from the old password.

This module is used with password management group.

pam_rootok Module

This module checks if the user ID is 0 that means only root users can run this service.

auth sufficient pam_rootok.so

You can use this module to ensure that a specific service is allowed for root users only.

This module is used with auth management group.

pam_limits Module

This module is used to set limits on the system resources, even root users are affected by these limits.

The limits configuration are in the /etc/security/limits.conf and  /etc/security/limits.d/  directory.

session required pam_limits.so

You can use this module to protect your system resources.

This module is used with session management group.

The limits in /etc/security/limits.conf file could be hard or soft.

Hard: The user cannot change its value, but root can.

Soft: normal user can change it.

The limits could be fsize, cpu, nproc, nproc, data and many other limits.

@mygroup hard nproc 50

myuser hard cpu 5000

The first limit for mygroup members which sets the number of processes for each one of them to be 50.

The second limit for the user named myuser which limits the CPU time to 5000 minutes.

You can edit any PAM service file in /etc/pam.d/ and use the module you want to protect your services the way you want.

I hope you find using Linux PAM modules easy and useful.

Thank you.

likegeeks.com

0