Archive | GNU/Linux

EndeavourOS 2020.05.08 duyuruldu

Kolay kurulum ve önceden yapılandırılmış bir masaüstü ortamı sağlamayı hedefleyen Arch Linux tabanlı bir GNU/Linux dağıtımı olan EndeavourOS‘un 2020.05.08 sürümü duyuruldu. Bu sürümde, belirli donanım ve gerçek performanstaki bazı hatalarla ilgilenildiği belirtiliyor. 5.6.11 Linux çekirdeği üzerine yapılandırılan sistem, Firefox 76.0.1, Mesa 20.0.6 ve Calamares 3.2.20 gibi güncel paketler içeriyor. Önemli hata düzeltmeleriyle gelen sürümde, ATI/AMD ve Nvidia GPU’lar için önyükleme sorunlarının düzeltildiği söyleniyor. EndeavourOS 2020.05.08 hakkında ayrıntılı bilgi edinmek için sürüm duyurusunu inceleyebilirsiniz.

Continue Reading →

EndeavourOS 2020.05.08 edinmek için aşağıdaki linklerden yararlanabilirsiniz.

0

Debian Edu/Skolelinux Buster 10.4 çıktı

Debian 10 “Buster”in dördüncü güvenlik ve hata düzeltme güncellemesi olarak Debian 10.4’ün 9 Mayıs 2020‘de duyurulmasının ardından, Debian Edu/Skolelinux Buster 10.4 de çıktı. Henüz resmi duyurusu yapılmamış olan sürüm, indirilmek üzere yansılarda yerini aldı. Yüzlerce paket ön yüklenmiş olarak gelen ve sonra da pek çok paketi ekleyebileceğiniz, Debian-edu projesince okullar ve üniversiteler için özel bir ortam sağlamayı hedefleyen ve özel bir Debian dağıtımı olarak geliştirilen Debian Edu/Skolelinux, okulda bir okul ağı mı, sunucular, iş istasyonları ve dizüstü bilgisayarlar mı kurulmak istendiğine veya Debian’ı ağ servisleriyle önceden yapılandırılmış olarak mı elde etmek istendiğine karar verilmesi suretiyle kullanılabiliyor. Ayrıca Skolelinux diye de adlandırılan Debian Edu, bilindiği gibi, okullar ve üniversiteler için özel bir ortam sağlamayı hedefleyen ve özel bir Debian dağıtımı olarak geliştirilen bir proje; sistemin, okullar ve üniversiteler için tam teşekküllü bir işletim sistemi olması arzu ediliyor.

Continue Reading →

Debian Edu okul sunucusu, bir LDAP veritabanı ve Kerberos kimlik doğrulama servisi, merkezi ev dizinleri, DHCP sunucusu, bir web proxy’si ve diğer birçok servis sağlar. Masaüstü 60’tan fazla eğitim yazılımı paketi içeriyor ve daha fazlası Debian arşivinden edinilebilir. Okullar masaüstü ortamları Xfce, GNOME, LXDE, MATE, KDE Plazma ve LXQt arasında seçim yapabilir. Debian Edu/Skolelinux Buster 10.4 edinmek için aşağıdaki linklerden yararlanabilirsiniz.

0

Debian’a LMDE nasıl eklenir?

Bilindiği gibi, Debian Türkiye Forum’un değerli bir üyesi, değerli arkadaşımız Vedat Kılıç; uzun zamandır kendine özgü ISO kalıpları hazırlıyor. Vedat, bunları kendisine ait olan gnulinuxfree.blogspot.com üzerinden yayımlıyor. Bilindiği gibi, daha geniş bir çevreye duyurulması amacıyla bu çalışmaları forum üzerinden ve buradan da sizlere duyurmaya çaba gösteriyoruz. Vedat Kılıç‘ın en son yazdığı”Debian’a LMDE nasıl eklenir?” adlı yazıyla ilginç bir konuya değinmiş. Dostumuzun yazısını buraya aktarma gereği duyduk. Yazısına şu şekilde başlamış Vedat: “LMDE “Linux Mint Debian Edition” çoğumuzun bildiği gibi Debian Stable tabanlı bir dağıtımdır. Mint topluluğu bu dağıtım için bir çok yararlı yazılım geliştirmiş. Resimlerde göründüğü gibi bu yazılımlar bir çok işi kolaylaştıran, oldukça kullanışlı ve son kullanıcıyı hedef alarak geliştirilmiş. Debian’ı daha kullanışlı yapmak isteyenler için gerçekten güzel bir imkan. Üstelik kararlı olduğu için çakışma veya kaynak kullanımında artış olmaması onu daha cazip hale getiriyor. Debian’ın kullandığı sistem kaynağı ne ise LMDE’yi ekledikten sonra yine aynı kaynağı kullanıyor. LMDE sadece Cinnamon oturumu üzerine inşa edilmiş. Bu nedenle biz de kurulu sisteme LMDE’yi ekleyerek kendi masaüstümüzde onun araçlarından yararlanacağız.”

Continue Reading →

“Kendim Xfce ortamında denedim, diğer masaüstlerinde de sorun olacağını zanetmiyorum, çünkü araçlar genel anlamda geliştirilmiş. Örneğin kurduğum araçlar şunlardır: mintupdate, mintinstall, mintstick, mintsources, mint-update-info, mint-mirrors. Ayrıca kendim geliştirdiğim Debian tabanlı sürümlere doğrudan eklemeyeceğim ama ekleme seçeneği koyacağım, isteyen tek tıkla ekleyebilecek. Siz de Debian ortamı kullanıyorsanız ve LMDE’nin bu güzide araçlarından yararlanmak isterseniz işleme başlayalım. Önce alttaki LMDE 4 (Debbie) deposundan linuxmint-keyring paketini indirin.
LMDE Debbie
İndirdiğiniz deb formatlı paketi Gdebi kuruluysa sağ tık Gdebi seçeneğinden kurabilirsiniz. Komut ile kurmak isterseniz paketi indirdiğiniz dizinde uçbirimi açın ve alttaki komutu girin.”

sh -c "sudo dpkg -i *.deb ; echo 'y' | sudo apt install -f"

“Paket kurulduysa alttaki komutla LMDE deposunu gerekli dosyaya ekleyelim, komutu olduğu gibi uçbirime yapıştırın.”

sudo cat <> /etc/apt/sources.list
deb http://packages.linuxmint.com debbie main upstream import backport
EOF

“Ardından depo listesini güncelleyelim.”

sudo apt update

“Bu şekilde Debian ortamına LMDE eklemiş olduk, artık yukarıda sıraladığım paketleri veya başka tercihiniz olan LMDE araçlarını kurabilirsiniz. Ancak yukarıda sıraladığım paketler sistem paketleri olduğu için mutlaka kurmanızı öneririm, çok işinize yarayacaktır. Kurmak isterseniz alttaki komutu kullanabilirsiniz.”

sudo apt install mintupdate mintinstall mintstick mintsources mint-update-info mint-mirrors -y

“Bilgisayarı yeniden başlattıktan sonra kısmen melez sayılabilecek ve daha kullanışlı bir sisteminiz olur. Debian’a LMDE nasıl eklenir? işlemi burada bitti, kolay gelsin.

Güncelleme Yöneticisi, listeyi yeniler, temizler, güncelleme yapar, bildirimde bulunur ve hata olduğunda uyarı verir.”

“Yazılım Yöneticisi, paket arar, kurar, kaldırır, paketleri kategorilere ayırır, yazılımları logolarıyla gösterir, özet açıklamada bulunur ve kullanıcı yorumlarını okuma veya yorumda bulunma imkanı sunar.”

“Yazılım Kaynakları, Debian ve LMDE depolarının en hızlısını bulma ve seçme şansı verir.
Ayrıca anahtar aktarma gibi bir çok özelliği bulunuyor, bu araç favorim diyebilirim.”

1

Exiting/Terminating Python scripts (Simple Examples)

Today, we’ll be diving into the topic of exiting/terminating Python scripts! Before we get started, you should have a basic understanding of what Python is and some basic knowledge about its use. You can use the IDE of your choice, but I’ll use  Microsoft’s Linux Subsystem for Windows (WSL) package this time. For more information on that and how you enable it on Windows 10 go here. The way Python executes a code block makes it execute each line in order, checking dependencies to import, reading definitions and classes to store in memory, and executing pieces of code in order allowing for loops and calls back to the defined definitions and classes. When the Python interpreter reaches the end of the file (EOF), it notices that it can’t read any more data from the source, whether that be the user’s input through an IDE or reading from a file. To demonstrate let’s try to get user input and interrupt the interpreter in the middle of execution!

Continue Reading →

Why does Python automatically exit a script when it’s done?

First, from your bash terminal in your PowerShell open a new file called “input.py”

nano input.py

Then paste the following into the shell by right-clicking on the PowerShell window

name=input("Don't type anything!\n")

print("Hi,",name,"!")

Now, press CTRL+X to save and exit the nano window and in your shell type:

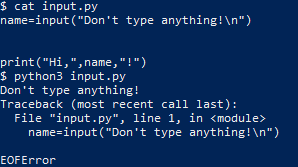
python3 input.py
Don't type anything!

And press CTRL+D to terminate the program while it’s waiting for user input

Traceback (most recent call last):

File "input.py", line 1, in

name=input("Don't type anything!")

EOFError

The EOFError exception tells us that the Python interpreter hit the end of file (EOF) condition before it finished executing the code, as the user entered no input data.

When Python reaches the EOF condition at the same time that it has executed all the code it exits without throwing any exceptions which is one way Python may exit “gracefully.”

Detect script exit

If we want to tell when a Python program exits without throwing an exception, we can use the built-in Python atexit module.

Theatexit handles anything we want the program to do when it exits and is typically used to do program clean up before the program process terminates

To experiment with atexit, let’s modify our input.py example to print a message at the program exit. Open the input.py file again and replace the text with this

import atexit

atexit.register(print,"Program exited successfully!")

name=input("What's your name?\n")

print("Hi,",name,"!")

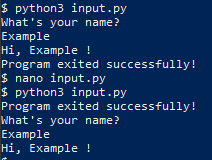
Type your name and when you hit enter you should get:

What's your name?
Example
Hi, Example !
Program exited successfully!

Notice how the exit text appears at the end of the output no matter where we place the atexit call, and how if we replace the atexit call with a simple print(), we get the exit text where the print() all was made, rather than where the code exits.

Program exited successfully!
What's your name?
Example
Hi, Example !

Graceful exit

There are several ways to exit a Python Program that doesn’t involve throwing an exception, the first was going to try is quit()

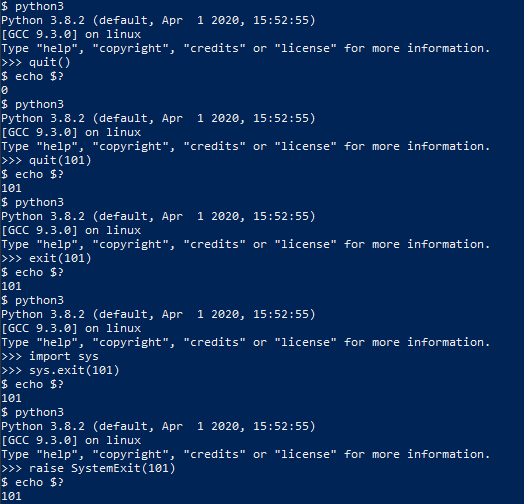
You can use the bash command echo $? to get the exit code of the Python interpreter.

python3
Python 3.8.2 (default, Apr 1 2020, 15:52:55)
[GCC 9.3.0] on linux
Type "help", "copyright", "credits" or "license" for more information.
>>> quit()
$ echo $?
0

We can also define the type of code the interpreter should exit with by handing quit() an integer argument less than 256

python3
Python 3.8.2 (default, Apr 1 2020, 15:52:55)
[GCC 9.3.0] on linux
Type "help", "copyright", "credits" or "license" for more information.
>>> quit(101)
$ echo $?
101

exit() has the same functionality as it is an alias for quit()

python3
Python 3.8.2 (default, Apr 1 2020, 15:52:55)
[GCC 9.3.0] on linux
Type "help", "copyright", "credits" or "license" for more information.
>>> exit(101)
$ echo $?
101

Neither quit() nor exit() are considered good practice, as they both require the site module which is meant to be used for interactive interpreters and not in programs. For our programs, we should use something like sys.exit

python3
Python 3.8.2 (default, Apr 1 2020, 15:52:55)
[GCC 9.3.0] on linux
Type "help", "copyright", "credits" or "license" for more information.
>>> import sys
>>> sys.exit(101)
$ echo $?
101

Notice that we need to explicitly import a module to call exit(), this might seem like its not an improvement but it guarantees that the necessary module is loaded because it’s not a good assumption site will be loaded at runtime. If we don’t want to import extra modules, we can do what exit(), quit() and sys.exit() are doing behind the scenes and raise SystemExit

python3
Python 3.8.2 (default, Apr 1 2020, 15:52:55)
[GCC 9.3.0] on linux
Type "help", "copyright", "credits" or "license" for more information.
>>> raise SystemExit(101)
$ echo $?
101

Exit with error messages

What if we get bad input from a user? Let’s look back at our input.py script, and add the ability to handle bad input from the user (CTRL+D to pass an EOF character)

nano input.py
try:

name=input("What's your name?\n")

print("Hi, "+name+"!")

except EOFError:

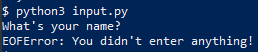
print("EOFError: You didn't enter anything!")

$ python3 input.py
What's your name?
EOFError: You didn't enter anything!

The try statement tells Python to try the code inside the statement and to pass any exception to the except statement before exiting.

Exiting without error

What if the user hands your program an error but you don’t want your code to print an error, or to do some sort of error handling to minimize user impact?

We can add a finally statement that lets us execute code after we do our error handling in catch

nano input.py
try:

name=input("What's your name?\n")

if(name==''):

print("Name cannot be blank!")

except EOFError:

#print("EOFError: You didn't enter anything!")
name="Blankname"

finally:

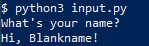
print("Hi, "+name+"!")

$ python3 input.py
What's your name?
Hi, Blankname!

Notice the user would never know an EOFError occurred, this can be used to pass default values in the event of poor input or arguments.

Exit and release your resources

Generally, Python releases all the resources you’ve called in your program automatically when it exits, but for certain processes, it’s good practice to encase some limited resources in a with block.

Often you’ll see this in open() calls, where failing to properly release the file could cause problems with reading or writing to the file later.

nano openfile.py
with open("testfile.txt","w") as file:

file.write("let's write some text!\n")

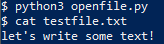
$ python3 openfile.py
$ cat testfile.txt
let's write some text!

The with block automatically releases all resources requisitioned within it. If we wanted to more explicitly ensure the file was closed, we can use the atexit.register() command to call close()

$ nano openfile.py
import atexit

file=open("testfile.txt","w")

file.write("let's write some text!\n")

atexit.register(file.close)

If resources are called without using a with block, make sure to explicitly release them in an atexit command.

Exit after a time

If we are worried our program might never terminate normally, then we can use Python’s multiprocessing module to ensure our program will terminate.

$ nano waiting.py
import time

import sys

from multiprocessing import Process

integer=sys.argv[1]

init=map(int, integer.strip('[]'))

num=list(init)[0]

def exclaim(int):

time.sleep(int)

print("You were very patient!")

if __name__ == '__main__':

program = Process(target=exclaim, args=(num,))

program.start()

program.join(timeout=5)

program.terminate()

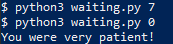
$ python3 waiting.py 7
$ python3 waiting.py 0
You were very patient!

Notice how the process failed to complete when the function was told to wait for 7 seconds but completed and printed what it was supposed to when it was told to wait 0 seconds!

Exiting using a return statement

If we have a section of code we want to use to terminate the whole program, instead of letting the break statement continue code outside the loop, we can use the return sys.exit() to exit the code completely.

$ nano break.py
import time

import sys

def stop(isTrue):

for a in range(0,1):

if isTrue:

break

else:

print("You didn't want to break!")

return sys.exit()

mybool = False

stop(mybool)

print("You used break!")

Exit in the middle of a function

If we don’t want to use a return statement, we can still call the sys.exit() to close our program and provide a return in another branch. Let’s use our code from break.py again.

$ nano break.py
import time

import sys

def stop(isTrue):

for a in range(0,1):

if isTrue:

word="bird"

break

else:

print("You didn't want to break!")

sys.exit()

mybool = False

print(stop(mybool))

Exit when conditions are met

If we have a loop in our Python code and we want to make sure the code can exit if it encounters a problem, we can use a flag that it can check to terminate the program.

$ nano break.py
import time

import sys

myflag=False

def stop(val):

global myflag

while 1==1:

val=val+1

print(val)

if val%5==0:

myflag=True

if val%7==0:

myflag=True

if myflag:

sys.exit()

stop(1)

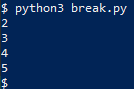
$ python3 break.py
2
3
4
5

Exit on keypress

If we want to hold our program open in the console till we press a key, we can use an unbound input() to close it.

$ nano holdopen.py
input("Press enter to continue")
$ python3 holdopen.py
Press enter to continue
$

We can also pass CTRL+C to the console to give Python a KeyboardInterrupt character. We can even handle the KeyboardInterrupt exception like we’ve handled exceptions before.

$ nano wait.py
import time

try:

i=0

while 1==1:

i=i+1

print(i)

time.sleep(1)

except KeyboardInterrupt:

print("\nWhoops I took too long")

raise SystemExit

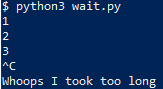
$ python3 wait.py
1
2
3
^C

Whoops I took too long

Exit a multithreaded program

Exiting a multithreaded program is slightly more involved, as a simple sys.exit() is called from the thread that will only exit the current thread. The “dirty” way to do it is to use os._exit()

$ nano threads.py
import threading

import os

import sys

import time

integer=sys.argv[1]

init=map(int, integer.strip('[]'))

num=list(init)[0]

def exclaim(int):

time.sleep(int)

os._exit(1)

print("You were very patient!")

if __name__ == '__main__':

program = threading.Thread(target=exclaim, args=(num,))

program.start()

program.join()

print("This should print before the main thread terminates!")

$ python3 threads.py 6
$

As you can see, the program didn’t print the rest of the program before it exited, this is why os._exit() is typically reserved for a last resort, and calling either Thread.join() from the main thread is the preferred method for ending a multithreaded program.

$ nano threads.py

import threading

import os

import sys

import time

import atexit

integer=sys.argv[1]

init=map(int, integer.strip('[]'))

num=list(init)[0]

atexit.register(print,"Threads exited successfully!")

def exclaim(int):

time.sleep(int)

print("You were very patient!")

if __name__ == '__main__':

program = threading.Thread(target=exclaim, args=(num,))

program.start()

program.join()

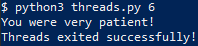
$ python3 threads.py 6
You were very patient!
Threads exited successfully!

End without sys exit

Sys.exit() is only one of several ways we can exit our python programs, what sys.exit() does is raise SystemExit, so we can just as easily use any built-in Python exception or create one of our own!

$ nano myexception.py
class MyException(Exception):

pass

try:

raise MyException()

except MyException:

print("The exception works!")

$ python3 myexception.py
The exception works!

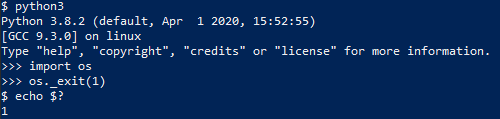
We can also use the os._exit() to tell the host system to kill the python process, although this doesn’t do atexit cleanup.

$ python3
Python 3.8.2 (default, Apr 1 2020, 15:52:55)
[GCC 9.3.0] on linux
Type "help", "copyright", "credits" or "license" for more information.
>>> import os
>>> os._exit(1)

Exit upon exception

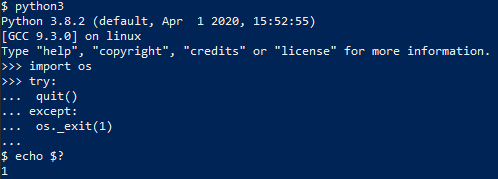
If we want to exit on any exception without any handling, we can use our try-except block to execute os._exit().

Note: this will also catch any sys.exit(), quit(), exit(), or raise SystemExit calls, as they all generate a SystemExit exception.

$ python3
Python 3.8.2 (default, Apr 1 2020, 15:52:55)
[GCC 9.3.0] on linux
Type "help", "copyright", "credits" or "license" for more information.
>>> import os
>>> try:
... quit()
... except:
... os._exit(1)
...
$ echo $?
1

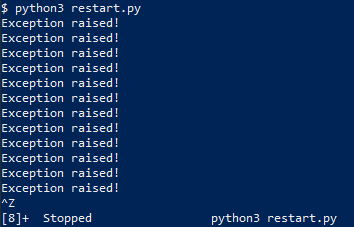
Exit and restart

Finally, we’ll explore what we do to exit Python and restart the program, which is useful in many cases.

$ nano restart.py
import atexit

import os

atexit.register(os.system,"python3 restart.py")

try:

n=0

while 1==1:

n=n+1

if n%5==0:

raise SystemExit
except:

print("Exception raised!")

$ python3 restart.py
Exception raised!
Exception raised!
...
Exception raised!
^Z
[3]+ Stopped python3 restart.py

I hope you find the tutorial useful. Keep coming back.

Thank you.

0

20+ examples for NumPy matrix multiplication

In this tutorial, we will look at various ways of performing matrix multiplication using NumPy arrays. we will learn how to multiply matrices with different sizes together. Also. we will learn how to speed up the multiplication process using GPU and other hot topics, so let’s get started! Before we move ahead, it is better to review some basic terminologies of Matrix Algebra. Basic Terminologies: Vector: Algebraically, a vector is a collection of coordinates of a point in space. Thus, a vector with 2 values represents a point in a 2-dimensional space. In Computer Science, a vector is an arrangement of numbers along a single dimension. It is also commonly known as an array or a list or a tuple. Eg. [1,2,3,4] Matrix: A matrix (plural matrices) is a 2-dimensional arrangement of numbers or a collection of vectors.

Continue Reading →

Ex:

[[1,2,3],
[4,5,6],
[7,8,9]]

Dot Product: A dot product is a mathematical operation between 2 equal-length vectors.
It is equal to the sum of the products of the corresponding elements of the vectors.
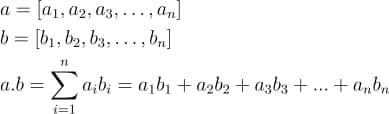
vector dot product operation

With a clear understanding of these terminologies, we are good to go.

Matrix multiplication with a vector

Let’s begin with a simple form of matrix multiplication – between a matrix and a vector.

Before we proceed, let’s first understand how a matrix is represented using NumPy.

NumPy’s array() method is used to represent vectors, matrices, and higher-dimensional tensors. Let’s define a 5-dimensional vector and a 3×3 matrix using NumPy.

import numpy as np

a = np.array([1, 3, 5, 7, 9])

b = np.array([[1, 2, 3],
[4, 5, 6],
[7, 8, 9]])

print("Vector a:\n", a)

print()

print("Matrix b:\n", b)

Output:
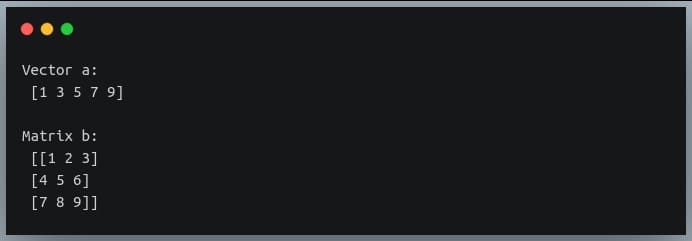
Let us now see how multiplication between a matrix and a vector takes place.

The following points should be kept in mind for a matrix-vector multiplication:

  1. The result of a matrix-vector multiplication is a vector.
  2. Each element of this vector is got by performing a dot product between each row of the matrix and the vector being multiplied.
  3. The number of columns in the matrix should be equal to the number of elements in the vector.
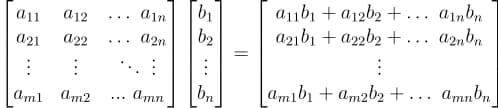
matrix vector multiplication
We’ll use NumPy’s matmul() method for most of our matrix multiplication operations.
Let’s define a 3×3 matrix and multiply it with a vector of length 3.

import numpy as np

a = np.array([[1, 2, 3],
[4, 5, 6],
[7, 8, 9]])
b= np.array([10, 20, 30])

print("A =", a)

print("b =", b)

print("Ab =",np.matmul(a,b))

Output:
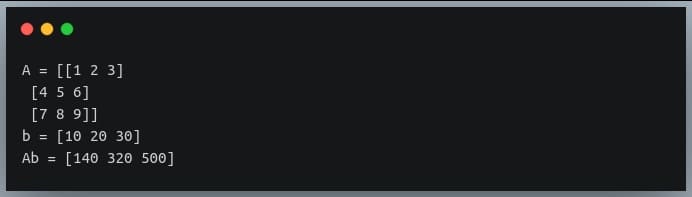
Notice how the result is a vector of length equal to the rows of the multiplier matrix.

Multiplication with another matrix

Now,  we understood the multiplication of a matrix with a vector, it would be easy to figure out the multiplication of two matrices.
But, before that, let’s review the most important rules of matrix multiplication:

  1. The number of columns in the first matrix should be equal to the number of rows in the second matrix.
  2. If we are multiplying a matrix of dimensions m x n with another matrix of dimensions n x p, then the resultant product will be a matrix of dimensions m x p.

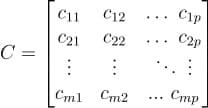
Let us consider multiplication of an m x n matrix A with an n x p matrix B: input matrices A and BC, product of A and B
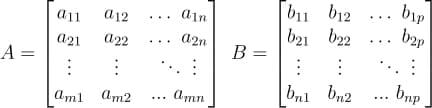
The product of the two matrices C = AB will have m row and p columns.
Each element in the product matrix C results from a dot product between a row vector in A and a column vector in B.

formula for each element in matrix multiplication result
Let us now do a matrix multiplication of 2 matrices in Python, using NumPy.
We’ll randomly generate 2 matrices of dimensions 3 x 2 and 2 x 4.
We will use np.random.randint() method to generate the numbers.

import numpy as np

np.random.seed(42)

A = np.random.randint(0, 15, size=(3,2))

B = np.random.randint(0, 15, size =(2,4))

print("Matrix A:\n", A)

print("shape of A =", A.shape)

print()

print("Matrix B:\n", B)

print("shape of B =", B.shape)

Output:
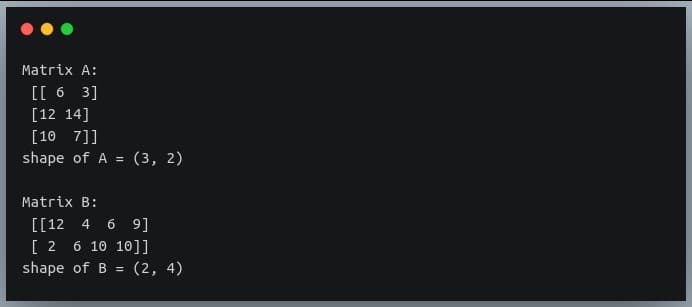
Note: we are setting a random seed using ‘np.random.seed()’ to make the random number generator deterministic.
This will generate the same random numbers each time you run this code snippet. This step is essential if you want to reproduce your result at a later point.

You can set any other integer as seed, but I suggest to set it to 42 for this tutorial so that your output will match the ones shown in the output screenshots.

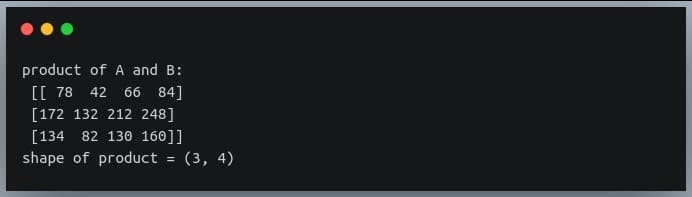
Let us now multiply the two matrices using the np.matmul() method. The resulting matrix should have the shape 3 x 4.

C = np.matmul(A, B)

print("product of A and B:\n", C)

print("shape of product =", C.shape)

Output:
Multiplication between 3 matrices

Multiplication of the 3 matrices will be composed of two 2-matrix multiplication operations and each of the two operations will follow the same rules as discussed in the previous section.

Let us say we are multiplying 3 matrices A, B, and C; and the product is D = ABC.
Here, the number of columns in A should be equal to the number of rows in B and the number of rows in C should be equal to the number of columns in B.

The resulting matrix will have rows equal to the number of rows in A, and columns equal to the number of columns in C.

An important property of matrix multiplication operation is that it is Associative.
With multi-matrix multiplication, the order of individual multiplication operations does not matter and hence does not yield different results.

For instance, in our example of multiplication of 3 matrices D = ABC, it doesn’t matter if we perform AB first or BC first.

diffrent orderings for multiplication of 3 matrices
Both orderings would yield the same result. Let us do an example in Python.

import numpy as np

np.random.seed(42)

A = np.random.randint(0, 10, size=(2,2))

B = np.random.randint(0, 10, size=(2,3))

C = np.random.randint(0, 10, size=(3,3))

print("Matrix A:\n{}, shape={}\n".format(A, A.shape))

print("Matrix B:\n{}, shape={}\n".format(B, B.shape))

print("Matrix C:\n{}, shape={}\n".format(C, C.shape))

Output:
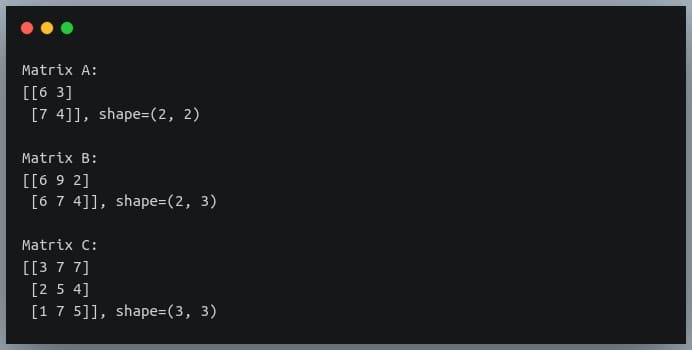
Based on the rules we discussed above, the multiplication of these 3 matrices should yield a resulting matrix of shape (2, 3).
Note that the method np.matmul() accepts only 2 matrices as input for multiplication, so we will call the method twice in the order that we wish to multiply, and pass the result of the first call as a parameter to the second.
(We’ll find a better way to deal with this problem in a later section when we introduce ‘@’ operator)

Let’s do the multiplication in both orders and validate the property of associativity.

D = np.matmul(np.matmul(A,B), C)

print("Result of multiplication in the order (AB)C:\n\n{},shape={}\n".format(D, D.shape))

D = np.matmul(A, np.matmul(B,C))

print("Result of multiplication in the order A(BC):\n\n{},shape={}".format(D, D.shape))

Output:
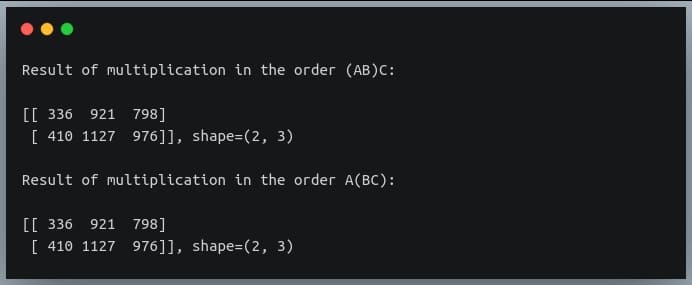
As we can see, the result of multiplication of the 3 matrices remains the same whether we multiply A and B first, or B and C first.
Thus, the property of associativity stands validated.
Also, the shape of the resulting array is (2, 3) which is on the expected lines.

NumPy 3D matrix multiplication

A 3D matrix is nothing but a collection (or a stack) of many 2D matrices, just like how a 2D matrix is a collection/stack of many 1D vectors.

So, matrix multiplication of 3D matrices involves multiple multiplications of 2D matrices, which eventually boils down to a dot product between their row/column vectors.

Let us consider an example matrix A of shape (3,3,2) multiplied with another 3D matrix B of shape (3,2,4).

import numpy as np

np.random.seed(42)

A = np.random.randint(0, 10, size=(3,3,2))

B = np.random.randint(0, 10, size=(3,2,4))

print("A:\n{}, shape={}\nB:\n{}, shape={}".format(A, A.shape,B, B.shape))

Output:
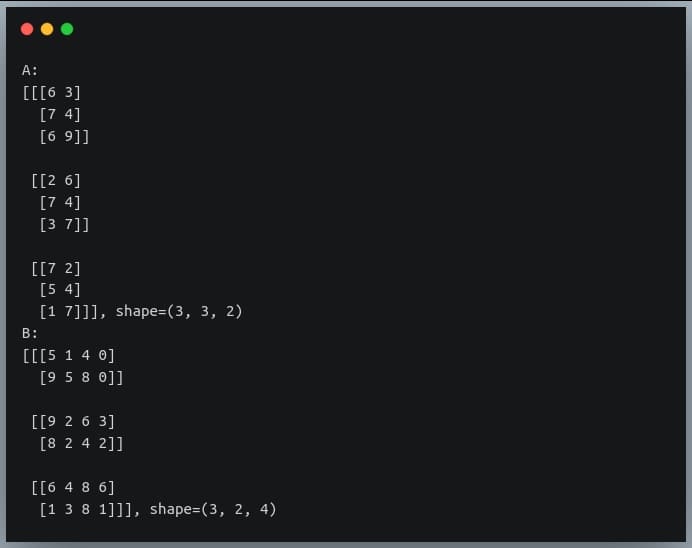
The first matrix is a stack of three 2D matrices each of shape (3,2) and the second matrix is a stack of 3 2D matrices, each of shape (2,4).

The matrix multiplication between these two will involve 3 multiplications between corresponding 2D matrices of A and B having shapes (3,2) and (2,4) respectively.

Specifically, the first multiplication will be between A[0] and B[0], the second multiplication will be between A[1] and B[1] and finally, the third multiplication will be between A[2] and B[2].

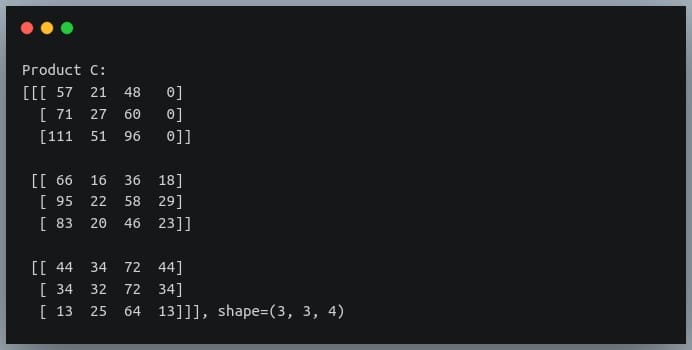
The result of each individual multiplication of 2D matrices will be of shape (3,4). Hence, the final product of the two 3D matrices will be a matrix of shape (3,3,4).

Let’s realize this using code.

C = np.matmul(A,B)

print("Product C:\n{}, shape={}".format(C, C.shape))

Output:
Alternatives to np.matmul()

Apart from ‘np.matmul()’, there are two other ways of doing matrix multiplication – the np.dot() method and the ‘@’ operator, each offering some differences/flexibility in matrix multiplication operations.

The ‘np.dot()’ method

This method is primarily used to find the dot product of vectors, but if we pass two 2-D matrices, then it will behave similarly to the ‘np.matmul()’ method and will return the result of the matrix multiplication of the two matrices.

Let us look at an example:

import numpy as np

# a 3x2 matrix
A = np.array([[8, 2, 2],
[1, 0, 3]])

# a 2x3 matrix
B = np.array([[1, 3],
[5, 0],
[9, 6]])

# dot product should return a 2x2 product
C = np.dot(A, B)

print("product of A and B:\n{} shape={}".format(C, C.shape))

Output:
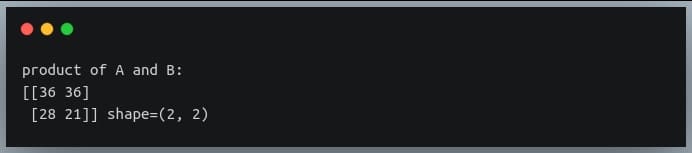
Here, we defined a 3×2 matrix and a 2×3 matrix and their dot product yields a 2×2 result which is the matrix multiplication of the two matrices,
the same as what ‘np.matmul()’ would have returned.

The difference between np.dot() and np.matmul() is in their operation on 3D matrices.
While ‘np.matmul()’ operates on two 3D matrices by computing matrix multiplication of the corresponding pairs of 2D matrices (as discussed in the last section), np.dot() on the other hand computes dot products of various pairs of row vectors and column vectors from the first and second matrix respectively.

np.dot() on two 3D matrices A and B returns a sum-product over the last axis of A and the second-to-last axis of B.
This is non-intuitive, and not easily comprehensible.

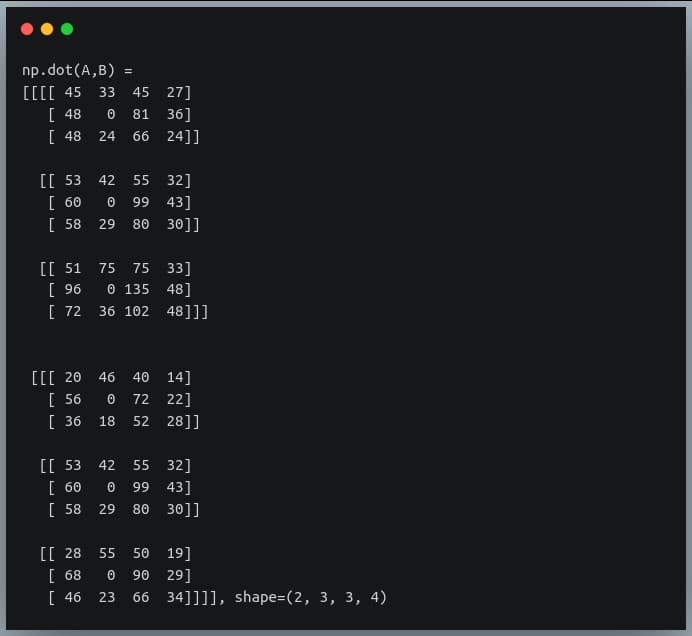
So, if A is of shape (a, b, c) and B is of shape (d, c, e), then the result of np.dot(A, B) will be of shape (a,d,b,e) whose individual element at a position (i,j,k,m) is given by:

dot(A, B)[i,j,k,m] = sum(A[i,j,:] * B[k,:,m])

Let’s check an example:

import numpy as np

np.random.seed(42)

A = np.random.randint(0, 10, size=(2,3,2))

B = np.random.randint(0, 10, size=(3,2,4))

print("A:\n{}, shape={}\nB:\n{}, shape={}".format(A, A.shape,B, B.shape))

Output:
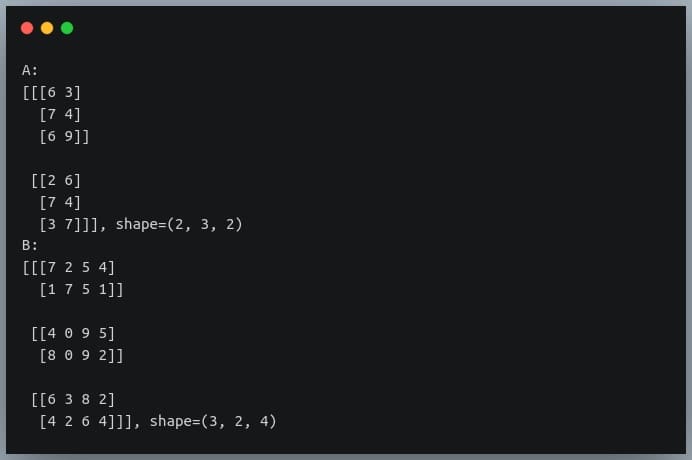
If we now pass these matrices to the ‘np.dot()’ method, it will return a matrix of shape (2,3,3,4) whose individual elements are computed using the formula given above.

C = np.dot(A,B)

print("np.dot(A,B) =\n{}, shape={}".format(C, C.shape))

Output:
Another important difference between ‘np.matmul()’ and ‘np.dot()’ is that ‘np.matmul()’ doesn’t allow multiplication with a scalar (will be discussed in the next section), while ‘np.dot()’ allows it.

The ‘@’ operator

The @ operator introduced in Python 3.5, it performs the same operation as ‘np.matmul()’.

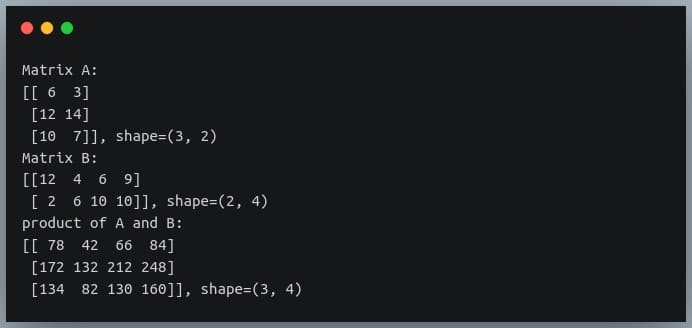
Let’s run through an earlier example of ‘np.matmul()’ using @ operator, and will see the same result as returned earlier:

import numpy as np

np.random.seed(42)

A = np.random.randint(0, 15, size=(3,2))

B = np.random.randint(0, 15, size =(2,4))

print("Matrix A:\n{}, shape={}".format(A, A.shape))

print("Matrix B:\n{}, shape={}".format(B, B.shape))

C = A @ B

print("product of A and B:\n{}, shape={}".format(C, C.shape))

Output:
The ‘@’ operator becomes handy when we are performing matrix multiplication of over 2 matrices.

Earlier, we had to call ‘np.matmul()’ multiple times and pass their results as a parameter to the next call.
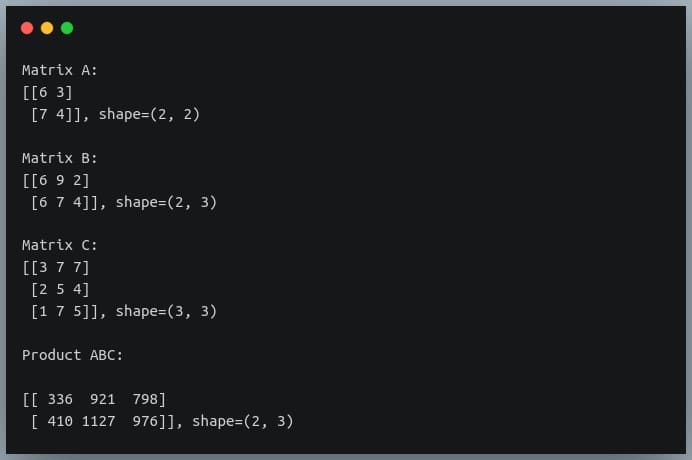
Now, we can perform the same operation in a simpler (and a more intuitive) way:

import numpy as np

np.random.seed(42)

A = np.random.randint(0, 10, size=(2,2))

B = np.random.randint(0, 10, size=(2,3))

C = np.random.randint(0, 10, size=(3,3))

print("Matrix A:\n{}, shape={}\n".format(A, A.shape))

print("Matrix B:\n{}, shape={}\n".format(B, B.shape))

print("Matrix C:\n{}, shape={}\n".format(C, C.shape))

D = A @ B @ C # earlier np.matmul(np.matmul(A,B),C)

print("Product ABC:\n\n{}, shape={}\n".format(D, D.shape))

Output:
Multiplication with a scalar (Single value)

So far we’ve performed multiplication of a matrix with a vector or another matrix. But what happens when we perform matrix multiplication with a scalar or a single numeric value?

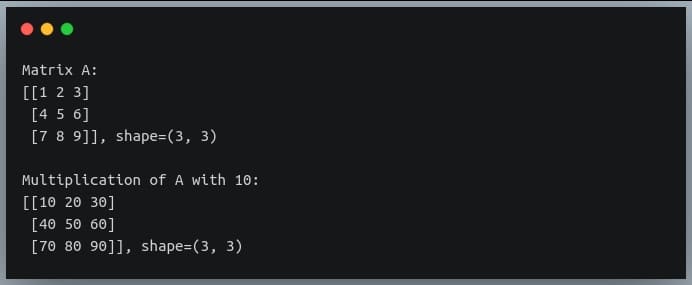
The result of such an operation is got by multiplying each element in the matrix with the scalar value. Thus the output matrix has the same dimension as the input matrix.

Note that ‘np.matmul()’ does not allow the multiplication of a matrix with a scalar. This can be achieved by using the np.dot() method or using the ‘*’ operator.

Let’s see this in a code example.

import numpy as np

A = np.array([[1,2,3],
[4,5, 6],
[7, 8, 9]])

B = A * 10

print("Matrix A:\n{}, shape={}\n".format(A, A.shape))

print("Multiplication of A with 10:\n{}, shape={}".format(B, B.shape))

Output:
Element-wise matrix multiplication

Sometimes we want to do multiplication of corresponding elements of two matrices having the same shape.

element-wise matrix multiplication
This operation is also called as the Hadamard Product. It accepts two matrices of the same dimensions and produces a third matrix of the same dimension.

It can be achieved in Python by calling the NumPy’s multiply() function or using the ‘*’ operator.

import numpy as np

np.random.seed(42)

A = np.random.randint(0, 10, size=(3,3))

B = np.random.randint(0, 10, size=(3,3))

print("Matrix A:\n{}\n".format(A))

print("Matrix B:\n{}\n".format(B))

C = np.multiply(A,B) # or A * B

print("Element-wise multiplication of A and B:\n{}".format(C))

Output:
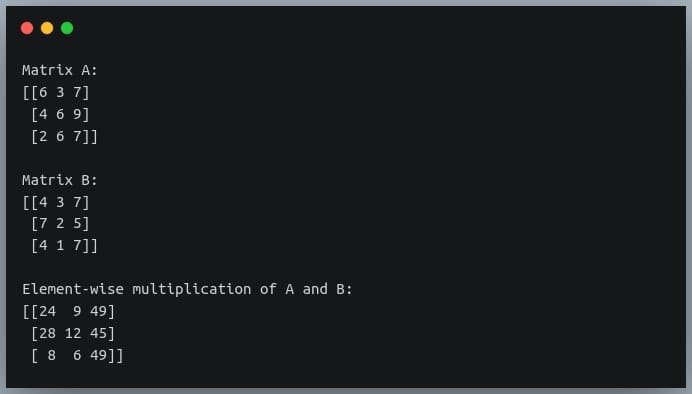
The only rule to be kept in mind for element-wise multiplication is that the two matrices should have the same shape.
However, if one dimension of a matrix is missing, NumPy would broadcast it to match the shape of the other matrix.

In fact, matrix multiplication with a scalar also involves the broadcasting of the scalar value to a matrix of the shape equal to the matrix operand in the multiplication.

That means when we are multiplying a matrix of shape (3,3) with a scalar value 10, NumPy would create another matrix of shape (3,3) with constant values 10 at all positions in the matrix and perform element-wise multiplication between the two matrices.

Let’s understand this through an example:

import numpy as np

np.random.seed(42)

A = np.random.randint(0, 10, size=(3,4))

B = np.array([[1,2,3,4]])

print("Matrix A:\n{}, shape={}\n".format(A, A.shape))

print("Matrix B:\n{}, shape={}\n".format(B, B.shape))

C = A * B

print("Element-wise multiplication of A and B:\n{}".format(C))

Output:
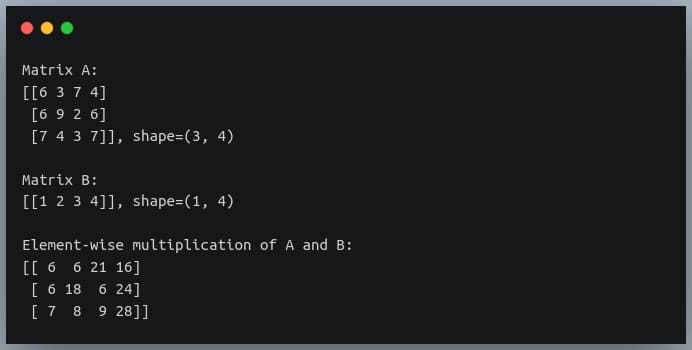
Notice how the second matrix which had shape (1,4) was transformed into a (3,4) matrix through broadcasting and the element-wise multiplication between the two matrices took place.

Matrix raised to a power (Matrix exponentiation)

Just like how we can raise a scalar value to an exponent, we can do the same operation with matrices.
Just as raising a scalar value (base) to an exponent n is equal to repeatedly multiplying the n bases, the same pattern is observed in raising a matrix to power, which involves repeated matrix multiplications.

For instance, if we raise a matrix A to a power n, it is equal to the matrix multiplications of n matrices, all of which will be the matrix A.

matrix A raised to power n
Note that for this operation to be possible, the base matrix has to be square.
This is to ensure the rules of matrix multiplication are followed (number of columns in preceding matrix = number of rows in the next matrix)

This operation is provided in Python by NumPy’s linalg.matrix_power() method, which accepts the base matrix and an integer power as its parameters.

Let us look at an example in Python:

import numpy as np

np.random.seed(10)

A = np.random.randint(0, 10, size=(3,3))

A_to_power_3 = np.linalg.matrix_power(A, 3)

print("Matrix A:\n{}, shape={}\n".format(A, A.shape))

print("A to the power 3:\n{}, shape={}".format(A_to_power_3,A_to_power_3.shape))

Output:
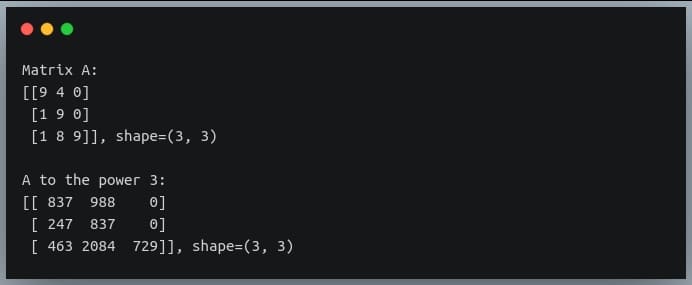
We can validate this result by doing normal matrix multiplication with 3 operands (all of them A), using the ‘@’ operator:

B = A @ A @ A

print("B = A @ A @ A :\n{}, shape={}".format(B, B.shape))

Output:
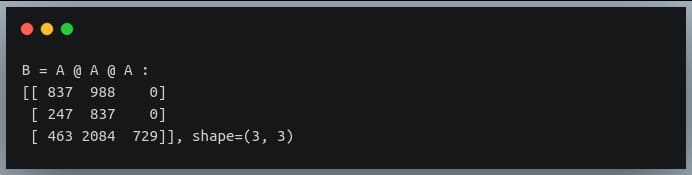
As you can see, the results from both operations are matching.

An important question that arises from this operation is – What happens when the power is 0?
To answer this question, let us review what happens when we raise a scalar base to power 0.
We get the value 1, right? Now, what is the equivalent of 1 in Matrix Algebra? You guessed it right!

It’s the identity matrix.

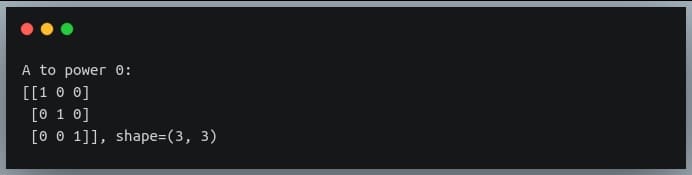
So raising an n x n matrix to the power 0 results in an identity matrix I of shape n x n.

Let’s quickly check this in Python, using our previous matrix A.

C = np.linalg.matrix_power(A, 0)

print("A to power 0:\n{}, shape={}".format(C, C.shape))

Output:
Element-wise exponentiation

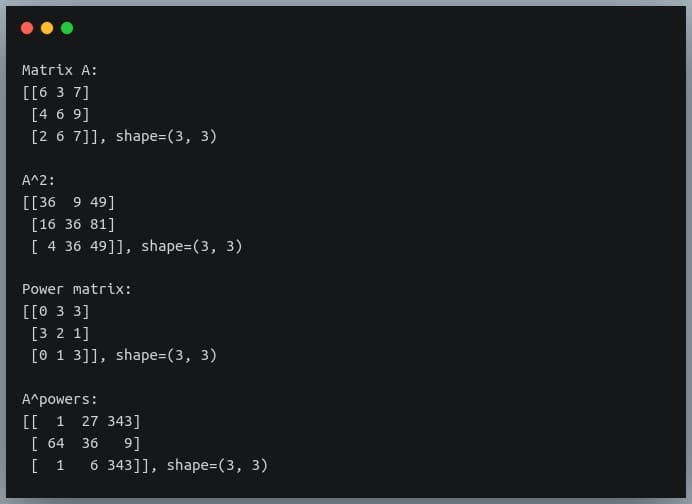
Just like how we could do element-wise multiplication of matrices, we can also do element-wise exponentiation i.e. raise each individual element of a matrix to some power.

This can be achieved in Python using standard exponent operator ‘**‘ – an example of operator overloading.

Again, we can provide a single constant power for all the elements in the matrix, or a matrix of powers for each element in the base matrix.

Let’s look at examples of both in Python:

import numpy as np

np.random.seed(42)

A = np.random.randint(0, 10, size=(3,3))

print("Matrix A:\n{}, shape={}\n".format(A, A.shape))

#constant power
B = A**2

print("A^2:\n{}, shape={}\n".format(B, B.shape))

powers = np.random.randint(0, 4, size=(3,3))

print("Power matrix:\n{}, shape={}\n".format(powers, powers.shape))

C = A ** powers

print("A^powers:\n{}, shape={}\n".format(C, C.shape))

Output:
Multiplication from a particular index

Suppose we have a 5 x 6 matrix A and another 3 x 3 matrix B. Obviously, we cannot multiply these two together, because of dimensional inconsistencies.

But what if we wanted to multiply a 3×3 submatrix in matrix A with matrix B while keeping the other elements in A unchanged?
For better understanding, refer to the following image:
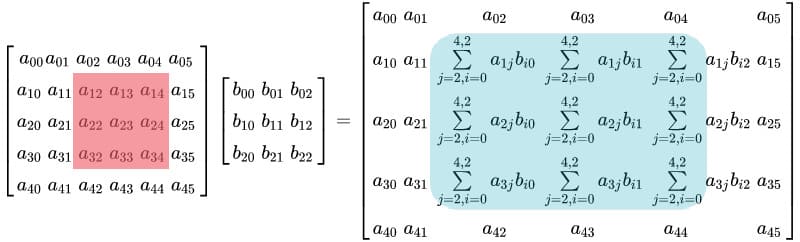
matrix multiplication of A from indices 1,2 to 3,4 with B
This operation can be achieved in Python, by using matrix slicing to extract the submatrix from A, performing multiplication with B, and then writing back the result at relevant index in A.

Let’s see this in action.

import numpy as np

np.random.seed(42)

A = np.random.randint(0, 10, size=(5,6))

B = np.random.randint(0, 10, size=(3,3))

print("Matrix A:\n{}, shape={}\n".format(A, A.shape))

print("Matrix B:\n{}, shape={}\n".format(B, B.shape))

C = A[1:4,2:5] @ B

A[1:4,2:5] = C

print("Matrix A after submatrix multiplication:\n{}, shape={}\n".format(A, A.shape))

Output:
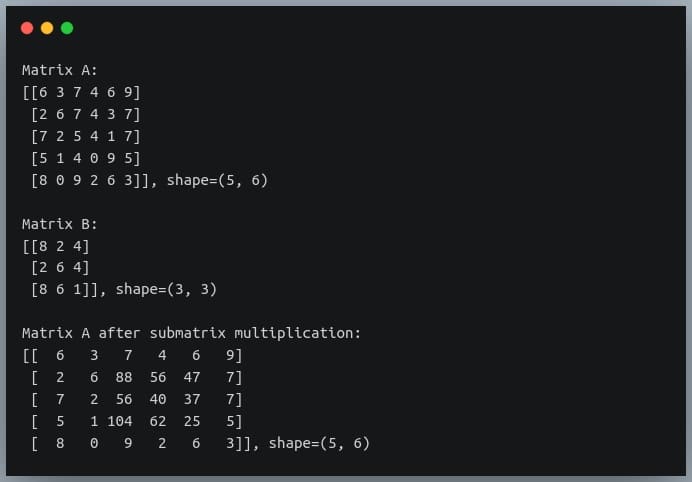
As you can see, only the elements at row indices 1 to 3 and column indices 2 to 4 have been multiplied with B and the same have been written back in A, while the remaining elements of A have remained unchanged.

Also, it’s unnecessary to overwrite the original matrix. We can also write the result in a new matrix, by first copying the original matrix to a new matrix and then writing the product at the position of the submatrix.

Matrix multiplication using GPU

We know that NumPy speeds up the matrix operations by parallelizing a lot of computations and making use of our CPU’s parallel computing capabilities.

However, modern-day applications need more than that. CPUs offer limited computation capabilities, and it does not suffice for the large number of computations that we need, typically in applications like deep learning.

That is where GPUs come into the picture. They offer large computation capabilities and excellent parallelized computation infrastructure, which helps us save a significant amount of time by doing hundreds of thousands of operations within fractions of seconds.

In this section, we will look at how we can perform matrix multiplication on a GPU, instead of a CPU and save a lot of time doing so.

NumPy does not offer the functionality to do matrix multiplications on GPU. So we must install some additional libraries that help us achieve our goal.

We will first install the ‘scikit-cuda‘ and ‘PyCUDA‘ libraries using pip install. These libraries help us perform computations on CUDA based GPUs. To install these libraries from your terminal, if you have a GPU installed on your machine.

pip install pycuda

pip install scikit-cuda

If you do not have a GPU on your machine, you can try out Google Colab notebooks, and enable GPU access, it’s free for use. Now we will write the code to generate two 1000×1000 matrices and perform matrix multiplication between them using two methods:

  1. Using NumPy’s ‘matmul()‘ method on a CPU
  2. Using scikit-cuda’s ‘linalg.mdot()‘ method on a GPU

In the second method, we will generate the matrices on a CPU, then we will store them on GPU (using PyCUDA’s ‘gpuarray.to_gpu()‘ method) before performing the multiplication between them. We will use the ‘time‘ module to compute the time of computation in both cases.

Using CPU

import numpy as np

import time

# generating 1000 x 1000 matrices
np.random.seed(42)

x = np.random.randint(0,256, size=(1000,1000)).astype("float64")

y = np.random.randint(0,256, size=(1000,1000)).astype("float64")

#computing multiplication time on CPU
tic = time.time()

z = np.matmul(x,y)

toc = time.time()

time_taken = toc - tic #time in s

print("Time taken on CPU (in ms) = {}".format(time_taken*1000))

Output:

On some old hardware systems, you may get a memory error, but if you are lucky, it will work in a long time (depends on your system).

Now, let us perform the same multiplication on a GPU and see how the time of computation differs between the two.

Using GPU

#computing multiplication time on GPU
linalg.init()

# storing the arrays on GPU
x_gpu = gpuarray.to_gpu(x)

y_gpu = gpuarray.to_gpu(y)

tic = time.time()

#performing the multiplication
z_gpu = linalg.mdot(x_gpu, y_gpu)

toc = time.time()

time_taken = toc - tic #time in s

print("Time taken on a GPU (in ms) = {}".format(time_taken*1000))

Output:

As we can see, performing the same operation on a GPU gives us a speed-up of 70 times as on CPU.
This was still a small computation. For large scale computations, GPUs give us speed-ups of a few orders of magnitude.

Conclusion

In this tutorial, we looked at how multiplication of two matrices takes place, the rules governing them, and how to implement them in Python.
We also looked at different variants of the standard matrix multiplication (and their implementation in NumPy) like multiplication of over 2 matrices, multiplication only at a particular index, or power of a matrix.

We also looked at element-wise computations in matrices such as element-wise matrix multiplication, or element-wise exponentiation.

Finally, we looked at how we can speed up the matrix multiplication process by performing them on a GPU.


0

Five Things You Must Consider Before ‘Developing an App’

Before you begin developing an app, it is worth taking the time to properly plan out your development cycle. From defining your intended feature set to load testing, the more work you do before you start coding, the quicker you will be able to progress through the actual development of your app.Below are five essential things to consider before developing your app. The more detailed your initial plans for your app, the smoother the entire development process will go. Before you even think about how to actually code your app, you need to establish exactly what it is going to do and why it is going to be doing it. If you want to develop an app just for the sake of it, this is a great way to teach yourself new skills. But if you are looking at developing an app with an eye to commercializing it, you need to know exactly what you are doing before you begin.

Continue Reading →

The Purpose Of Your App

When developing an app for your business, there should be a clear rationale for you doing so. If you are only developing an app because you feel like you are supposed to or because your competitors have beaten you to the punch, the result is almost definitely going to be underwhelming.

On the other hand, if you take the time beforehand to plan your app properly and seriously consider how you can provide real value to your users, you stand a much better chance of critical and commercial success.

Before you can make any detailed plans about what your app will look like and what it will do, you need to be clear with yourself about what its main purpose is.

The Intended Feature Set

Once you have defined the ultimate purpose of your app, you can then begin to think about what features you need to include to achieve it.

Laying out your feature set should be one of the first things you do when you are preparing to develop an app. The features you want to include will have an impact on every other part of the design process.

For example, when it comes to your user interface, you will want to choose something that makes it easy for a user to see and access all of the features your app offers.

Equally, when you are assigning coders to various tasks, knowing what features you are shooting for will enable you to delegate work appropriately. There is no sense in asking a coder to work on a feature that lies well outside of their skill set.

The Price Point

If you are developing an app for a business, most of the time it will be distributed for free. It is important to know upfront whether the app you are working on is going to be provided for free, whether it will cost money, or whether there is an associated subscription cost as the buyer want to save money in all cases.

The price point at which you intend to sell an app will determine how much money you can sink into its development. It will also have a significant impact on the way that the app is marketed.

Fortunately, it is possible for you to have the best of all worlds when it comes to pricing. Many app developers have realized the potential in offering a free version of the app that is funded through advertising alongside a premium version that includes no ads.

The Platform

Before you can properly plan out your app development, you need to establish exactly what platform you are going to be aiming for.

Even if you intend to make your app available on every mobile operating system possible, you will still need to prioritize. In the vast majority of cases, it will make more sense to build your app for one primary platform first and then go about converting it for other platforms.

If you are trying to develop an app for multiple different platforms simultaneously, you are much more likely to run into problems.

Not only this, but you will find yourself having to solve problems for multiple different platforms at once. It is far more efficient to develop for your primary platform and iron out all the kinks before moving on to the next one.

App Load Testing

Developing an app is much more involved than many people realize. Lots of people think that once you have written the code and compiled the binary, your app is done and dusted. On the contrary, it doesn’t matter how talented your coders are or how much regression testing you have undertaken, there is still a range of things that you need to test under specific circumstances.

Load testing is one of many tests that can be used to assess an app’s performance under certain circumstances. Specifically, load testing will tell you how well your app performs when the system running it is under a heavy load and most of its available resources are being used.

For an app that is entirely offline, it is the system resources of the device it is running on that matter.

However, if your app also has online features, the current load placed on your internet connection will also be a factor in determining performance. In this case, many developers use proxies to load test their servers. Some proxy providers offer easy to use options.

Planning is everything in app development. If you take the time beforehand to work out exactly what you are doing and why then you will find the whole process much easier.

0

NumPy loadtxt tutorial (Load data from files)

In a previous tutorial, we talked about NumPy arrays and we saw how it makes the process of reading, parsing and performing operations on numeric data a cakewalk. In this tutorial, we will discuss the NumPy loadtxt method that is used to parse data from text files and store them in an n-dimensional NumPy array. Then we can perform all sorts of operations on it that are possible on a NumPy array. np.loadtxt offers a lot of flexibility in the way we read data from a file by specifying options such as the data type of the resulting array, how to distinguish one data entry from the others through delimiters, skipping/including specific rows, etc. We’ll look at each of those ways in the following tutorial.

Continue Reading →

Specifying the file path

Let’s look at how we can specify the path of the file from which we want to read data.

We’ll use a sample text file for our code examples, which lists the weights (in kg) and heights (in cm) of 100 individuals, each on a row.

I will use various variants in this file for explaining different features of the loadtxt function.

Let’s begin with the simplest representation of the data in a text file. We have 100 lines (or rows) of data in our text file, each of which comprises 2 floating-point numbers separated by a space.

The first number on each row represents the weight and the second number represents the height of an individual.

Here’s a little glimpse from the file:

110.90 146.03
44.83 211.82
97.13 209.30
105.64 164.21

This file is stored as `weight_height_1.txt`.
Our task is to read the file and parse the data in a way that we can represent in a NumPy array.
We’ll import the NumPy package and call the loadtxt method, passing the file path as the value to the first parameter filePath.

import numpy as np

data = np.loadtxt("./weight_height_1.txt")

Here we are assuming the file is stored at the same location from where our Python code will run (‘./’ represents current directory). If that is not the case, we need to specify the complete path of the file (Ex: “C://Users/John/Desktop/weight_height_1.txt”)

We also need to ensure each row in the file has the same number of values.

The extension of the file can be anything other than .txt as long as the file contains text, we can also pass a generator instead of a file path (more on that later)

The function returns an n-dimensional NumPy array of values found in the text.

Here our text had 100 rows with each row having 2 float values, so the returned object data will be a NumPy array of shape (100, 2) with the float data type.

You can verify this by checking ‘shape’ and ‘dtype’ attribute of the returned data:

print("shape of data:",data.shape)

print("datatype of data:",data.dtype)

Output:

Specifying delimiters

A delimiter is a character or a string of characters that separates individual values on a line.

For example, in our earlier file, we had the values separated by a space, so in that case, the delimiter was a space character (” “).

However, some other files may have a different delimiter, for instance, CSV files generally use comma (“,”) as a delimiter. Another file may have a semicolon as a delimiter.

So we need our data loader to be flexible enough to identify such delimiters in each row and extract the correct values from them.

This can be achieved by passing our delimiter as a parameter to the np.loadtxt function.

Let us consider another file ‘weight_height_2.txt’, it has the same data content as the previous one, but this time the values in each row are separated by a comma:

110.90, 146.03
44.83, 211.82
97.13, 209.30
…
…

We’ll call the np.loadtxt function the same way as before, except that now we pass an additional parameter – ‘delimiter’:

import numpy as np

data = np.loadtxt("./weight_height_2.txt", delimiter = ",")

This function will return the same array as before.

  • In the previous section, we did not pass delimiter parameter value because np.loadtxt() expects space “ “ to be the default delimiter
  • If the values on each row were separated by a tab, in that case, the delimiter would be specified by using the escape character “\t”

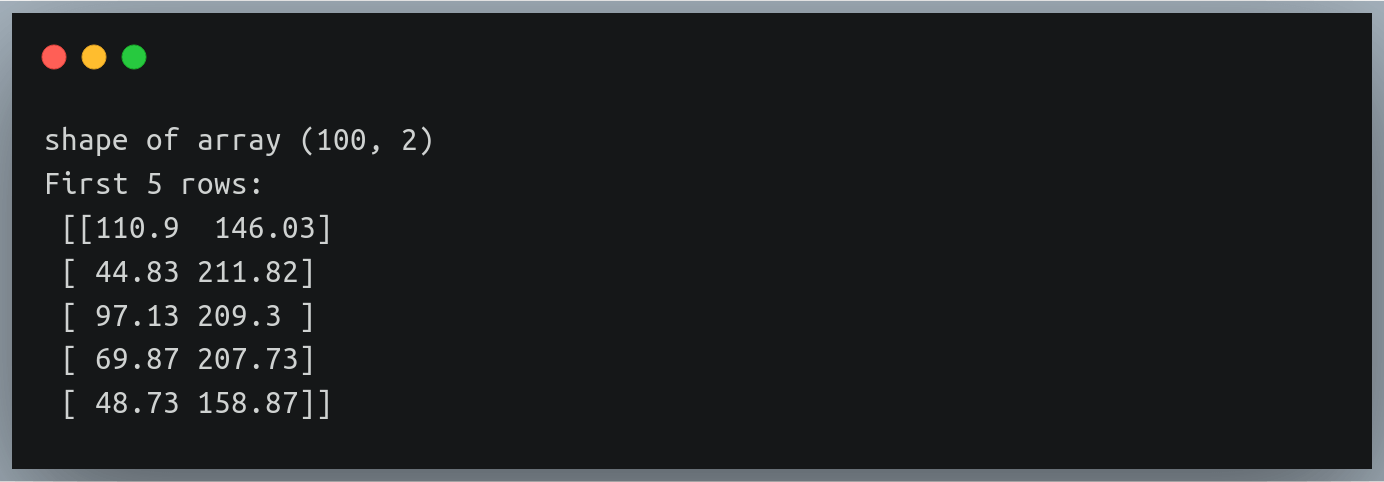
You can verify the results again by checking the shape of the data array and also printing the first few rows:

print("shape of array", data.shape)

print("First 5 rows:\n", data[:5])

Output:

Dealing with 2 delimiters

Now there may be a situation where there are more than 1 delimiters in a file.

For example, let’s imagine each of our lines contained a 3rd value representing the date of birth of the individual in dd-mm-yyyy format

110.90, 146.03, 3-7-1981
44.83, 211.82, 1-2-1986
97.13, 209.30, 14-2-1989
…

Now suppose we want to extract the dates, months and years as 3 different values into 3 different columns of our NumPy array. So should we pass “,” as the delimiter or should we pass “-”?

We can pass only 1 value to the delimiter parameter in the np.loadtxt method!

No need to worry, there is always a workaround. Let’s use a third file ‘./weight_height_3.txt’ for this example

We’ll use a naive approach first, which has the following steps:

  1. read the file
  2. eliminate one of the delimiters in each line and replace it with one common delimiter (here comma)
  3. append the line into a running list
  4. pass this list of strings to the np.loadtxt function instead of passing a file path.

Let’s write the code:

#reading each line from file and replacing "-" by ","
with open("./weight_height_3.txt") as f_input:

text = [l.replace("-", ",") for l in f_input]

#calling the loadtxt method with “,“ as delimiter
data = np.loadtxt(text, delimiter=",")

  • Note that we are passing a list of strings as input and not a file path.
  • When calling the function we still pass the delimiter parameter with the value “,” as we’ve replaced all instances of the second delimiter ‘-’ by a comma.
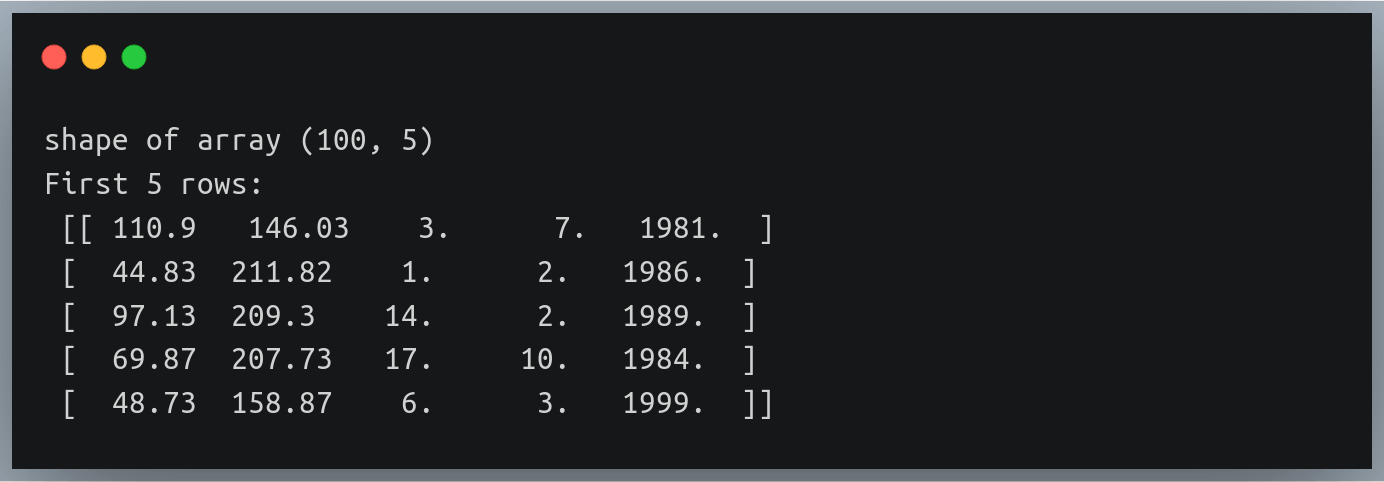
  • The returned NumPy array should now have 5 columns

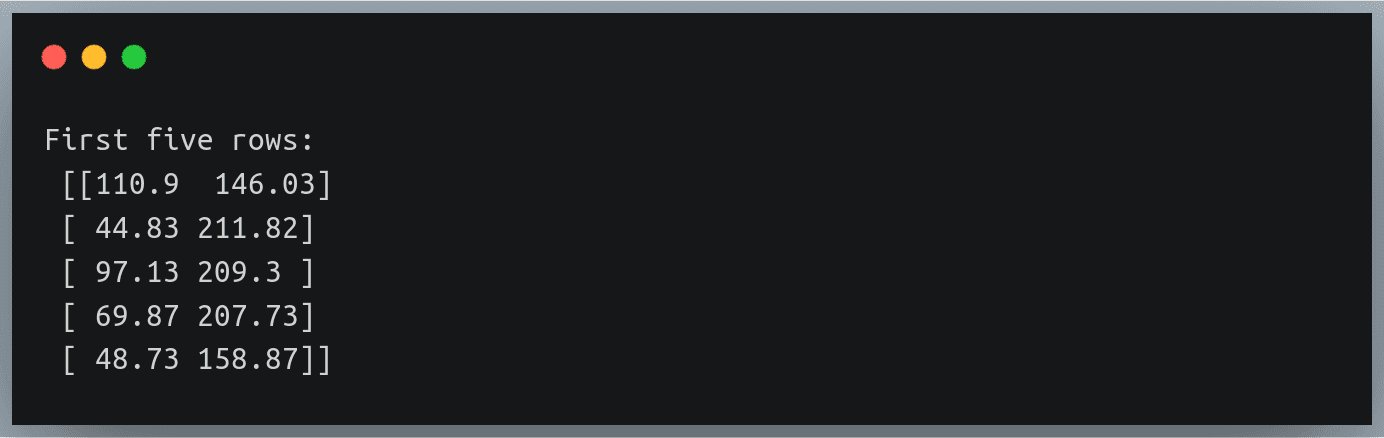
You can once again validate the results by printing the shape and the first five lines:

print("Shape of data:", data.shape)

print("First five rows:\n",data[:5])

Output:

Notice how we have 3 additional columns in each row indicating the date, month and year of birth

Also notice the new values are all floating-point values; however date, month or year make more sense as integers!
We’ll look at how to handle such data type inconsistencies in the coming section.

A general approach for multiple delimiters

In this section, we will look at a general approach for working with multiple delimiters.

Also, we’ll learn how we can use generators instead of file paths – a more efficient solution for multiple delimiters, than the one we discussed in the previous section.

The problem with reading the entire file at once and storing them as a list of strings is that it doesn’t scale well. For instance, if there is a file with a million lines, storing them in a list all at once is going to consume unnecessary additional memory.

Hence we will use generators to get rid of any additional delimiter.
A generator ‘yields’ us a sequence of values on the fly i.e it will read the lines of a file as required instead of reading them all at once

So let’s first define a generator function that takes in a file path and a list of delimiters as a parameter.

def generate_lines(filePath, delimiters=[]):

with open(filePath) as f:

for line in f:

line = line.strip() #removes newline character from end

for d in delimiters:

line =line.replace(d, " ")

yield line

Here we are going through each of the delimiters one by one in each line and replacing them by a blank space ” ” which is the default delimiter in np.loadtxt function

We will now call this generator function and pass the returned generator object to the np.loadtxt method in place of the file path.

gen = generate_lines("./weight_height_3.txt", ["-",","])

data = np.loadtxt(gen)

Note that we did not need to pass any additional delimiter parameter, as our generator function replaced all instances of the delimiters in the passed list by a space, which is the default delimiter.

We can extend this idea and specify as many delimiters as needed.

Specifying the data type

Unless specified otherwise, the np.loadtxt function of the NumPy package assumes the values in the passed text file to be floating-point values by default.

So if you pass a text file that has characters other than numbers, the function will throw an error, stating it was expecting floating-point values.

We can overcome this by specifying the data type of the values in the text file using the datatypeparameter.

In the previous example, we saw the date, month and year were being interpreted as floating-point values, however, we know that these values can never exist in decimal form.

Let’s look at a new file ‘./weight_height_4.txt’ which has only 1 column for the date of birth of individuals in the dd-mm-yyyy format:

13-2-1991
17-12-1990
18-12-1986
…

So we’ll call the loadtxt method with “-” as the delimiter:

data = np.loadtxt("./weight_height_4.txt", delimiter="-")

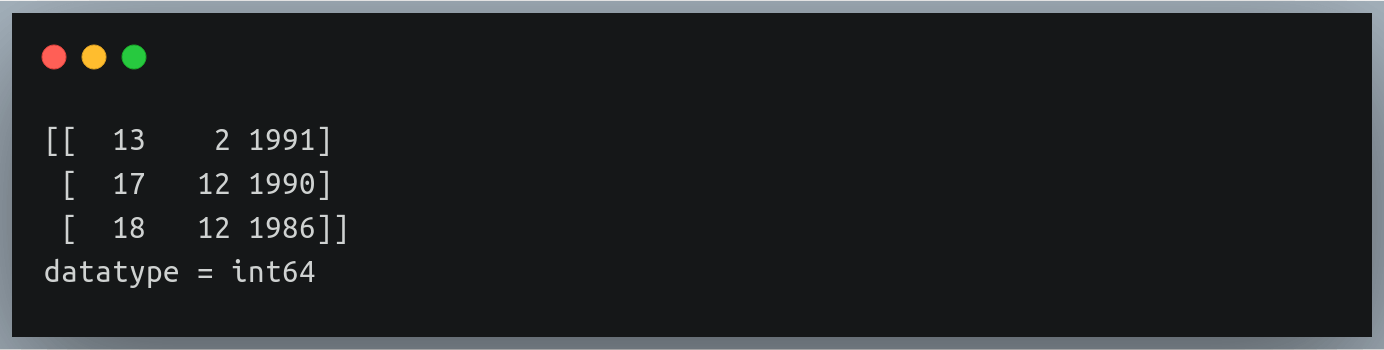
print(data[:3])

print("datatype =",data.dtype)

If we look at the output of the above lines of code, we’ll see that each of the 3 values has been stored as floating-point values by default and the data type of the array is ‘float64’

We can alter this behavior by passing the value ‘int’ to the ‘dtype’ parameter. This will ask the function to store the extracted values as integers, and hence the data type of the array will also be int.

data = np.loadtxt("./weight_height_4.txt", delimiter="-", dtype="int")

print(data[:3])

print("datatype =",data.dtype)

Output:

But what if there are columns with different data types?

Let’s say we have the first two columns having float values and the last column having integer values.

In that case, we can pass a comma-separated datatype string specifying the data type of each column (in order of their existence) to the dtype parameter.

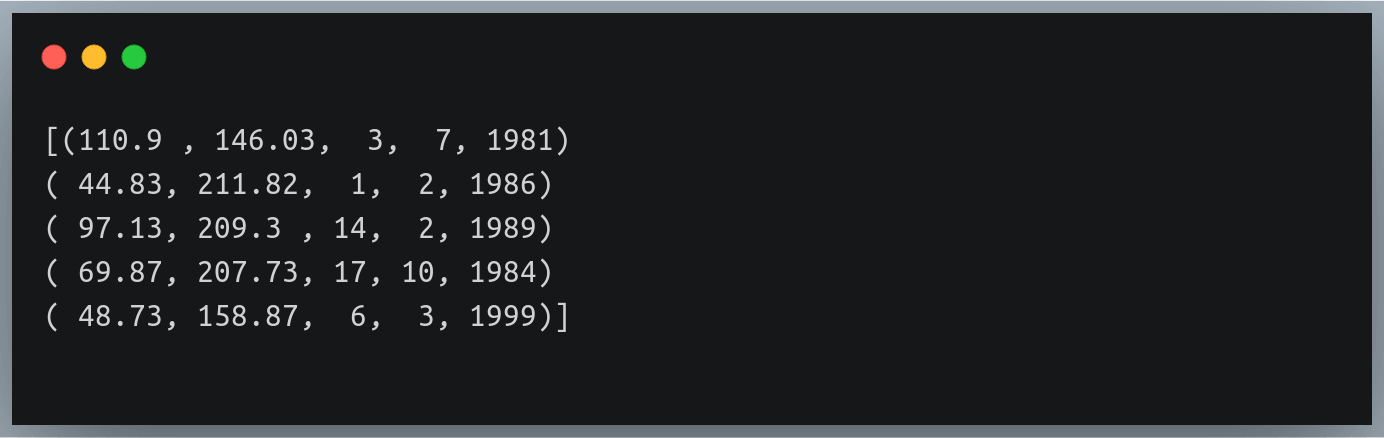
However, in such a case the function will return a NumPy array of tuples of values since a NumPy array as a whole can have only 1 data type

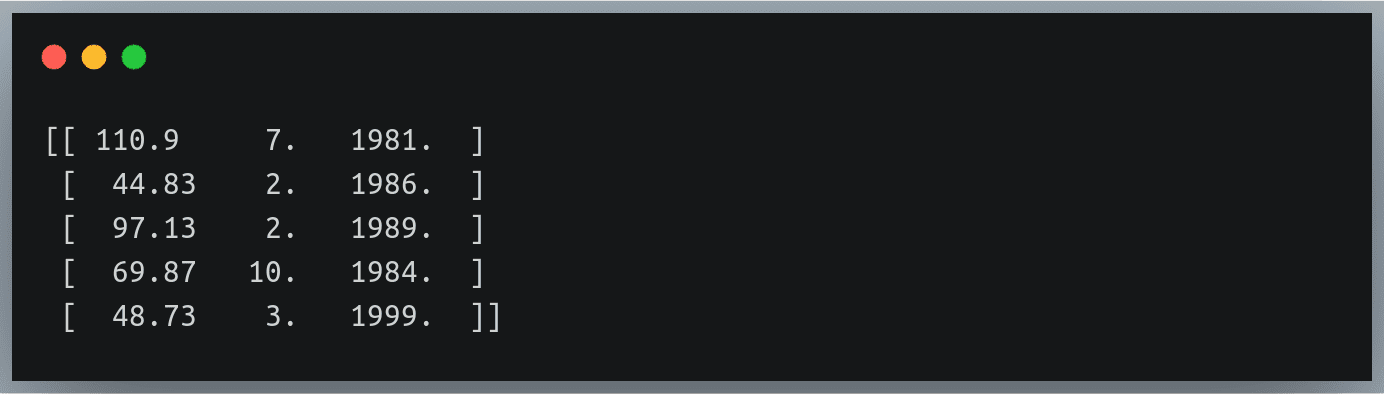
Let’s try this on ‘weight_height_3.txt’ file where the first two columns (weight, height) had float values and the last 3 values (date, month, year) were integers:

Output:

Ignoring headers

In some cases (especially CSV files), the first line of the text file may have ‘headers’ describing what each column in the following rows represents. While reading data from such text files, we may want to ignore the first line because we cannot (and should not) store them in our NumPy array.

In such a case, we can use the ‘skiprows’ parameter and pass the value 1, asking the function to ignore the first 1 line(s) of the text file.

Let’s try this on a CSV file – ‘weight_height.csv’:

Weight (in Kg), Height (in cm)
73.847017017515,241.893563180437
68.7819040458903,162.310472521300
74.1101053917849,212.7408555565
…

Now we want to ignore the header line i.e the first line of the file:

data = np.loadtxt("./weight_height.csv", delimiter=",", skiprows=1)

print(data[:3])

Output:

Likewise, we can pass any positive integer n to the skiprows parameter asking to ignore first n rows from the file.

Ignoring the first column

Sometimes, we may also want to skip the first column because we are not interested in it. For example, if our text file had the first column as “gender”, and if we don’t need to include the values of this column when extracting the data, we need a way to ask the function to do the same.

We do not have a skipcols parameter like skiprows in np.loadtxt function, using which, we could express this need. However, np.loadtxt has another parameter called ‘usecols’ where we specify the indices of the columns to be retained.

So if we want to skip the first column, we can simply supply the indices of all the columns except the first (remember indexing begins at zero)

Enough talking, let’s get to work!

Let’s look at the content of a new file ‘weight_height_5.txt’ which has an additional gender column that we want to ignore.

Male, 110.90, 146.03
Male, 44.83, 211.82
…
…
Female, 78.67, 158.74
Male, 105.64, 164.21

We’ll first determine the number of columns in the file from the first line and then pass a range of column indices excluding the first one:

with open("./weight_height_5.txt") as f:
#determining number of columns from the first line of text

n_cols = len(f.readline().split(","))

data = np.loadtxt("./weight_height_5.txt", delimiter=",",usecols=np.arange(1, n_cols))

print("First five rows:\n",data[:5])

Here we are supplying a range of values beginning from 1 (second column) and extending up to n_cols (the last column)

Output:

We can generalize the use of the usecols parameter by passing a list of indices of only those columns that we want to retain.

Load first n rows

Just as we can skip the first n rows using the skiprows parameter, we can also choose to load only the first n rows and skip the rest. This can be achieved using the max_rows parameter of the np.loadtxt method.

Let us suppose that we want to read only the first 10 rows from the text file ‘weight_height_2.txt’. We’ll call the np.loadtxt method along with the max_rows parameter and pass the value 10.

data = np.loadtxt("./weight_height_2.txt", delimiter=",",max_rows = 10)

print("Shape of data:",data.shape)

Output:

As we can see, the returned NumPy array has only 10 rows which are the first 10 rows of the text file.

If we use the max_rows parameter along with skiprowsparameter, then the specified number of rows will be skipped and next n rows will be extracted where n is the value we pass to max_rows.

Load specific rows

If we want the np.loadtxt function to load only specific rows from the text file, no parameter supports this feature.

However, we can achieve this by defining a generator that accepts row indices and returns lines at those indices. We’ll then pass this generator object to our np.loadtxt method.

Let’s first define the generator:

def generate_specific_rows(filePath, row_indices=[]):

with open(filePath) as f:

# using enumerate to track line no.
for i, line in enumerate(f):

#if line no. is in the row index list, then return that line
if i in row_indices:

yield line

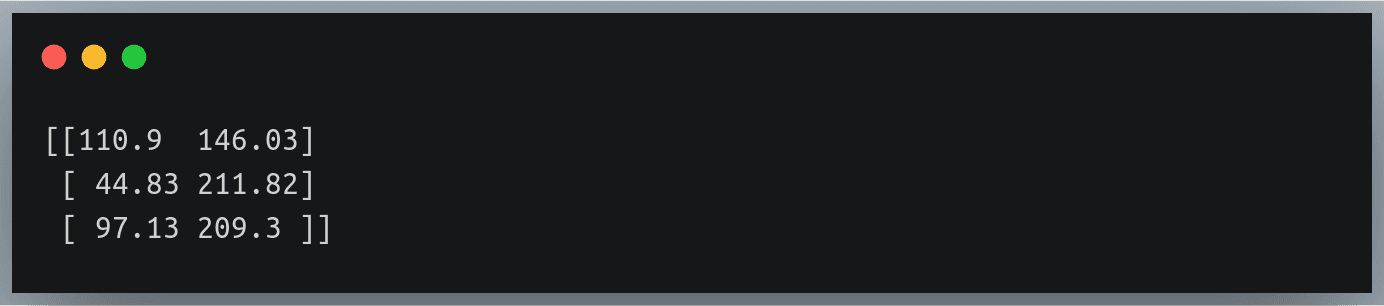
Let’s now use the np.loadtxt function to read the 2nd, 4th and 100th line in the file ‘weight_height_2.txt’

gen = generate_specific_rows("./weight_height_2.txt",row_indices = [1, 3, 99])

data = np.loadtxt(gen, delimiter=",")

print(data)

This should return a NumPy array having 3 rows and 2 columns:

Skip the last row

If you want to exclude the last line of the text file, you can achieve this in multiple ways. You can either define another generator that yields lines one by one and stops right before the last one, or you can use an even simpler approach – just figure out the number of lines in the file, and pass 1 less than that count to the max_rows parameter.

But how will you figure out the number of lines?
Follow along!

with open("./weight_height_2.txt") as f:

n = len(list(f))

print("n =", n)

Now n contains the number of lines present in `weight_height_2.txt` file, that value should be 100.

We will now read the text file as we used to, using the np.loadtxt method along with the max_rows parameter with value n – 1.

data = np.loadtxt("./weight_height_2.txt", delimiter=",",max_rows=n - 1)

print("data shape =",data.shape)

Output:

As we can see, the original text file had 100 rows, but when we read data from the file, it’s shape is (99, 2) since it skipped the last row from the file.

Skip specific columns

Suppose you wanted to ignore some of the columns while loading data from a text file by specifying the indices of such columns.

While the np.loadtxt method provides a parameter to specify which columns to retain (usecols), it doesn’t offer a way to do the opposite i.e specify which columns to skip. However, we can always find a workaround!

We shall first define the indices of columns to be ignored, and then using them we will derive the list of indices to be retained as the two sets would be mutually exclusive.

We will then pass this derived indices list to the usecols parameter.

Here is pseudocode for the entire process:

  1. Find the number of columns in the file n_cols (explained in an earlier section)
  2. Define the list of indices to be ignored
  3. Create a range of indices from 0 to n_cols, and eliminate the indices of step 2 from this range
  4. Pass this new list to usecols parameter in np.loadtxt method

Let’s create a wrapper function loadtext_without_columns that implements all the above steps:

def loadtext_without_columns(filePath, skipcols=[], delimiter=","):

with open(filePath) as f:

n_cols = len(f.readline().split(delimiter))

#define a range from 0 to n_cols
usecols = np.arange(0, n_cols)

#remove the indices found in skipcols
usecols = set(usecols) - set(skipcols)

#sort the new indices in ascending order
usecols = sorted(usecols)

#load the file and retain indices found in usecols
data = np.loadtxt(filePath, delimiter = delimiter, usecols = usecols)

return data

To test our code, we will work with a new file `weight_height_6.txt` which has 5 columns – the first two columns indicate width and height and the remaining 3 indicate the date, month and year of birth of the individuals.

All the values are separated by a single delimiter – comma:

110.90, 146.03, 3,7,1981
44.83, 211.82, 1,2,1986
97.13, 209.30, 14,2,1989
…
…
105.64, 164.21, 3,6,2000

Suppose we were not interested in the height and the date of birth of the individual, and so we wanted to skip the columns at positions 1 and 2.

Let’s call our wrapper function specifying our requirements:

data = loadtext_without_columns("./weight_height_6.txt",skipcols = [1, 2], delimiter = ",")

# print first 5 rows
print(data[:5])

Output:

We can see that our wrapper function only returns 3 columns – weight, month and year. It has ensured that the columns we specified have been skipped!

Load 3D arrays

So far we’ve been reading the contents of the file as a 2D NumPy array. This is the default behavior of the np.loadtxt method, and there’s no additional parameter that we can specify to interpret the read data as a 3D array.

So the simplest approach to solve this problem would be to read the data as a NumPy array and use NumPy’s reshape method to reshape the data in any shape of any dimension that we desire.

We just need to be careful that if we want to interpret it as a multidimensional array, we should make sure it is stored in the text file in an appropriate manner and that after reshaping the array, we’d get what we actually desired.

Let us take an example file – ‘weight_height_7.txt’.

This is the same file as ‘weight_height_2.txt’. The only difference is that this file has 90 rows, and each 30-row block represents a different section or class to which individuals belong.

So there are a total of 3 sections (A, B and C) – each having 30 individuals whose weights and heights are listed on a new row.

The section names are denoted with a comment just before the beginning of each section (you can check this at lines 1, 32 and 63).

The comment statements begin with ‘#’ and these lines are ignored by np.loadtxt when reading the data. We can also specify any other identifier for comment lines using the parameter ‘comments’

Now when you read this file, and print its shape, it would display (90,2) because that is how np.loadtxt reads the data – it arranges a multi-row data into 2D arrays.

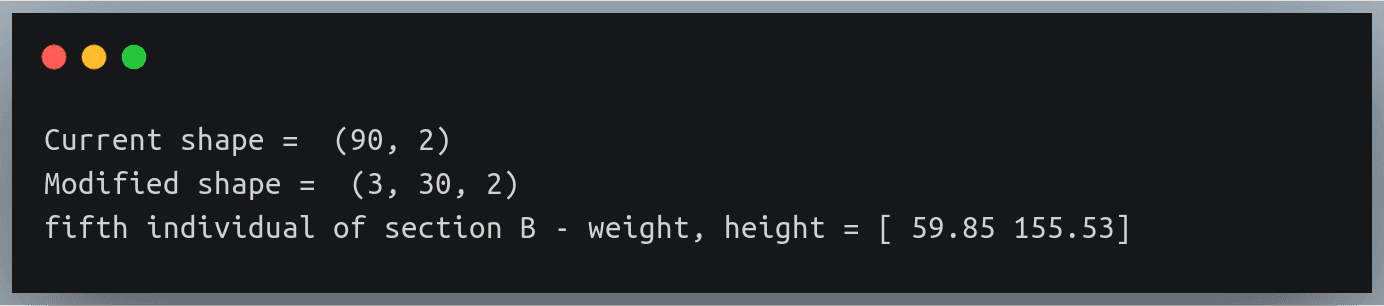
But we know that there is a logical separation between each group of 30 individuals, and we would want the shape to be (3, 30, 2) – where the first dimension indicates the sections, the second one represents each of the individuals in that section and the last dimension indicates the number of values associated to each of these individuals (here 2 for weight & height).

Using NumPy reshape method

So we want our data to be represented as a 3D array.

We can achieve this by simply reshaping the returned data using NumPy’s reshape method.

data = np.loadtxt("./weight_height_7.txt",delimiter=",")

print("Current shape = ",data.shape)

Settingsdata = data.reshape(3,30,2)

print("Modified shape = ",data.shape)

print("fifth individual of section B - weight, height =",data[1,4,:])

Output:

Notice how we are printing the details of a specific individual using 3 indices

The returned result belongs to the 5th individual of section B – this can be validated from the text:
…
#section B
100.91, 155.55
72.93, 150.38
116.68, 137.15
86.51, 172.15
59.85, 155.53
…

Comparison with alternatives

While numpy.loadtxt is an extremely useful utility for reading data from text files, it is not the only one!

There are many alternatives out there that can do the same task as np.loadtxt, many of these are better than np.loadtxt in many aspects. Let’s briefly look at 3 such alternative functions.

numpy.genfromtxt

  1. This is the most discussed and the most used method alongside np.loadtxt
  2. There’s no major difference between the two, the only one that stands out is np.genfromtxt’s ability to smoothly handle missing values.
  3. In fact, NumPy’s documentation describes np.loadtxt as “an equivalent function (to np.genfromtxt) when no data is missing.
  4. So the two are almost similar methods, except that np.genfromtxt can do more sophisticated processing of the data in a text file.

numpy.fromfile

  1. np.fromfile is commonly used when working with data stored in binary files, with no delimiters.
  2. It can read plain text files but does so with a lot of issues (go ahead and try reading the files we discussed using np.fromfile)
  3. While it is faster in execution time than np.loadtxt, but it is generally not a preferred choice when working with well-structured data in a text file.
  4. Besides NumPy’s documentation mentions np.loadtxt as a ‘more flexible (than np.fromfile) way of loading data from a text file.

pandas.read_csv

  1. pandas.read_csv is the most popular choice of Data Scientists, ML Engineers, Data Analysts, etc. for reading data from text files.
  2. It offers way more flexibility than np.loadtxt or np.genfromtxt.
  3. Although you cannot pass a generator to pandas.read_csv as we did.
  4. In terms of speed of execution, however, pandas.read_csv do better than np.loadtxt

Handling Missing Values

As discussed in our section comparing np.loadtxt with other options, np.genfromtxt handles missing values by default. We do not have any direct way of handling missing values in np.loadtxt

Here we’ll look at an indirect (and a slightly sophisticated) way of handling missing values with the np.loadtxt method.

The converters parameter:

  • np.loadtxt has a converters parameter that is used to specify the preprocessing (if any) required for each of the columns in the file.
  • For example, if the text file stores the height column in centimeters and we want to store them as inches, we can define a converter for the heights column.
  • The converters parameter accepts a dictionary where the keys are column indices and the values are methods that accept the column value, ‘convert’ it and return the modified value.

How can we use converters to handle missing values?

  • We need to first decide the default datatype i.e the value to be used to fill in the positions where the actual values are missing. Let’s say we want to fill in the missing height and weight values with 0, so our fill_value will be 0.
  • Next, we can define a converter for each column in the file, which checks if there is some value or an empty string in that column and if it’s an empty string, it will fill it with our fill_value.
  • To do this, we’ll have to find the number of columns in the text file, and we have already discussed how to achieve this in an earlier section.

We’ll use the file ‘weight_height_8.txt’ which is the same as ‘weight_height_2.txt’ but has several missing values.

, 146.03
44.83, 211.82
97.13,
69.87, 207.73
, 158.87
99.25, 195.41
…

Let’s write the code to fill in these missing values’ positions with 0.

# finding number of columns in the file
with open("./weight_height_8.txt") as f:

n_cols = len(f.readline().split(","))

print("Number of columns", n_cols)

# defining converters for each of the column (using 'dictionary
# comprehension') to fill each missing value with fill_value

fill_value = 0

converters = {i: lambda s: float(s.strip() or fill_value) for i in range(2)}

data = np.loadtxt("./weight_height_8.txt", delimiter=",",converters = converters)

print("data shape =",data.shape)

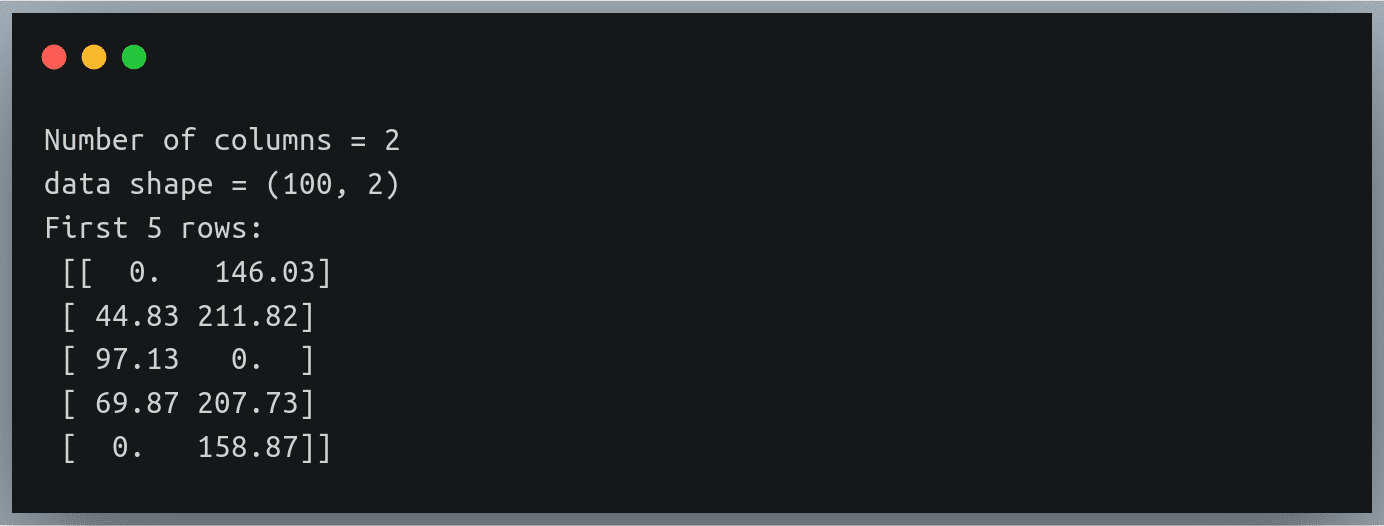
print("First 5 rows:\n",data[:5])

Output:

The missing height and weight values have been correctly replaced with a 0. No magic!

Conclusion

numpy.loadtxt is undoubtedly one of the most standard choices for reading a well-structured data stored in a text file. It offers us great flexibility in choosing various options for specifying the way we want to read the data, and wherever it doesn’t – remember there’s always a workaround!

0