


Linux çekirdeği resmi sitesi: https://www.kernel.org
Uzun süreli destek sürümü:
4.14.141 2019-08-29
Değişiklik listesi…
Archive | GNU/Linux
Container Linux 2191.4.1 duyuruldu
 Asıl olarak sunucular için tasarlanan Gentoo tabanlı GNU/Linux dağıtımı Container Linux‘un 2191.4.1 sürümü duyuruldu. Eski adı CoreOS Linux olan sistemin yeni sürümüne ilişkin paketler yansılarda yerini aldı. Linux çekirdeğini temel alan ve kümelenmiş dağıtımlara altyapı sağlamak için tasarlanmış, otomasyon, uygulama dağıtım kolaylığı, güvenlik, güvenilirlik ve ölçeklenebilirliğe odaklanan açık kaynaklı, hafif bir işletim sistemi olan Container Linux, sunucular için tasarlandığı için bir masaüstü ortamı içermiyor. 4.19.66 Linux çekirdeği üzerine yapılandırılan sistem; rkt 1.30.0, docker 18.06.3, etcd 3.3.13, systemd 241 ve Ignition 0.33.0 içeriyor.Container 2191.4.1 hakkında ayrıntılı bilgi edinmek için sürüm notlarını inceleyebilirsiniz.
Container Linux 2191.4.1 edinmek için aşağıdaki linkten yararlanabilirsiniz.
ExTiX 19.8 çıktı
 Bilindiği gibi, 18 Nisan 2019‘da duyurulan ExTiX 19.4’ten sonra Ubuntu 19.04 Disco Dingo’ya dayalı olarak hazırlanan ExTiX 19.8 de çıktı. Henüz resmi duyurusu yapılmamış olan sürüme ait ISO kalıpları indirilmek üzere yansılarda yerini aldı. En güncel Linux çekirdeğiyle kullanılmak üzere sürümler geliştiren geliştirme ekibi, bilindiği gibi, şu anda, özellikle Xfce 4.14 masaüstü ortamını tercih ediyor. 5.3.0-rc6-exton Linux çekirdeği üzerine yapılandırılan sistem, Deepin 15.11 masaüstü ortamını kullanıma sunuyor. Kodi, Nvidia tescilli grafik sürücüsü, Netflix eklentisi gibi değişmezler yanında, diğer güncel yazılımların da kullanıma sunulduğu tahmin ediliyor. ExTiX 19.8 hakkında ayrıntılı bilgi edinmek için resmi sürüm duyurusu az önce yayımlandı. Sürüm duyurusunu inceleyebilirsiniz.

BlackArch Linux 2019.09.1 duyuruldu
 Penetrasyon testleri ve güvenlik araştırmacıları için tasarlanmış Arch Linux tabanlı bir dağıtım olan BlackArch Linux’un 2019.09.1 sürümü, BlackArch Linux geliştiricileri tarafından duyuruldu. Temel Linux sistemi güncellenen ve birkaç yeni araç getiren sürüme ait ISO ve OVA kalıpları kullanıma sunuldu. 150’den fazla yeni aracın eklendiği sistemde, blackarch-installer 1.1.19 sürümüne güncellenmiş bulunuyor. 5.2.9 Linux çekirdeği üzerine yapılandırılan sistem, çeşitli iyileştirmeler ve düzeltmeler içeriyor. dwm pencere yöneticisinin kaldırıldığı bildirilirken, varsayılan terminal xterm rxvt-unicode ile değiştirildi. config dosyaları dahil tüm blackarch araçları ve paketleri güncellendi. BlackArch Linux 2019.09.1 hakkında ayrıntılı bilgi edinmek için projenin blog sayfasını inceleyebilirsiniz.
BlackArch Linux 2019.09.1 edinmek için aşağıdaki linklerden yararlanabilirsiniz.
Debian ve Ubuntu Python 2’ye dayanan paketleri kaldırmayı planlıyor
 Python Proje Lideri Guido van Rossum, Python 2.7’yi 2020’ye kadar uzatmış ve bunun Python 2 döngüsündeki son sürüm olduğunu açıklamıştı. Dolayısıyla, Aralık 2019’da Python 2’nin ömrü sona eriyor. Hatırlanacağı gibi, Ubuntu ilk olarak 14.04 sürümünde Python 3 versiyonunu standart olarak ilan etmek istemişti. Debian ise 10 Buster sürüm desteğinin sonuna kadar Python 2’yi desteklemeye devam edeceğini açıkladı. Ubuntu’da bu süre, Ubuntu 18.04 Bionic Beaver sürüm desteğinin sonuna kadar devam edecek. Bundan sonra, her iki dağıtım da Python 2’ye dayanan paketleri kaldıracaklar. Yani her iki dağıtım; Debian 11 “Bullseye” ve Ubuntu 20.04 LTS sürümlerinde Python 2’ye dayanan paketleri kaldırmayı planlıyor. Debian geliştiricileri şu anda Python 3’e aktarılmayacak Python 2 paketlerini kaldırmak için çalışıyor. Ubuntu, Upstream Debian’da olmayan Python 2 paketlerini kaldırmaya hazırlanıyor. Her iki proje de mümkünse paketleri Python 3’e geçirmek için çalışıyor.
Her iki projenin de geliştiricisi olan Matthias Klose, geçtiğimiz hafta Ubuntu’da olan ancak Debian’ın arşivlerinde olmayan uzun bir paket listesi yayımladı. Konu hakkında daha ayrıntılı bilgi edinmek isterseniz, pro-linux.de üzerinde Ferdinand Thommes’in yayımladığı yazıyı inceleyebilirisniz.
31+ Examples for sed Linux Command in Text Manipulation
 In the previous post, we talked about bash functions and how to use them from the command line directly and we saw some other cool stuff. Today we will talk about a very useful tool for string manipulation called sed or sed Linux command. Sed is used to work with text files like log files, configuration files, and other text files. In this post, we are going to focus on sed Linux command which is used for text manipulation, which is a very important step in our bash scripting journey. Linux system provides some tools for text processing, one of those tools is sed. We will discuss the 31+ examples with pictures to show the output of every example.
Understand sed Linux Command
The sed command is a non-interactive text editor. Sed Linux command edits data based on the rules you provide, you can use it like this:
sed options file
You are not limited to use sed to manipulate files, you apply it to the STDIN directly like this:
echo "Welcome to LikeGeeks page" | sed 's/page/website/'

The s command replaces the first text with the second text pattern. In this case, the string “website” was replaced with the word “page”, so the result will be as shown.
The above example was a very basic example to demonstrate the tool. We can use sed Linux command to manipulate files as well.
This is our file:
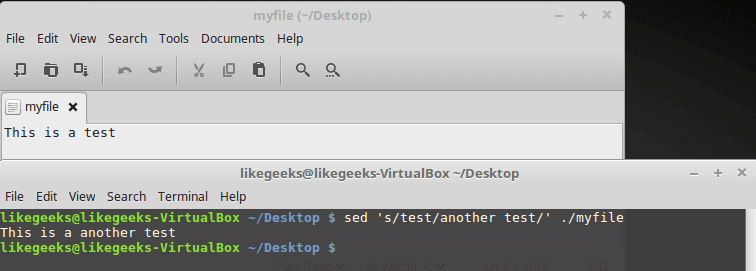
sed 's/test/another test/' ./myfile
The results are printed to the screen instantaneously, you don’t have to wait for processing the file to the end.
If your file is huge enough, you will see the result before the processing is finished.
Sed Linux command doesn’t update your data. It only sends the changed text to STDOUT. The file still untouched. If you need to overwrite the existing content, you can check our previous post which was talking about redirections.
Using Multiple sed Linux Commands in The Command Line
To run multiple sed commands, you can use the -e option like this:
sed -e 's/This/That/; s/test/another test/' ./myfile
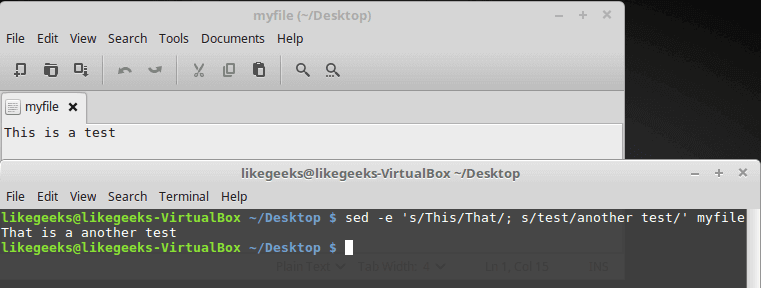
Sed command must be separated by a semicolon without any spaces.
Also, you can use a single quotation to separate commands like this:
sed -e '
> s/This/That/
> s/test/another test/' myfile
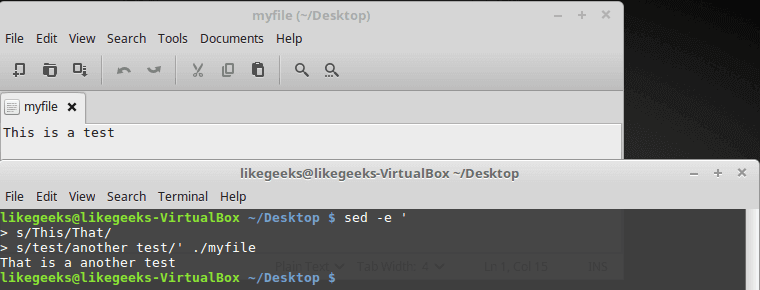
The same result, no big deal.
Reading Commands From a File
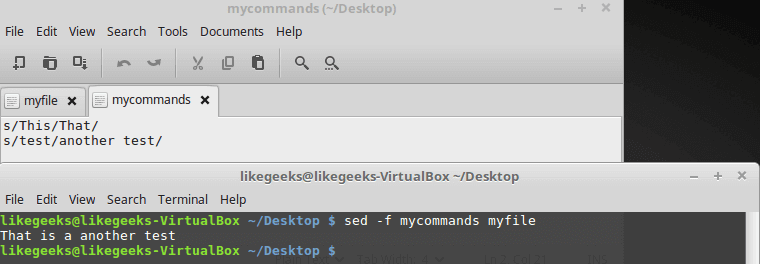
You can save your sed commands in a file and use them by specifying the file using -f option.
cat mycommands
s/This/That/
s/test/another test/
sed -f mycommands myfile
Substituting Flags
Look at the following example carefully:
cat myfile
sed 's/test/another test/' myfile
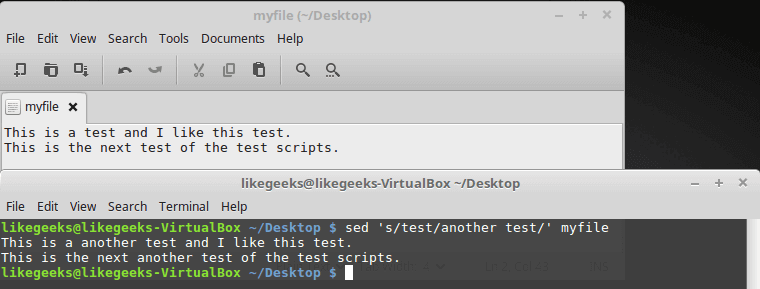
The above result shows the first occurrence in each line is only replaced. To substitute all occurrences of a pattern, use one of the following substitution flags.
The flags are written like this:
s/pattern/replacement/flags
There are four types of substitutions:
- g, replace all occurrences.
- A number, the occurrence number for the new text that you want to substitute.
- p, print the original content.
- w file: means write the results to a file.
You can limit your replacement by specifying the occurrence number that should be replaced like this:
sed 's/test/another test/2' myfile

As you can see, only the second occurrence on each line was replaced.
The g flag means global, which means a global replacement for all occurrences:
sed 's/test/another test/g' myfile

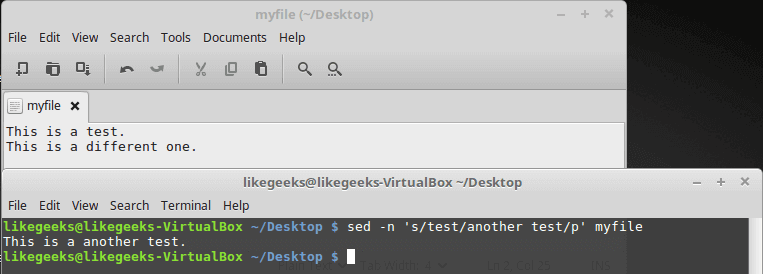
The p flag prints each line contains a pattern match, you can use the -n option to print the modified lines only.
cat myfile
sed -n 's/test/another test/p' myfile
The w flag saves the output to a specified file:
sed 's/test/another test/w output' myfile

The output is printed on the screen, but the matching lines are saved to the output file.
Replace Characters
Suppose that you want to search for bash shell and replace it with csh shell in the /etc/passwd file using sed, well, you can do it easily:
sed 's/\/bin\/bash/\/bin\/csh/' /etc/passwd
Oh!! that looks terrible.
Luckily, there is another way to achieve that. You can use the exclamation mark (!) as string delimiter like this:
sed 's!/bin/bash!/bin/csh!' /etc/passwd
Now it’s easier to read.
Limiting sed
Sed command processes your entire file. However, you can limit the sed command to process specific lines, there are two ways:
- A range of lines.
- A pattern that matches a specific line.
You can type one number to limit it to a specific line:
sed '2s/test/another test/' myfile
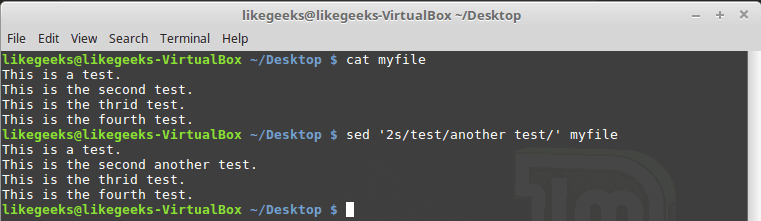
Only line two is modified.
What about using a range of lines:
sed '2,3s/test/another test/' myfile

Also, we can start from a line to the end of the file:
sed '2,$s/test/another test/' myfile

Or you can use a pattern like this:
sed '/likegeeks/s/bash/csh/' /etc/passwd

Awesome!!
You can use regular expressions to write this pattern to be more generic and useful.
Delete Lines
To delete lines, the delete (d) flag is your friend.
The delete flag deletes the text from the stream, not the original file.
sed '2d' myfile
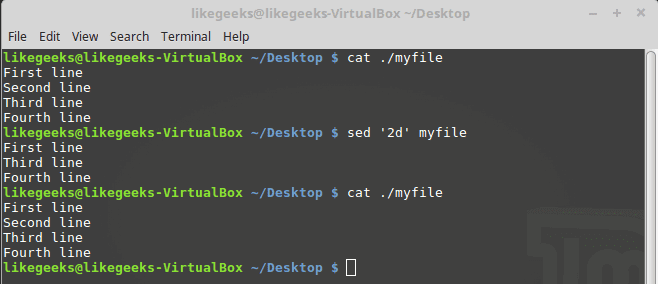
Here we delete the second line only from myfile.
What about deleting a range of lines?
sed '2,3d' myfile

Here we delete a range of lines, the second and the third.
Another type of ranges:
sed '3,$d' myfile

Here we delete from the third line to the end of the file.
All these examples never modify your original file.
sed '/test 1/d' myfile
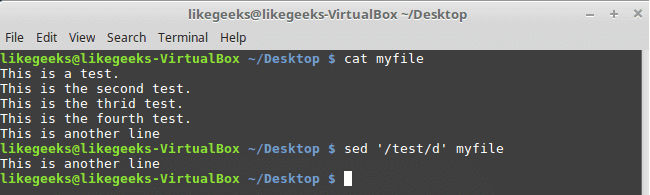
Here we use a pattern to delete the line if matched on the first line.
If you need to delete a range of lines, you can use two text patterns like this:
sed '/second/,/fourth/d' myfile
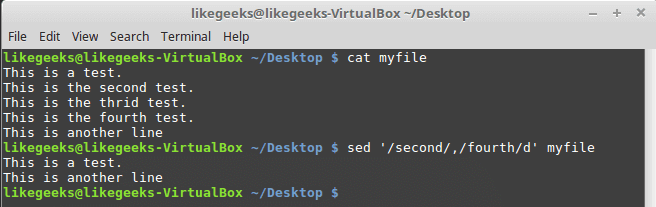
From the second to the fourth line are deleted.
Insert and Append Text
You can insert or append text lines using the following flags:
- The (i) flag.
- The (a) flag.
echo "Another test" | sed 'i\First test '

Here the text is added before the specified line.
echo "Another test" | sed 'a\First test '

Here the text is added after the specified line.
Well, what about adding text in the middle?
Easy, look at the following example:
sed '2i\This is the inserted line.' myfile
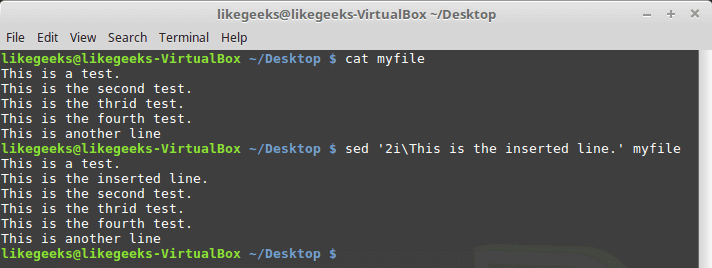
And the appending works the same way, but look at the position of the appended text:
sed '2a\This is the appended line.' myfile
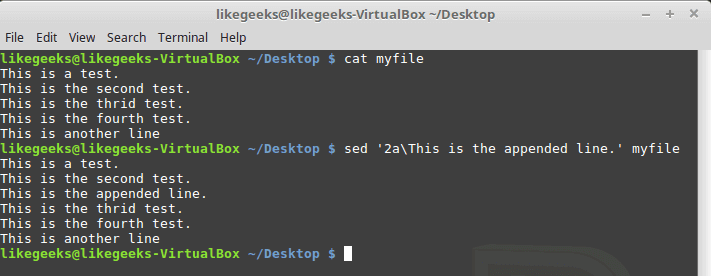
The same flags are used but with a location of insertion or appending.
Modifying Lines
To modify a specific line, you can use the (c) flag like this:
sed '3c\This is a modified line.' myfile
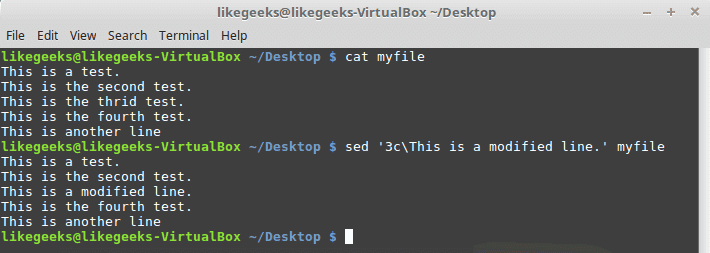
You can use a regular expression pattern and all lines match that pattern will be modified.
sed '/This is/c Line updated.' myfile
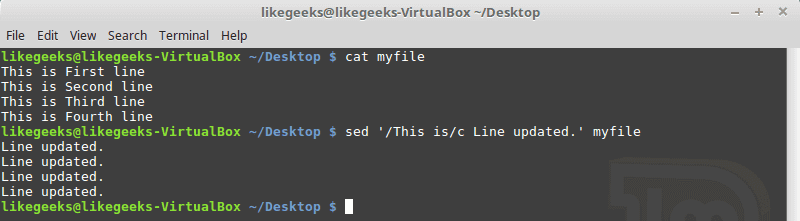
Transform Characters
The transform flag (y) works on characters like this:
sed 'y/123/567/' myfile
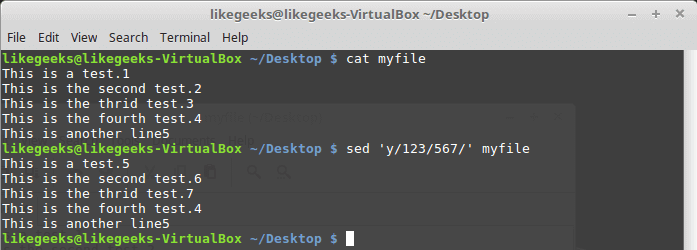
The transformation is applied to all data and cannot be limited to a specific occurrence.
Print Line Numbers
You can print line number using the (=) sign like this:
sed '=' myfile
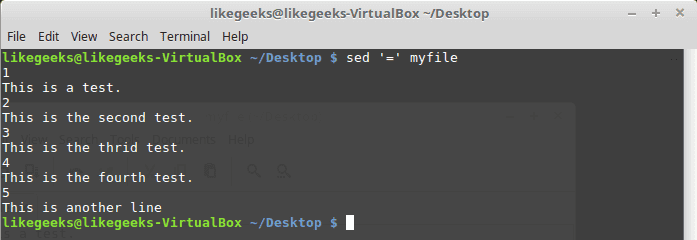
However, by using -n combined with the equal sign, the sed command displays the line number that contains matching.
sed -n '/test/=' myfile
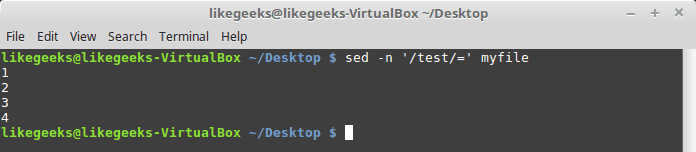
Read Data From a File
You can use the (r) flag to read data from a file.
You can define a line number or a text pattern for the text that you want to read.
cat newfile
sed '3r newfile' myfile
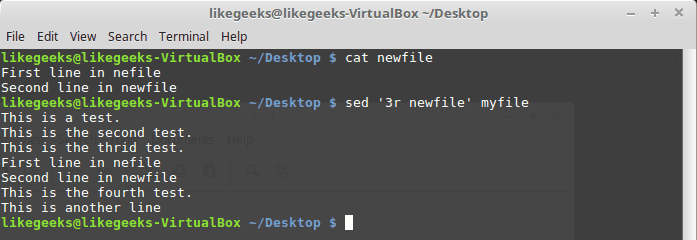
The content is just inserted after the third line as expected.
And this is using a text pattern:
sed '/test/r newfile' myfile
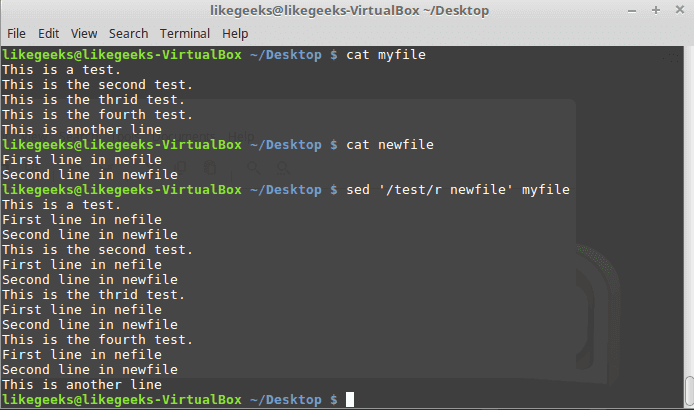
Cool right?
Useful Examples
We have a file that contains text with a placeholder and we have another file that contains the data that will be filled in that placeholder.
We will use the (r) and (d) flags to do the job.
The word DATA in that file is a placeholder for a real content which is stored in another file called data.
We will replace it with the actual content:
Sed '/DATA>/ {
r newfile
d}' myfile
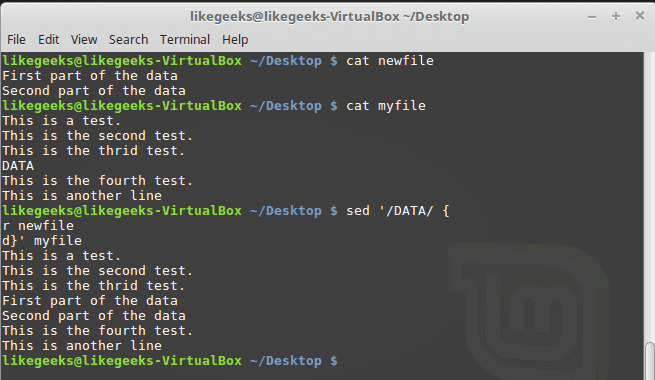
Awesome!! as you can see, the placeholder location is filled with the data from the other file.
This is just a very small intro about sed command. Actually, sed Linux command is another world by itself.
The only limitation is your imagination.
I hope you enjoy what’ve introduced today about the string manipulation using sed Linux command.
Thank you.

Clonezilla live 2.6.3-5 duyuruldu
 Sabit disk klonlamak ve yedeklemek için tasarlanmış Debian GNU/Linux tabanlı Clonezilla Live’in yeni test sürümü 2.6.3-5, Steven Shiau tarafından duyuruldu. Debian Sid depolarıyla 27 Ağustos 2019 tarihi itibariyle senkronize edilen sistemin temel GNU/Linux işletim sistemi güncellenmiş bulunuyor. Sistemde, zh_TW.UTF-8 yazım hatası da düzeltilmiş bulunuyor. 5.2.9-2 Linux çekirdeği üzerine yapılandırılan sistemin; GNU/Linux üzerinde ext2, ext3, ext4, reiserfs, xfs ve jfs dosya sistemlerini; Windows üzerinde FAT, NTFS dosya sistemlerini; Mac OS üzerinde HFS ve BSD üzerinde UFS dosya sistemlerini desteklediği hatırlatılıyor. Sistem, bilindiği gibi, Clonezilla live ve Clonezilla SE (Sunucu Sürümü) olarak kullanıma sunuluyor. Sistem, ağ yöneticisi de içeriyor. Clonezilla live 2.6.3-5 hakkında ayrıntılı bilgi edinmek için değişiklikler sayfasını inceleyebilirsiniz.
Clonezilla live 2.6.3-5 edinmek için aşağıdaki linklerden yararlanabilirsiniz.