Sistem tamiri için tasarlanan Gentoo tabanlı, Fransız kökenli SystemRescueCd‘nin 5.1.2 sürümü duyuruldu. Sistemin kararlı Linux çekirdeği LTS 4.9.60’a dayalı olarak geldiği bildirilirken, UEFI Önyükleme için Grub 2.02 kullanımının tercih edildiği belirtildi. Disk araçları güncellenmiş olarak gelen sistemde, sistem çekirdeği; ext2, ext3, ext4, ReiserFS, Reiser4FS, btrfs, XFS, JFS, VFAT, NTFS, ISO9660 gibi günümüzün en önemli dosya sistemlerinin tümünü ve Samba ve NFS gibi ağ dosya sistemlerini destekliyor. Gentoo tabanlı önyüklenebilir bir CD-ROM veya USB sistem olan SystemRescueCd ile yönetim görevlerini kolaylıkla yürütmek ve sabit disk bölümlerini düzenlemek mümkündür. SystemRescueCd 5.1.2 hakkında ayrıntılı bilgi edinmek için değişiklikler sayfasını inceleyebilirsiniz.
Ubuntu tabanlı, kullanıcı dostu masaüstü ve sunucu versiyonlarıyla kullanıma sunulan GNU/Linux dağıtımı Black Lab Linux’un (eski adıyla OS4 OpenLinux) 11.5 sürümünün 3. betası, Roberto J. Dohnert tarafından duyuruldu. Black Lab Enterprise Linux 11.5 Beta 3’ü duyurmaktan memnuniyet duyduklarını söyleyen Dohnert; bu sürümde, sistemde birkaç geliştirme yaptıklarını belirtti ve sürücü yetenekleri artırılan sistemin 4.10.0-38 Linux çekirdeği üzerine yapılandırılarak daha iyi bir performans elde edildiğini ifade etti. Xorg 1.18’e dayalı olarak gelen sistem; LibreOffice 5.4 ve Chromium Browser 62 içeriyor ve Thunderbird, Ice SSB, Calligra, Skype 8.9, Nitroshare, Samba4, Synergy, Audacious gibi popüler yazılımların en yeni sürümleriyle kullanıma sunuluyor. Kullanıcılara KDE Plasma 5, Xfce, LXDE ve MATE masaüstü ortamlarını deneyimleme olanağı sağlayan sistem; XFS, JFS ve Btrfs dosya sistemlerini destekliyor ve ses düzenleme, 3D render ve video düzenleme araçları içeriyor. Black Lab Enterprise Linux 11.5 Beta 3 hakkında daha ayrıntılı bilgi edinmek için sürüm duyurusunu inceleyebilirsiniz.
In the previous post, we discussed how to install Linux, now we are going to talk about the most powerful features in Linux which is Linux commands or shell commands. For the whole documentation of Linux Commands, you can check Linux Documentation. The power of Linux is in the power of commands that you can use. I’m going to talk about the main Linux commands with their main parameters that you might use daily.
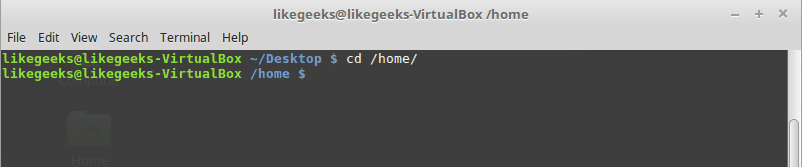
Change directory from the current directory to another one.
cd /home
Will go to home directory
cp Command
Copy the source to target.
Parameters
-i
Interactive mode means wait for the confirmation if there are files on the target will be overwritten.
-r
Recursive copy means include subdirectories if they found.
Example
cp –ir sourcedir targetdir
mv Command
Move the source to target and remove the source.
Parameters
-i
Interactive mode means wait for the confirmation if there are files on the target will be overwritten.
Example
mv –i sourceFile targetFile
rm Command
Delete file or directory and you must use –r in case you want to delete a directory.
Parameters
-r
Recursive delete means delete all subdirectories if found.
-i
Interactive means wait till confirmation
mkdir Command
Create a new directory.
mkdir newDir
rmdir Command
Delete a directory
chown Command
Change the owner of a file or directory.
Parameters:
-R
Capital R here means to change ownership of all subdirectories if found and you must use this parameter if you use the command against a directory.
chown –R root:root myDir
chmod Command
Change the permission of a file or directory.
Parameters
The mode which consists of 3 parts, owner, group, and others means what will be the permissions for these modes, and you must specify them.
The permission is one of the followings:
Read =4
Write = 2
Execute =1
Every permission represented by a number as shown and you can combine permissions.
Example
chmod 755 myfile
That means set permission for the file named myfile as follows:
owner: set it to 7 which means 4+2+1 means read+write+execute.
group: set it to 5 which means 4+1 means read+execute.
other: set it to 5 which means 4+1 means read+execute.
Note: execute for a folder permission means opening it.
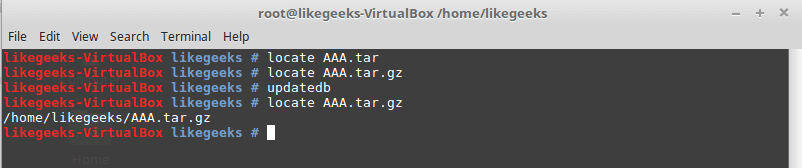
locate Command
To find a file in your system, the locate command will search the system for the pattern you provide.
locate myfile
updatedb Command
updates the database used by the locate command.
date Command
Simply prints today’s date. Just type date on the shell.
tar Command
Combines several files into archive and compression if you want.
Parameters
-c
Create new archive.
-z
Compress the archive using gzip package.
-j
Compress the archive using bzip2 package.
-v
Verbose mode means show the processed files.
-f
Write the output to a file and not to screen.
-x
Unpack files from archive.
Example
tar –czvf myfiles.tar.gz myfiles
This command will pack and compress all files in folder myfiles to a compressed archive named myfiles.tar.gz.
tar-xzvf myfiels.tar.gz
This command will decompress the archive.
cat Command
Display file content to screen without limits.
Example
cat myfile.txt
less Command
Displays file content with scroll screen so you can navigate between pages using PgUp, PgDn, Home, and End.
less myfile
grep Command
Searches for a string in the specified files and displays which line contains the matched string.
Parameters
-R
Recursive search inside subdirectories if found.
-i
Insensitive search and ignore case.
-l
Display file name, not the text lines.
Example
grep –Ril mystring /home
passwd Command
Used to change your user password.
du Command
Calculates the disk usage of a file or a directory.
Parameters
-h
Display human readable form.
-s
Summarize the output total size.
Example
du –hs /home
reboot Command
Reboot the system immediately. Just type reboot.
halt Command
Shuts down the system, but make sure to close all of your files to avoid data loss.
That was just some of the main Linux commands.
Notice that, if you forget any command parameters, just type the command with – -help as a parameter and it will list the used parameters so you don’t have to remember all those parameters at the beginning.
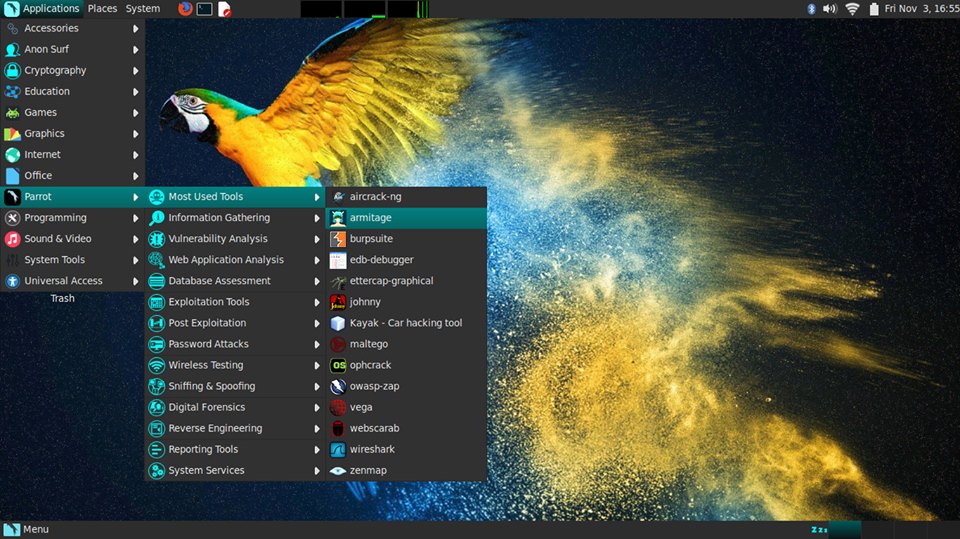
Beta sürümü 18 Ekim 2017‘de duyurulan Debian GNU/Linux tabanlı, penetrasyon testleri için güvenliğe odaklanmış bir koleksiyonla gelen ve adli tıp, tersine mühendislik, hack, gizlilik, anonimlik, şifreleme çözümleri sunan İtalyan kökenli dağıtım Parrot Security OS‘un 3.9 final sürümü çıktı. Resmi duyurusu henüz yapılmamış olan sürüm, indirilmek üzere yansılarda yerini aldı. Tüm güncellemeleri ve son sürümden bu yana piyasaya sürülen yeni özellikleri içeren “intruder” kod adlı yeni sürüm, 4.13 Linux çekirdeği üzerine yapılandırılmış bulunuyor. Debian 10 Buster tabanlı sürüm, MATE 1.18 masaüstü ortamıyla kullanıma sunuluyor. LibreOffice 5.4, Firefox 56 gibi güncel yazılımlarla gelen sistem, AnonSurf, TOR Browser, Cryptographic tolls, güvenlik Pentesting araçları, Digital adli araçlar, geliştirme araçları, Electrum Bitcoin cüzdan, Wine ve UEFI desteği içeriyor. Sürüm hakkında daha ayrıntılı bilgi edinmek için sürüm notlarını inceleyebilirsiniz.
As we’ve talked about Linux on the previous post and we have chosen the best Linux distro, also we’ve learned how to install Linux. Today we will discuss the Linux file system. What Is Linux File System? Linux File System or any file system generally is a layer which is under the operating system that handles the positioning of your data on the storage, without it; the system cannot knows which file starts from where and ends where. Even if you find any unsupported file system type. You can even download a software that can deal with it. So what are Linux file system types? When you try to install Linux you will see that Linux offers many file systems like these:
Ext: old one and no longer used due to limitations.
Ext2: first Linux file system that allows 2 terabytes of data allowed.
Ext3: came from Ext2, but with upgrades and backward compatibility.
The only problem about it that the servers don’t use this kind of file system because this file system doesn’t support file recovery or disk snapshots.
Ext4: faster and allow large files with significant speed.
It is a very good option for SSD disks and you notice when you try to install any Linux distro that this one is the default file system that Linux suggests.
JFS: old file system made by IBM. It works very well with small and big files, but it failed and files corrupted after long time use, reports say.
XFS: old file system and works slowly with small files.
Btrfs: made by Oracle. It is not stable as Ext in some distros, but you can say that it is a replacement for it if you have to. It has a good performance.
You may notice From the comparison above that Ext4 is the best Linux File System
Top Level Explanation
Now you know what file system Linux is and its types. So what is inside that filesystem, I mean from the top level.
You may come from Windows, and Windows has partitions like C:\ and D:\, you can install Windows on any of these partitions, usually C:\.
What about Linux File System Structure?
Well, if you navigate to the root partition which is / you’ll see the Linux File System hierarchy.
Most distros have the same structure with some little difference between distros.
Linux File System Directories
/bin: Where Linux core commands reside like ls, mv.
/boot: Where boot loader and boot files are located.
/dev: Where all physical drives are mounted like USBs DVDs.
/etc: Contains configurations for the installed packages.
/home: Where every user will have a personal folder to put his folders with his name like /home/likegeeks.
/lib: Where the libraries of the installed packages located since libraries shared among all packages
unlike windows, you may find duplicates in different folders.
/media: Here is the external devices like DVDs and USB sticks are mounted and you can access their files from here.
/mnt: Where you mount other things Network locations and some distros you may find your mounted USB or DVD.
/opt: Some optional packages are located here and this is managed by the package manager.
/proc: Because everything on Linux is a file, this folder for processes running on the system,
and you can access them and see much info about the current processes.
/root: The home folder for the root user.
/sbin: Like /bin, but binaries here are for root user only.
/tmp: Contains the temporary files.
/usr: Where the utilities and files shared between users on Linux.
/var: Contains system logs and other variable data.
Now you have a good idea about what the Linux file system is.
Choosing the right file system can lead you to the best performance, so choose the best.
After you’ve chosen the Best Linux Distro, now it’s the time to know how to install Linux. If you want to install Linux, there are 2 ways to do that: The first way is to download the Linux distribution you want and burn it into a DVD or USB stick and boot your machine with it and complete the installation process. The second way is to install it virtually on a virtual machine like VirtualBox or VMware without touching your Windows or Mac system, so your Linux system will be contained in a window you can minimize and continue working on your real system. For me, I prefer VirtualBox, it’s free and runs very fast on my PC than VMware, and support installing Windows, Linux and Mac OS with all versions. Let’s choose any Linux distro and install it using both 2 ways. I’m going to choose Linux mint, they call it the Mac OS of Linux. It is a good distro for personal use. The version we are going to install is 18.1 “Serena” at the time of writing that article.
I prefer the Cinnamon desktop version it is promising and elegant.
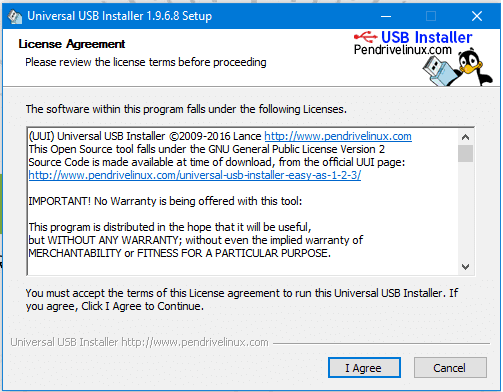
Once you download the ISO file, you will have to burn it on DVD or the easy way, copying it on a USB stick using a program called universal USB installer, you can download this program from this link:
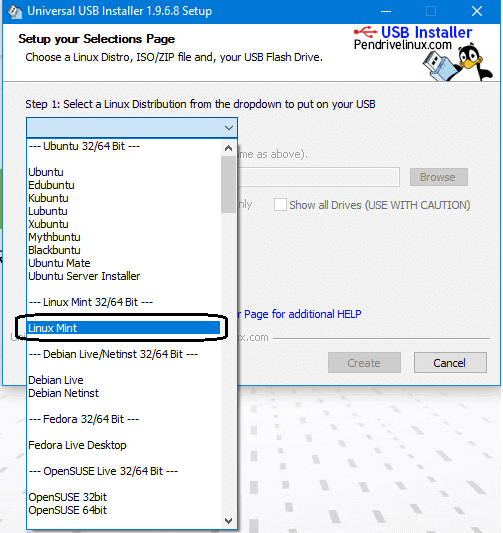
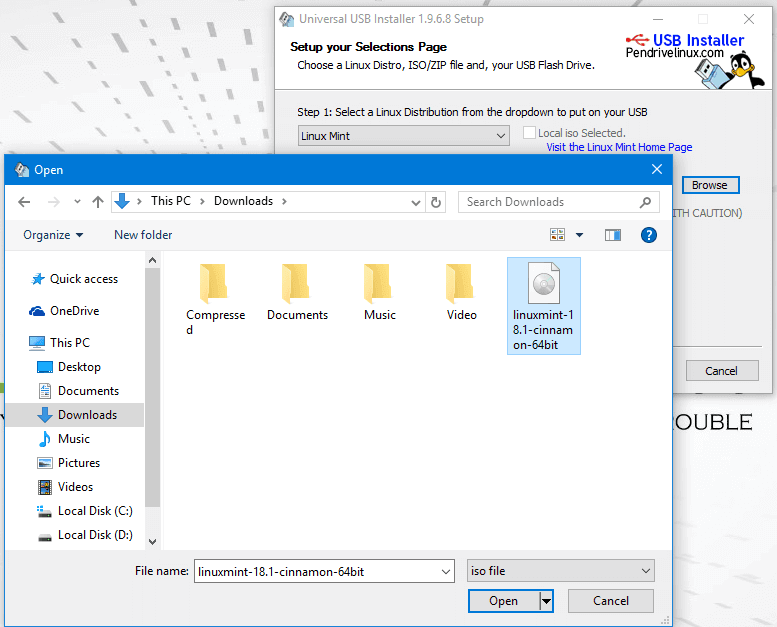
After downloading the program, open it and choose from the list the distro you want to install, in our case we will choose Linux mint.
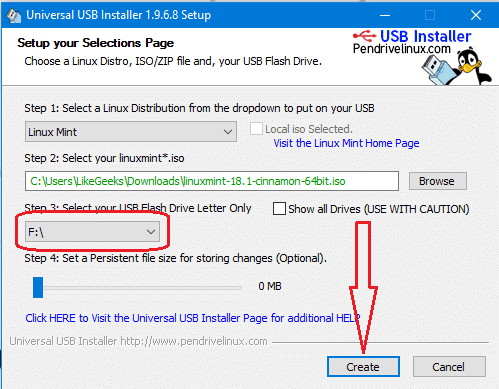
Make sure that you put your memory stick on the computer and click next and wait till the copying process is finished.
how to install Linux using USB
Now Finally we click create to create bootable USB
And now you can boot with this memory stick.
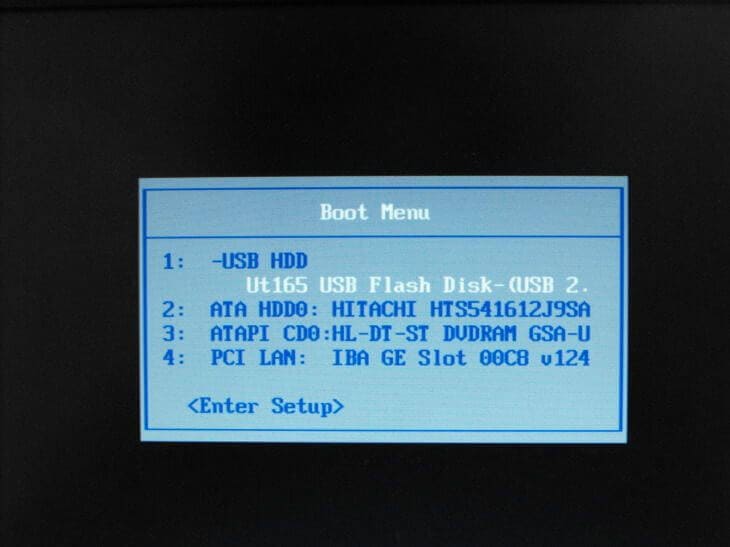
Then Restart your PC and go to BIOS settings and select boot options and make sure that the USB is the first option, then save your BIOS settings and reboot.
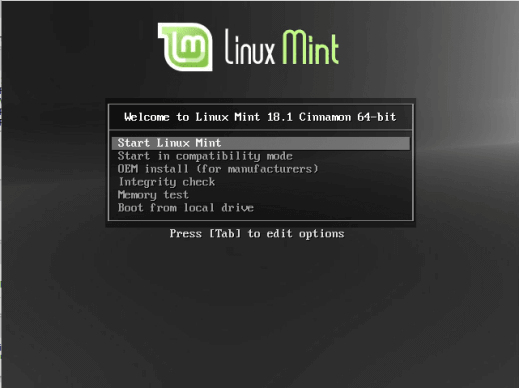
Then it will show the installation screen, press Enter and it will load the live CD content.
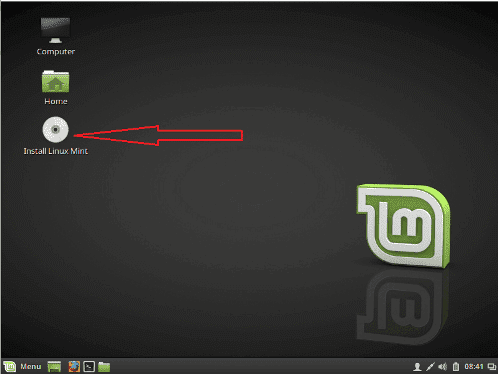
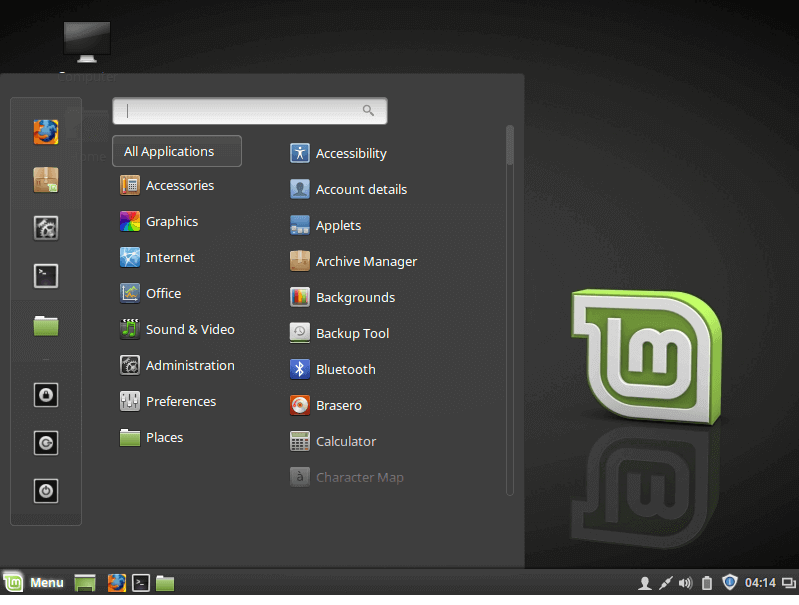
Now the desktop should appear like that:
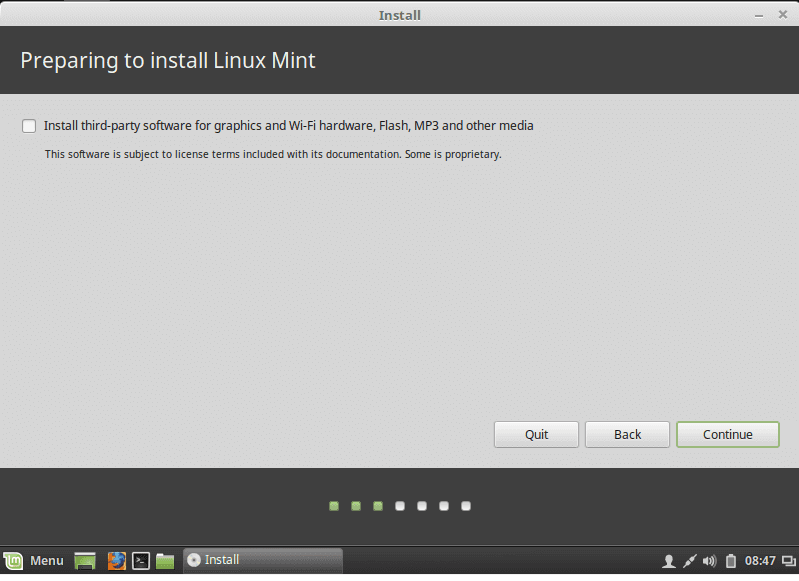
Click install Linux mint
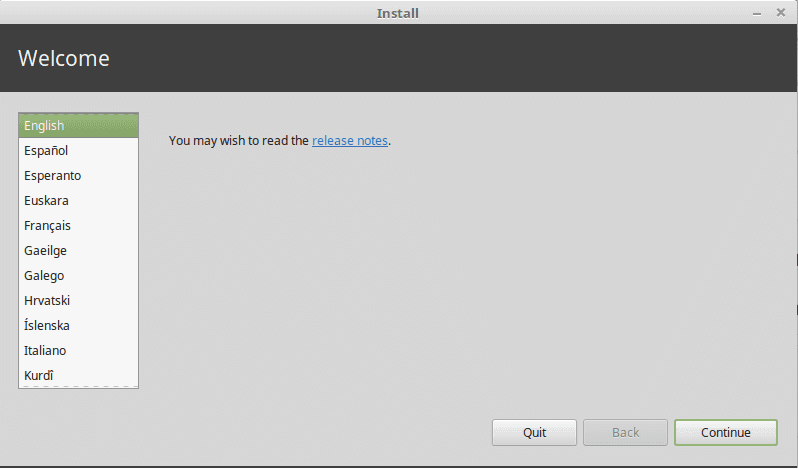
Then choose the language used for installation.
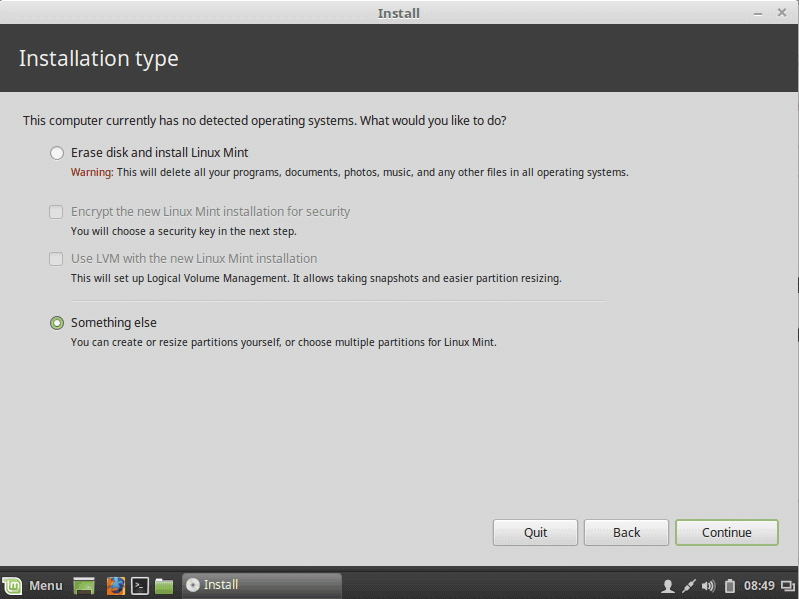
Then choose the installation type, and TAKE CARE if you are installing Linux on a disk that contains other operating systems, you MUST choose the option called something else.
If you are installing it on a new disk, choose the option Erase disk.
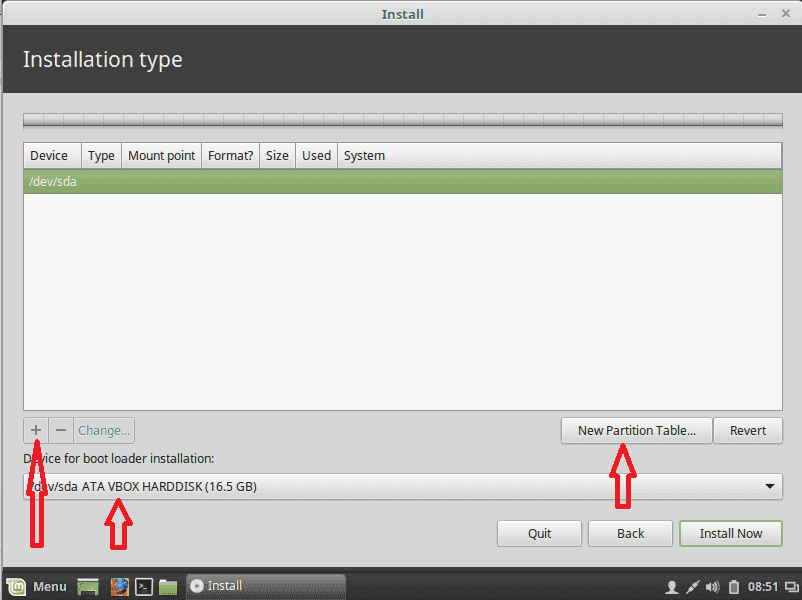
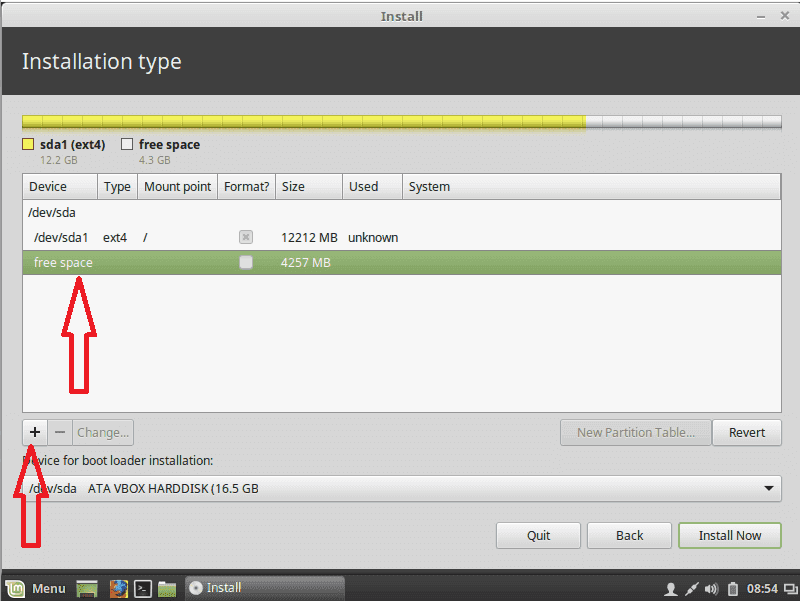
Linux requires 2 partitions to work, the root partition and the swap partition.
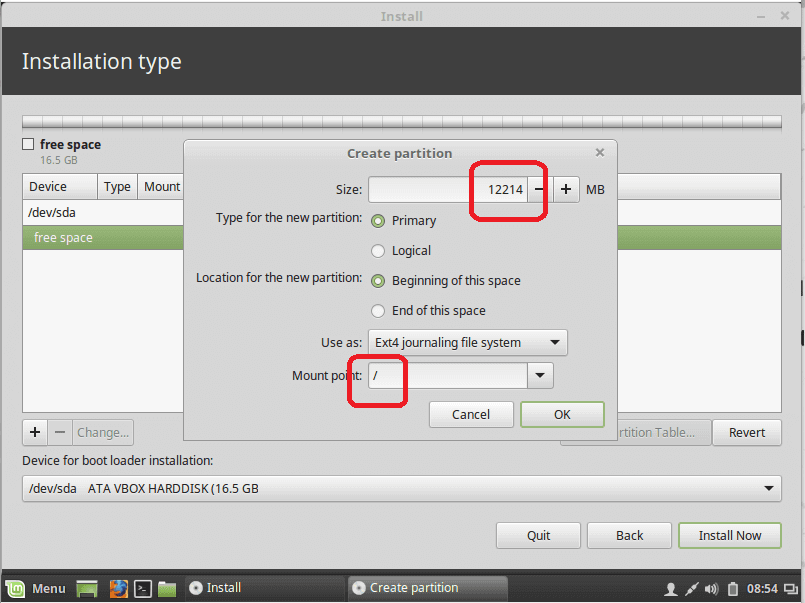
Now we will create them by clicking the plus button and choose about 12 GB or more as you need but not less than that for root partition, and choose mount type as / which stands for root and of course format will be Ext4.
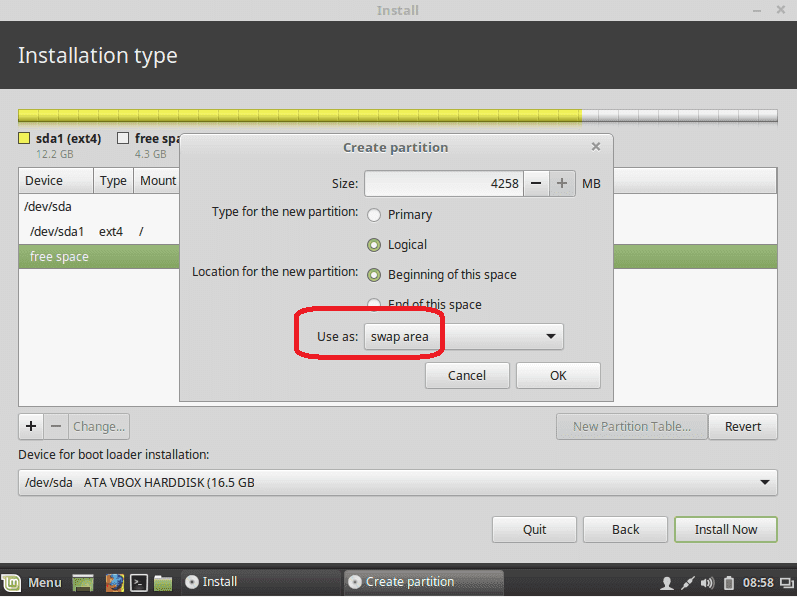
Now we create a swap partition, choose the remaining free space and click the plus button and choose swap area as shown:
Then Create the swap area:
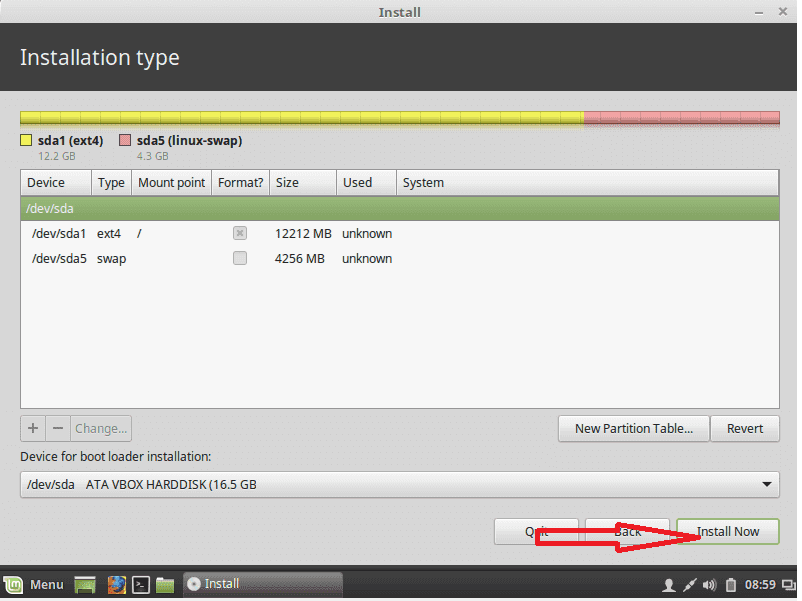
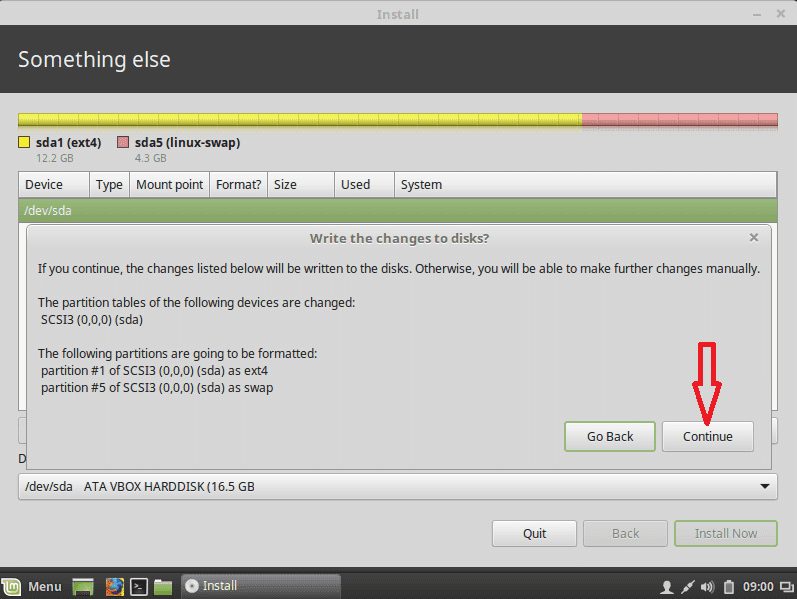
Then click install now and agree about writing changes to disk:
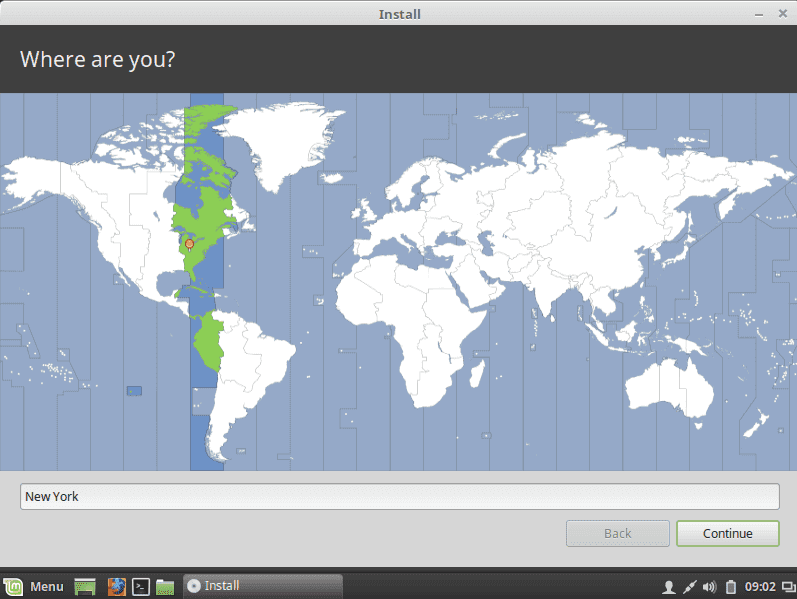
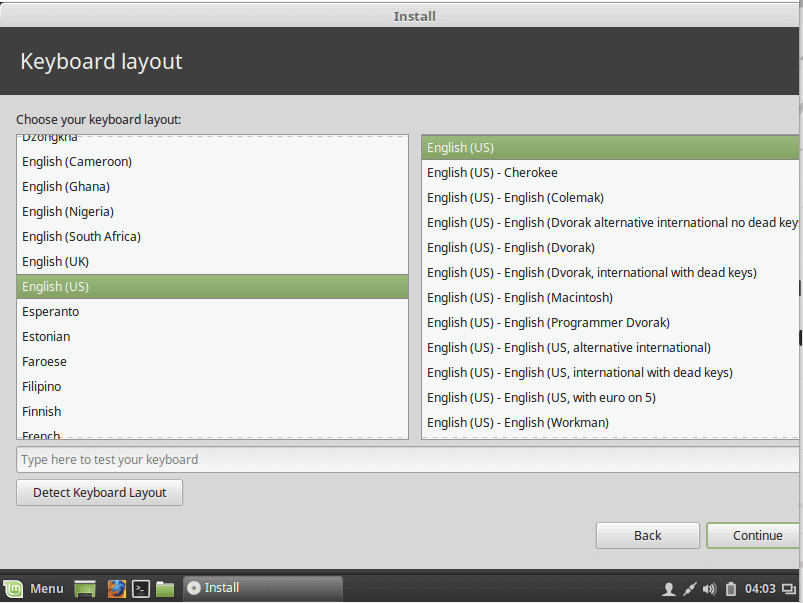
Now you choose the time zone and click continue the choose the language:
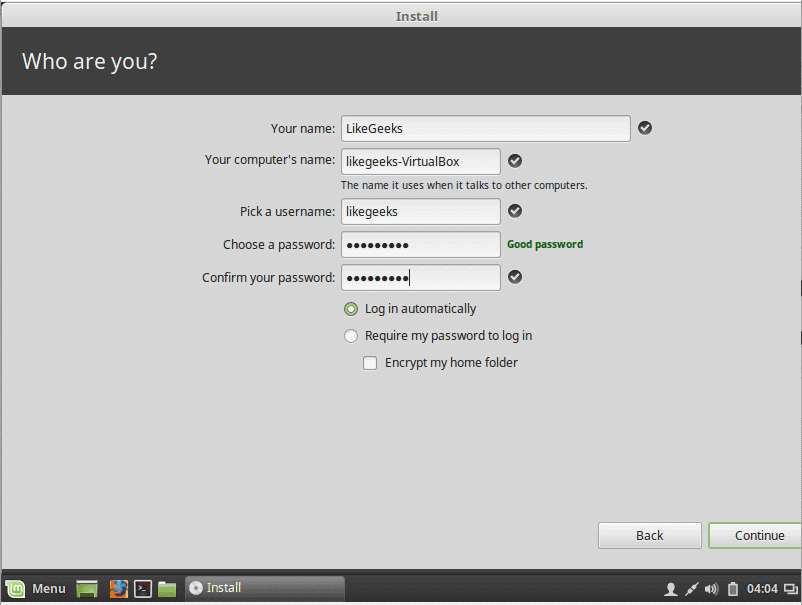
Now you write your username and password and click continue:
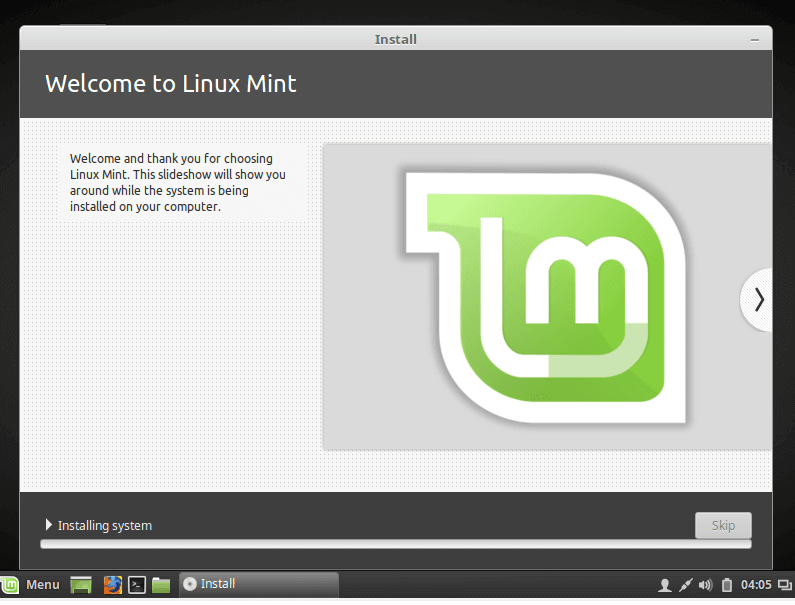
Finally, installation started:
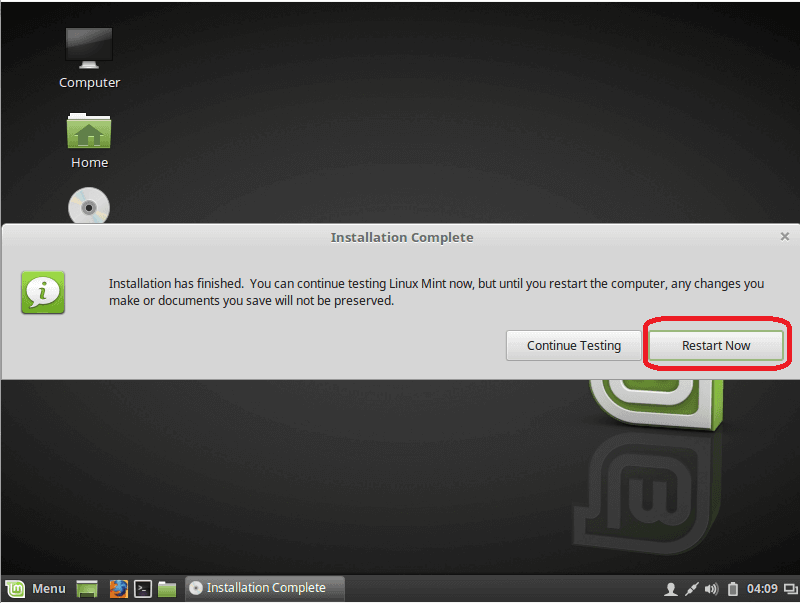
After finishing the installation, it will prompt you to reboot the machine and remove the installation media whether it is a DVD or USB.
And yes, this is how to install Linux on Physical machine.
The second way it to install Linux is to install it on VirtualBox First download VirtualBox from here:
The first way is easy, it like the normal installation process
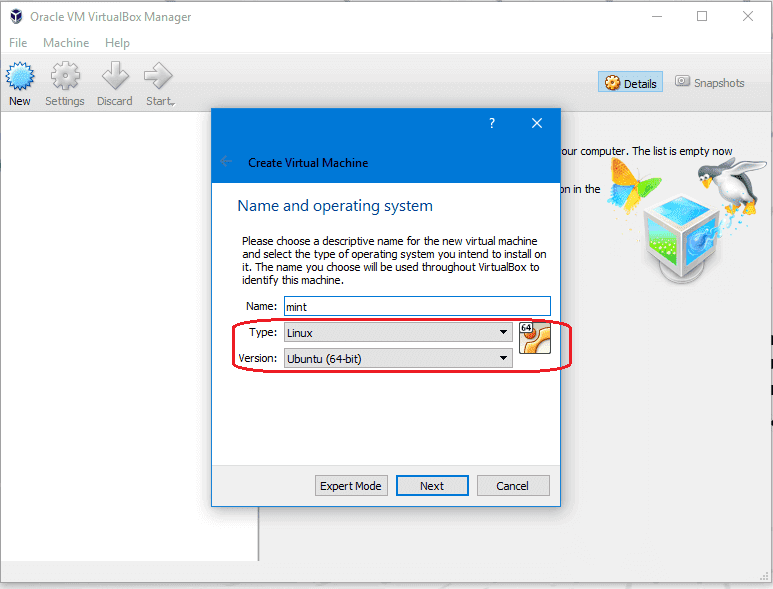
Open VirtualBox and click new and choose Linux and Ubuntu 64:
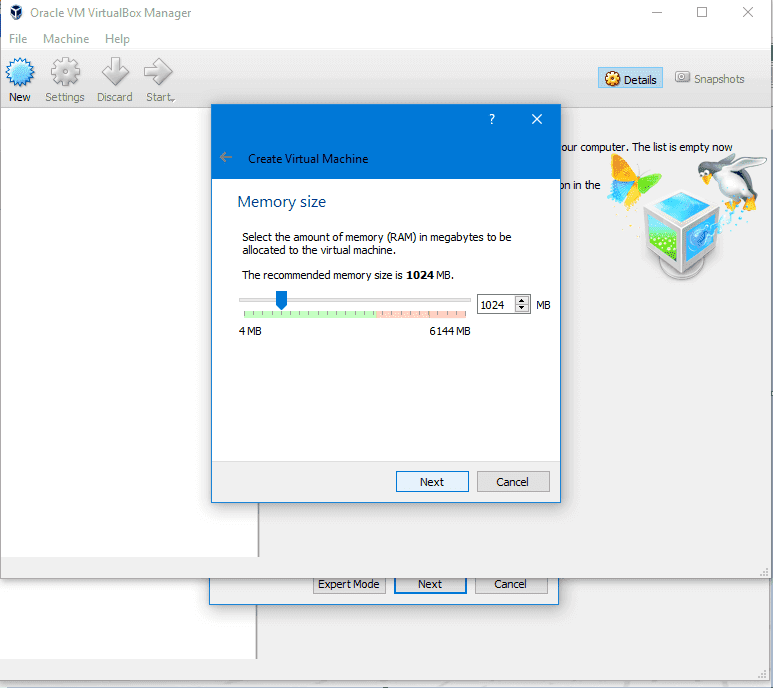
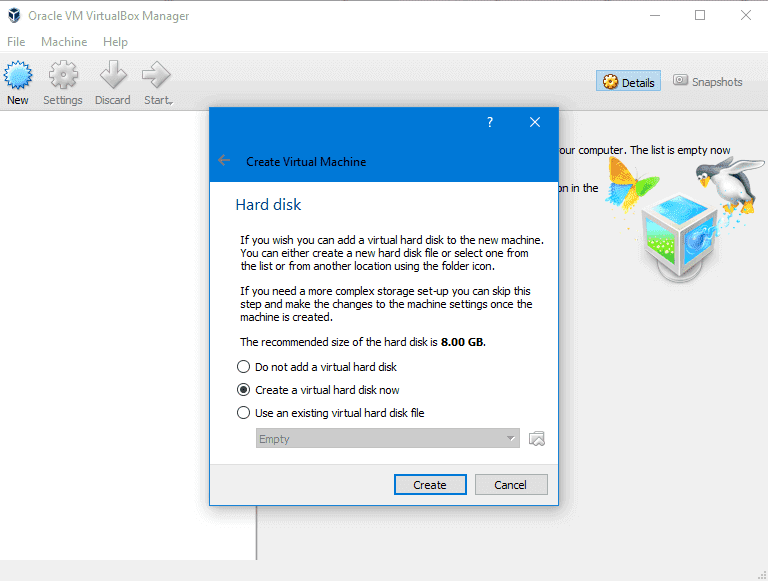
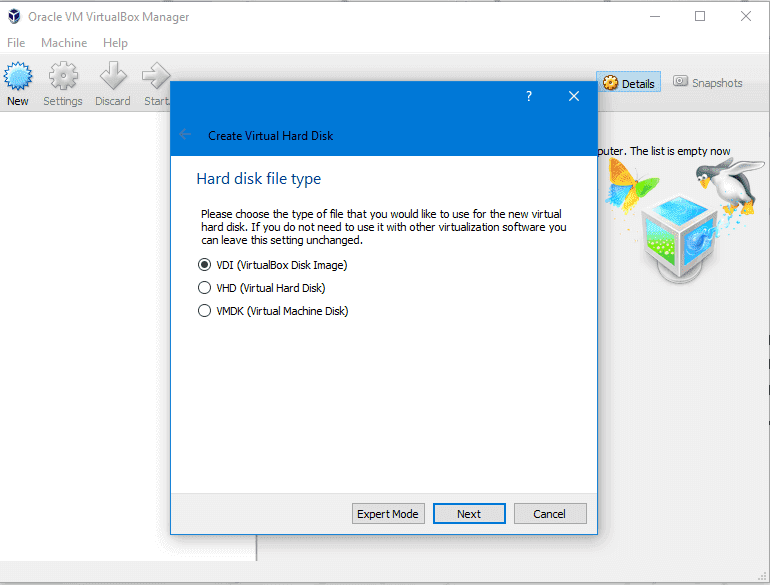
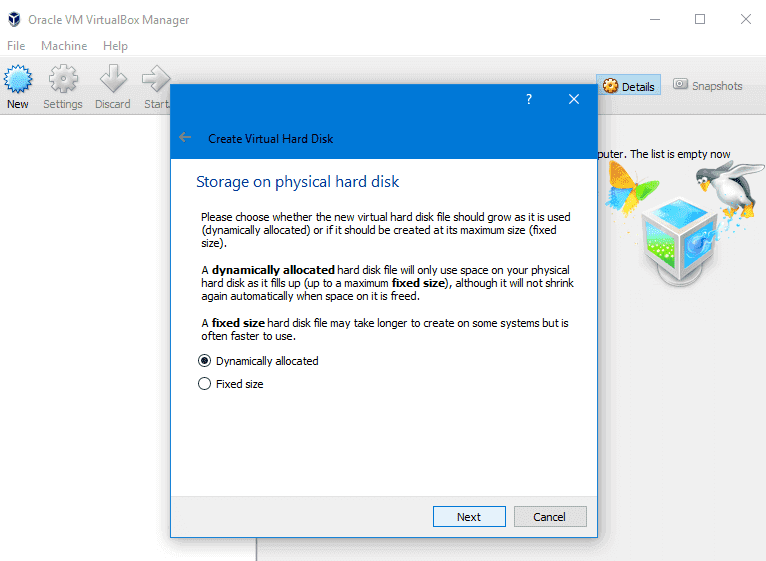
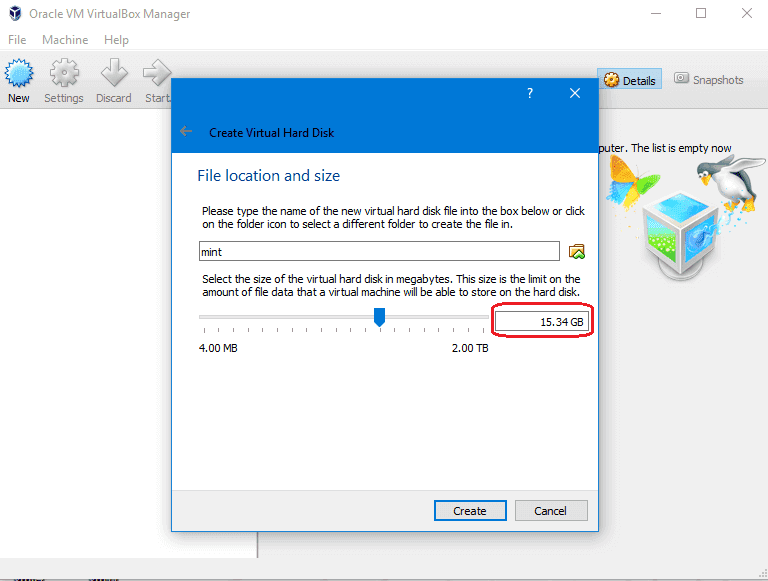
Then choose the RAM required not less than 1 GB and choose the disk file type or leave it as VDI and dynamically allocated and the size not less than 12 GB and hit ok.
Then file location for disk to be used
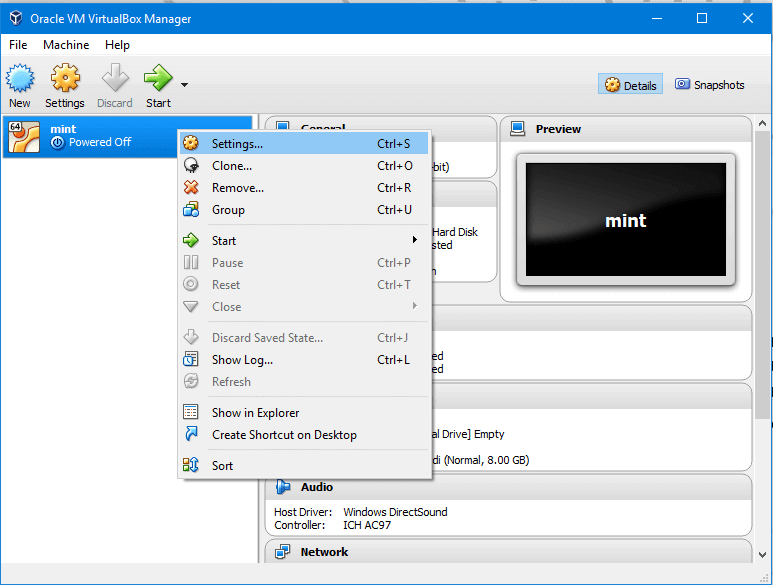
So now the VirtualBox is created, we just need to make it boot from the DVD that we’ve downloaded.
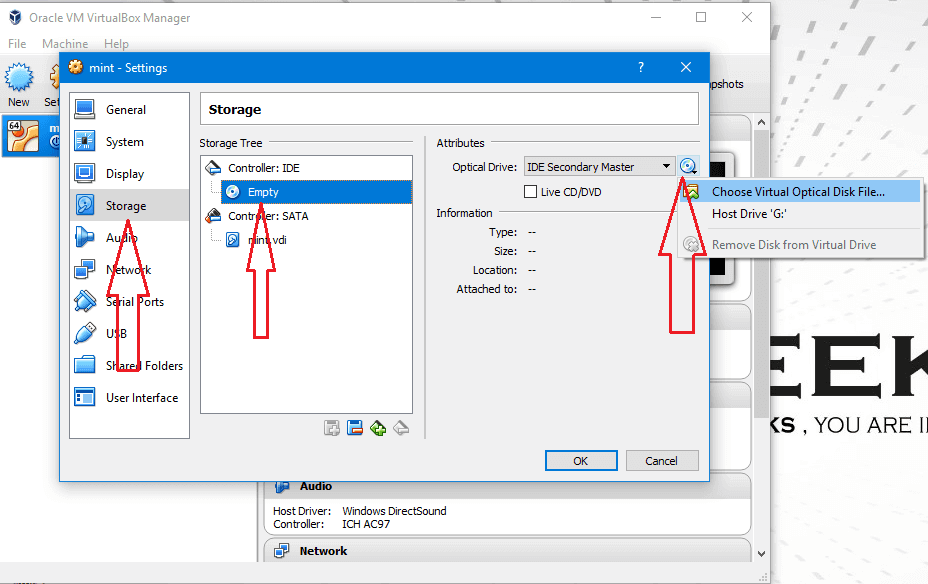
Choose from settings > Storage and choose the ISO image and click OK.
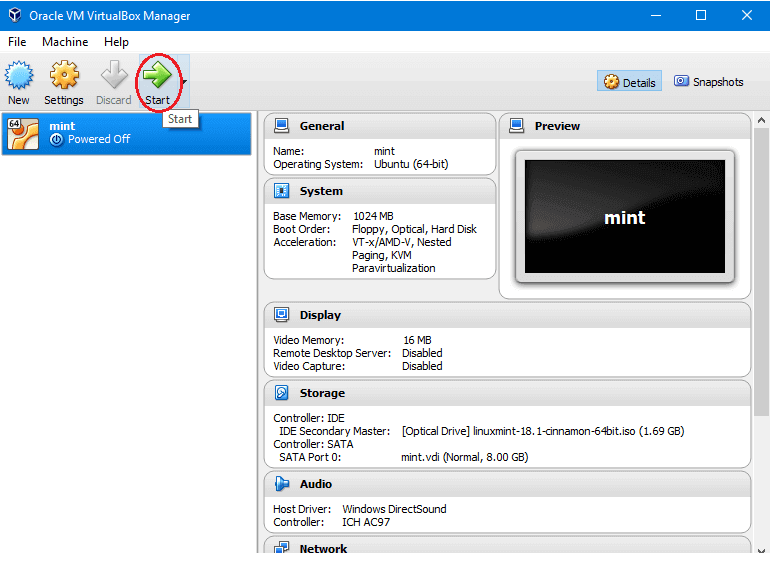
Then choose the iso imageThen Click start
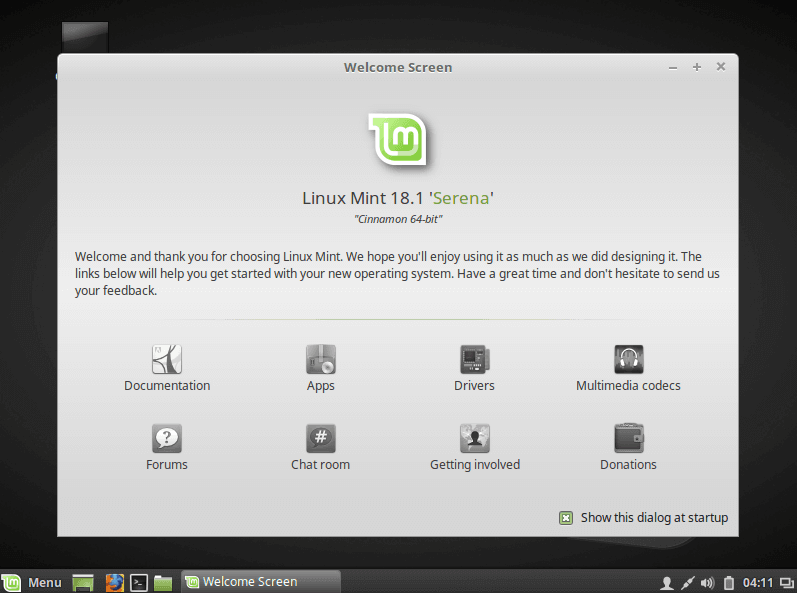
After loading the desktop, click install Linux mint and the rest of the steps are the same as the above mentioned without any change, And this is how to install Linux on a virtual machine.


 Sistem tamiri için tasarlanan Gentoo tabanlı, Fransız kökenli SystemRescueCd‘nin 5.1.2 sürümü duyuruldu. Sistemin kararlı Linux çekirdeği LTS 4.9.60’a dayalı olarak geldiği bildirilirken, UEFI Önyükleme için Grub 2.02 kullanımının tercih edildiği belirtildi. Disk araçları güncellenmiş olarak gelen sistemde, sistem çekirdeği; ext2, ext3, ext4, ReiserFS, Reiser4FS, btrfs, XFS, JFS, VFAT, NTFS, ISO9660 gibi günümüzün en önemli dosya sistemlerinin tümünü ve Samba ve NFS gibi ağ dosya sistemlerini destekliyor. Gentoo tabanlı önyüklenebilir bir CD-ROM veya USB sistem olan SystemRescueCd ile yönetim görevlerini kolaylıkla yürütmek ve sabit disk bölümlerini düzenlemek mümkündür. SystemRescueCd 5.1.2 hakkında ayrıntılı bilgi edinmek için değişiklikler sayfasını inceleyebilirsiniz.

 Ubuntu tabanlı, kullanıcı dostu masaüstü ve
 In the previous post, we discussed












 Beta sürümü
 As we’ve talked about Linux on the previous post and we have chosen the
 After you’ve chosen the