Tag Archives | command

15+ examples for yum update command

Yum is a package manager used on Red Hat, CentOS, and other Linux distributions that use RPM Package Manager. Yum is used to install, update, delete, or otherwise manipulate the packages installed on these Linux systems. In this tutorial, we will cover the yum update command – what it is, how to use it, and all the different commands you may need to know when you wish to upgrade the installed packages on your system. Yum update is the command used to update applications installed on a system. If the command is run without any package names specified, it will update every currently installed package on the system. When running this command, yum will begin by checking its repositories for updated version of the software your system currently has installed. The screenshot below shows the type of output you’ll typically see when first issuing the yum update command.

Continue Reading →

How does yum update work?

Yum update is the command used to update applications installed on a system. If the command is run without any package names specified, it will update every currently installed package on the system.

yum update

When running this command, yum will begin by checking its repositories for updated version of the software your system currently has installed. The screenshot below shows the type of output you’ll typically see when first issuing the yum update command.

yum update command

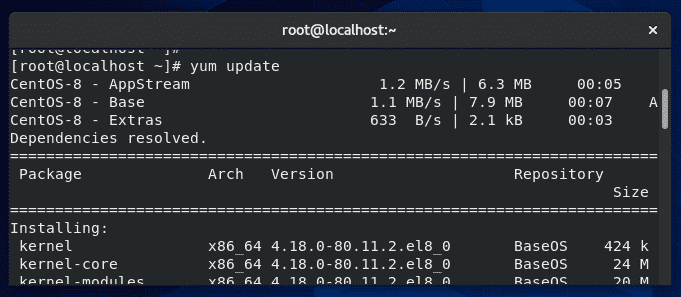
As you can see, the output from yum first lists the repositories it’s querying, which are the default ones for CentOS: AppStream, Base, and Extras. Below that, yum lists the various packages which it has found updates for.

At the tail end of this output, yum will display the “Transaction Summary,” which shows the total number of packages that are to be installed and upgraded.

yum update summary

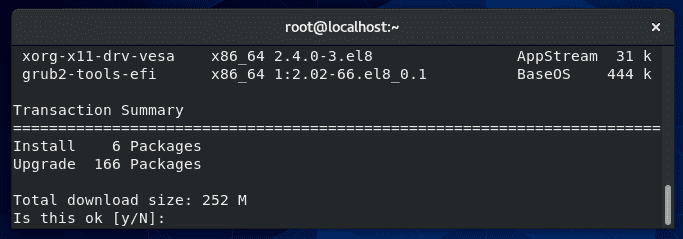
In this example, 166 packages are being upgraded, and 6 new packages are being installed.

In case you’re wondering why new packages are being installed when we are only supposed to be upgrading applications, some new software packages may have become part of this Linux distribution, or some upgraded applications may rely on extra packages that are not yet installed.

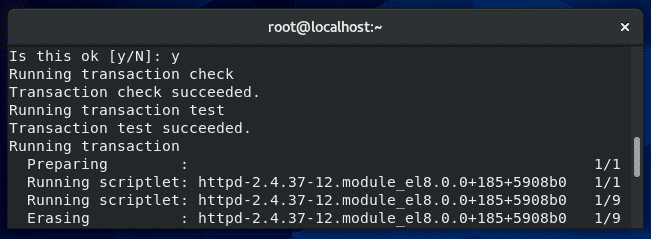
Once you review the list of software that yum plans to upgrade, you can confirm these changes by typing “y” and hitting enter.

Yum will then perform the upgrades, which may take some time depending on the speed of your connection and the system itself.

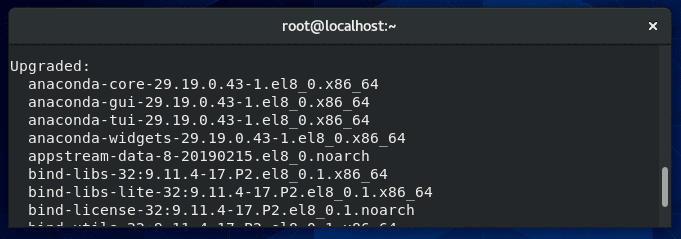
Once it has finished, you’ll get a final summary which will list all the packages that were successfully upgraded, as well as any errors that may have been encountered.

yum update complete

Update without gpg checking

GPG keys are used to verify the authenticity of an RPM package. The –nogpgcheck option in yum will instruct it to skip checking GPG signatures on packages. This is useful in cases where you have an unsigned package or you just don’t have the GPG key.

yum update --nogpgcheck

This is a quick solution if you encounter an error like “Package NameOfPackage.rpm is not signed .. install failed!” when running the normal yum update command. The –nogpgcheck option will ignore this warning and proceed with upgrading the package anyway.

Update from a local repo

It’s possible to set up local repositories for yum to query when it does an update. This is often done if you want to use yum to update packages that aren’t included in the default repos, or if you need to upgrade an offline system.

First, place all your updated RPM files in a new folder. In this example, we’ll use /root/rpms.

Next, navigate to the following directory where you can see all the repo files for yum:

cd /etc/yum.repos.d

Local repo files

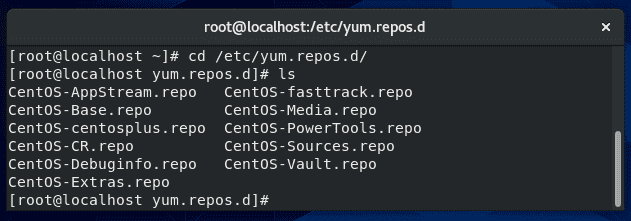
To set up a local repo, create a new file in this directory.

vi MyRepo.repo

Inside your repo file, configure it in this format, changing the lines as necessary:

[MyRepo]

name=My Local Repo

baseurl=file:///root/rpms

enabled=1

gpgcheck=0

The big difference between a local repo and a remote repo is in the “baseurl” line, where the file:// protocol is specifying a local file, as opposed to the remote protocols http:// or ftp://

Once the file has been saved, apply the correct permissions:

chmod 644 MyRepo.repo

The repository should now be ready to use. Be sure clear yum’s cache before attempting a yum update command:

yum clean all

Show patches

Yum can display available security patches, without installing them, with this command:

yum updateinfo list security

List specific patches

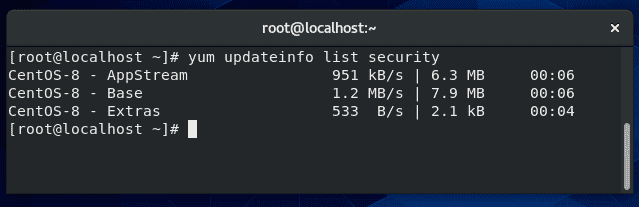
If no output is returned, like in the screenshot above, this means there are no security patches available for any installed software on your system.

Update a single package

If you need to update a certain package without running an update for every application installed, just specify the name of the package in your yum update command.

yum update name-of-package

Multiple packages can be specified, separated by a space. You need to have the name of the package typed perfectly in order for yum to find it in its repositories; if you’re not sure of a package name, first check what packages are currently eligible for updates:

yum check-update

Update all but one package

If you need to run the yum update command but you wish to exclude a package from being updated, you can specify the –exclude option.

A common situation where administrators may find this necessary is with kernel updates, since these are major updates that could cause unpredictable errors on a production server. However, they may still want to run the command to update less sensitive applications.

To exclude a package (in this example, those related to the kernel):

yum update --exclude=kernel*

The asterisk acts as a wildcard, in case there are multiple related packages or you don’t know the full name of the package.

Alternatively:

yum update -x 'kernel*'

Exclude multiple packages

You can exclude multiple packages with more –exclude flags.

yum update --exclude=kernel* --exclude=httpd

Use this flag as in the example above, or the -x flag, as many times as needed.

Check when last yum update ran

To see a list of yum transactions, with the date and time they were ran, use the yum history command.

yum history

Check yum update history

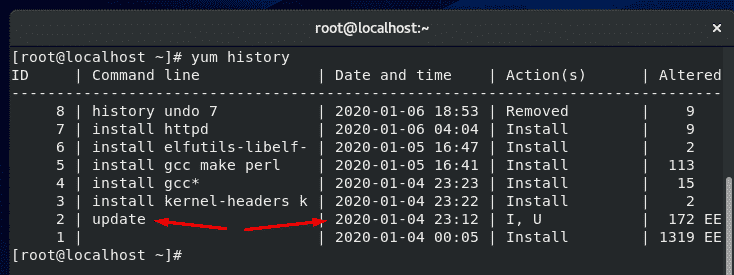
In the screenshot above, you can see that the last time yum updated software was on January 4th.

Rollback (revert) update

A great feature of yum is that it allows you to undo a recent update, thus restoring the upgraded packages to their previous versions.

Each yum action (install, update, erase, etc) is assigned a transaction ID, and this ID must be specified when undoing a yum update. To see a list of transaction IDs for recent yum operations, use this command:

yum history

List yum history

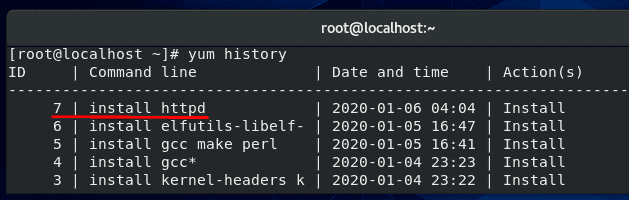
In the screenshot above, you can see the last operation run with yum was to install the httpd package. Undoing an installation or an update works the same way, so in this example, we will undo this recent installation of httpd. As shown in the screenshot, this transaction has an ID of 7.

To undo this change and roll back the program to its previous version, issue this command:

yum history undo 7

Undo yum update

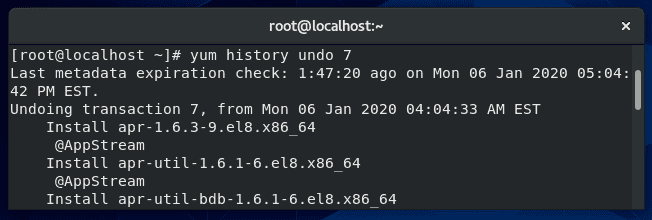
As usual, yum will summarize the changes to be made and ask if you’d like to proceed with a Y/N prompt. Enter Y and the specified transaction will be undone.

yum undo report

Clean up a failed yum update (Troubleshooting)

If one or more packages fail to upgrade successfully when you run the yum update command, the system can end up with duplicate packages installed (2 versions of the same program).

Sometimes, following the rollback instructions in the section above can fix the problem. If that doesn’t work, you can remove duplicate packages on your system with this command:

package-cleanup --dupes

Yum stores a cache of information for packages, metadata, and headers. If you encounter an error, clearing yum’s cache is a good first step in troubleshooting. Use the following command to do that:

yum clean all

yum clean command

Skip errors

When updating or installing a package, that package may require additional software in order to run correctly. Yum is aware of these dependencies and will try to resolve them during updates by installing or upgrading the extra packages that are needed.

If yum has trouble installing the necessary dependencies, it produces an error and doesn’t proceed further. This is a problem if you have other packages that need to be updated.

To instruct yum to proceed with updating other packages and skipping the ones with broken dependencies, you can specify the –skip-broken command in your yum update command.

yum update --skip-broken

Get a list of packages that need an update

Running the yum update command as normal, with no additional options, will output a list of available updates.

yum update

If you’d like to see some additional information about the package updates available, type this command:

yum updateinfo

To see information about security updates that are available for the system, type this command:

yum updateinfo security

Difference between yum check updates and list update

Although the two commands sound similar, so there is a difference between checking for updates and listing updates in yum.

yum list updates

The command to list updates, shown above, will list all the packages in the repositories that have an update available. Keep in mind that some of the packages in the repositories may not even be installed on your system.

yum check-update

The command to check for updates, seen above, is a way to check for updates without prompting for interaction from the user. This is the command you would opt for if you were coding a script to check for updates, for example.

The check-update command will return an exit value of 100 if there are packages that have updates available, and it will return an exit value of 0 if there are no available updates.

A value of 1 is returned if an error is encountered. Use these exit codes to code your script accordingly.

Notify when updates are available

There are a few packages that can help manage yum updates on your system. Some can even notify administrators when yum has updates that are available to be installed. One such service is called yum-cron.

Install yum-cron using yum:

yum install yum-cron

Set the yum-cron service to start at boot:

systemctl enable yum-cron.service

systemctl start yum-cron.service

Configure the settings for yum-cron inside the configuration file using vi or your preferred text editor:

vi /etc/yum/yum-cron.conf

In this file, you can specify if the updates should be automatically applied or not. If you’d only like to receive notifications, fill out the email information inside the configuration file. Yum-cron will then send you an email anytime there are updates available for your system.

apply_updates = no #don’t apply updates automatically

email_from = root@localhost

email_to = admin@example.com

email_host = localhost

What port does yum update use

Yum uses port 80 when checking for updates. If you look inside the repository files on your system, you’ll see that all of the links inside begin with http.

If you need to create a rule in your firewall to allow yum to function, you need to allow port 80.

Yum update vs upgrade

So far, we have only talked about the yum update command in this tutorial, but there’s another very similar command: yum upgrade.

yum upgrade

There is a small difference between these two commands. Yum update will update the packages on your system, but skip removing obsolete packages.

Yum upgrade will also update all the packages on your system, but it will also remove the obsolete packages.

This inherently makes yum update the safer option, since you don’t have to worry about accidentally removing a necessary package when updating your software.

Use some discretion when issuing the yum upgrade command, since it may not preserve some packages that you are still using.

At last, I hope you find the tutorial useful.

keep coming back.

0

Expect command and how to automate shell scripts like magic

In the previous post, we talked about writing practical shell scripts and we saw how it is easy to write a shell script. Today we are going to talk about a tool that does magic to our shell scripts, that tool is the Expect command or Expect scripting language. Expect command or expect scripting language is a language that talks with your interactive programs or scripts that require user interaction. Expect scripting language works by expecting input, then the Expect script will send the response without any user interaction. You can say that this tool is your robot which will automate your scripts.

Continue Reading →

If Expect command if not installed on your system, you can install it using the following command:

$ apt-get install expect

Or on Red Hat based systems like CentOS:

$ yum install expect

Expect Command

Before we talk about expect command, Let’s see some of the expect command which used for interaction:

spawn                  Starting a script or a program.

expect                  Waiting for program output.

send                      Sending a reply to your program.

interact                Allowing you in interact with your program.

  • The spawn command is used to start a script or a program like the shell, FTP, Telnet, SSH, SCP, and so on.
  • The send command is used to send a reply to a script or a program.
  • The Expect command waits for input.
  • The interact command allows you to define a predefined user interaction.

We are going to type a shell script that asks some questions and we will make an Expect script that will answer those questions.

First, the shell script will look like this:

#!/bin/bash

echo "Hello, who are you?"

read $REPLY

echo "Can I ask you some questions?"

read $REPLY

echo "What is your favorite topic?"

read $REPLY

Now we will write the Expect scripts that will answer this automatically:

#!/usr/bin/expect -f

set timeout -1

spawn ./questions

expect "Hello, who are you?\r"

send -- "Im Adam\r"

expect "Can I ask you some questions?\r"

send -- "Sure\r"

expect "What is your favorite topic?\r"

send -- "Technology\r"

expect eof

The first line defines the expect command path which is #!/usr/bin/expect.

On the second line of code, we disable the timeout. Then start our script using spawn command.

We can use spawn to run any program we want or any other interactive script.

The remaining lines are the Expect script that interacts with our shell script.

The last line if the end of file which means the end of the interaction.

Now Showtime, let’s run our answer bot and make sure you make it executable.

$ chmod +x ./answerbot

$./answerbot

expect command

Cool!! All questions are answered as we expect.

If you get errors about the location of Expect command you can get the location using the which command:

$ which expect

We did not interact with our script at all, the Expect program do the job for us.

The above method can be applied to any interactive script or program.Although the above Expect script is very easy to write, maybe the Expect script little tricky for some people, well you have it.

Using autoexpect

To build an expect script automatically, you can the use autoexpect command.

autoexpect works like expect, but it builds the automation script for you. The script you want to automate is passed to autoexpect as a parameter and you answer the questions and your answers are saved in a file.

$ autoexpect ./questions

autoexpect command

A file is generated called script.exp contains the same code as we did above with some additions that we will leave it for now.

autoexpect script

If you run the auto generated file script.exp, you will see the same answers as expected:

autoexpect script execution

Awesome!! That super easy.

There are many commands that produce changeable output, like the case of FTP programs, the expect script may fail or stuck. To solve this problem, you can use wildcards for the changeable data to make your script more flexible.

Working with Variables

The set command is used to define variables in Expect scripts like this:

set MYVAR 5

To access the variable, precede it with $ like this $VAR1

To define command line arguments in Expect scripts, we use the following syntax:

set MYVAR [lindex $argv 0]

Here we define a variable MYVAR which equals the first passed argument.

You can get the first and the second arguments and store them in variables like this:

set my_name [lindex $argv 0]

set my_favorite [lindex $argv 1]

Let’s add variables to our script:

#!/usr/bin/expect -f

set my_name [lindex $argv 0]

set my_favorite [lindex $argv 1]

set timeout -1

spawn ./questions

expect "Hello, who are you?\r"

send -- "Im $my_name\r"

expect "Can I ask you some questions?\r"

send -- "Sure\r"

expect "What is your favorite topic?\r"

send -- "$my_favorite\r"

expect eof

Now try to run the Expect script with some parameters to see the output:

$ ./answerbot SomeName Programming

expect command variables

Awesome!! Now our automated Expect script is more dynamic.

Conditional Tests

You can write conditional tests using braces like this:

expect {

"something" { send -- "send this\r" }

"*another" { send -- "send another\r" }

}

We are going to change our script to return different conditions, and we will change our Expect script to handle those conditions.

We are going to emulate different expects with the following script:

#!/bin/bash

let number=$RANDOM

if [ $number -gt 25000 ]; then

echo "What is your favorite topic?"

else

echo "What is your favorite movie?"

fi

read $REPLY

A random number is generated every time you run the script and based on that number, we put a condition to return different expects.

Let’s make out Expect script that will deal with that.

#!/usr/bin/expect -f

set timeout -1

spawn ./questions

expect {

"*topic?" { send -- "Programming\r" }

"*movie?" { send -- "Star wars\r" }

}

expect eof

expect command conditions

Very clear. If the script hits the topic output, the Expect script will send programming and if the script hits movie output the expect script will send star wars. Isn’t cool?

If else Conditions

You can use if/else clauses in expect scripts like this:

#!/usr/bin/expect -f

set NUM 1

if { $NUM < 5 } {

puts "\Smaller than 5\n"

} elseif { $NUM > 5 } {

puts "\Bigger than 5\n"

} else {

puts "\Equals 5\n"

}

if command

Note: The opening brace must be on the same line.

While Loops

While loops in expect language must use braces to contain the expression like this:

#!/usr/bin/expect -f

set NUM 0

while { $NUM <= 5 } {

puts "\nNumber is $NUM"

set NUM [ expr $NUM + 1 ]

}

puts ""

while loop

For Loops

To make a for loop in expect, three fields must be specified, like the following format:

#!/usr/bin/expect -f

for {set NUM 0} {$NUM <= 5} {incr NUM} {

puts "\nNUM = $NUM"

}

puts ""

for loop

User-defined Functions

You can define a function using proc like this:

proc myfunc { TOTAL } {

set TOTAL [expr $TOTAL + 1]

return "$TOTAL"

}

And you can use them after that.

#!/usr/bin/expect -f

proc myfunc { TOTAL } {

set TOTAL [expr $TOTAL + 1]

return "$TOTAL"

}

set NUM 0

while {$NUM <= 5} {

puts "\nNumber $NUM"

set NUM [myfunc $NUM]

}

puts ""

user-defined functions

Interact Command

Sometimes your Expect script contains some sensitive information that you don’t want to share with other users who use your Expect scripts, like passwords or any other data, so you want your script to take this password from you and continuing automation normally.

The interact command reverts the control back to the keyboard.

When this command is executed, Expect will start reading from the keyboard.

This shell script will ask about the password as shown:

#!/bin/bash

echo "Hello, who are you?"

read $REPLY

echo "What is you password?"

read $REPLY

echo "What is your favorite topic?"

read $REPLY

Now we will write the Expect script that will prompt for the password:

#!/usr/bin/expect -f

set timeout -1

spawn ./questions

expect "Hello, who are you?\r"

send -- "Hi Im Adam\r"

expect "*password?\r"

interact ++ return

send "\r"

expect "*topic?\r"

send -- "Technology\r"

expect eof

interact command

After you type your password type ++ and the control will return back from the keyboard to the script.

Expect language is ported to many languages like C#, Java, Perl, Python, Ruby and Shell with almost the same concepts and syntax due to its simplicity and importance.

Expect scripting language is used in quality assurance, network measurements such as echo response time, automate file transfers, updates, and many other uses.

I hope you now supercharged with some of the most important aspects of Expect command, autoexpect command and how to use it to automate your tasks in a smarter way.

Thank you.

0

How to write practical shell scripts

In the last post, we talked about regular expressions and we saw how to use them in sed and awk for text processing, and we discussed before Linux sed command and awk command. During the series, we wrote small shell scripts, but we didn’t mix things up, I think we should take a small step further and write a useful shell script. However, the scripts in this post will help you to empower your scriptwriting skills. You can send messages to someone by phone or email, but one method, not commonly used anymore, is sending a message directly to the user’s terminal. We are going to build a bash script that will send a message to a user who is logged into the Linux system. For this simple shell script, only a few functions are required. Most of the required commands are common and have been covered in our series of shell scripting; you can review the previous posts.

Continue Reading →

Sending Messages

First, we need to know who is logged in. This can be done using the who command which retrieves all logged in users.

who

shell scripts who command

To send a message you need the username and his current terminal.

You need to know if messages are allowed or not for that user using the mesg command.

mesg

mesg command

If the result shows “is y” that means messaging is permitted. If the result shows “is n”, that means messaging is not permitted.

To check any logged user message status, use the who command with -T option.

who -T

If you see a dash (-) that means messages are turned off and if you see plus sign (+) that means messages are enabled.

To allow messages, type mesg command with the “y” option like this

mesg y

allow messages

Sure enough, it shows “is y” which means messages are permitted for this user.

Of course, we need another user to be able to communicate with him so in my case I’m going to connect to my PC using SSH and I’m already logged in with my user, so we have two users logged onto the system.

Let’s see how to send a message.

Write Command

The write command is used to send messages between users using the username and current terminal.

For those users who logged into the graphical environment (KDE, Gnome, Cinnamon or any), they can’t receive messages. The user must be logged onto the terminal

We will send a message to testuser user from my user likegeeks like this:

write testuser pts/1

write command

Type the write command followed by the user and the terminal and hit Enter.

When you hit Enter, you can start typing your message. After finishing the message, you can send the message by pressing the Ctrl+D key combination which is the end of file signal. I recommend you to review the post about signals and jobs.

Receive message

The receiver can recognize which user on which terminal sends the message. EOF means that the message is finished.

I think now we have all the parts to build our shell script.

Creating The Send Script

Before we create our shell script, we need to determine whether the user we want to send a message to him is currently logged on the system, this can be done using the who command to determine that.

logged=$(who | awk -v IGNORECASE=1 -v usr=$1 '{ if ($1==usr) { print $1 }exit }')

We get the logged in users using the who command and pipe it to awk and check if it is matching the entered user.

The final output from the awk command is stored in the variable logged.

Then we need to check the variable if it contains something or not:

if [ -z $logged ]; then

echo "$1 is not logged on."

echo "Exit"

exit

fi

I recommend you to read the post about the if statement and how to use it Bash Script.

Check logged user

The logged variable is tested to check if it is a zero or not.

If it is zero, the script prints the message, and the script is terminated.

If the user is logged, the logged variable contains the username.

Checking If The User Accepts Messages

To check if messages are allowed or not, use the who command with -T option.

check=$(who -T | grep -i -m 1 $1 | awk '{print $2}')

if [ "$check" != "+" ]; then

echo "$1 disable messaging."

echo "Exit"

exit

fi

Check message allowed

Notice that we use the who command with -T. This shows a (+) beside the username if messaging is permitted. Otherwise, it shows a (-) beside the username, if messaging is not permitted.

Finally, we check for a messaging indicator if the indicator is not set to plus sign (+).

Checking If Message Was Included

You can check if the message was included or not like this:

if [ -z $2 ]; then

echo "Message not found"

echo "Exit"

exit

fi

Getting the Current Terminal

Before we send a message, we need to get the user current terminal and store it in a variable.

terminal=$(who | grep -i -m 1 $1 | awk '{print $2}')

Then we can send the message:

echo $2 | write $logged $terminal

Now we can test the whole shell script to see how it goes:

$ ./senderscript likegeeks welcome

Let’s see the other shell window:

Send message

Good!  You can now send simple one-word messages.

Sending a Long Message

If you try to send more than one word:

$ ./senderscript likegeeks welcome to shell scripting

One word message

It didn’t work. Only the first word of the message is sent.

To fix this problem, we will use the shift command with the while loop.

shift

while [ -n "$1" ]; do

message=$message' '$1

shift

done

And now one thing needs to be fixed, which is the message parameter.

echo $whole_message | write $logged $terminal

So now the whole script should be like this:

If you try now:

$ ./senderscript likegeeks welcome to shell scripting

Complete message

Awesome!! It worked. Again, I’m not here to make a script to send the message to the user, but the main goal is to review our shell scripting knowledge and use all the parts we’ve learned together and see how things work together.

Monitoring Disk Space

Let’s build a script that monitors the biggest top ten directories.

If you add -s option to the du command, it will show summarized totals.

$ du -s /var/log/

The -S option is used to show the subdirectories totals.

$ du -S /var/log/

du command

You should use the sort command to sort the results generated by the du command to get the largest directories like this:

$ du -S /var/log/ | sort -rn

sort command

The -n to sort numerically and the -r option to reverse the order so it shows the bigger first.

The N command is used to label each line with a number:

sed '{11,$D; =}' |

sed 'N; s/\n/ /' |

Then we can clean the output using the awk command:

awk '{printf $1 ":" "\t" $2 "\t" $3 "\n"}'

Then we add a colon and a tab so it appears much better.

$ du -S /var/log/ |

sort -rn |

sed '{11,$D; =}' |

# pipe the first result for another one to clean it

sed 'N; s/\n/ /' |

# formated printing using printf

awk '{printf $1 ":" "\t" $2 "\t" $3 "\n"}'

Format output with sed and awk

Suppose we have a variable called  MY_DIRECTORIES that holds 2 folders.

MY_DIRECTORIES=”/home /var/log”

We will iterate over each directory from MY_DIRECTORIES variable and get the disk usage using du command.

So the shell script will look like this:

Monitor disk usage

Good!! Both directories /home and /var/log are shown on the same report.

You can filter files, so instead of calculating the consumption of all files, you can calculate the consumption for a specific extension like *.log or whatever.

One thing I have to mention here, in production systems, you can’t rely on disk space report instead, you should use disk quotas.

Quota package is specialized for that, but here we are learning how bash scripts work.

Again the shell scripts we’ve introduced here is for showing you how shell scripting work, there are a ton of ways to implement any task in Linux.

My post is finished! I tried to reduce the post length and make everything as simple as possible, hope you like it.

Keep coming back. Thank you.

0

Regex tutorial for Linux (Sed & AWK) examples

In order to successfully work with the Linux sed editor and the awk command in your shell scripts, you have to understand regular expressions or in short regex. Since there are many engines for regex, we will use the shell regex and see the bash power in working with regex. First, we need to understand what regex is, then we will see how to use it. For some people, when they see the regular expressions for the first time they said what are these ASCII pukes !! Well, A regular expression or regex, in general, is a pattern of text you define that a Linux program like sed or awk uses it to filter text. We saw some of those patterns when introducing basic Linux commands and saw how the ls command uses wildcard characters to filter output.

Continue Reading →

Types of regex

There are many different applications use different types of regex in Linux, like the regex included in programming languages (Java, Perl, Python,,,) and Linux programs like (sed, awk, grep,) and many other applications.

A regex pattern uses a regular expression engine which translates those patterns.

Linux has two regular expression engines:

  • The Basic Regular Expression (BRE) engine.
  • The Extended Regular Expression (ERE) engine.

Most Linux programs work well with BRE engine specifications, but some tools like sed understand some of the BRE engine rules.

The POSIX ERE engine is shipped with some programming languages. It provides more patterns like matching digits, and words. The awk command uses the ERE engine to process its regular expression patterns.

Since there are many regex implementations, it’s difficult to write patterns that work on all engines. Hence, we will focus on the most commonly found regex and demonstrate how to use it in the sed and awk.

Define BRE Patterns

You can define a pattern to match text like this:

echo "Testing regex using sed" | sed -n '/regex/p'

echo "Testing regex using awk" | awk '/regex/{print $0}'

Linux regex tutorial

You may notice that the regex doesn’t care where the pattern occurs or how many times in the data stream.

The first rule to know is that regular expression patterns are case sensitive.

echo "Welcome to LikeGeeks" | awk '/Geeks/{print $0}'

echo "Welcome to Likegeeks" | awk '/Geeks/{print $0}'

regex character case

The first regex succeeds because the word “Geeks” exists in the upper case, while the second line fails because it uses small letters.

You can use spaces or numbers in your pattern like this:

echo "Testing regex 2 again" | awk '/regex 2/{print $0}'

space character

Special Characters

regex patterns use some special characters. And you can’t include them in your patterns and if you do so, you won’t get the expected result.

These special characters are recognized by regex:

.*[]^${}\+?|()

You need to escape these special characters using the backslash character (\).

For example, if you want to match a dollar sign ($), escape it with a backslash character like this:

cat myfile

There is 10$ on my pocket

awk '/\$/{print $0}' myfile

dollar sign

If you need to match the backslash (\) itself, you need to escape it like this:

echo "\ is a special character" | awk '/\\/{print $0}'

special character

Despite the forward slash isn’t a special character, you still get an error if you use it directly.

echo "3 / 2" | awk '///{print $0}'

regex slash

So you need to escape it like this:

echo "3 / 2" | awk '/\//{print $0}'

escape slash

Anchor Characters

To locate the beginning of a line in a text, use the caret character (^).

You can use it like this:

echo "welcome to likegeeks website" | awk '/^likegeeks/{print $0}'

echo "likegeeks website" | awk '/^likegeeks/{print $0}'

anchor begin character

The caret character (^) matches the start of text:

awk '/^this/{print $0}' myfile

caret anchor

What if you use it in the middle of the text?

echo "This ^ caret is printed as it is" | sed -n '/s ^/p'

caret character

It’s printed as it is like a normal character.

When using awk, you have to escape it like this:

echo "This ^ is a test" | awk '/s \^/{print $0}'

escape caret

This is about looking at the beginning of the text, what about looking at the end?

The dollar sign ($) checks for the end a line:

echo "Testing regex again" | awk '/again$/{print $0}'

end anchor

You can use both the caret and dollar sign on the same line like this:

cat myfile
this is a test
This is another test
And this is one more

awk '/^this is a test$/{print $0}' myfile

combine anchors

As you can see, it prints only the line that has the matching pattern only.

You can filter blank lines with the following pattern:

awk '!/^$/{print $0}' myfile

Here we introduce the negation which is done by the exclamation mark !

The pattern searches for empty lines where nothing between the beginning and the end of the line and negates that to print only the lines have text.

The dot Character

The dot character is used to match any character except newline (\n).

Look at the following example to get the idea:

cat myfile
this is a test
This is another test
And this is one more
start with this

awk '/.st/{print $0}' myfile

dot character

You can see from the result that it prints only the first two lines because they contain the st pattern while the third line does not have that pattern and fourth line start with st so that also doesn’t match our pattern.

Character Classes

You can match any character with the dot special character, but what if you match a set of characters only, you can use a character class.

The character class matches a set of characters if any of them found, the pattern matches.

The chracter classis defined using square brackets [] like this:

awk '/[oi]th/{print $0}' myfile

character classes

Here we search for any th characters that have o character or i before it.

This comes handy when you are searching for words that may contain upper or lower case and you are not sure about that.

echo "testing regex" | awk '/[Tt]esting regex/{print $0}'

echo "Testing regex" | awk '/[Tt]esting regex/{print $0}'

upper and lower case

Of course, it is not limited to characters; you can use numbers or whatever you want. You can employ it as you want as long as you got the idea.

Negating Character Classes

What about searching for a character that is not in the character class?

To achieve that, precede the character class range with a caret like this:

awk '/[^oi]th/{print $0}' myfile

negate character classes

So anything is acceptable except o and i.

Using Ranges

To specify a range of characters, you can use the (-) symbol like this:

awk '/[e-p]st/{print $0}' myfile

regex ranges

This matches all characters between e and p then followed by st as shown.

You can also use ranges for numbers:

echo "123" | awk '/[0-9][0-9][0-9]/'

echo "12a" | awk '/[0-9][0-9][0-9]/'

number range

You can use multiple and separated ranges like this:

awk '/[a-fm-z]st/{print $0}' myfile

non-continuous range

The pattern here means from a to f, and m to z must appear before the st text.

echo "abc" | awk '/[[:alpha:]]/{print $0}'

echo "abc" | awk '/[[:digit:]]/{print $0}'

echo "abc123" | awk '/[[:digit:]]/{print $0}'

special character classes

The Asterisk

The asterisk means that the character must exist zero or more times.

echo "test" | awk '/tes*t/{print $0}'

echo "tessst" | awk '/tes*t/{print $0}'

asterisk

This pattern symbol is useful for checking misspelling or language variations.

echo "I like green color" | awk '/colou*r/{print $0}'

echo "I like green colour " | awk '/colou*r/{print $0}'

asterisk example

Here in these examples whether you type it color or colour it will match, because the asterisk means if the “u” character existed many times or zero time that will match.

To match any number of any character, you can use the dot with the asterisk like this:

awk '/this.*test/{print $0}' myfile

asterisk with dot

It doesn’t matter how many words between the words “this” and “test”, any line matches, will be printed.

You can use the asterisk character with the character class.

echo "st" | awk '/s[ae]*t/{print $0}'

echo "sat" | awk '/s[ae]*t/{print $0}'

echo "set" | awk '/s[ae]*t/{print $0}'

asterisk with character classes

All three examples match because the asterisk means if you find zero times or more any “a” character or “e” print it.

Extended Regular Expressions

The following are some of the patterns that belong to Posix ERE:

The question mark

The question mark means the previous character can exist once or none.

echo "tet" | awk '/tes?t/{print $0}'

echo "test" | awk '/tes?t/{print $0}'

echo "tesst" | awk '/tes?t/{print $0}'

question mark

The question mark can be used in combination with a character class:

echo "tst" | awk '/t[ae]?st/{print $0}'

echo "test" | awk '/t[ae]?st/{print $0}'

echo "tast" | awk '/t[ae]?st/{print $0}'

echo "taest" | awk '/t[ae]?st/{print $0}'

echo "teest" | awk '/t[ae]?st/{print $0}'

question mark with character classes

If any of the character class items exists, the pattern matching passes. Otherwise, the pattern will fail.

The Plus Sign

The plus sign means that the character before the plus sign should exist one or more times, but must exist once at least.

echo "test" | awk '/te+st/{print $0}'

echo "teest" | awk '/te+st/{print $0}'

echo "tst" | awk '/te+st/{print $0}'

plus sign

If the “e” character not found, it fails.

You can use it with character classes like this:

echo "tst" | awk '/t[ae]+st/{print $0}'

echo "test" | awk '/t[ae]+st/{print $0}'

echo "teast" | awk '/t[ae]+st/{print $0}'

echo "teeast" | awk '/t[ae]+st/{print $0}'

plus sign with character classes

if any character from the character class exists, it succeeds.

Curly Braces

Curly braces enable you to specify the number of existence for a pattern, it has two formats:

n: The regex appears exactly n times.

n,m: The regex appears at least n times, but no more than m times.

echo "tst" | awk '/te{1}st/{print $0}'

echo "test" | awk '/te{1}st/{print $0}'

curly braces

In old versions of awk, you should use –re-interval option for the awk command to make it read curly braces, but in newer versions you don’t need it.

echo "tst" | awk '/te{1,2}st/{print $0}'

echo "test" | awk '/te{1,2}st/{print $0}'

echo "teest" | awk '/te{1,2}st/{print $0}'

echo "teeest" | awk '/te{1,2}st/{print $0}'

curly braces interval pattern

In this example, if the “e” character exists one or two times, it succeeds; otherwise, it fails.

You can use it with character classes like this:

echo "tst" | awk '/t[ae]{1,2}st/{print $0}'

echo "test" | awk '/t[ae]{1,2}st/{print $0}'

echo "teest" | awk '/t[ae]{1,2}st/{print $0}'

echo "teeast" | awk '/t[ae]{1,2}st/{print $0}'

interval pattern with character classes

If there are one or two instances of the letter “a” or “e” the pattern passes, otherwise, it fails.

Pipe Symbol

The pipe symbol makes a logical OR between 2 patterns. If one of the patterns exists, it succeeds, otherwise, it fails, here is an example:

echo "Testing regex" | awk '/regex|regular expressions/{print $0}'

echo "Testing regular expressions" | awk '/regex|regular expressions/{print $0}'

echo "This is something else" | awk '/regex|regular expressions/{print $0}'

pipe symbol

Don’t type any spaces between the pattern and the pipe symbol.

Grouping Expressions

You can group expressions so the regex engines will consider them one piece.

echo "Like" | awk '/Like(Geeks)?/{print $0}'

echo "LikeGeeks" | awk '/Like(Geeks)?/{print $0}'

grouping expressions

The grouping of the “Geeks” makes the regex engine treats it as one piece, so if “LikeGeeks” or the word “Like” exist, it succeeds.

Practical examples

We saw some simple demonstrations of using regular expression patterns, it’s time to put that in action, just for practicing.

Counting Directory Files

Let’s look at a bash script that counts the executable files in a folder from the PATH environment variable.

echo $PATH

To get a directory listing, you must replace each colon with space.

echo $PATH | sed 's/:/ /g'

Now let’s iterate through each directory using the for loop like this:

mypath=$(echo $PATH | sed 's/:/ /g')

for directory in $mypath; do

done

Great!!

You can get the files on each directory using the ls command and save it in a variable.

You may notice some directories doesn’t exist, no problem with this its OK.

count files

Cool!! This is the power of regex. These few lines of code count all files in all directories. Of course, there is a Linux command to do that very easy, but here we discuss how to employ regex on something you can use. You can come up with some more useful ideas.

Validating E-mail Address

There are a ton of websites that offer ready to use regex patterns for everything including e-mail, phone number, and much more, this is handy but we want to understand how it works.

username@hostname.com

The username can use any alphanumeric characters combined with dot, dash, plus sign, underscore.

The hostname can use any alphanumeric characters combined with a dot and underscore.

For the username, the following pattern fits all usernames:

^([a-zA-Z0-9_\-\.\+]+)@

The plus sign means one character or more must exist followed by the @ sign.

Then the hostname pattern should be like this:

([a-zA-Z0-9_\-\.]+)

There are special rules for the TLDs or Top-level domains, and they must be not less than 2 and five characters maximum. The following is the regex pattern for the top-level domain.

\.([a-zA-Z]{2,5})$

Now we put them all together:

^([a-zA-Z0-9_\-\.\+]+)@([a-zA-Z0-9_\-\.]+)\.([a-zA-Z]{2,5})$

Let’s test that regex against an email:

echo "name@host.com" | awk '/^([a-zA-Z0-9_\-\.\+]+)@([a-zA-Z0-9_\-\.]+)\.([a-zA-Z]{2,5})$/{print $0}'

echo "name@host.com.us" | awk '/^([a-zA-Z0-9_\-\.\+]+)@([a-zA-Z0-9_\-\.]+)\.([a-zA-Z]{2,5})$/{print $0}'

validate email

Awesome!! Works great.

This was just the beginning of regex world that never ends. I hope after this post you understand these ASCII pukes 🙂 and use it more professionally.

I hope you like the post.

Thank you.

0

30 Examples for Awk Command in Text Processing

In the previous post, we talked about sed command and we saw many examples of using it in text processing and we saw how it is good in this, but it has some limitations. Sometimes you need something powerful, giving you more control to process data. This is where awk command comes in. The awk command or GNU awk in specific provides a scripting language for text processing. With awk scripting language, you can make the following: Define variables, use string and arithmetic operators, use control flow and loops, generate formatted reports, actually, you can process log files that contain maybe millions of lines to output a readable report that you can benefit from.

Continue Reading →

Awk Options

The awk command is used like this:

awk options program file

Awk can take the following options:

-F fs To specify a file separator.

-f file To specify a file that contains awk script.

-v var=value To declare a variable.

We will see how to process files and print results using awk.

Read AWK Scripts

To define an awk script, use braces surrounded by single quotation marks like this:

awk '{print "Welcome to awk command tutorial "}'

awk command

If you type anything, it returns the same welcome string we provide.

To terminate the program, press The Ctrl+D. Looks tricky, don’t panic, the best is yet to come.

Using Variables

With awk, you can process text files. Awk assigns some variables for each data field found:

  • $0 for the whole line.
  • $1 for the first field.
  • $2 for the second field.
  • $n for the nth field.

The whitespace character like space or tab is the default separator between fields in awk.

Check this example and see how awk processes it:

awk '{print $1}' myfile

awk command variables

The above example prints the first word of each line.

Sometimes the separator in some files is not space nor tab but something else. You can specify it using –F option:

awk -F: '{print $1}' /etc/passwd

awk command passwd

This command prints the first field in the passwd file. We use the colon as a separator because the passwd file uses it.

Using Multiple Commands

To run multiple commands, separate them with a semicolon like this:

echo "Hello Tom" | awk '{$2="Adam"; print $0}'

awk multiple commands

The first command makes the $2 field equals Adam. The second command prints the entire line.

Reading The Script From a File

You can type your awk script in a file and specify that file using the -f option.

Our file contains this script:

{print $1 " home at " $6}

awk -F: -f testfile /etc/passwd

read from file

Here we print the username and his home path from /etc/passwd, and surely the separator is specified with capital -F which is the colon.

You can your awk script file like this:

{

text = $1 " home at " $6

print text

}

awk -F: -f testfile /etc/passwd

multiple commands

Awk Preprocessing

If you need to create a title or a header for your result or so. You can use the BEGIN keyword to achieve this. It runs before processing the data:

awk 'BEGIN {print "Report Title"}'

Let’s apply it to something we can see the result:

awk 'BEGIN {print "The File Contents:"}

{print $0}' myfile

begin command

Awk Postprocessing

To run a script after processing the data, use the END keyword:

awk 'BEGIN {print "The File Contents:"}

{print $0}

END {print "File footer"}' myfile

end command

This is useful, you can use it to add a footer for example.

Let’s combine them together in a script file:

BEGIN {

print "Users and thier corresponding home"

print " UserName \t HomePath"

print "___________ \t __________"

FS=":"

}

{

print $1 " \t " $6

}

END {

print "The end"

}

First, the top section is created using BEGIN keyword. Then we define the FS and print the footer at the end.

awk -f myscript /etc/passwd

complete script

Built-in Variables

We saw the data field variables $1, $2 $3, etc are used to extract data fields, we also deal with the field separator FS.

But these are not the only variables, there are more built-in variables.

The following list shows some of the built-in variables:

FIELDWIDTHS     Specifies the field width.

RS     Specifies the record separator.

FS     Specifies the field separator.

OFS  Specifies the Output separator.

ORS  Specifies the Output separator.

By default, the OFS variable is the space, you can set the OFS variable to specify the separator you need:

awk 'BEGIN{FS=":"; OFS="-"} {print $1,$6,$7}' /etc/passwd

builtin variables

Sometimes, the fields are distributed without a fixed separator. In these cases, FIELDWIDTHS variable solves the problem.

Suppose we have this content:

1235.96521

927-8.3652

36257.8157

awk 'BEGIN{FIELDWIDTHS="3 4 3"}{print $1,$2,$3}' testfile

field width

Look at the output. The output fields are 3 per line and each field length is based on what we assigned by FIELDWIDTH exactly.

Suppose that your data are distributed on different lines like the following:

Person Name

123 High Street

(222) 466-1234

Another person

487 High Street

(523) 643-8754

In the above example, awk fails to process fields properly because the fields are separated by newlines and not spaces.

You need to set the FS to the newline (\n) and the RS to a blank text, so empty lines will be considered separators.

awk 'BEGIN{FS="\n"; RS=""} {print $1,$3}' addresses

field separator

Awesome! we can read the records and fields properly.

More Variables

There are some other variables that help you to get more information:

ARGC     Retrieves the number of passed parameters.

ARGV     Retrieves the command line parameters.

ENVIRON     Array of the shell environment variables and corresponding values.

FILENAME    The file name that is processed by awk.

NF     Fields count of the line being processed.

NR    Retrieves total count of processed records.

FNR     The record which is processed.

IGNORECASE     To ignore the character case.

You can review the previous post shell scripting to know more about these variables.

Let’s test them.

awk 'BEGIN{print ARGC,ARGV[1]}' myfile

awk command arguments

The ENVIRON variable retrieves the shell environment variables like this:

$ awk '

BEGIN{

print ENVIRON["PATH"]

}'

data variables

You can use bash variables without ENVIRON variables like this:

echo | awk -v home=$HOME '{print "My home is " home}'

awk shell variables

The NF variable specifies the last field in the record without knowing its position:

awk 'BEGIN{FS=":"; OFS=":"} {print $1,$NF}' /etc/passwd

awk command NF

The NF variable can be used as a data field variable if you type it like this: $NF.

Let’s take a look at these two examples to know the difference between FNR and NR variables:

awk 'BEGIN{FS=","}{print $1,"FNR="FNR}' myfile myfile

awk command FNR

In this example, the awk command defines two input files. The same file, but processed twice. The output is the first field value and the FNR variable.

Now, check the NR variable and see the difference:

awk '

BEGIN {FS=","}

{print $1,"FNR="FNR,"NR="NR}

END{print "Total",NR,"processed lines"}' myfile myfile

awk command NR FNR

The FNR variable becomes 1 when comes to the second file, but the NR variable keeps its value.

User Defined Variables

Variable names could be anything, but it can’t begin with a number.

You can assign a variable as in shell scripting like this:

awk '

BEGIN{

test="Welcome to LikeGeeks website"

print test

}'

user variables

Structured Commands

The awk scripting language supports if conditional statement.

The testfile contains the following:

10

15

6

33

45

awk '{if ($1 > 30) print $1}' testfile

if command

Just that simple.

You should use braces if you want to run multiple statements:

awk '{

if ($1 > 30)

{

x = $1 * 3

print x

}

}' testfile

multiple statements

You can use else statements like this:

awk '{

if ($1 > 30)

{

x = $1 * 3

print x

} else

{

x = $1 / 2

print x

}}' testfile

awk command else

Or type them on the same line and separate the if statement with a semicolon like this:

else one line

While Loop

You can use the while loop to iterate over data with a condition.

cat myfile

124 127 130

112 142 135

175 158 245

118 231 147

awk '{

sum = 0

i = 1

while (i < 5)

{

sum += $i

i++

}

average = sum / 3

print "Average:",average

}' testfile

while loop

The while loop runs and every time it adds 1 to the sum variable until the i variable becomes 4.

You can exit the loop using break command like this:

awk '{

tot = 0

i = 1

while (i < 5)

{

tot += $i

if (i == 3)

break

i++

}

average = tot / 3

print "Average is:",average

}' testfile

awk command break

The for Loop

The awk scripting language supports the for loops:

awk '{

total = 0

for (var = 1; var < 5; var++)

{

total += $var

}

avg = total / 3

print "Average:",avg

}' testfile

for loop

Formatted Printing

The printf command in awk allows you to print formatted output using format specifiers.

The format specifiers are written like this:

%[modifier]control-letter

This list shows the format specifiers you can use with printf:

c              Prints numeric output as a string.

d             Prints an integer value.

e             Prints scientific numbers.

f               Prints float values.

o             Prints an octal value.

s             Prints a text string.

Here we use printf to format our output:

awk 'BEGIN{

x = 100 * 100

printf "The result is: %e\n", x

}'

awk command printf

Here is an example of printing scientific numbers.

We are not going to try every format specifier. You know the concept.

Built-In Functions

Awk provides several built-in functions like:

Mathematical Functions

If you love math, you can use these functions in your awk scripts:

sin(x) | cos(x) | sqrt(x) | exp(x) | log(x) | rand()

And they can be used normally:

awk 'BEGIN{x=exp(5); print x}'

math functions

String Functions

There are many string functions, you can check the list, but we will examine one of them as an example and the rest is the same:

awk 'BEGIN{x = "likegeeks"; print toupper(x)}'

string functions

The function toupper converts character case to upper case for the passed string.

User Defined Functions

You can define your function and use them like this:

awk '

function myfunc()

{

printf "The user %s has home path at %s\n", $1,$6

}

BEGIN{FS=":"}

{

myfunc()

}' /etc/passwd

user defined functions

Here we define a function called myprint, then we use it in our script to print output using printf function.

I hope you like the post.

Thank you.

0

Linux Bash Scripting Part5 – Signals and Jobs

In the previous post, we talked about input, output, and redirection in bash scripts. Today we will learn how to run and control them on a Linux system. Till now, we can run scripts only from the command line interface. This isn’t the only way to run Linux bash scripts. This post describes the different ways to control your Linux bash scripts. In shell scripts, we talked about important things called Input, Output and Redirection. Everything is a file in Linux and that includes input and output. So we need to understand each one in detail.


Continue Reading →

Your Linux bash scripts don’t control these signals, you can program your bash script to recognize signals and perform commands based on the signal that was sent.

Stop a Process

To stop a running process, you can press Ctrl+C which generates SIGINT signal to stop the current process running in the shell.

sleep 100

Ctrl+C

Linux bash scripting Signals and Jobs stop process

Pause a Process

The Ctrl+Z keys generate a SIGTSTP signal to stop any processes running in the shell, and that leaves the program in memory.

sleep 100

Ctrl+Z

pause process

The number between brackets which is (1) is the job number.

If try to exit the shell and you have a stopped job assigned to your shell, the bash warns you if you.

The ps command is used to view the stopped jobs.

ps –l

ps -l

In the S column (process state), it shows the traced (T) or stopped (S) states.

If you want to terminate a stopped job you can kill its process by using kill command.

kill processID

Trap Signals

To trap signals, you can use the trap command. If the script gets a signal defined by the trap command, it stops processing and instead the script handles the signal.

You can trap signals using the trap command like this:

#!/bin/bash

trap "echo 'Ctrl-C was trapped'" SIGINT

total=1

while [ $total -le 3 ]; do

echo "#$total"

sleep 2

total=$(($total + 1))

done

Every time you press Ctrl+C, the signal is trapped and the message is printed.

trap signal

If you press Ctrl+C, the echo statement specified in the trap command is printed instead of stopping the script. Cool, right?

Trapping The Script Exit

You can trap the shell script exit using the trap command like this:

#!/bin/bash

# Add the EXIT signal to trap it

trap "echo Goodbye..." EXIT

total=1

while [ $total -le 3 ]; do

echo "#$total"

sleep 2

total=$(($total + 1))

done

trap exit

When the bash script exits, the Goodbye message is printed as expected.

Also, if you exit the script before finishing its work, the EXIT trap will be fired.

Modifying Or Removing a Trap

You can reissue the trap command with new options like this:

#!/bin/bash

trap "echo 'Ctrl-C is trapped.'" SIGINT

total=1

while [ $total -le 3 ]; do

echo "Loop #$total"

sleep 2

total=$(($total + 1))

done

# Trap the SIGINT

trap "echo ' The trap changed'" SIGINT

total=1

while [ $total -le 3 ]; do

echo "Second Loop #$total"

sleep 1

total=$(($total + 1))

done

modify trap

Notice how the script manages the signal after changing the signal trap.

You can also remove a trap by using 2 dashes trap -- SIGNAL

#!/bin/bash

trap "echo 'Ctrl-C is trapped.'" SIGINT

total=1

while [ $total -le 3 ]; do

echo "#$total"

sleep 1

total=$(($total + 1))

done

trap -- SIGINT

echo "I just removed the trap"

total=1

while [ $total -le 3 ]; do

echo "Loop #2 #$total"

sleep 2

total=$(($total + 1))

done

Notice how the script processes the signal before removing the trap and after removing the trap.

./myscript

Crtl+C

remove trap

The first Ctrl+C was trapped and the script continues running while the second one exits the script because the trap was removed.

Running Linux Bash Scripts in Background Mode

If you see the output of the ps command, you will see all the running processes in the background and not tied to the terminal.

We can do the same, just place ampersand symbol (&) after the command.

#!/bin/bash

total=1

while [ $total -le 3 ]; do

sleep 2

total=$(($total + 1))

done

./myscipt &

run in background

Once you’ve done that, the script runs in a separate background process on the system and you can see the process id between the square brackets.

When the script dies,  you will see a message on the terminal.

Notice that while the background process is running, you can use your terminal monitor for STDOUT and STDERR messages so if an error occurs, you will see the error message and normal output.

run script in background

The background process will exit if you exit your terminal session.

So what if you want to continue running even if you close the terminal?

Running Scripts without a Hang-Up

You can run your Linux bash scripts in the background process even if you exit the terminal session using the nohup command.

The nohup command blocks any SIGHUP signals. This blocks the process from exiting when you exit your terminal.

nohup ./myscript &

linux bash nohup command

After running the nohup command, you can’t see any output or error from your script. The output and error messages are sent to a file called nohup.out.

Note: when running multiple commands from the same directory will override the nohup.out file content.

Viewing Jobs

To view the current jobs, you can use the jobs command.

#!/bin/bash

total=1

while [ $total -le 3 ]; do

echo "#$count"

sleep 5

total=$(($total + 1))

done

Then run it.

./myscript

Then press Ctrl+Z to stop the script.

linux bash view jobs

Run the same bash script but in the background using the ampersand symbol and redirect the output to a file just for clarification.

./myscript > outfile &

linux bash list jobs

The jobs command shows the stopped and the running jobs.

jobs –l

-l parameter to view the process ID

 Restarting Stopped Jobs

The bg command is used to restart a job in background mode.

./myscript

Then press Ctrl+Z

Now it is stopped.

bg

linux bash restart job

After using bg command, it is now running in background mode.

If you have multiple stopped jobs, you can do the same by specifying the job number to the bg command.

The fg command is used to restart a job in foreground mode.

fg 1

Scheduling a Job

The Linux system provides 2 ways to run a bash script at a predefined time:

  • at command.
  • cron table.

The at command

This is the format of the command

at [-f filename] time

The at command can accept different time formats:

  • Standard time format like 10:15.
  • An AM/PM indicator like 11:15PM.
  • A specifically named time like now, midnight.

You can include a specific date, using some different date formats:

  • A standard date format, such as MMDDYY or DD.MM.YY.
  • A text date, such as June 10 or Feb 12, with or without the year.
  • Now + 25 minutes.
  • 05:15AM tomorrow.
  • 11:15 + 7 days.

We don’t want to dig deep into the at command, but for now, just make it simple.

at -f ./myscript now

linux bash at command

The -M parameter is used to send the output to email if the system has email, and if not, this will suppress the output of the at command.

To list the pending jobs, use atq command:

linux bash at queue

Remove Pending Jobs

To remove a pending job, use the atrm command:

atrm 18

delete at queue

You must specify the job number to the atrm command.

Scheduling Scripts

What if you need to run a script at the same time every day or every month or so?

You can use the crontab command to schedule jobs.

To list the scheduled jobs, use the -l parameter:

crontab –l

The format for crontab is:

minute,Hour, dayofmonth, month, and dayofweek

So if you want to run a command daily at 10:30, type the following:

30 10 * * * command

The wildcard character (*) used to indicate that the cron will execute the command daily on every month at 10:30.

To run a command at 5:30 PM every Tuesday, you would use the following:

30 17 * * 2 command

The day of the week starts from 0 to 6 where Sunday=0 and Saturday=6.

To run a command at 10:00 on the beginning of every month:

00 10 1 * * command

The day of the month is from 1 to 31.

Let’s keep it simple for now and we will discuss the cron in great detail in future posts.

To edit the cron table, use the -e parameter like this:

crontab –e

Then type your command like the following:

30 10 * * * /home/likegeeks/Desktop/myscript

This will schedule our script to run at 10:30 every day.

Note: sometimes you see error says Resource temporarily unavailable.

All you have to do is this:

rm -f /var/run/crond.pid

You should be a root user to do this.

Just that simple!

You can use one of the pre-configured cron script directories like:

/etc/cron.hourly

/etc/cron.daily

/etc/cron.weekly

/etc/cron.monthly

Just put your bash script file on any of these directories and it will run periodically.

Starting Scripts at Login

In the previous posts, we’ve talked about startup files, I recommend you to review the previous.

$HOME/.bash_profile

$HOME/.bash_login

$HOME/.profile

To run your scripts at login, place your code in $HOME/.bash_profile.

Starting Scripts When Opening the Shell

OK, what about running our bash script when the shell opens? Easy.

Type your script on .bashrc file.

And now if you open the shell window, it will execute that command.

I hope you find the post useful. keep coming back.

Thank you.

0

Linux Virtual File System

The Linux virtual file system or virtual file system generally is a layer that sits on the top of your actual file system which allows the user to access different types of file systems, you can think of virtual file system as an interface between the kernel and the actual file system. That means you will not find any entries for those Linux virtual filesystems in your /etc/fstab file. Yet, you will still find them when you type the mount command. If you are coming from Windows, the virtual file system is the Registry. The proc file system is a virtual file system which is mounted on /proc directory. There is no real file system exists on /proc, it’s a virtual layer that is used for dealing with the kernel functionalities.

Continue Reading →

/proc File System

For example, to get the processor specifications, type the following command:

cat /proc/cpuinfo

This is a very powerful and easy way to query Linux kernel.

Notice that if you check the size of the file in /proc directory, you will find that all file sizes are 0, because as we said they don’t exist on the disk.

When you type cat /proc/cpuinfo command, a file is dynamically created to show you the CPU info.

The only file that has a size in /proc directory is /proc/kcore file, which shows the RAM content. Actually, this file isn’t occupying any space on the disk.

Writing to Proc Files

As we’ve seen, we can read the content of proc files, but some of them are writable, so we can write to them to change some functionality.

For example, this /proc/sys/net/ipv4/ip_forward file controls IP forwarding in case you have multiple network cards.

You can change the value of this file like this:

echo "1" > /proc/sys/net/ipv4/ip_forward

Keep in mind that when you change any file or value under /proc directory there is no validation of what you are doing, you may crash your system if you type a wrong setting.

Persisting /proc Files Changes

The previous modification to the /proc/sys/net/ipv4/ip_forward entry will not survive after rebooting since you are not writing to a file, this is a virtual file system, means change happens to the memory.

If you need to save changes under /proc, you have two ways:

You can write your entries in /etc/rc.local file, or in Red Hat based distros like CentOS, create /etc/rc.d/rc.local file and make it executable and enable the systemd service unit that enables the use of the rc.local file and write your entries.
The sysctl command is used to change entries in /proc/sys/ directory.

sysctl net.ipv4.ip_forward

This will show the value of the entry, to change it, use the -w option:

sysctl -w net.ipv4.ip_forward=1

One final step is to write the changes to /etc/sysctl.conf:

echo "net.ipv4.ip_forward = 1" >> /etc/sysctl.conf

Make sure that the file /etc/sysctl.conf does not contain the entry before you write your changes.

Common /proc Entries

These are some of the commonly used /proc entries:

/proc/cpuinfo                    information about CPUs in the system.

/proc/meminfo                information about memory usage.

/proc/ioports                     list of port regions used for I/O communication with devices.

/proc/mdstat                     display the status of RAID disks configuration.

/proc/kcore                        displays the system actual memory.

/proc/modules                 displays a list of kernel loaded modules.

/proc/cmdline                   displays the passed boot parameters.

/proc/swaps                      displays the status of swap partitions.

/proc/iomem                     the current map of the system memory for each physical device.

/proc/version                    displays the kernel version and time of compilation.

/proc/net/dev                   displays information about each network device like packets count.

/proc/net/sockstat         displays statistics about network socket utilization.

/proc/sys/net/ipv4/ip_ display the range of ports that Linux uses.

local_port_range

/proc/sys/net/ipv4/        protection against syn flood attacks.

tcp_ syncookies

These are some of the common entries in /proc directory.

Listing /proc Directory

If you list the files in /proc directory, you’ll notice a lot of directories which have numeric names, these directories contain information about the running processes and the numeric value is the corresponding process ID.

You can check the consumed resources by a specific process from these directories.

If you take a look at the folder named 1, it belongs to the init process or systemd (like CentOS 7) which is the first process runs When Linux starts.

ls -l /proc/1

The /proc/1/exe file is a symbolic link to /lib/systemd/systemd binary or /sbin/init in other systems that use init binary.

The same concept applies to all numeric folders under /proc directory.

/proc Useful Examples

To protect your server from SYN flood attack, you can use iptables to block SYN packets.

A better solution is to use SYN cookies. A special method in the kernel that keeps track of which SYN packets come. If the SYN packets don’t move to established state within a reasonable interval, the kernel will drop them.

sysctl -w net.ipv4.tcp_syncookies=1

And to persist the changes.

echo "net.ipv4.tcp_syncookies = 1" >> /etc/sysctl.conf

Another useful example which is the /proc/sys/fs/file-max, this value shows the maximum files (including sockets, files, etc,) that can be opened at the same time.

You can increase this number like this:

sysctl -w "fs.file-max=96992"

echo "fs.file-max = 96992" >> /etc/sysctl.conf

sysfs Virtual File System

sysfs is a Linux virtual file systems which mean it’s also in memory.

sysfs file system can be found at /sys. The sysfs can be used to get information about your system hardware.

ls -l /sys

From the result of the above command, the file sizes are all zero because as we know this is a Linux virtual file system.

The top level directory of /sys contains the following:

Block                     list of block devices detected on the system like sda.

Bus                        contains subdirectories for physical buses detected in the kernel.

class                      describes class of device like audio, network or printer.

Devices                 list all detected devices by the physical bus registered with the kernel.

Module                 lists all loaded modules.

Power                   the power state of your devices.

tmpfs Virtual File System

tmpfs is a Linux virtual file system that keeps data in the system virtual memory. It is the same like any other Virtual File Systems, any files are temporarily stored in the Kernel’s internal caches.

The /tmp file system is used as the storage location for temporary files.

The /tmp file system is backed by an actual disk-based storage and not by a virtual system.

This location is chosen during Linux installation.

The /tmp is created automatically by systemd service when booting the system.

You can setup tmpfs style file system with the size you want, using the mount command.

mount it tmpfs -o size=2GB tmpfs /home/myfolder

Awesome!!

Working with Linux virtual file system is very easy.

I hope you find the post useful and interesting. Keep coming back.

Thank you.

0