


Linux çekirdeği resmi sitesi: https://www.kernel.org
Uzun süreli destek sürümü:
 4.9.69 2017-12-14
Değişiklik listesi…
Tag Archives | linux
How to write practical shell scripts
 In the last post, we talked about regular expressions and we saw how to use them in sed and awk for text processing, and we discussed before Linux sed command and awk command. During the series, we wrote small shell scripts, but we didn’t mix things up, I think we should take a small step further and write a useful shell script. However, the scripts in this post will help you to empower your script writing skills. You can send messages to someone by phone or email, but one method, not commonly used anymore, is sending a message directly to the user’s terminal. We are going to build a bash script that will send a message to a user who is logged into the Linux system. For this simple shell script, only a few functions are required. Most of the required commands are common and have been covered in our series of shell scripting; you can review the previous posts.
First, we need to know who is logged in. This can be done using the who command which retrieves all logged in users.
$ who

To send a message you need the username and his current terminal.
You need to know if messages are allowed or not for that user using the mesg command.
$ mesg

If the result shows “is y” that means messaging is permitted. If the result shows “is n”, that means messaging is not permitted.
To check any logged user message status, use the who command with -T option.
$ who –T
If you see a dash (-) that means messages are turned off and if you see plus sign (+) that means messages are enabled.
To allow messages, type mesg command with the “y” option like this:
$ mesg y
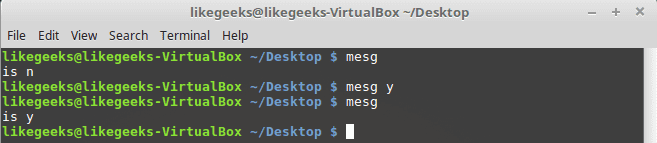
Sure enough, it shows “is y” which means messages are permitted for this user.
Of course, we need another user to be able to communicate with him so in my case I’m going to connect to my PC using SSH and I’m already logged in with my user, so we have two users logged onto the system.
Let’s see how to send a message.
Write Command
The write command is used to send messages between users using the username and current terminal.
For those users who logged into the graphical environment (KDE, Gnome, Cinnamon or any), they can’t receive messages. The user must be logged onto the terminal
We will send a message to testuser user from my user likegeeks like this:
$ write testuser pts/1
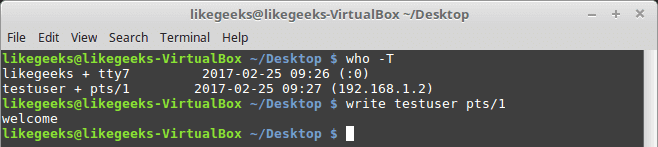
Type the write command followed by the user and the terminal and hit Enter.
When you hit Enter, you can start typing your message. After finishing the message, you can send the message by pressing the Ctrl+D key combination which is the end of file signal. I recommend you to review the post about signals and jobs.

The receiver can recognize which user on which terminal sends the message. EOF means that the message is finished.
I think now we have all the parts to build our shell script.
Creating The Send Script
Before we create our shell script, we need to determine whether the user we want to send a message to him is currently logged on the system, this can be done using who command to determine that.
logged=$(who | grep -i -m 1 $1 | awk '{print $1}')
We get the logged user using the grep command. The -m 1 option is used in case there are multiple sessions opened for the same user.
If the user is not online, the grep command returns either nothing.
This output is piped to the awk command. The awk command returns only the first item. The final output from the awk command is stored in the variable logged_on.
Then we need to check the variable if it contains something or not:
if [ -z $logged ]
then
echo "$1 is not logged on."
echo "Exit"
exit
fi
I recommend you to read the post about the if statement and how to use it Bash Script.
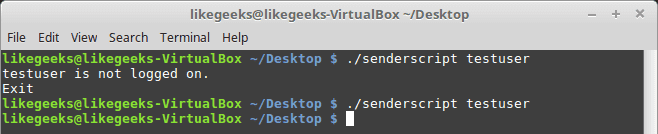
The logged variable is tested to check if it is a zero or not.
If it is zero, the script prints the message, and the script is terminated.
If the user is logged, the logged_on variable contains the username.
Checking If The User Accepts Messages
To check if messages are allowed or not, use the who command with -T option.
check=$(who -T | grep -i -m 1 $1 | awk '{print $2}')
if [ "$check" != "+" ]
then
echo "$1 disable messaging."
echo "Exit"
exit
fi
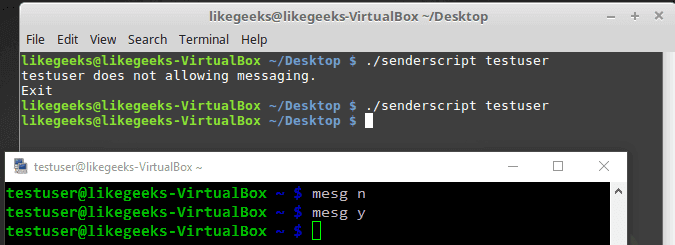
Notice that we use the who command with -T. This shows a (+) beside the username if messaging is permitted. Otherwise, it shows a (-) beside the username, if messaging is not permitted.
Finally, we check for a messaging indicator if the indicator is not set to plus sign (+).
Checking If Message Was Included
You can check if the message was included or not like this:
if [ -z $2 ]
then
echo "Message not found"
echo "Exit"
exit
fi
Getting the Current Terminal
Before we send a message, we need to get the user current terminal and store it in a variable.
terminal=$(who | grep -i -m 1 $1 | awk '{print $2}')
Then we can send the message:
echo $2 | write $logged $terminal
Now we can test the whole shell script to see how it goes:
$ ./senderscript likegeeks welcome
Let’s see the other shell window:
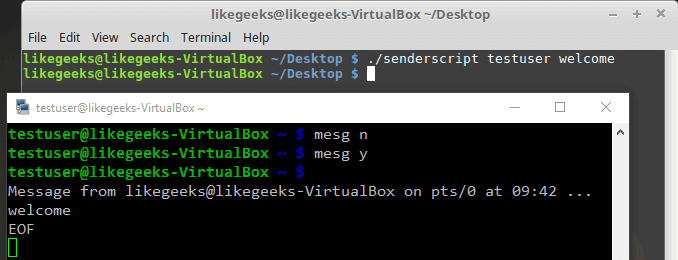
Good! You can now send a simple one-word messages.
Sending a Long Message
If you try to send more than one word:
$ ./senderscript likegeeks welcome to shell scripting
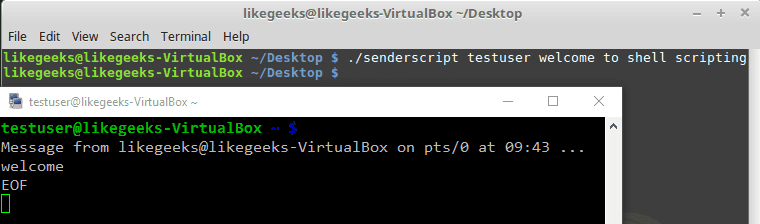
It didn’t work. Only the first word of the message is sent.
To fix this problem, we will use the shift command with the while loop.
shift
while [ -n "$1" ]
do
message=$message' '$1
shift
done
And now one thing needs to be fixed, which is the message parameter.
echo $whole_message | write $logged $terminal
So now the whole script should be like this:
#!/bin/bash
logged=$(who | grep -i -m 1 $1 | awk '{print $1}')
if [ -z $logged ]
then
echo "$1 is not logged on."
echo "Exit"
exit
fi
check=$(who -T | grep -i -m 1 $1 | awk '{print $2}')
if [ "$check" != "+" ]
then
echo "$1 disable messaging."
echo "Exit"
exit
fi
if [ -z $2 ]
then
echo "Message not found"
echo "Exit"
exit
fi
terminal=$(who | grep -i -m 1 $1 | awk '{print $2}')
shift
while [ -n "$1" ]
do
message=$message' '$1
shift
done
echo $message | write $logged $terminal
If you try now:
$ ./senderscript likegeeks welcome to shell scripting
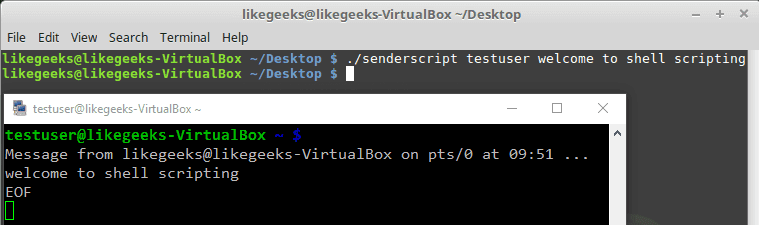
Awesome!! It worked. Again, I’m not here to make a script to send the message to the user, but the main goal is to review our shell scripting knowledge and use all the parts we’ve learned together and see how things work together.
Monitoring Disk Space
Let’s build a script that monitors the biggest top ten directories.
If you add -s option to the du command, it will show summarized totals.
$ du -s /var/log/
The -S option is used to show the subdirectories totals.
$ du -S /var/log/
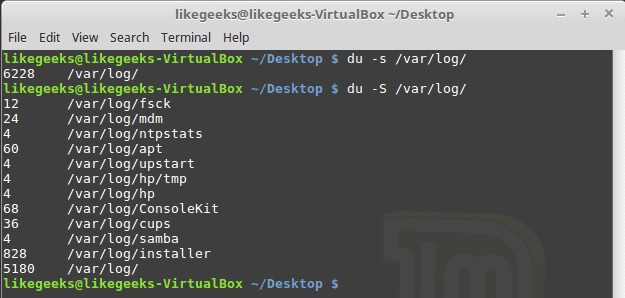
You should use the sort command to sort the results generated by the du command to get the largest directories like this:
$ du -S /var/log/ | sort -rn
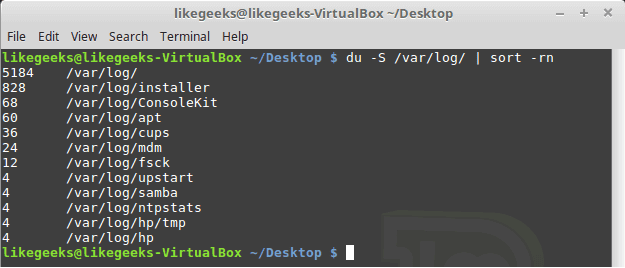
The -n to sort numerically and the -r option to reverse the order so it shows the bigger first.
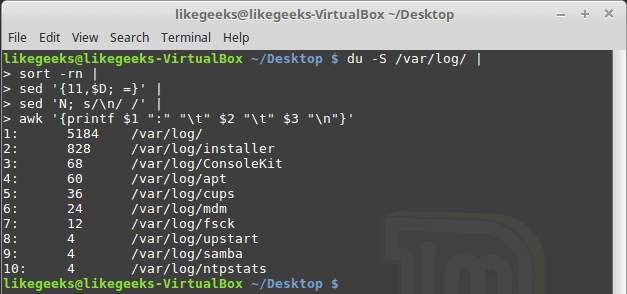
The N command is used to label each line with a number:
sed '{11,$D; =}' |
sed 'N; s/\n/ /' |
Then we can clean the output using the awk command:
awk '{printf $1 ":" "\t" $2 "\t" $3 "\n"}'
Then we add a colon and a tab so it appears much better.
$ du -S /var/log/ |
sort -rn |
sed '{11,$D; =}' |
# pipe the first result for another one to clean it
sed 'N; s/\n/ /' |
# formated printing using printf
awk '{printf $1 ":" "\t" $2 "\t" $3 "\n"}'
Suppose we have a variable called MY_DIRECTORIES that holds 2 folders.
MY_DIRECTORIES=”/home /var/log”
We will iterate over each directory from MY_DIRECTORIES variable and get the disk usage using du command.
So the shell script will look like this:
#!/bin/bash
MY_DIRECTORIES="/home /var/log"
echo "Top Ten Directories"
for DIR in $MY_DIRECTORIES
do
echo "The $DIR Directory:"
du -S $DIR 2>/dev/empty |
sort -rn |
sed '{11,$D; =}' |
# pipe the first result for another one to clean it
sed 'N; s/\n/ /' |
# formated printing using printf
awk '{printf $1 "\t" "\t" $2 "\t" $3 "\r\n"}'
done
exit
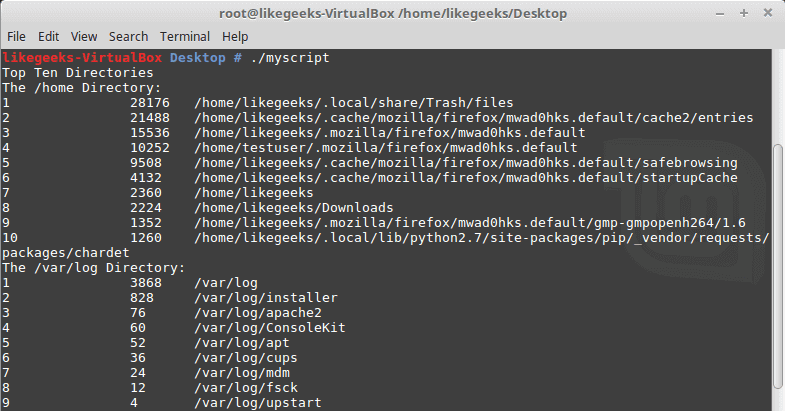
Good!! Both directories /home and /var/log are shown on the same report.
You can filter files, so instead of calculating the consumption of all files, you can calculate the consumption for a specific extension like *.log or whatever.
One thing I have to mention here, in production systems, you can’t rely on disk space report instead, you should use disk quotas.
Quota package is specialized for that, but here we are learning how bash scripts work.
Again the shell scripts we’ve introduced here is for showing you how shell scripting work, there are a ton of ways to implement any task in Linux.
My post is finished for now. I tried to reduce the post length and make everything simple as possible, hope you like it.
Keep coming back. Thank you.
Kernel’in 4.14.5 kararlı sürümü duyuruldu
Linux çekirdeği resmi sitesi: https://www.kernel.org
En son kararlı çekirdek:
4.14.5 2017-12-10
Değişiklik listesi…
Kernel’in 4.9.68 uzun süreli destek sürümü duyuruldu
Linux çekirdeği resmi sitesi: https://www.kernel.org
Uzun süreli destek sürümü:
4.9.68 2017-12-09Değişiklik listesi…
Linux Bash Scripting Part5 – Signals and Jobs
 In the previous post, we talked about input, output, and redirection in bash scripts. Today we will learn how to run and control them on Linux system. Till now, we can run scripts only from the command line interface. This isn’t the only way to run Linux bash scripts. This post describes the different ways to control your Linux bash scripts. These are the most common Linux system signals:
Linux Signals
These are the most common Linux system signals:
Num Name Job
1 SIGHUP Process hangs up.
2 SIGINT Process Interruption.
3 SIGQUIT Proces quit or stop.
9 SIGKILL Process termination.
15 SIGTERM Process termination.
17 SIGSTOP Process stopping without termination.
18 SIGTSTP Process stopping or pausing without termination.
19 SIGCONT Process continuation after stopping.
Your Linux bash scripts don’t control these signals, you can program your bash script to recognize signals and perform commands based on the signal that was sent.
Stop a Process
To stop a running process, you can press Ctrl+C which generates SIGINT signal to stop the current process running in the shell.
$ sleep 100
Ctrl+C

Pause a Process
The Ctrl+Z keys generate a SIGTSTP signal to stop any processes running in the shell, and that leaves the program in memory.
$ sleep 100
Ctrl+Z

The number between brackets which is (1) is the job number.
If try to exit the shell and you have a stopped job assigned to your shell, the bash warns you if you.
The ps command is used to view the stopped jobs.
ps –l
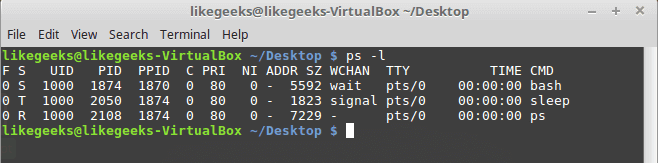
In the S column (process state), it shows the traced (T) or stopped (S) states.
If you want to terminate a stopped job you can kill its process by using kill command.
kill processID
Trap Signals
To trap signals, you can use the trap command. If the script gets a signal defined by the trap command, it stops processing and instead the script handles the signal.
You can trap signals using the trap command like this:
#!/bin/bash
trap "echo 'Ctrl-C was trapped'" SIGINT
total=1
while [ $total -le 3 ]
do
echo "#$total"
sleep 2
total=$(( $total + 1 ))
done
Every time you press Ctrl+C, the signal is trapped and the message is printed.
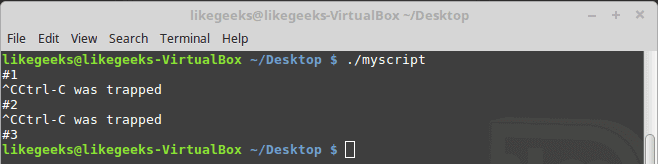
If you press Ctrl+C, the echo statement specified in the trap command is printed instead of stopping the script. Cool, right?
Trapping The Script Exit
You can trap the shell script exit using the trap command like this:
#!/bin/bash
# Add the EXIT signal to trap it
trap "echo Goodbye..." EXIT
total=1
while [ $total -le 3 ]
do
echo "#$total"
sleep 2
total=$(( $total + 1 ))
done
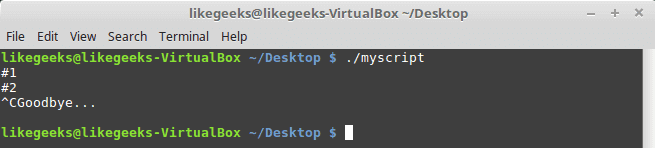
When the bash script exits, the Goodbye message is printed as expected.
Also, if you exit the script before finishing its work, the EXIT trap will be fired.
Modifying Or Removing a Trap
You can reissue the trap command with new options like this:
#!/bin/bash
trap "echo 'Ctrl-C is trapped.'" SIGINT
total=1
while [ $total -le 3 ]
do
echo "Loop #$total"
sleep 2
total=$(( $total + 1 ))
done
# Trap the SIGINT
trap "echo ' The trap changed'" SIGINT
total=1
while [ $total -le 3 ]
do
echo "Second Loop #$total"
sleep 1
total=$(( $total + 1 ))
done
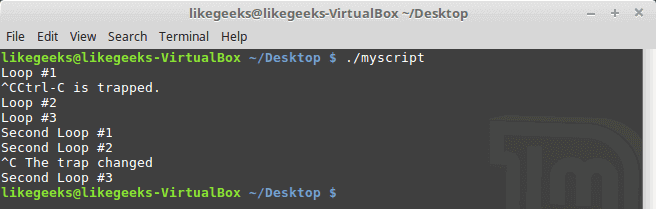
Notice how the script manages the signal after changing the signal trap.
You can also remove a trap by using 2 dashes trap — SIGNAL
#!/bin/bash
trap "echo 'Ctrl-C is trapped.'" SIGINT
total=1
while [ $total -le 3 ]
do
echo "#$total"
sleep 1
total=$(( $total + 1 ))
done
trap -- SIGINT
echo "I just removed the trap"
total=1
while [ $total -le 3 ]
do
echo "Loop #2 #$total"
sleep 2
total=$(( $total + 1 ))
done
Notice how the script processes the signal before removing the trap and after removing the trap.
$ ./myscript
Crtl+C
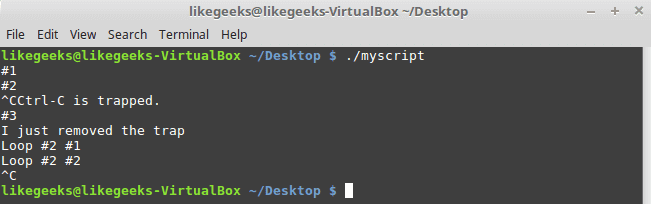
The first Ctrl+C was trapped and the script continues running while the second one exits the script because the trap was removed.
Running Linux Bash Scripts in Background Mode
If you see the output of the ps command, you will see all the running processes in the background and not tied to the terminal.
We can do the same, just place ampersand symbol (&) after the command.
#!/bin/bash
total=1
while [ $total -le 3 ]
do
sleep 2
total=$(( $total + 1 ))
done
$ ./myscipt &

Once you’ve done that, the script runs in a separate background process on the system and you can see the process id between the square brackets.
When the script dies, you will see a message on the terminal.
Notice that while the background process is running, you can use your terminal monitor for STDOUT and STDERR messages so if an error occurs, you will see the error message and normal output.
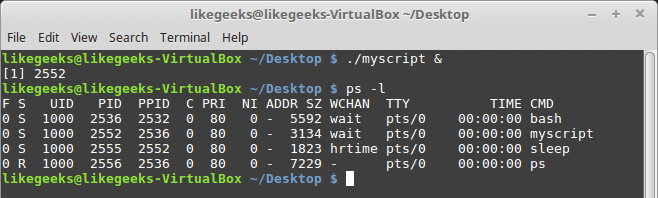
The background process will exit if you exit your terminal session.
So what if you want to continue running even if you close the terminal?
Running Scripts without a Hang-Up
You can run your Linux bash scripts in the background process even if you exit the terminal session using the nohup command.
The nohup command blocks any SIGHUP signals. This blocks the process from exiting when you exit your terminal.
$ nohup ./myscript &
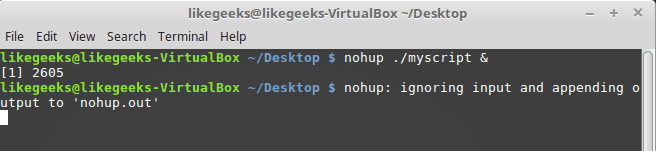
After running the nohup command, you can’t see any output or error from your script. The output and error messages are sent to a file called nohup.out.
Note: when running multiple commands from the same directory will override the nohup.out file content.
Viewing Jobs
To view the current jobs, you can use the jobs command.
#!/bin/bash
total=1
while [ $total -le 3 ]
do
echo "#$count"
sleep 5
total=$(( $total + 1 ))
done
Then run it.
$ ./myscript
Then press Ctrl+Z to stop the script.
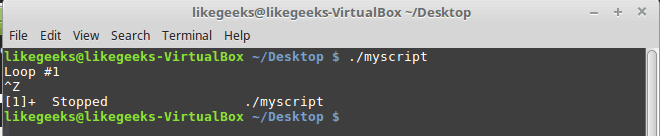
Run the same bash script but in the background using the ampersand symbol and redirect the output to a file just for clarification.
v$ ./myscript > outfile &
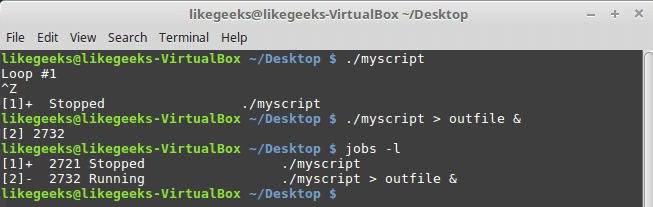
The jobs command shows the stopped and the running jobs.
jobs –l
-l parameter to view the process ID
Restarting Stopped Jobs
The bg command is used to restart a job in background mode.
$ ./myscript
Then press Ctrl+Z
Now it is stopped.
$ bg
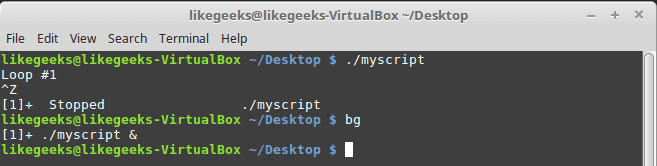
After using bg command, it is now running in background mode.
If you have multiple stopped jobs, you can do the same by specifying the job number to the bg command.
The fg command is used to restart a job in foreground mode.
$ fg 1
Scheduling a Job
The Linux system provides 2 ways to run a bash script at a predefined time:
- at command.
- cron table.
The at command
This is the format of the command
at [-f filename] time
The at command can accept different time formats:
- Standard time format like 10:15.
- An AM/PM indicator like 11:15PM.
- A specifically named time like now, midnight.
You can include a specific date, using some different date formats:
- A standard date format, such as MMDDYY or DD.MM.YY.
- A text date, such as June 10 or Feb 12, with or without the year.
- Now + 25 minutes.
- 05:15AM tomorrow.
- 11:15 + 7 days.
We don’t want to dig deep into the at command, but for now, just make it simple.
$ at -f ./myscript now

The -M parameter is used to send the output to email if the system has email, and if not, this will suppress the output of the at command.
To list the pending jobs, use atq command:

Remove Pending Jobs
To remove a pending job, use the atrm command:
$ atrm 18
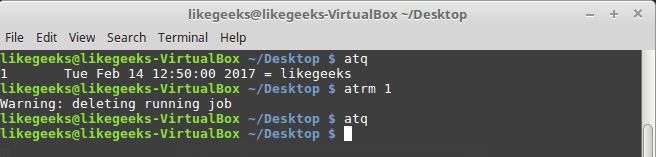
You must specify the job number to the atrm command.
Scheduling Scripts
What if you need to run a script at the same time every day or every month or so?
You can use the crontab command to schedule jobs.
To list the scheduled jobs, use the -l parameter:
$ crontab –l
The format for crontab is:
minute,Hour, dayofmonth, month, and dayofweek
So if you want to run a command daily at 10:30, type the following:
30 10 * * * command
The wildcard character (*) used to indicate that the cron will execute the command daily on every month at 10:30.
To run a command at 5:30 PM every Tuesday, you would use the following:
30 17 * * 2 command
The day of the week starts from 0 to 6 where Sunday=0 and Saturday=6.
To run a command at 10:00 on the beginning of every month:
00 10 1 * * command
The day of the month is from 1 to 31.
Let’s keep it simple for now and we will discuss the cron in great detail in future posts.
To edit the cron table, use the -e parameter like this:
crontab –e
Then type your command like the following:
30 10 * * * /home/likegeeks/Desktop/myscript
This will schedule our script to run at 10:30 every day.
Note: sometimes you see error says Resource temporarily unavailable.
All you have to do is this:
$ rm -f /var/run/crond.pid
You should be a root user to do this.
Just that simple!
You can use one of the pre-configured cron script directories like:
/etc/cron.hourly
/etc/cron.daily
/etc/cron.weekly
/etc/cron.monthly
Just put your bash script file on any of these directories and it will run periodically.
Starting Scripts at Login
In the previous posts, we’ve talked about startup files, I recommend you to review the previous.
$HOME/.bash_profile
$HOME/.bash_login
$HOME/.profile
To run your scripts at login, place your code in $HOME/.bash_profile.
Starting Scripts When Opening the Shell
OK, what about running our bash script when the shell opens? Easy.
Type your script on .bashrc file.
And now if you open the shell window, it will execute that command.
I hope you find the post useful. keep coming back.
Thank you.
Kernel’in 4.4.105 uzun süreli destek sürümü duyuruldu
Linux çekirdeği resmi sitesi: https://www.kernel.org
Uzun süreli destek sürümü:
4.4.105 2017-12-09
Değişiklik listesi…
Kernel’in 3.18.87 [EOL] uzun süreli destek sürümü duyuruldu
Linux çekirdeği resmi sitesi: https://www.kernel.org
Uzun süreli destek sürümü:
3.18.87 [EOL] 2017-12-09
Değişiklik listesi…