


Linux çekirdeği resmi sitesi: https://www.kernel.org
Uzun süreli destek sürümü:
 4.1.47 2017-12-07
Değişiklik listesi…
Tag Archives | linux
Shell Scripting Part4 – Input, Output, and Redirection
 In the previous post, we talked about parameters and options in detail, today we will talk about something very important in shell scripting which are Input, Output, and Redirection. You can display the output from your shell scripts in two ways:
- Display output on the screen.
- Send output to a file.
Everything is a file in Linux and that includes input and output.
Each process can have 9 file descriptors opened at the same time. The file descriptors 0, 1, 2 are kept for the bash shell usage.
0 STDIN.
1 STDOUT.
2 STDERR.
You can use the above file descriptors to control input and output.
You need to fully understand these three because they are like the backbones of your shell scripting. So we are going to describe every one of them in detail.
STDIN
STDIN stands for standard input which is the keyboard by default.
You can replace the STDIN which is the keyboard and replace it with a file by using the input redirect symbol (<), it sends the data as keyboard typing. No magic!!
When you type the cat command without anything, it accepts input from STDIN. Any line you type, the cat command prints that line to the screen.
STDOUT
This stands for the standard output which is the screen by default.
You can redirect output to a file using the >> symbol.
If we have a file contains data, you can append data to it using this symbol like this:
pwd >> myfile
The output generated by pwd is appended to myfile without deleting the existed content.
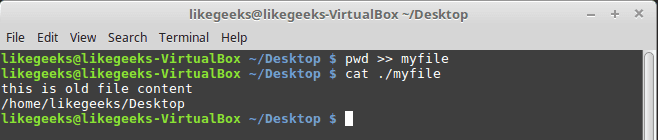
The following command tries to redirect the output to a file using > symbol.
ls –l xfile > myfile

I have no file called xfile on my PC, and that generates an error which is sent to STDERR.
STDERR
This file descriptor is the standard error output of the shell which is sent to the screen by default.
If you need to redirect the errors to a log file instead of sending it to the screen, you can redirect errors using the redirection symbol.
Redirecting Errors
We can redirect the errors by placing the file descriptor which is 2 before the redirection symbol like this:
ls -l xfile 2>myfile
cat ./myfile

As you can see, the error now is in the file and nothing on the screen.
Redirecting Errors and Normal Output
To redirect errors and the normal output, you have to precede each with the proper file descriptor like this:
ls –l myfile xfile anotherfile 2> errorcontent 1> correctcontent
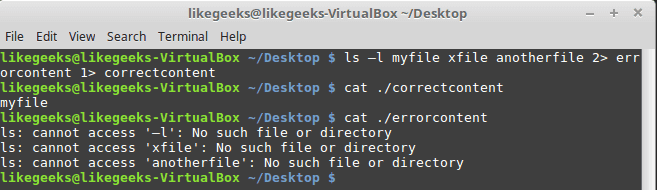
The ls command result is sent to the correctcontent file using the 1> symbol. And error messages were sent to the errorcontent file using the 2> symbol.
You can redirect normal output and errors to the same file using &> symbol like this:
ls –l myfile xfile anotherfile &> content
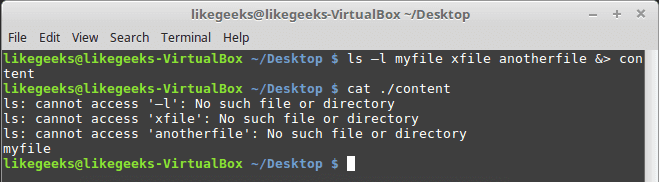
All errors and normal output are redirected to file named content.
Output Redirection
There are two ways for output redirection:
- Temporarily redirection.
- Permanently redirection.
Temporary Redirections
For temporary redirections, you can use the >&2 symbol like this:
#!/bin/bash
echo "Error message" >&2
echo "Normal message"

So if we run it, we will see both lines printed normally because as we know errors go to the screen by default.
You can redirect errors to a file like this:
./myscript 2> myfile
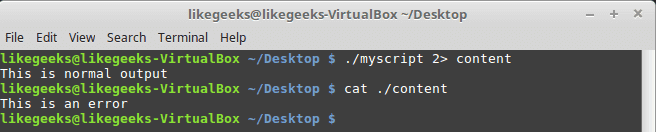
Shell scripting is Awesome! Normal output is sent to the screen, while the echo message which has >&2 symbol sends errors to the file.
Permanent Redirections
If you have much data that need to be redirected, you can have a permanent redirection using the exec command like this:
#!/bin/bash
exec 1>outfile
echo "Permanent redirection"
echo "from a shell to a file."
echo "without redirecting every line"
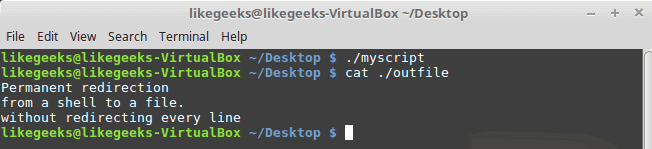
If we look at the file called outfile, we will see the output of the echo lines.
We redirect the STDOUT at the beginning, what about in the middle of a script like this:
#!/bin/bash
exec 2>myerror
echo "Script Begining ..."
echo "Redirecting Output"
exec 1>myfile
echo "Output goes to the myfile"
echo "Output goes to myerror file" >&2
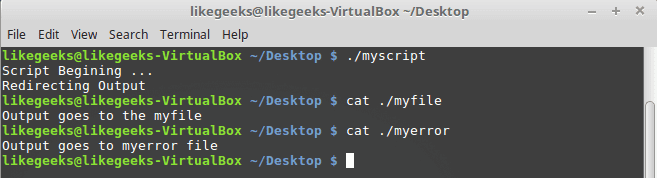
The exec command redirects all errors to the file myerror, and standard output is sent to the screen.
The statement exec 1>myfile is used to redirect output to the myfile file, and finally, errors go to myerror file using >&2 symbol.
Redirecting Input
You can redirect input to a file instead of STDIN using exec command like this:
exec 0< myfile
This command tells the shell to take the input from a file called myfile instead of STDIN and here is an example:
#!/bin/bash
exec 0< testfile
total=1
while read line
do
echo "#$total: $line"
total=$(( $total + 1 ))
done
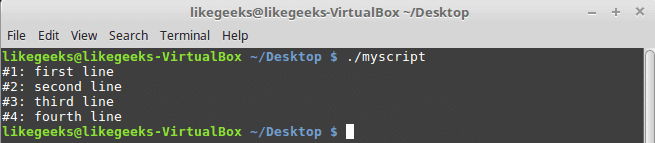
Shell scripting is easy.
You know how to use the read command to get user input. If you redirect the STDIN to a file, the read command will try to read from STDIN which points to the file.
Some Linux system administrators use this technique to read the log files for processing and we will discuss more ways to read the log on the upcoming posts in a professional way.
Creating Custom Redirection
You know that there are 9 file descriptors, you use only 3 of them for input, output, and error.
The remaining six file descriptors are available for use for input and output redirection.
The exec command is used to assign a file descriptor for output like this:
#!/bin/bash
exec 3>myfile
echo "This line appears on the screen"
echo "This line stored on myfile" >&3
echo "This line appears on the screen"
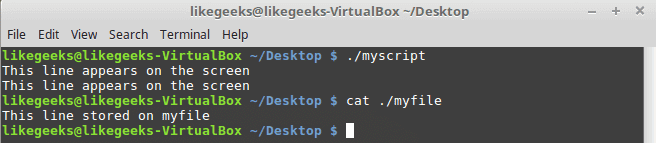
Creating Input File Descriptors
To redirect input file descriptors do the following:
1- Save the STDIN to another file descriptor.
2- Redirecting it to a file.
3- Revert STDIN to its original location.
Look at the following code to understand these steps:
#!/bin/bash
exec 7<&0
exec 0< myfile
total=1
while read line
do
echo "#$total: $line"
total=$(( $total + 1 ))
done
exec 0<&7
read -p "Finished? " res
case $res in
y) echo "Goodbye";;
n) echo "Sorry, this is the end.";;
esac
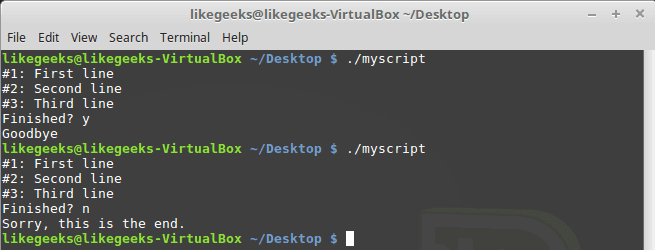
The STDIN is saved to file descriptor 7 and the STDIN is redirected to a file.
The STDIN reverted back to its original location after iterating over file lines.
The last read command just to make sure that STDIN is reverted back to and you can use the keyboard normally.
Close File Descriptors
The file descriptors are closed automatically when the script exits. If you want to close the file descriptor yourself, redirect the file descriptor to this symbol &- it will be closed.
#!/bin/bash
exec 3> myfile
echo "Testing ..." >&3
exec 3>&-
echo "Nothing works" >&3

As you can see, it gives error bad file descriptor because it is no longer exist.
lsof Command
The lsof command is used to list all the opened files on the system and background processes.
On many Linux systems like Fedora, the lsof command is located under /usr/sbin.
This is some of the important options for lsof command:
-p: for process ID.
-d: for the file descriptor.
You can get the process PID using $$ variable.
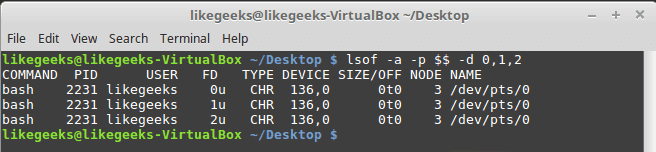
The -a is used to combine results of -p option and -d option.
Now, testing the command from a script:
#!/bin/bash
exec 4> myfile1
exec 5> myfile2
exec 6< myfile3
lsof -a -p $$ -d 0,1,2,4,5,6
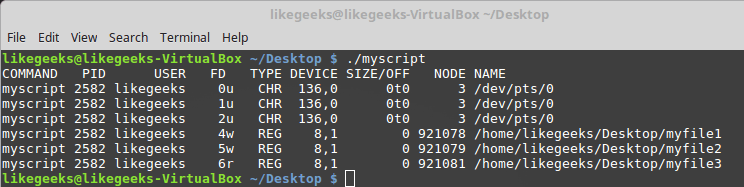
The shell script creates the file descriptors 4 and 5 for writing and 6 for reading.
Suppressing Command Output
Sometimes you don’t want to see any output. We redirect the output to the black hole which is /dev/null.
For example, we can suppress errors like this:
ls -al badfile anotherfile 2> /dev/null
And this idea is also used when you want to truncate a file without deleting it completely.
cat /dev/null > myfile
Now you understand the input, output, how to redirect them, how to create your own file descriptor, and redirect to it.
I hope you enjoy it. keep coming back.
Thank you.
Kernel’in 4.14.4 kararlı sürümü duyuruldu
Linux çekirdeği resmi sitesi: https://www.kernel.org
En son kararlı çekirdek:
4.14.4 2017-12-05
Değişiklik listesi…
Kernel’in 4.9.67 uzun süreli destek sürümü duyuruldu
Linux çekirdeği resmi sitesi: https://www.kernel.org
Uzun süreli destek sürümü:
4.9.67 2017-12-05
Değişiklik listesi…
Kernel’in 4.4.104 uzun süreli destek sürümü duyuruldu
Linux çekirdeği resmi sitesi: https://www.kernel.org
Uzun süreli destek sürümü:
4.4.104 2017-12-05
Değişiklik listesi…
Kernel’in 3.18.86 [EOL] uzun süreli destek sürümü duyuruldu
Linux çekirdeği resmi sitesi: https://www.kernel.org
Uzun süreli destek sürümü:
3.18.86 [EOL] 2017-12-05
Değişiklik listesi…
Configure and Use Linux-PAM
 In the previous post, we talked about Linux iptables firewall, and some people asked about authentication. Today we will talk about the powerful framework in Linux used for authentication which is Linux-PAM. PAM or Pluggable Authentication Modules are the management layer that sits between Linux applications and the Linux native authentication system. There are many programs on your system that use PAM modules like su, passwd, ssh and login and other services, we will discuss some of them. PAM main focus is to authenticate your users. Authentication in Linux is done by matching the encrypted password in /etc/shadow file with the entered one. We have many services on our systems that require authentication like SSH, FTP, TELNET, IMAP and many other services, so we will have a lot of authentication files besides /etc/shadow file to maintain, and it could be a serious problem if there is any inconsistent data between these authentication files. Here comes PAM. Linux-PAM offers a unified login system for your services.
To check if your program uses Linux-PAM or not:
$ ldd /bin/su
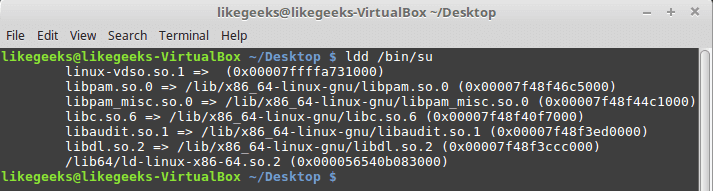
You should see libpam.so library.
Linux-PAM Configuration
The configuration of Linux-PAM is in the directory /etc/pam.d/.
Some PAM modules require configuration files with the PAM configuration to operate. You can find the configuration files in /etc/security
If PAM is misconfigured, this could lead to serious problems.
PAM Services
The four types of PAM services:
- Authentication service modules.
- Account management modules.
- Session management modules.
- Password management modules.
Any application requires authentication can register with PAM using a service name.
You can list Linux services that use Linux-PAM.
$ ls /etc/pam.d/
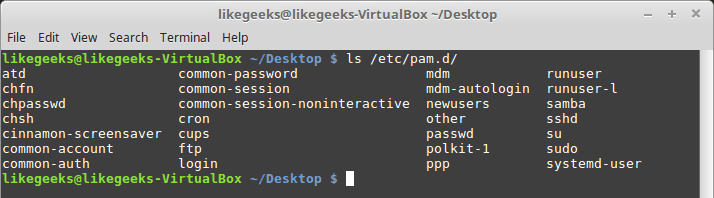
If you open any service file, you will see that the file is divided into three columns. The first column is management group, the second column is for control flags and the third column is the module (so file) used.
$ cat /etc/pam.d/sshd
account required pam_nologin.so
The account is the management group, required is the control flag and the used module is pam_nologin.so.
You may find a fourth column which is for module parameters.
Management Groups
There are four Management Groups you will see in PAM services files:
- Auth Group: it can validate users
- Account Group: controls the access to the service like how many times you should use this service.
- Session Group: responsible for the service environment.
- Password Group: for password updating.
Control Flags
We have four control flags in services files:
- Requisite: the strongest flag. If the requisite not found or failed to load, it will stop loading other modules and return failure.
- Required: The same as requisite, but if the module failed to load for any reason, it continues loading other modules and returns failure at the end of execution.
- Sufficient: if the module return success, the processing of other modules no longer needed.
- Optional: In the case of failure, the stack of modules continues execution and the return code is ignored.
Modules Order
The order is important because each module depends on the previous module on the stack.
If you try a configuration like the following to log in:
auth required pam_unix.so
auth optional pam_deny.so
That will work correctly, but what will happen if we change the order like this:
auth optional pam_deny.so
auth required pam_unix.so
No one can log in, so the order matters.
PAM Modules
There are PAM built-in modules on your system that you should know about, so you can use them perfectly.
pam_succeed_if Module
This module allows access for the specified groups. You can validate user accounts like this:
auth required pam_succeed_if.so gid=1000,2000
The above line states that only users in the group whose ID 1000 or 2000 are allowed to log in.
You can use uid as user id instead.
auth requisite pam_succeed_if.so uid >= 1000
In this example, any user id greater than or equal 1000 can log in.
You can also use it with ingroup parameter like this:
auth required pam_succeed_if.so user ingroup mygroup
Only people in the group named mygroup can log in.
pam_nologin Module
This module allows root only to log in if /etc/nologin file is available.
auth required pam_nologin.so
You can modify login service file with this line and create /etc/nologin file, so root only can log in.
This module used with auth, account management groups.
pam_access Module
This module works like the pam_succeed_if module except the pam_access module checks logging from networked hosts, while the pam_succeed_if module doesn’t care.
account required pam_access.so accessfile=/etc/security/access.conf
You can type your rules in the /etc/security/access.conf file like this:
+:mygroup
-:ALL:ALL
The above rules state that only mygroup users are allowed to log in while others can’t.
Where plus sign means allow and minus sign means deny.
This module is used with auth, account, session, password management groups.
pam_deny Module
The module is used to restricting access. It will always return a non-OK.
You can use it at the end of your module stack to protect yourself from any misconfiguration.
If you use it at the beginning of module stack, your service will be disabled:
auth required pam_deny.so
auth required pam_unix.so
This module is used with auth, account, session, password management groups.
pam_unix Module
This module is used to check user’s credentials against /etc/shadow file.
auth required pam_unix.so
You will see this module used in many services in your system.
This module is used with auth, session, password management groups.
pam_localuser Module
This module is used to check if the user is listed in /etc/passwd.
account sufficient pam_localuser.so
This module is used with auth, session, password, account management groups.
pam_mysql Module
Instead of checking user’s credentials against/etc/shadow, you can use a MySQL database as a backend using the pam_mysql module.
It can be used like this:
auth sufficient pam_mysql.so user=myuser passwd=mypassword host=localhost db=mydb table=users usercolumn=username passwdcolumn=password
The parameters for pam_mysql is used to validate the user.
You can install if it is not on your system like this:
$ yum install libpam-mysql
This module is used with auth, session, password, account management groups.
pam_cracklib module
Strong passwords are a must these days. This module ensures that you will use strong passwords.
password required pam_cracklib.so retry=4 minlen=12 difok=6
This example ensures that:
Password minimum length = 12
Four times to pick a string password, otherwise, it will exit.
Your new password must have 6 new characters from the old password.
This module is used with password management group.
pam_rootok Module
This module checks if the user ID is 0 that means only root users can run this service.
auth sufficient pam_rootok.so
You can use this module to ensure that a specific service is allowed for root users only.
This module is used with auth management group.
pam_limits Module
This module is used to set limits on the system resources, even root users are affected by these limits.
The limits configuration are in the /etc/security/limits.conf and /etc/security/limits.d/ directory.
session required pam_limits.so
You can use this module to protect your system resources.
This module is used with session management group.
The limits in /etc/security/limits.conf file could be hard or soft.
Hard: The user cannot change its value, but root can.
Soft: normal user can change it.
The limits could be fsize, cpu, nproc, nproc, data and many other limits.
@mygroup hard nproc 50
myuser hard cpu 5000
The first limit for mygroup members which sets the number of processes for each one of them to be 50.
The second limit for the user named myuser which limits the CPU time to 5000 minutes.
You can edit any PAM service file in /etc/pam.d/ and use the module you want to protect your services the way you want.
I hope you find using Linux PAM modules easy and useful.
Thank you.