 You can think of Linux runlevels as different “modes” that the operating system runs in. Each of these modes, or runlevels, has its own list of processes and services that are either turned on or off. From the time Linux boots up, it’s always in some runlevel. This runlevel may change as you continue to use your computer, depending on what kind of services the operating system needs access to. For example, running your Linux machine with a graphical user interface will necessitate a different runlevel than if you were only running the command line on your system. This is because the graphical user interface will need access to various services that the command line simply does not. In order for the system to determine which services are needed to be switched on (or off), it changes the runlevel as needed.
Importance of Linux runlevels
You may have used Linux for years without realizing that there are different runlevels. That’s because it’s not something most server administrators will need to configure often.
However, Linux runlevels do give administrators increased control over the systems they manage.
The runlevel a system is in can be changed (which we will see how to do later in the article), as can the services which run inside the runlevels. This allows us complete control over what services our systems have access to at any given time.
How many runlevels are in Linux?
There are seven different runlevels in Linux, numbered from zero to six. Various distributions may use the seven runlevels differently, so it’s not very easy to compile a definitive list of what the runlevels do.
Instead, you would need to check how the runlevels work on the specific distribution that you are using. For the most part, the list below represents how Linux distributions generally configure runlevels:
Runlevel 0 shuts down the system.
Runlevel 1 is a single-user mode, which is used for maintenance or administrative tasks. You may also see this mode referred to as runlevel S (the S stands for single-user).
Runlevel 2 is a multi-user mode. This runlevel does not use any networking services.
Runlevel 3 is a multi-user mode with networking. This is the normal runlevel you are used to if you use a system that doesn’t boot into a GUI (graphical user interface).
Runlevel 4 is not used. The user can customize this runlevel for their own purposes (which we will cover how to do later in the article).
Runlevel 5 is the same as runlevel 3, but it also starts a display manager. This is the runlevel you are used to if you use a system that boots into a GUI.
Runlevel 6 reboots the system.
What is my current runlevel?
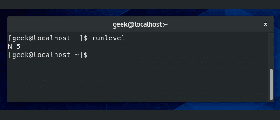
You can see your current runlevel on most distributions by simply typing “runlevel” in the terminal.
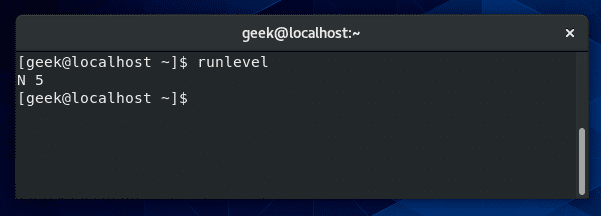
When you enter the “runlevel” command, it’ll give you two different numbers. The first number is the previous runlevel your system was running, and the second number is the current runlevel of your system.
In the screenshot above, the “N” is short for “none”, meaning that the system was not in any different runlevel previously. The “5” means our system is currently in runlevel 5.
We are running CentOS in this example, which booted directly into a graphical interface, hence why the system went straight to runlevel 5.
How to change the current runlevel?
You can change the current runlevel of your system using the “telinit” command. For example, to change to runlevel 3 on CentOS, you would type:
telinit 3
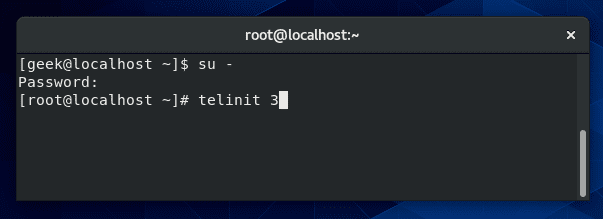
Keep in mind that you must be the root user to execute this command. Be aware that runlevels work differently on Debian and Ubuntu – for example, Ubuntu will boot into runlevel 5 even without starting a GUI.
If you follow the example above, your screen may go blank. This is because you’re left at the – now empty – tty. Just do Alt+F1 (or some other function key) on your keyboard to be taken to a working terminal.
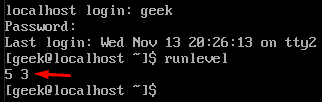
If we use the “runlevel” command again, we’ll see that we are now in runlevel 3, and the previous runlevel is listed as 5 since we just changed from it.
Linux systemd targets vs runlevels
In recent years, systemd has come to replace the long-standing “System V init” (runlevels) system. It still works in basically the same way, but uses some new commands and commonly refers to “runlevels” as “targets” instead.
Runlevel 0 = poweroff.target (runlevel0.target)
Runlevel 1 = rescue.target (runlevel1.target)
Runlevel 2 = multi-user.target (runlevel2.target)
Runlevel 3 = multi-user.target (runlevel3.target)
Runlevel 4 = multi-user.target (runlevel4.target)
Runlevel 5 = graphical.target (runlevel5.target)
Runlevel 6 = reboot.target (runlevel6.target)
We’ll continue going over systemd and the commands you’ll need to know as this tutorial progresses.
How to change the default runlevel at startup?
There are a lot of reasons why you may wish to boot into a different runlevel. For example, it’s common for system administrators to boot into the command line, and only start a graphical interface when deemed necessary.
For this functionality, you would want to make sure your default runlevel is set to 3, and not 5.
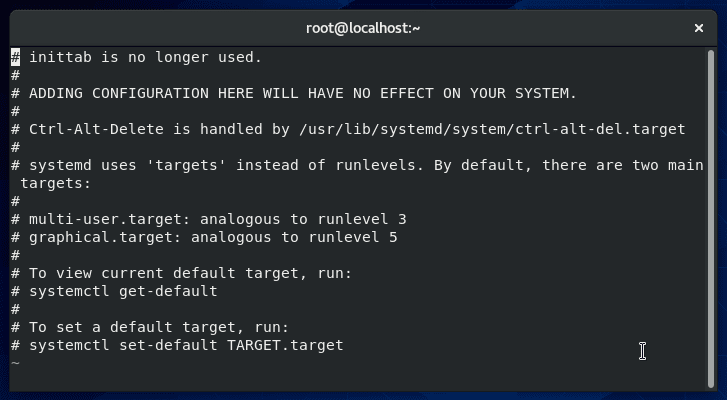
In the past, one was required to edit the /etc/inittab file to define the default runlevel at startup. You may still find this to be the case on some distributions.
If working with an operating system that has not been upgraded for a few years, you’ll still find this method to be relevant for you.
vi /etc/inittab
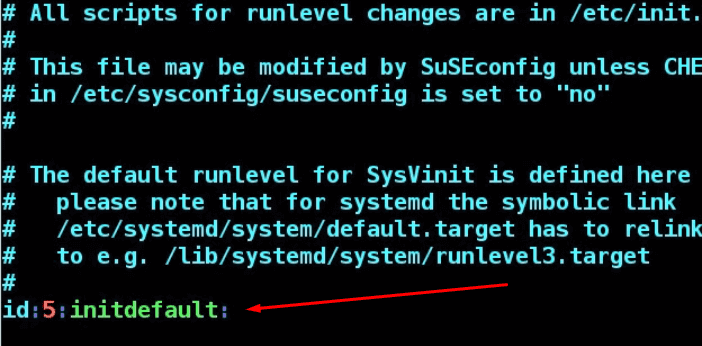
In the screenshot above, runlevel 5 is currently set to the default runlevel for the startup.
As of 2016, most major Linux distributions have phased out the /etc/inittab file, in favor of systemd targets – we’ll cover the differences later in this article.
You may find that your system doesn’t have the /etc/inittab file at all, or your inittab file may advise you to use systemd instead like, in this screenshot from our CentOS system.
To check the current default target of your system:
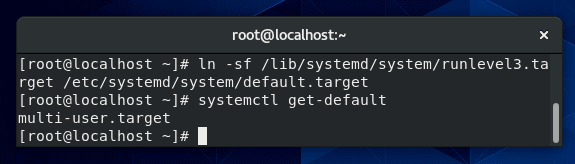
systemctl get-default
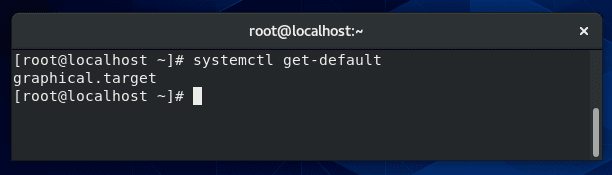
In the screenshot above, the reply back from the system is “graphical.target”. As you can probably guess, this is the equivalent to runlevel 5.
To see the other available targets, and the runlevels they are associated with, type:
ls -l /lib/systemd/system/runlevel*
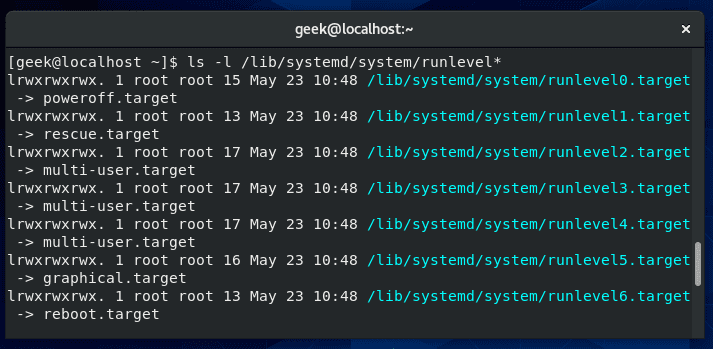
These symbolic links tell us that the systemd targets pretty much operate the same way runlevels do. So, how can we change the default runlevel (or target) at startup? We need to create a new symbolic link, like this:
ln -sf /lib/systemd/system/runlevel3.target /etc/systemd/system/default.target
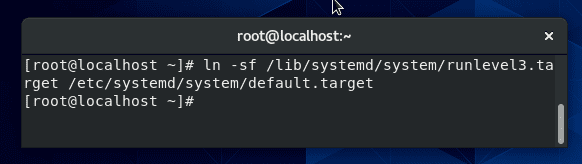
This command will change our default runlevel to 3, so the next time we reboot, our system will be in runlevel 3 instead of 5. If you wanted a different runlevel, you would just substitute a different number in place of the “3” in the command.
For reference, the -f switch in that command indicates that the target file should be removed, before creating the new link. You could also just remove it first with a simple rm command.
You can confirm that the change was made successfully with the “systemctl get-default” command again.
Runlevel 3 vs runlevel 5
The two runlevels you will hear about and work with the most are going to be 3 and 5. It basically boils down to this: runlevel 3 is a command line, and runlevel 5 is a graphical user interface.
Of course, not every distribution follows this convention, and your system could be configured by an admin so that these runlevels have even more differences.
But, in general, that’s how it works. If you want to see exactly what services are enabled at both of these runlevels, we cover that in the next section.
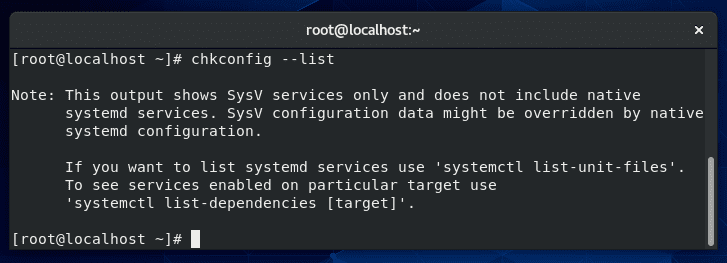
List services that are enabled at a particular runlevel
Up till recent years, “chkconfig –list” was the command to list the services that would be enabled at different runlevels. If your operating system is up to date, that command may give you an error or defer you over to systemd.
If we want to see what services will be started when we boot into graphical mode (runlevel 5), we can run this command:
Runlevel 3 vs runlevel 5
The two runlevels you will hear about and work with the most are going to be 3 and 5. It basically boils down to this: runlevel 3 is a command line, and runlevel 5 is a graphical user interface.
Of course, not every distribution follows this convention, and your system could be configured by an admin so that these runlevels have even more differences.
But, in general, that’s how it works. If you want to see exactly what services are enabled at both of these runlevels, we cover that in the next section.
List services that are enabled at a particular runlevel
Up till recent years, “chkconfig –list” was the command to list the services that would be enabled at different runlevels. If your operating system is up to date, that command may give you an error or defer you over to systemd.
If we want to see what services will be started when we boot into graphical mode (runlevel 5), we can run this command:
systemctl list-dependencies graphical.target
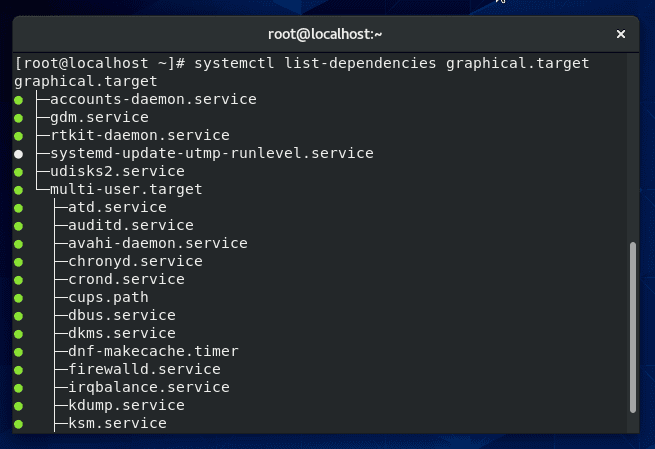
To see the services that run by default on other runlevels, just replace “graphical.target” with the name of the target you need to see.
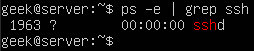
Under which runlevel will a process run?
If you’d like to see which runlevel(s) a specific service runs at, you can use this command:
systemctl show -p WantedBy [name of service]
For example, if you wanted to see at which runlevel the SSH daemon will run, you would type:
systemctl show -p WantedBy sshd.service
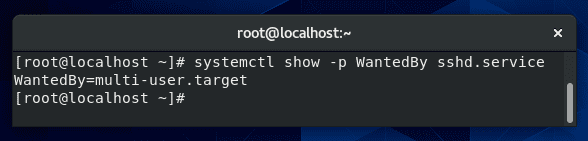
According to the output in the above screenshot, the SSH service will start on runlevels 2, 3, and 4 (multi-user.target)
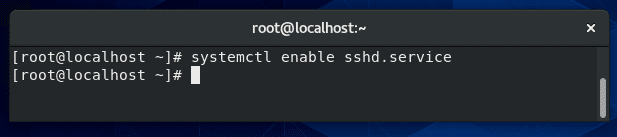
How to change the runlevel of an application?
As seen above, our SSH service is only running at runlevels 2-4 (multi-user.target). What if we also want it to start when we boot into a graphical interface – runlevel 5 (graphical.target)? We could apply that configuration with the following command:
systemctl enable sshd.service
Security issues with runlevels in Linux
As we said earlier in this article, the point of Linux runlevels is to give an administrator control over what services run under certain conditions. Having this type of granular control over your system enhances security since you can be sure that there are no extraneous services running.
The problem can arise when an administrator is unaware of exactly what services are running, therefore doesn’t bother to secure those attack surfaces.
You can use the methods in this guide to configure your default runlevel and to control which applications are running. These practices will not only free up system resources, but also keep your server more secure.
Remember to only use the runlevel you need. For example, there is no sense in starting runlevel 5 (graphical interface) if you only plan to use the terminal.
Changing to a different runlevel will introduce multiple new services, some of which may run completely in the background and you may forget to secure them.
Which runlevel is the best for me?
Determining which runlevel is the best for you all depends on the situation. Generally, you are probably going to be using runlevels 3 and 5 on a regular basis.
If you are comfortable with the command line and don’t need a graphical interface, runlevel 3 (on most distributions) is going to be best for you.
This will keep unnecessary services from running. On the other hand, if you want more of a desktop experience and a graphical interface to use various apps, etc, then runlevel 5 will be your preferred runlevel.
If you need to perform maintenance on a production server, runlevel 1 suits that situation well. This is used to ensure that you are the only one on the server (the network service is not even started), and you can perform your maintenance uninterrupted.
In rare cases, you may even need to use runlevel 4. This would only be in particular situations where you or the system administrator has a custom configured runlevel. We will cover how to do that in the next section.
As you have probably assumed, you won’t (and can’t) run your system in runlevels 0 or 6, but it’s possible to switch to them just to reboot or power off. Doing so shouldn’t ordinarily be necessary since there are other commands that do that for us.
Can we create a new runlevel in Linux?
It is possible to create a new runlevel in Linux, but it’s extremely unlikely that you would ever need to do that. If you were determined to do it anyway, you can start by copying one of the existing systemd targets, and then editing it with your own customizations.
The targets are located in:
/usr/lib/systemd/system
If you wanted to base your new runlevel/target off of graphical.target (runlevel 5), copy that directory to your new target directory.
cp /usr/lib/systemd/system/graphical.target /usr/lib/systemd/system/mynew.target
After that, create a new “wants” directory, like so:
mkdir /etc/systemd/system/mynew.target.wants
And then symlink the additional services from /usr/lib/systemd/system that you want to enable for your new runlevel.
I hope you find the tutorial useful. Keep coming back.


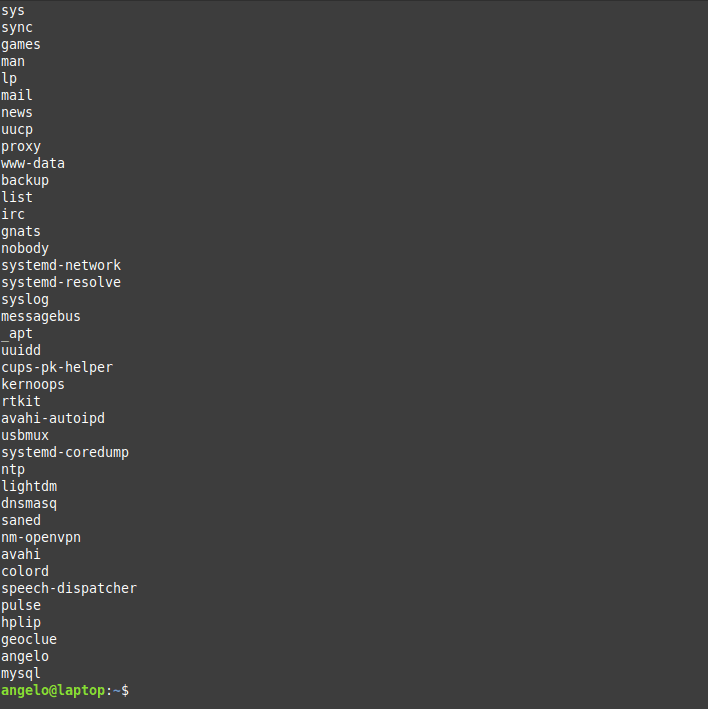
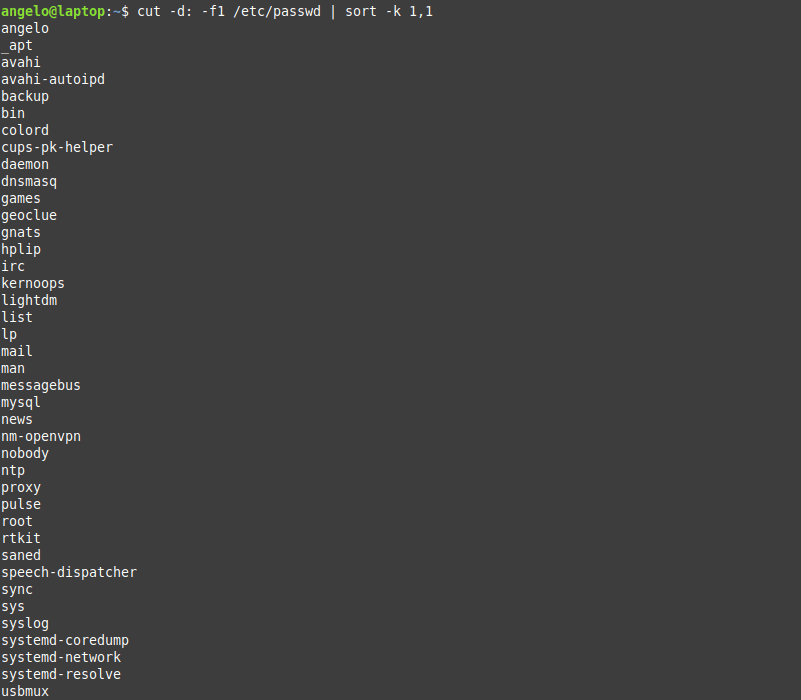
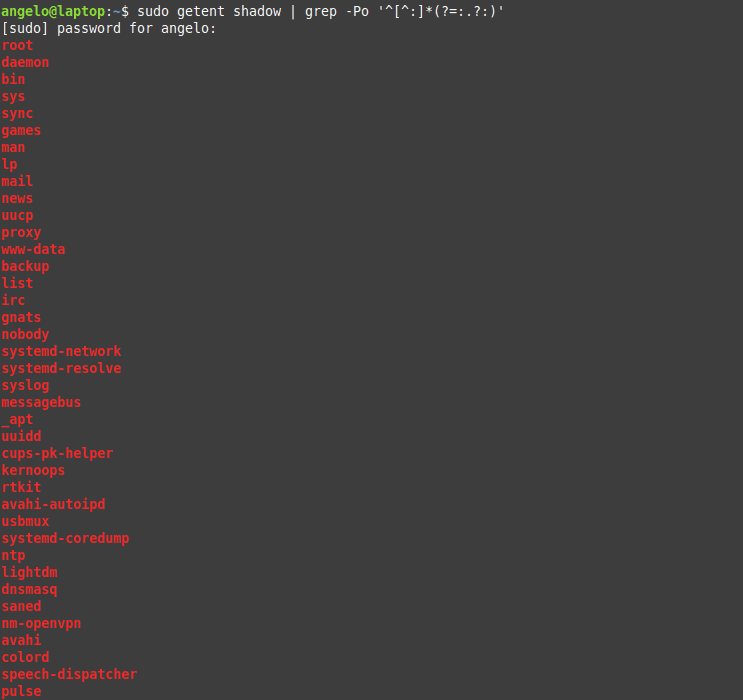
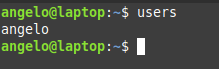
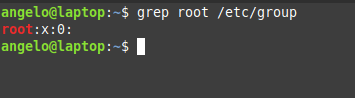
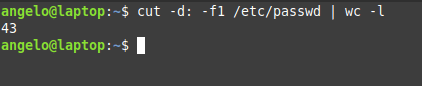
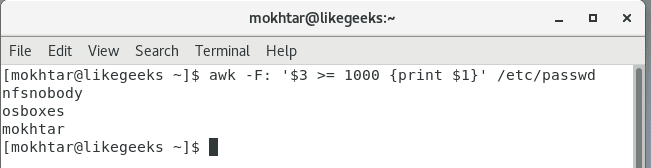
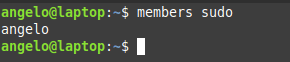
 In this post, you will learn about listing users in


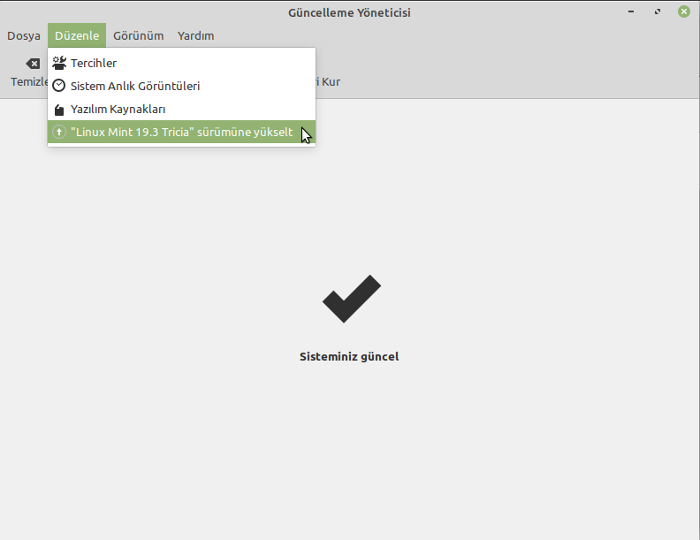
 Değerli dostumuz @caylakpenguen, yine ilginç bir konuya değinmiş. Dostumuz, bu kez, “
 Bilindiği gibi,