Tag Archives | 15+ examples

15+ examples for Linux cURL command

In this tutorial, we will cover the cURL command in Linux. Follow along as we guide you through the functions of this powerful utility with examples to help you understand everything it’s capable of. The cURL command is used to download or upload data to a server, using one of its 20+ supported protocols. This data could be a file, email message, or web page. cURL is an ideal tool for interacting with a website or API, sending requests and displaying the responses to the terminal or logging the data to a file. Sometimes it’s used as part of a larger script, handing off the retrieved data to other functions for processing. Since cURL can be used to retrieve files from servers, it’s often used to download part of a website. It performs this function well, but sometimes the wget command is better suited for that job. We’ll go over some of the differences and similarities between wget and cURL later in this article. We’ll show you how to get started using cURL in the sections below.

Continue Reading →

Download a file

The most basic command we can give to cURL is to download a website or file. cURL will use HTTP as its default protocol unless we specify a different one. To download a website, just issue this command:

curl http://www.google.com

Of course, enter any website or page that you want to retrieve.

curl basic command

Doing a basic command like this with no extra options will rarely be useful, because this only tells cURL to retrieve the source code of the page you’ve provided.
curl output

When we ran our command, our terminal is filled with HTML and other web scripting code – not something that is particularly useful to us in this form.

Let’s download the website as an HTML document instead, that way the content can be displayed. Add the –output option to cURL to achieve this.

curl www.likegeeks.com --output likegeeks.html
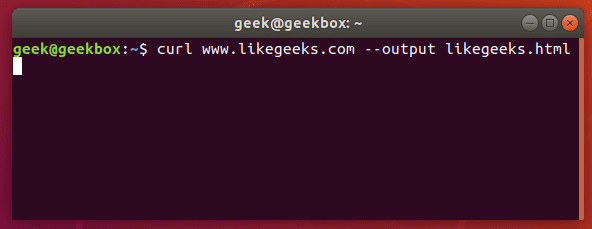
curl output switch

Now the website we downloaded can be opened and displayed in a web browser.

downloaded website

If you’d like to download an online file, the command is about the same. But make sure to append the –output option to cURL as we did in the example above.

If you fail to do so, cURL will send the binary output of the online file to your terminal, which will likely cause it to malfunction.

Here’s what it looks like when we initiate the download of a 500KB word document.
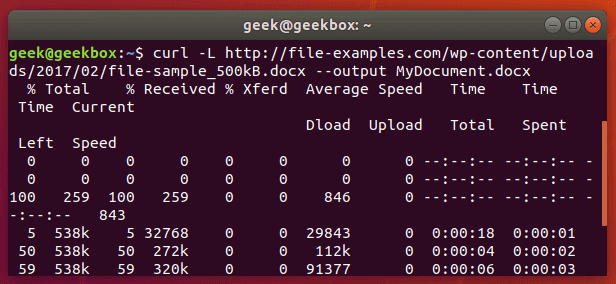
curl download document

The word document begins to download and the current progress of the download is shown in the terminal. When the download completes, the file will be available in the directory we saved it to.

In this example, no directory was specified, so it was saved to our present working directory (the directory from which we ran the cURL command).

Also, did you notice the -L option that we specified in our cURL command? It was necessary in order to download this file, and we go over its function in the next section.

Follow redirect

If you get an empty output when trying to cURL a website, it probably means that the website told cURL to redirect to a different URL. By default, cURL won’t follow the redirect, but you can tell it to with the -L switch.

curl -L www.likegeeks.com

curl follow redirect

In our research for this article, we found it was necessary to specify the -L on a majority of websites, so be sure to remember this little trick. You may even want to append it to the majority of your cURL commands by default.

Stop and resume download

If your download gets interrupted, or if you need to download a big file but don’t want to do it all in one session, cURL provides an option to stop and resume the transfer.

To stop a transfer manually, you can just end the cURL process the same way you’d stop almost any process currently running in your terminal, with a ctrl+c combination.
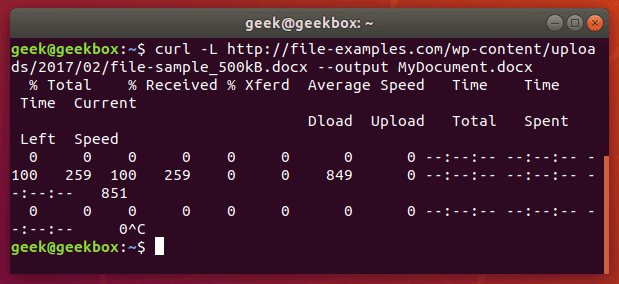
curl stop download

Our download has begun, but was interrupted with ctrl+c, now let’s resume it with the following syntax:

curl -C - example.com/some-file.zip --output MyFile.zip

The -C switch is what resumes our file transfer, but also notice that there is a dash (-) directly after it. This tells cURL to resume the file transfer, but to first look at the already downloaded portion in order to see the last byte downloaded and determine where to resume.
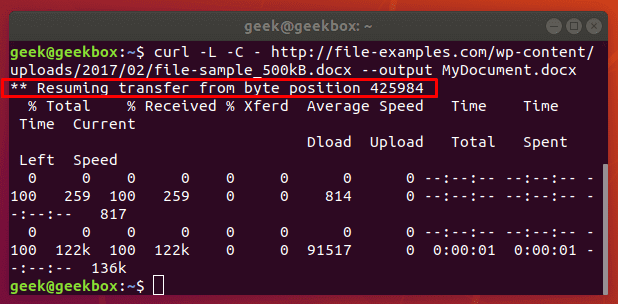
resume file download

Our file transfer was resumed and then proceeded to finish downloading successfully.

Specify timeout

If you want cURL to abandon what it’s doing after a certain amount of time, you can specify a timeout in the command. This is especially useful because some operations in cURL don’t have a timeout by default, so one needs to be specified if you don’t want it getting hung up indefinitely.

You can specify a maximum time to spend executing a command with the -m switch. When the specified time has elapsed, cURL will exit whatever it’s doing, even if it’s in the middle of downloading or uploading a file.

cURL expects your maximum time to be specified in seconds. So, to timeout after one minute, the command would look like this:

curl -m 60 example.com

Another type of timeout that you can specify with cURL is the amount of time to spend connecting. This helps make sure that cURL doesn’t spend an unreasonable amount of time attempting to contact a host that is offline or otherwise unreachable.

It, too, accepts seconds as an argument. The option is written as –connect-timeout.

curl --connect-timeout 60 example.com

Using a username and a password

You can specify a username and password in a cURL command with the -u switch. For example, if you wanted to authenticate with an FTP server, the syntax would look like this:

curl -u username:password ftp://example.com

curl authenticate

You can use this with any protocol, but FTP is frequently used for simple file transfers like this.

If we wanted to download the file displayed in the screenshot above, we just issue the same command but use the full path to the file.

curl -u username:password ftp://example.com/readme.txt
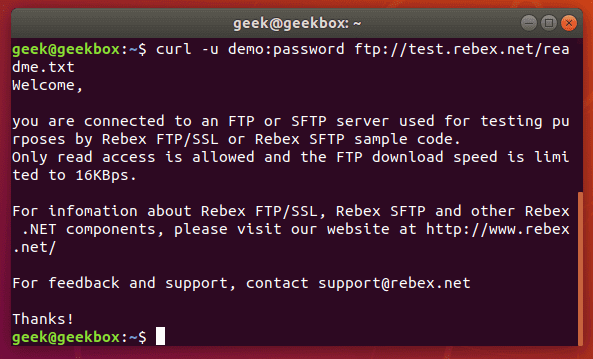
curl authenticate download

Use proxies

It’s easy to direct cURL to use a proxy before connecting to a host. cURL will expect an HTTP proxy by default, unless you specify otherwise.

Use the -x switch to define a proxy. Since no protocol is specified in this example, cURL will assume it’s an HTTP proxy.

curl -x 192.168.1.1:8080 http://example.com

This command would use 192.168.1.1 on port 8080 as a proxy to connect to example.com.

You can use it with other protocols as well. Here’s an example of what it’d look like to use an HTTP proxy to cURL to an FTP server and retrieve a file.

curl -x 192.168.1.1:8080 ftp://example.com/readme.txt

cURL supports many other types of proxies and options to use with those proxies, but expanding further would be beyond the scope of this guide. Check out the cURL man page for more information about proxy tunneling, SOCKS proxies, authentication, etc.

Chunked download large files

We’ve already shown how you can stop and resume file transfers, but what if we wanted cURL to only download a chunk of a file? That way, we could download a large file in multiple chunks.

It’s possible to download only certain portions of a file, in case you needed to stay under a download cap or something like that. The –range flag is used to accomplish this.
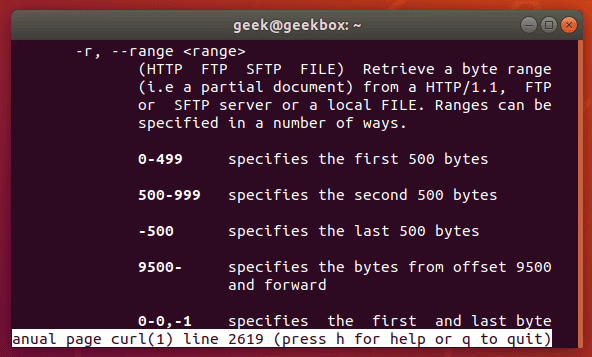
curl range man

Sizes must be written in bytes. So if we wanted to download the latest Ubuntu .iso file in 100 MB chunks, our first command would look like this:

curl --range 0-99999999 http://releases.ubuntu.com/18.04/ubuntu-18.04.3-desktop-amd64.iso ubuntu-part1

The second command would need to pick up at the next byte and download another 100 MB chunk.

curl --range 0-99999999 http://releases.ubuntu.com/18.04/ubuntu-18.04.3-desktop-amd64.iso ubuntu-part1

curl --range 100000000-199999999 http://releases.ubuntu.com/18.04/ubuntu-18.04.3-desktop-amd64.iso ubuntu-part2

Repeat this process until all the chunks are downloaded. The last step is to combine the chunks into a single file, which can be done with the cat command.

cat ubuntu-part? > ubuntu-18.04.3-desktop-amd64.iso

Client certificate

To access a server using certificate authentication instead of basic authentication, you can specify a certificate file with the –cert option.

curl --cert path/to/cert.crt:password ftp://example.com

cURL has a lot of options for the format of certificate files.
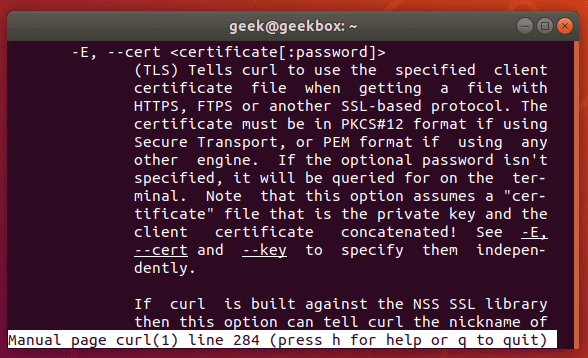
curl cert

There are more certificate related options, too: –cacert, –cert-status, –cert-type, etc. Check out the man page for a full list of options.

Silent cURL

If you’d like to suppress cURL’s progress meter and error messages, the -s switch provides that feature. It will still output the data you request, so if you’d like the command to be 100% silent, you’d need to direct the output to a file.

Combine this command with the -O flag to save the file in your present working directory. This will ensure that cURL returns with 0 output.

curl -s -O http://example.com

Alternatively, you could use the –output option to choose where to save the file and specify a name.

curl -s http://example.com --output index.html

curl silent

Get headers

Grabbing the header of a remote address is very simple with cURL, you just need to use the -I option.

curl -I example.com
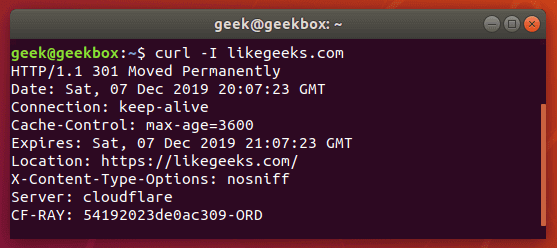
curl headers

If you combine this with the –L option, cURL will return the headers of every address that it’s redirected to.

curl -I -L example.com

Multiple headers

You can pass headers to cURL with the -H option. And to pass multiple headers, you just need to use the -H option multiple times. Here’s an example:

curl -H 'Connection: keep-alive' -H 'Accept-Charset: utf-8 ' http://example.com

Post (upload) file

POST is a common way for websites to accept data. For example, when you fill out a form online, there’s a good chance that the data is being sent from your browser using the POST method. To send data to a website in this way, use the -d option.

curl -d 'name=geek&location=usa' http://example.com

To upload a file, rather than text, the syntax would look like this:

curl -d @filename http://example.com

Use as many -d flags as you need in order to specify all the different data or filenames that you are trying to upload.

You can the -T option if you want to upload a file to an FTP server.

curl -T myfile.txt ftp://example.com/some/directory/

Send an email

Sending an email is simply uploading data from your computer (or another device) to an email server. Since cURL is able to upload data, we can use it to send emails. There are a slew of options, but here’s an example of how to send an email through an SMTP server:

curl smtp://mail.example.com --mail-from me@example.com --mail-rcpt john@domain.com --upload-file email.txt

Your email file would need to be formatted correctly. Something like this:

cat email.txt

From: Web Administrator <me@example.com>

To: John Doe <john@domain.com>

Subject: An example email

Date: Sat, 7 Dec 2019 02:10:15

John,

Hope you have a great weekend.

-Admin

As usual, more granular and specialized options can be found in the man page of cURL.

Read email message

cURL supports IMAP (and IMAPS) and POP3, both of which can be used to retrieve email messages from a mail server.

Login using IMAP like this:

curl -u username:password imap://mail.example.com

This command will list available mailboxes, but not view any specific message. To do this, specify the UID of the message with the –X option.

curl -u username:password imap://mail.example.com -X 'UID FETCH 1234'

Difference between cURL and wget

Sometimes people confuse cURL and wget because they’re both capable of retrieving data from a server. But this is the only thing they have in common.

We’ve shown in this article what cURL is capable of. wget provides a different set of functions. wget is the best tool for downloading websites and is capable of recursively traversing directories and links to download entire sites.

For downloading websites, use wget. If using some protocol other than HTTP or HTTPS, or for uploading files, use cURL. cURL is also a good option for downloading individual files from the web, although wget does that fine, too.

I hope you find the tutorial useful. Keep coming back.

0

15+ examples for Linux cURL command

In this tutorial, we will cover the cURL command in Linux. Follow along as we guide you through the functions of this powerful utility with examples to help you understand everything it’s capable of. The cURL command is used to download or upload data to a server, using one of its 20+ supported protocols. This data could be a file, email message, or web page. What is cURL command? cURL is an ideal tool for interacting with a website or API, sending requests and displaying the responses to the terminal or logging the data to a file. Sometimes it’s used as part of a larger script, handing off the retrieved data to other functions for processing. Since cURL can be used to retrieve files from servers, it’s often used to download part of a website. It performs this function well, but sometimes the wget command is better suited for that job. We’ll go over some of the differences and similarities between wget and cURL later in this article. We’ll show you how to get started using cURL in the sections below.

Continue Reading →

Download a file

The most basic command we can give to cURL is to download a website or file. cURL will use HTTP as its default protocol unless we specify a different one. To download a website, just issue this command:

curl http://www.google.com

Of course, enter any website or page that you want to retrieve.

curl basic command

Doing a basic command like this with no extra options will rarely be useful, because this only tells cURL to retrieve the source code of the page you’ve provided.

curl output

When we ran our command, our terminal is filled with HTML and other web scripting code – not something that is particularly useful to us in this form.

Let’s download the website as an HTML document instead, that way the content can be displayed. Add the –output option to cURL to achieve this.
curl output switch

Now the website we downloaded can be opened and displayed in a web browser.

downloaded website

If you’d like to download an online file, the command is about the same. But make sure to append the –output option to cURL as we did in the example above.

If you fail to do so, cURL will send the binary output of the online file to your terminal, which will likely cause it to malfunction.

Here’s what it looks like when we initiate the download of a 500KB word document.

curl download document

The word document begins to download and the current progress of the download is shown in the terminal. When the download completes, the file will be available in the directory we saved it to.

In this example, no directory was specified, so it was saved to our present working directory (the directory from which we ran the cURL command).

Also, did you notice the -L option that we specified in our cURL command? It was necessary in order to download this file, and we go over its function in the next section.

Follow redirect

If you get an empty output when trying to cURL a website, it probably means that the website told cURL to redirect to a different URL. By default, cURL won’t follow the redirect, but you can tell it to with the -L switch.

curl -L www.likegeeks.com

curl follow redirect

In our research for this article, we found it was necessary to specify the -L on a majority of websites, so be sure to remember this little trick. You may even want to append it to the majority of your cURL commands by default.

Stop and resume download

If your download gets interrupted, or if you need to download a big file but don’t want to do it all in one session, cURL provides an option to stop and resume the transfer.

To stop a transfer manually, you can just end the cURL process the same way you’d stop almost any process currently running in your terminal, with a ctrl+c combination.

curl stop download

Our download has begun, but was interrupted with ctrl+c, now let’s resume it with the following syntax:

curl -C - example.com/some-file.zip --output MyFile.zip

The -C switch is what resumes our file transfer, but also notice that there is a dash (-) directly after it. This tells cURL to resume the file transfer, but to first look at the already downloaded portion in order to see the last byte downloaded and determine where to resume.

resume file download

Our file transfer was resumed and then proceeded to finish downloading successfully.

Specify timeout

If you want cURL to abandon what it’s doing after a certain amount of time, you can specify a timeout in the command. This is especially useful because some operations in cURL don’t have a timeout by default, so one needs to be specified if you don’t want it getting hung up indefinitely.

You can specify a maximum time to spend executing a command with the -m switch. When the specified time has elapsed, cURL will exit whatever it’s doing, even if it’s in the middle of downloading or uploading a file.

cURL expects your maximum time to be specified in seconds. So, to timeout after one minute, the command would look like this:

curl -m 60 example.com

Another type of timeout that you can specify with cURL is the amount of time to spend connecting. This helps make sure that cURL doesn’t spend an unreasonable amount of time attempting to contact a host that is offline or otherwise unreachable.

It, too, accepts seconds as an argument. The option is written as –connect-timeout.

curl --connect-timeout 60 example.com

Using a username and a password

You can specify a username and password in a cURL command with the -u switch. For example, if you wanted to authenticate with an FTP server, the syntax would look like this:

curl -u username:password ftp://example.com

curl authenticate

You can use this with any protocol, but FTP is frequently used for simple file transfers like this.

If we wanted to download the file displayed in the screenshot above, we just issue the same command but use the full path to the file.

curl -u username:password ftp://example.com/readme.txt

curl authenticate download

Use proxies

It’s easy to direct cURL to use a proxy before connecting to a host. cURL will expect an HTTP proxy by default, unless you specify otherwise.

Use the -x switch to define a proxy. Since no protocol is specified in this example, cURL will assume it’s an HTTP proxy.

curl -x 192.168.1.1:8080 http://example.com

This command would use 192.168.1.1 on port 8080 as a proxy to connect to example.com.

You can use it with other protocols as well. Here’s an example of what it’d look like to use an HTTP proxy to cURL to an FTP server and retrieve a file.

curl -x 192.168.1.1:8080 ftp://example.com/readme.txt

cURL supports many other types of proxies and options to use with those proxies, but expanding further would be beyond the scope of this guide. Check out the cURL man page for more information about proxy tunneling, SOCKS proxies, authentication, etc.

Chunked download large files

We’ve already shown how you can stop and resume file transfers, but what if we wanted cURL to only download a chunk of a file? That way, we could download a large file in multiple chunks.

It’s possible to download only certain portions of a file, in case you needed to stay under a download cap or something like that. The –range flag is used to accomplish this.

curl range man

Sizes must be written in bytes. So if we wanted to download the latest Ubuntu .iso file in 100 MB chunks, our first command would look like this:

curl --range 0-99999999 http://releases.ubuntu.com/18.04/ubuntu-18.04.3-desktop-amd64.iso ubuntu-part1

The second command would need to pick up at the next byte and download another 100 MB chunk.

curl --range 0-99999999 http://releases.ubuntu.com/18.04/ubuntu-18.04.3-desktop-amd64.iso ubuntu-part1

curl --range 100000000-199999999 http://releases.ubuntu.com/18.04/ubuntu-18.04.3-desktop-amd64.iso ubuntu-part2

Repeat this process until all the chunks are downloaded. The last step is to combine the chunks into a single file, which can be done with the cat command.

cat ubuntu-part? > ubuntu-18.04.3-desktop-amd64.iso

Client certificate

To access a server using certificate authentication instead of basic authentication, you can specify a certificate file with the –cert option.

curl --cert path/to/cert.crt:password ftp://example.com

cURL has a lot of options for the format of certificate files.

curl cert

There are more certificate related options, too: –cacert, –cert-status, –cert-type, etc. Check out the man page for a full list of options.

Silent cURL

If you’d like to suppress cURL’s progress meter and error messages, the -s switch provides that feature. It will still output the data you request, so if you’d like the command to be 100% silent, you’d need to direct the output to a file.

Combine this command with the -O flag to save the file in your present working directory. This will ensure that cURL returns with 0 output.

curl -s -O http://example.com

Alternatively, you could use the –output option to choose where to save the file and specify a name.

curl -s http://example.com --output index.html

curl silent

Get headers

Grabbing the header of a remote address is very simple with cURL, you just need to use the -I option.

curl -I example.com

curl headers

If you combine this with the –L option, cURL will return the headers of every address that it’s redirected to.

curl -I -L example.com

Multiple headers

You can pass headers to cURL with the -H option. And to pass multiple headers, you just need to use the -H option multiple times. Here’s an example:

curl -H 'Connection: keep-alive' -H 'Accept-Charset: utf-8 ' http://example.com

Post (upload) file

POST is a common way for websites to accept data. For example, when you fill out a form online, there’s a good chance that the data is being sent from your browser using the POST method. To send data to a website in this way, use the -d option.

curl -d 'name=geek&location=usa' http://example.com

To upload a file, rather than text, the syntax would look like this:

curl -d @filename http://example.com

Use as many -d flags as you need in order to specify all the different data or filenames that you are trying to upload.

You can the -T option if you want to upload a file to an FTP server.

curl -T myfile.txt ftp://example.com/some/directory/

Send an email

Sending an email is simply uploading data from your computer (or another device) to an email server. Since cURL is able to upload data, we can use it to send emails. There are a slew of options, but here’s an example of how to send an email through an SMTP server:

curl smtp://mail.example.com --mail-from me@example.com --mail-rcpt john@domain.com --upload-file email.txt

Your email file would need to be formatted correctly. Something like this:

As usual, more granular and specialized options can be found in the man page of cURL.

Read email message

cURL supports IMAP (and IMAPS) and POP3, both of which can be used to retrieve email messages from a mail server.

Login using IMAP like this:

curl -u username:password imap://mail.example.com

This command will list available mailboxes, but not view any specific message. To do this, specify the UID of the message with the –X option.

curl -u username:password imap://mail.example.com -X 'UID FETCH 1234'

Difference between cURL and wget

Sometimes people confuse cURL and wget because they’re both capable of retrieving data from a server. But this is the only thing they have in common.

We’ve shown in this article what cURL is capable of. wget provides a different set of functions. wget is the best tool for downloading websites and is capable of recursively traversing directories and links to download entire sites.

For downloading websites, use wget. If using some protocol other than HTTP or HTTPS, or for uploading files, use cURL. cURL is also a good option for downloading individual files from the web, although wget does that fine, too.

I hope you find the tutorial useful. Keep coming back.

0

15+ examples for listing users in Linux

In this post, you will learn about listing users in Linux. Besides this, you will know other tricks about Linux users’ characteristics. There are 2 types of users in Linux, system users who are created by default with the system. On the other hand, there are regular users who are created by system administrators and can log in to the system and use it. Before we start listing users, we need to know where are these users saved on Linux? The users are stored in a text file on the system called the passwd file. This file is located in the /etc directory. The file is located on the following path:
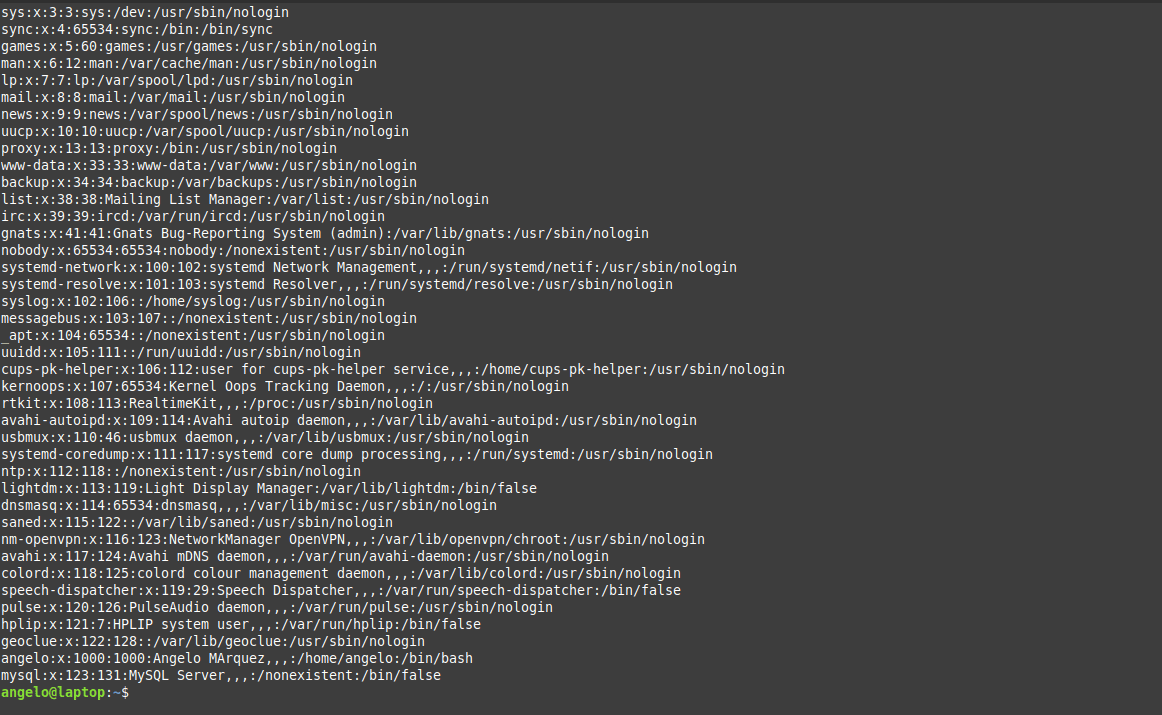
Continue Reading →

/etc/passwd

In this file, you can find all the information about the users in the system.

List all users

Listing users is a the first step to manage them. This way we will know how many they are and who they are. In Linux, almost everything can be done in various ways and this is no exception.

To list all users, you can use the cat command:

cat /etc/passwd

list all users in Linux

As you can see in the image, there is all the information about the users.

1- In the first field, you will see the user name.

2- Then, a representation of the encrypted password (The x character). The encrypted password is stored in /etc/shadow file.

3- The UID or the user ID.

4- The next field refers to the primary group of the user.

5- Then, it shows user ID info such as the address, email, etc.

6- After this, you will see the home directory of the user.

7- The last field is the shell used by that user.

However, although the information is quite useful but if you only want to list users’ names in a basic way, you can use this command:

cut -d: -f1 /etc/passwd

Listing users in Linux

Now we have the names only by printing the first field of te file only.

List & sort users by name

The above command serves the purpose of listing users on Linux. But what about listing the users in alphabetical order?

To do this, we will use the previous command, but we will add the sort command.

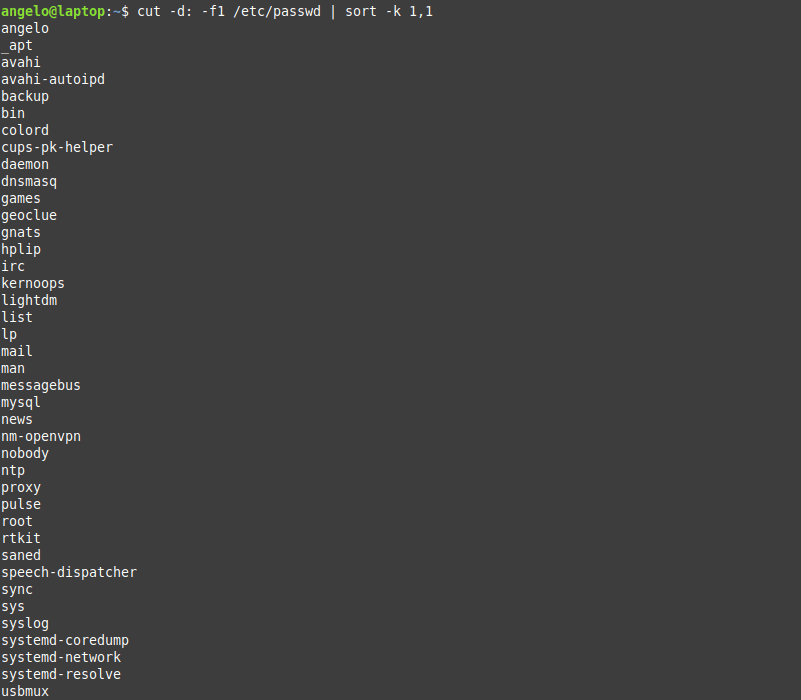
So, the command will be like this:

cut -d: -f1 /etc/passwd | sort

Sort by name

As you can see in the image, the users are shown sorted.

Linux list users without password

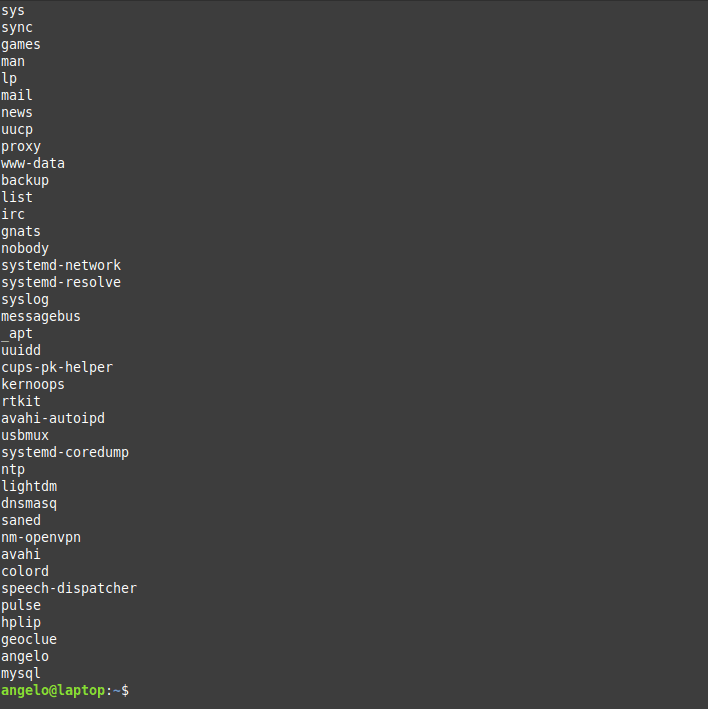
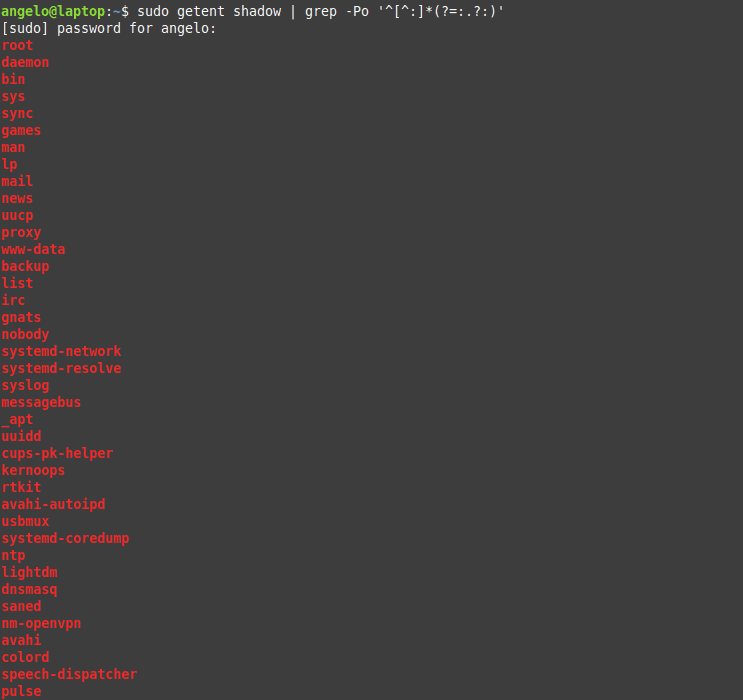
It is important to know users who have no password and to take appropriate action. To list users who do not have a password, just use the following command:

sudo getent shadow | grep -Po '^[^:]*(?=:.?:)'

User with no password

The used regex will list all users with no password.

List users by disk usage

If you have a big directory and you want to know which user is flooding it, you can use the du command to get the disk usage.

With this, you can detect which of these users are misusing the disk space.

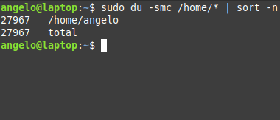
For it, it is enough to use the following command:

sudo du -smc /home/* | sort -n

List users by disk usage

In this way, you will have the users ordered by the disk usage for the /home directory.

We used the -n for the sort command to sort the output by numbers.

List the currently logged users

To list the currently logged in users, we have several ways to do it. The first method we can use the users command:

users

Users currently logged

It will list the users with open sessions in the system.

But this information is a little basic however, we have another command that gives more details. The command is simply w.

w

Using the w command to list users currently logged

With this command, we can have more information such as the exact time when the session was started and the terminal session he has available.

Finally, there is a command called who. It is available to the entire Unix family. So you can use it on other systems like FreeBSD.

who

The who command

With who command, we also have some information about currently logged in users. Of course, we can add the option -a and show all the details.

who -a

The who command with options

So, this way you know everything about the logged in users.

Linux list of users who recently logged into the system

We saw how to get the currently logged in users, what about listing the login history of users?

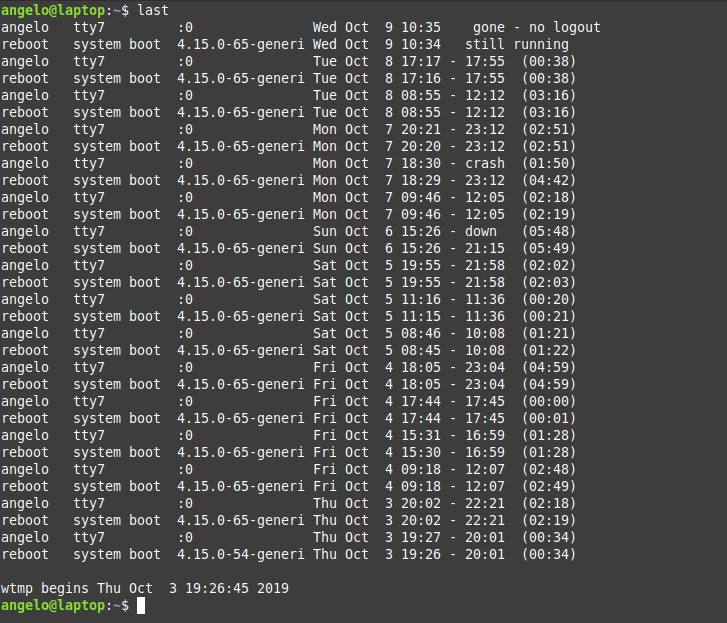
You can use the last command to get more info about the logins that took place:

last

The last command

Or the logins of a particular user

last [username]

For example:

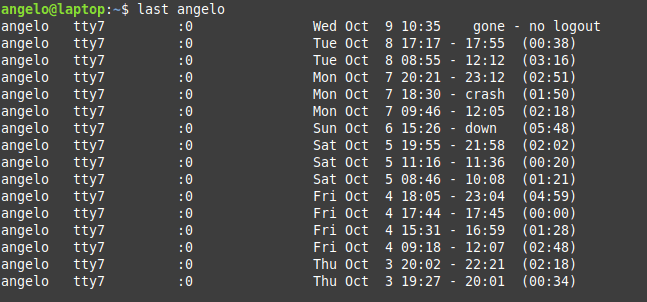
last angelo

last command with specific user

These are the user login activity and when it was started and how long it took.

List users’ logins on a specific date or time

What about listing users’ logins on a specific date or time? To achieve this, we use the last command but with the -t parameter:

last -t YYMMDDHHMMSS
For example:
last -t 20190926110509

List users by a specific date

And now all you have to do is choose an exact date & time to list who logged on that time.

List all users in a group

There are 2 ways to list the members of a group in Linux, the easiest and most direct way is to get the users from the /etc/group file like this:

cat /etc/group | grep likegeeks

This command will list users in the likegeeks group.

The other way is by using commands like the members command in Debian based distros. However, it is not installed by default in Linux distributions.

To install it in Ubuntu / Linux Mint 19, just use APT:

sudo apt install members

Or in the case of CentOS:
sudo dnf install members

Once it’s installed, you can run the command then the name of the group you want to list the users to:

members [group_name]

For example:
members avahi

Using the members command

This way you can list users for a group in a Debian based distro. What about a RedHat based distro like CentOS?

You can use the following command:

getent group likegeeks

List users with UID

In Unix systems, each user has a user identifier or ID. It serves to manage and administer accounts internally in the operating system.

Generally, UIDs from 0 to 1000 are for system users. And thereafter for regular users. Always on Unix systems, UID zero belongs to the root users (You can have more than one user with UID of zero).

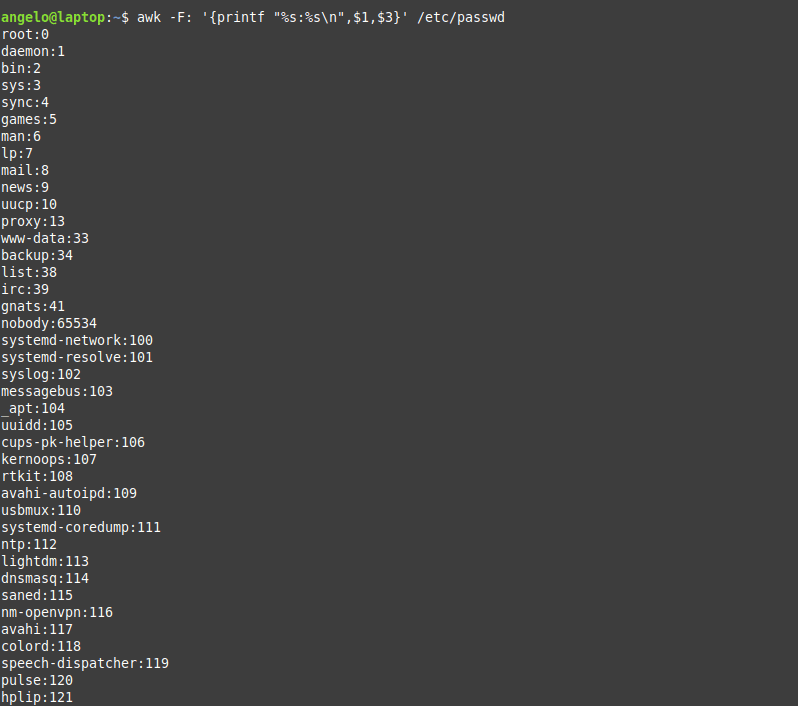
So now we will list the users with their respective UID using awk.

The command that performs the task is the following:

awk -F: '{printf "%s:%s\n",$1,$3}' /etc/passwd

List users with the UID

As you can see, each user with his UID.

List root users

In a Unix-like system like Linux, there is usually only one root user. If there are many, how to list them?

To do this, we can use this command:

grep 'x:0:' /etc/passwd

root users in the system

Here we are filtering the file to get users with UID of zero (root users).

Another way by checking the /etc/group file:

grep root /etc/group

The root users in Linux

Here we are getting users in the group root from the /etc/group file.

Also, you can check if any user can execute commands as root by checking the /etc/sudoers file:

cat /etc/sudoers

Get the total number of users

To get the total number of users in Linux, you can count lines in /etc/passwd file using the wc command like this:

cut -d: -f1 /etc/passwd | wc -l

List total number of users in Linux

Great! 43 users. But this includes system and regular users. What about getting the number of regular users only?

Easy! Since we know from above that regular users have UID of 1000 or greater, we can use awk to get them:

awk -F: '$3 >= 1000 {print $1}' /etc/passwd

List regular users

Cool!

List sudo users

Linux systems have a utility called sudo that allows you to execute commands as if you were another user who is usually the root user.

This should be handled with care in a professional environment.

Also, it is very important to know which users can run the sudo command. For this, it is enough to list the users that belong to the sudo group.

members sudo

sudo group users

Users in this group can execute commands as super users.

List users who have SSH access

SSH allows users to access remote computers over a network. It is quite secure and was born as a replacement for Telnet.

On Linux by default, all regular users can log in and use SSH. If you want to limit this, you can use the SSH configuration file (/etc/ssh/ssh_config) and add the following directive:

AllowUsers user1 user2 user3
Also, you can allow groups instead of allowing users only using the AllowGroups directive:
AllowGroups group1 group2 group3

These directives define who can access the service. Don’t forget to restart the SSH service.

List users who have permissions to a file or directory

We can give more than one user permission to access or modify files & directories in two ways.

The first method is by adding users to the group of the file or the directory.

This way, we can list the group members using the members utility as shown above.

Okay, but what if we just want this user to have access to this specific file only (Not all the group permissions)?

Here we can set the ACL for this file using setfacl command like this:

setfacl -m u:newuser:rwx myfile

Here we give the user called newser the permission for the file called myfile the permissions of read & write & execute.

Now the file can be accessed or modified by the owner and the user called newuser. So how to list them?

We can list them using the getfacl command like this:

getfacl myfile

This command will list all users who have permissions for the file with their corresponding permissions.

List locked (disabled) users

In Linux, as a security measure, we can lock users. This as a precaution if it is suspected that the user is doing things wrong and you don’t want to completely remove the user and just lock him for investigation.

To lock a user, you can use the following command:

usermod -L myuser

Now the user named myuser will no longer to able to login or use the system.

To list all locked users of the system, just use the following command:

cat /etc/passwd | cut -d : -f 1 | awk '{ system("passwd -S " $0) }' | grep locked

This will print all locked users including system users. What about listing regular users only?

As we saw above, using awk we can get locked regular users like this:

awk -F: '$3 >= 1000 {print $1}' /etc/passwd | cut -d : -f 1 | awk '{ system("passwd -S " $0) }' | grep locked

Very easy!

Listing remote users (LDAP)

Okay, now can list all system users (local users), but what about remote users or LDAP users? Well, we can use a tool like ldapsearch, but is there any other way?

Luckily yes! You can list local & remote users with one command called getent

getent passwd

This command lists both local system users and LDAP or NIS users or any other network users.

You can pipe the results of this command to any of the above-mentioned commands the same way.

Also, the getent command can list group accounts like this:

getent group

You can check the man page of the command to know the other databases the command can search in.

Conclusion

Listing users in the Linux system was fun! Besides this, we have learned some tips about users and how to manage them in different ways.

Finally, this knowledge will allow a better administration of the users of the system.

I hope you find the tutorial useful. keep coming back.

0