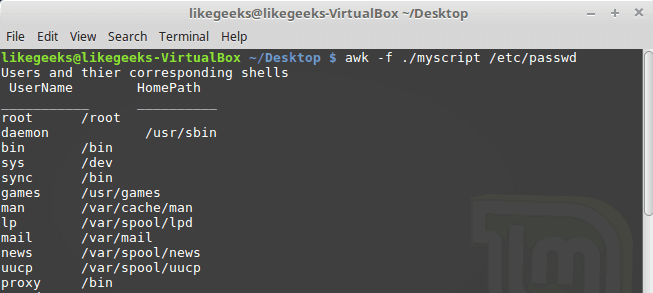
 In order to successfully work with the Linux sed editor and the awk command in your shell scripts, you have to understand regular expressions or in short regex. Since there are many engines for regex, we will use the shell regex and see the bash power in working with regex. First, we need to understand what regex is, then we will see how to use it. For some people, when they see the regular expressions for the first time they said what are these ASCII pukes !! Well, A regular expression or regex, in general, is a pattern of text you define that a Linux program like sed or awk uses it to filter text. We saw some of those patterns when introducing basic Linux commands and saw how the ls command uses wildcard characters to filter output.
Types of regex
There are many different applications use different types of regex in Linux, like the regex included in programming languages (Java, Perl, Python,,,) and Linux programs like (sed, awk, grep,) and many other applications.
A regex pattern uses a regular expression engine which translates those patterns.
Linux has two regular expression engines:
- The Basic Regular Expression (BRE) engine.
- The Extended Regular Expression (ERE) engine.
Most Linux programs work well with BRE engine specifications, but some tools like sed understand some of the BRE engine rules.
The POSIX ERE engine is shipped with some programming languages. It provides more patterns like matching digits, and words. The awk command uses the ERE engine to process its regular expression patterns.
Since there are many regex implementations, it’s difficult to write patterns that work on all engines. Hence, we will focus on the most commonly found regex and demonstrate how to use it in the sed and awk.
Define BRE Patterns
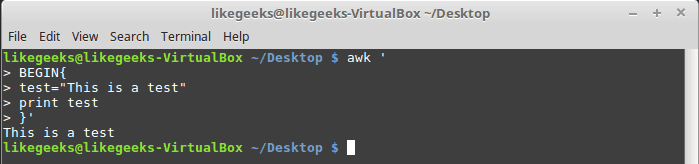
You can define a pattern to match text like this:
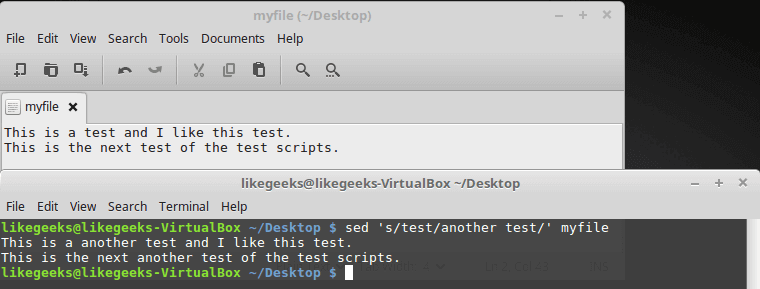
echo "Testing regex using sed" | sed -n '/regex/p'
echo "Testing regex using awk" | awk '/regex/{print $0}'

You may notice that the regex doesn’t care where the pattern occurs or how many times in the data stream.
The first rule to know is that regular expression patterns are case sensitive.
echo "Welcome to LikeGeeks" | awk '/Geeks/{print $0}'
echo "Welcome to Likegeeks" | awk '/Geeks/{print $0}'

The first regex succeeds because the word “Geeks” exists in the upper case, while the second line fails because it uses small letters.
You can use spaces or numbers in your pattern like this:
echo "Testing regex 2 again" | awk '/regex 2/{print $0}'

Special Characters
regex patterns use some special characters. And you can’t include them in your patterns and if you do so, you won’t get the expected result.
These special characters are recognized by regex:
.*[]^${}\+?|()
You need to escape these special characters using the backslash character (\).
For example, if you want to match a dollar sign ($), escape it with a backslash character like this:
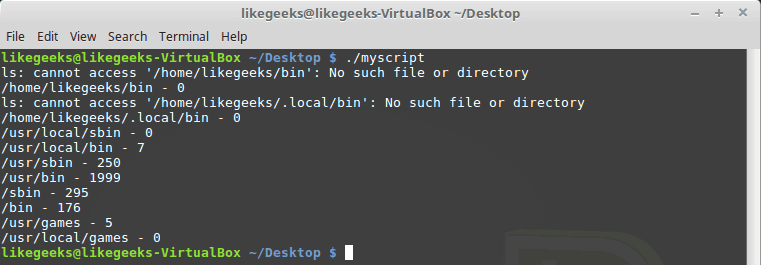
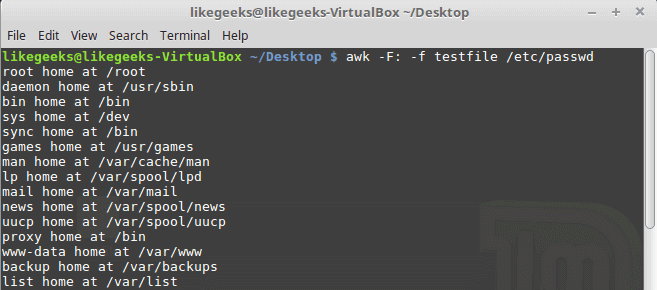
cat myfile
There is 10$ on my pocket
awk '/\$/{print $0}' myfile

If you need to match the backslash (\) itself, you need to escape it like this:
echo "\ is a special character" | awk '/\\/{print $0}'

Despite the forward slash isn’t a special character, you still get an error if you use it directly.
echo "3 / 2" | awk '///{print $0}'

So you need to escape it like this:
echo "3 / 2" | awk '/\//{print $0}'

Anchor Characters
To locate the beginning of a line in a text, use the caret character (^).
You can use it like this:
echo "welcome to likegeeks website" | awk '/^likegeeks/{print $0}'
echo "likegeeks website" | awk '/^likegeeks/{print $0}'

The caret character (^) matches the start of text:
awk '/^this/{print $0}' myfile
![]()
What if you use it in the middle of the text?
echo "This ^ caret is printed as it is" | sed -n '/s ^/p'
![]()
It’s printed as it is like a normal character.
When using awk, you have to escape it like this:
echo "This ^ is a test" | awk '/s \^/{print $0}'
![]()
This is about looking at the beginning of the text, what about looking at the end?
The dollar sign ($) checks for the end a line:
echo "Testing regex again" | awk '/again$/{print $0}'

You can use both the caret and dollar sign on the same line like this:
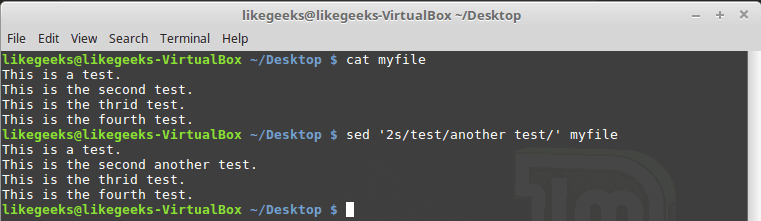
cat myfile
this is a test
This is another test
And this is one more
awk '/^this is a test$/{print $0}' myfile

As you can see, it prints only the line that has the matching pattern only.
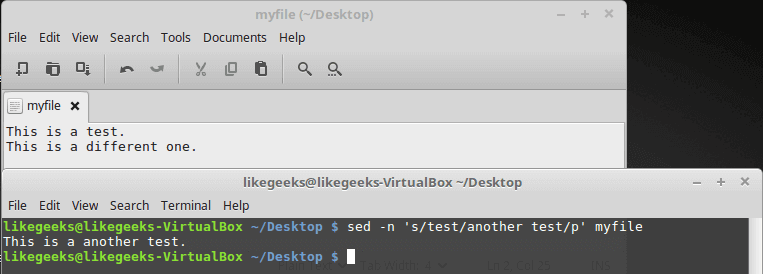
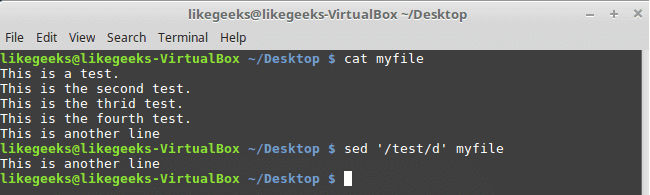
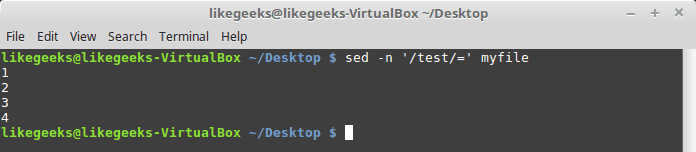
You can filter blank lines with the following pattern:
awk '!/^$/{print $0}' myfile
Here we introduce the negation which is done by the exclamation mark !
The pattern searches for empty lines where nothing between the beginning and the end of the line and negates that to print only the lines have text.
The dot Character
The dot character is used to match any character except newline (\n).
Look at the following example to get the idea:
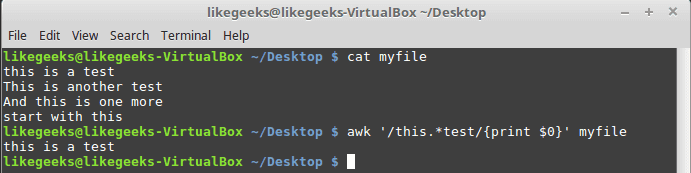
cat myfile
this is a test
This is another test
And this is one more
start with this
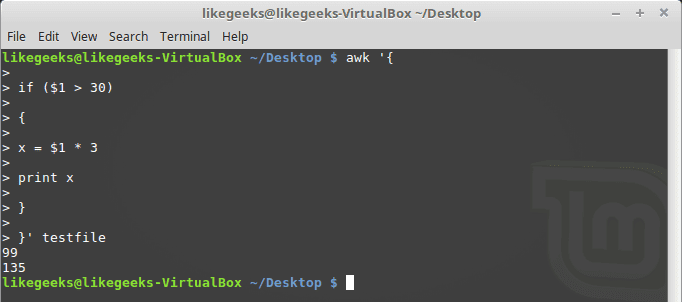
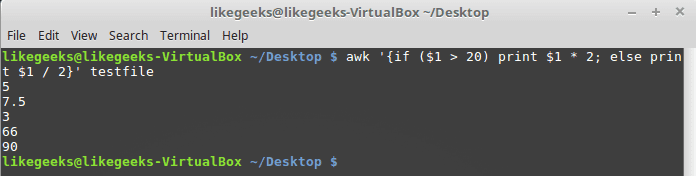
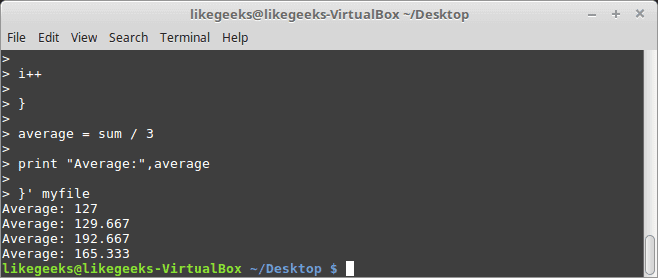
awk '/.st/{print $0}' myfile
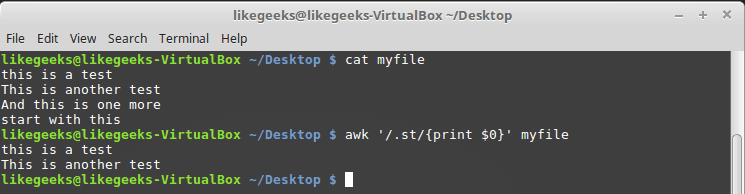
You can see from the result that it prints only the first two lines because they contain the st pattern while the third line does not have that pattern and fourth line start with st so that also doesn’t match our pattern.
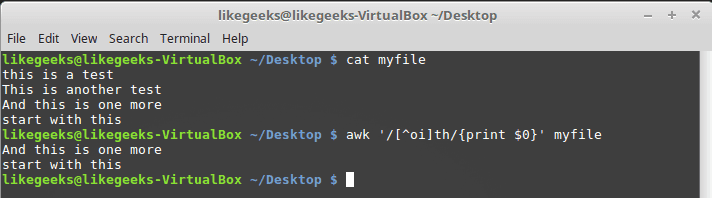
Character Classes
You can match any character with the dot special character, but what if you match a set of characters only, you can use a character class.
The character class matches a set of characters if any of them found, the pattern matches.
The chracter classis defined using square brackets [] like this:
awk '/[oi]th/{print $0}' myfile
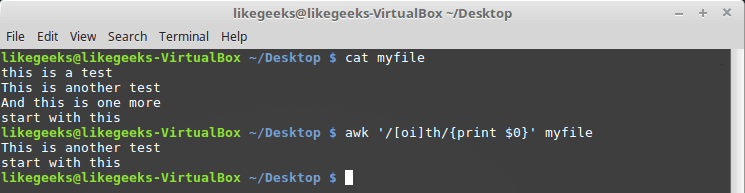
Here we search for any th characters that have o character or i before it.
This comes handy when you are searching for words that may contain upper or lower case and you are not sure about that.
echo "testing regex" | awk '/[Tt]esting regex/{print $0}'
echo "Testing regex" | awk '/[Tt]esting regex/{print $0}'

Of course, it is not limited to characters; you can use numbers or whatever you want. You can employ it as you want as long as you got the idea.
Negating Character Classes
What about searching for a character that is not in the character class?
To achieve that, precede the character class range with a caret like this:
awk '/[^oi]th/{print $0}' myfile
So anything is acceptable except o and i.
Using Ranges
To specify a range of characters, you can use the (-) symbol like this:
awk '/[e-p]st/{print $0}' myfile
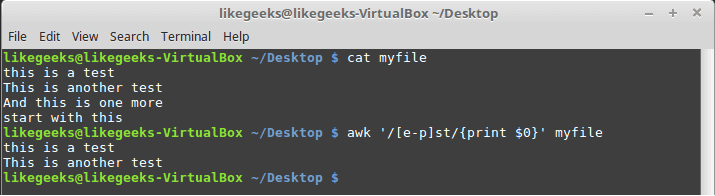
This matches all characters between e and p then followed by st as shown.
You can also use ranges for numbers:
echo "123" | awk '/[0-9][0-9][0-9]/'
echo "12a" | awk '/[0-9][0-9][0-9]/'

You can use multiple and separated ranges like this:
awk '/[a-fm-z]st/{print $0}' myfile
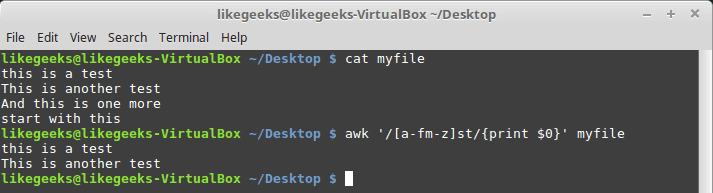
The pattern here means from a to f, and m to z must appear before the st text.
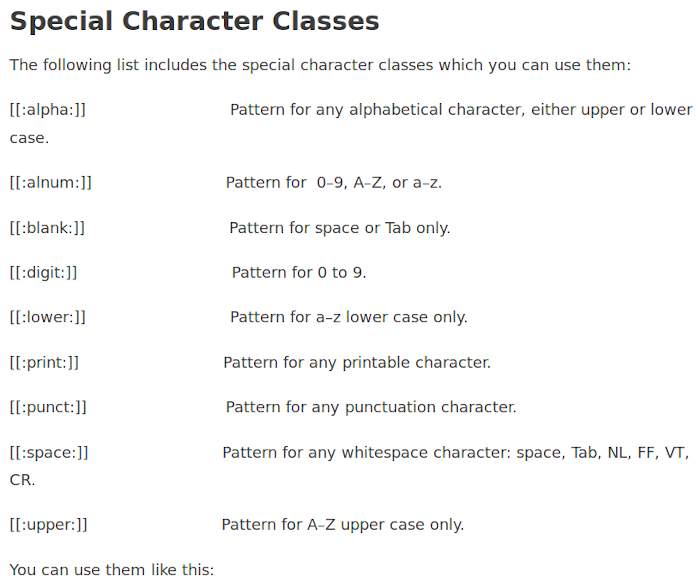
echo "abc" | awk '/[[:alpha:]]/{print $0}'
echo "abc" | awk '/[[:digit:]]/{print $0}'
echo "abc123" | awk '/[[:digit:]]/{print $0}'

The Asterisk
The asterisk means that the character must exist zero or more times.
echo "test" | awk '/tes*t/{print $0}'
echo "tessst" | awk '/tes*t/{print $0}'

This pattern symbol is useful for checking misspelling or language variations.
echo "I like green color" | awk '/colou*r/{print $0}'
echo "I like green colour " | awk '/colou*r/{print $0}'

Here in these examples whether you type it color or colour it will match, because the asterisk means if the “u” character existed many times or zero time that will match.
To match any number of any character, you can use the dot with the asterisk like this:
awk '/this.*test/{print $0}' myfile
It doesn’t matter how many words between the words “this” and “test”, any line matches, will be printed.
You can use the asterisk character with the character class.
echo "st" | awk '/s[ae]*t/{print $0}'
echo "sat" | awk '/s[ae]*t/{print $0}'
echo "set" | awk '/s[ae]*t/{print $0}'
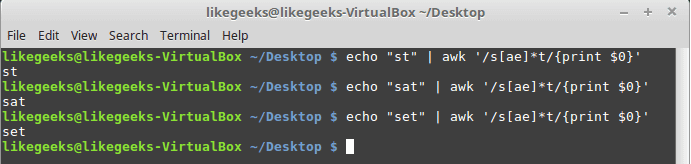
All three examples match because the asterisk means if you find zero times or more any “a” character or “e” print it.
Extended Regular Expressions
The following are some of the patterns that belong to Posix ERE:
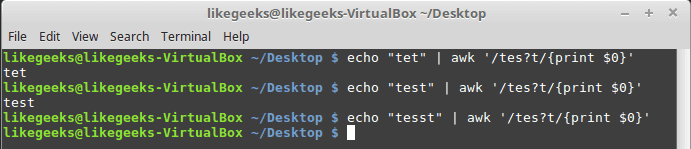
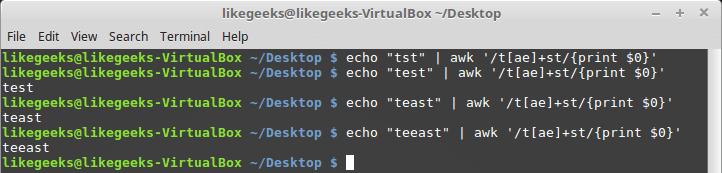
The question mark
The question mark means the previous character can exist once or none.
echo "tet" | awk '/tes?t/{print $0}'
echo "test" | awk '/tes?t/{print $0}'
echo "tesst" | awk '/tes?t/{print $0}'
The question mark can be used in combination with a character class:
echo "tst" | awk '/t[ae]?st/{print $0}'
echo "test" | awk '/t[ae]?st/{print $0}'
echo "tast" | awk '/t[ae]?st/{print $0}'
echo "taest" | awk '/t[ae]?st/{print $0}'
echo "teest" | awk '/t[ae]?st/{print $0}'
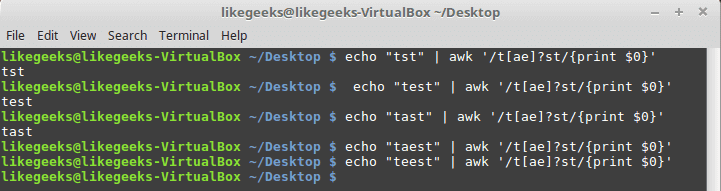
If any of the character class items exists, the pattern matching passes. Otherwise, the pattern will fail.
The Plus Sign
The plus sign means that the character before the plus sign should exist one or more times, but must exist once at least.
echo "test" | awk '/te+st/{print $0}'
echo "teest" | awk '/te+st/{print $0}'
echo "tst" | awk '/te+st/{print $0}'
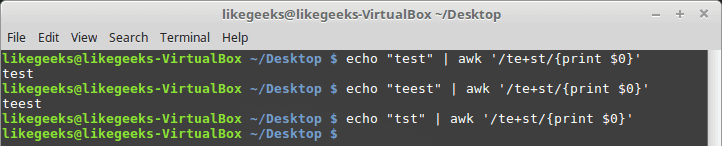
If the “e” character not found, it fails.
You can use it with character classes like this:
echo "tst" | awk '/t[ae]+st/{print $0}'
echo "test" | awk '/t[ae]+st/{print $0}'
echo "teast" | awk '/t[ae]+st/{print $0}'
echo "teeast" | awk '/t[ae]+st/{print $0}'
if any character from the character class exists, it succeeds.
Curly Braces
Curly braces enable you to specify the number of existence for a pattern, it has two formats:
n: The regex appears exactly n times.
n,m: The regex appears at least n times, but no more than m times.
echo "tst" | awk '/te{1}st/{print $0}'
echo "test" | awk '/te{1}st/{print $0}'

In old versions of awk, you should use –re-interval option for the awk command to make it read curly braces, but in newer versions you don’t need it.
echo "tst" | awk '/te{1,2}st/{print $0}'
echo "test" | awk '/te{1,2}st/{print $0}'
echo "teest" | awk '/te{1,2}st/{print $0}'
echo "teeest" | awk '/te{1,2}st/{print $0}'
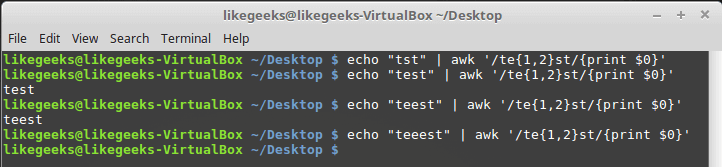
In this example, if the “e” character exists one or two times, it succeeds; otherwise, it fails.
You can use it with character classes like this:
echo "tst" | awk '/t[ae]{1,2}st/{print $0}'
echo "test" | awk '/t[ae]{1,2}st/{print $0}'
echo "teest" | awk '/t[ae]{1,2}st/{print $0}'
echo "teeast" | awk '/t[ae]{1,2}st/{print $0}'

If there are one or two instances of the letter “a” or “e” the pattern passes, otherwise, it fails.
Pipe Symbol
The pipe symbol makes a logical OR between 2 patterns. If one of the patterns exists, it succeeds, otherwise, it fails, here is an example:
echo "Testing regex" | awk '/regex|regular expressions/{print $0}'
echo "Testing regular expressions" | awk '/regex|regular expressions/{print $0}'
echo "This is something else" | awk '/regex|regular expressions/{print $0}'
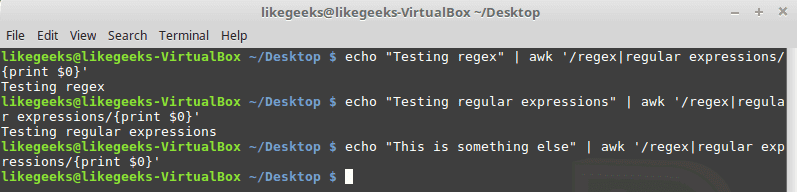
Don’t type any spaces between the pattern and the pipe symbol.
Grouping Expressions
You can group expressions so the regex engines will consider them one piece.
echo "Like" | awk '/Like(Geeks)?/{print $0}'
echo "LikeGeeks" | awk '/Like(Geeks)?/{print $0}'

The grouping of the “Geeks” makes the regex engine treats it as one piece, so if “LikeGeeks” or the word “Like” exist, it succeeds.
Practical examples
We saw some simple demonstrations of using regular expression patterns, it’s time to put that in action, just for practicing.
Counting Directory Files
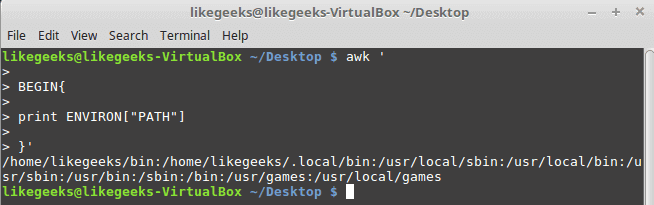
Let’s look at a bash script that counts the executable files in a folder from the PATH environment variable.
echo $PATH
To get a directory listing, you must replace each colon with space.
echo $PATH | sed 's/:/ /g'
Now let’s iterate through each directory using the for loop like this:
mypath=$(echo $PATH | sed 's/:/ /g')
for directory in $mypath; do
done
Great!!
You can get the files on each directory using the ls command and save it in a variable.
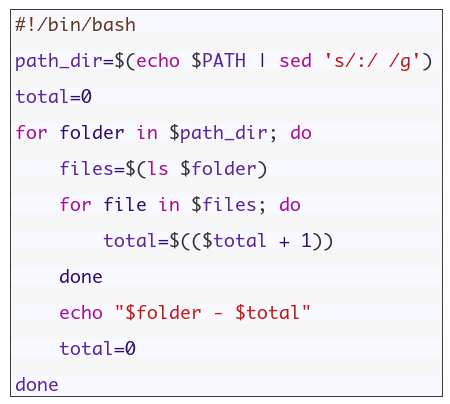
You may notice some directories doesn’t exist, no problem with this its OK.
Cool!! This is the power of regex. These few lines of code count all files in all directories. Of course, there is a Linux command to do that very easy, but here we discuss how to employ regex on something you can use. You can come up with some more useful ideas.
Validating E-mail Address
There are a ton of websites that offer ready to use regex patterns for everything including e-mail, phone number, and much more, this is handy but we want to understand how it works.
The username can use any alphanumeric characters combined with dot, dash, plus sign, underscore.
The hostname can use any alphanumeric characters combined with a dot and underscore.
For the username, the following pattern fits all usernames:
^([a-zA-Z0-9_\-\.\+]+)@
The plus sign means one character or more must exist followed by the @ sign.
Then the hostname pattern should be like this:
([a-zA-Z0-9_\-\.]+)
There are special rules for the TLDs or Top-level domains, and they must be not less than 2 and five characters maximum. The following is the regex pattern for the top-level domain.
\.([a-zA-Z]{2,5})$
Now we put them all together:
^([a-zA-Z0-9_\-\.\+]+)@([a-zA-Z0-9_\-\.]+)\.([a-zA-Z]{2,5})$
Let’s test that regex against an email:
echo "[email protected]" | awk '/^([a-zA-Z0-9_\-\.\+]+)@([a-zA-Z0-9_\-\.]+)\.([a-zA-Z]{2,5})$/{print $0}'
echo "[email protected]" | awk '/^([a-zA-Z0-9_\-\.\+]+)@([a-zA-Z0-9_\-\.]+)\.([a-zA-Z]{2,5})$/{print $0}'

Awesome!! Works great.
This was just the beginning of regex world that never ends. I hope after this post you understand these ASCII pukes 🙂 and use it more professionally.
I hope you like the post.
Thank you.

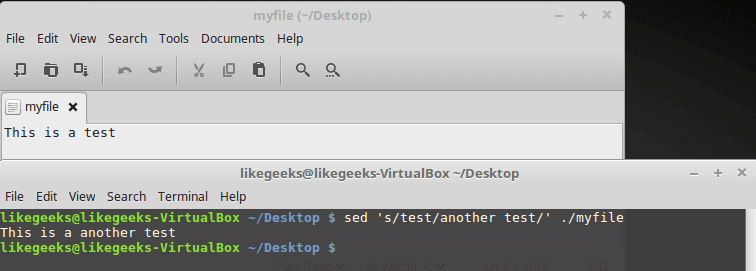
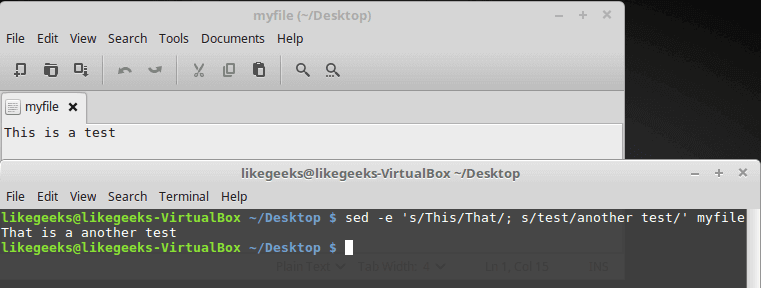
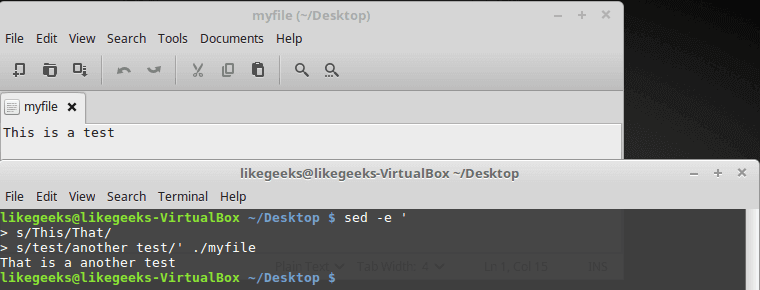
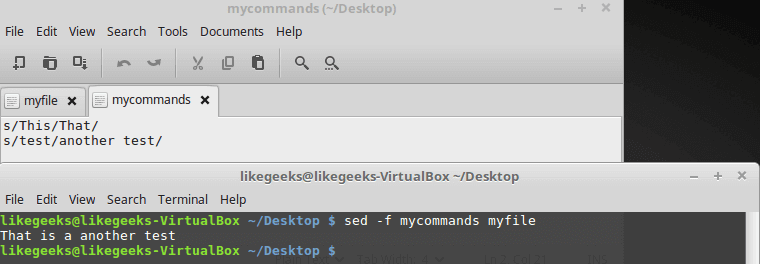
 In the previous post, we talked about


 Özgür bir yazılım olan

 In the previous post, we talked about


 Before we talk about