Archive | GNU/Linux İpuçları

Linux Bash Scripting Part5 – Signals and Jobs

In the previous post, we talked about input, output, and redirection in bash scripts. Today we will learn how to run and control them on a Linux system. Till now, we can run scripts only from the command line interface. This isn’t the only way to run Linux bash scripts. This post describes the different ways to control your Linux bash scripts. In shell scripts, we talked about important things called Input, Output and Redirection. Everything is a file in Linux and that includes input and output. So we need to understand each one in detail.


Continue Reading →

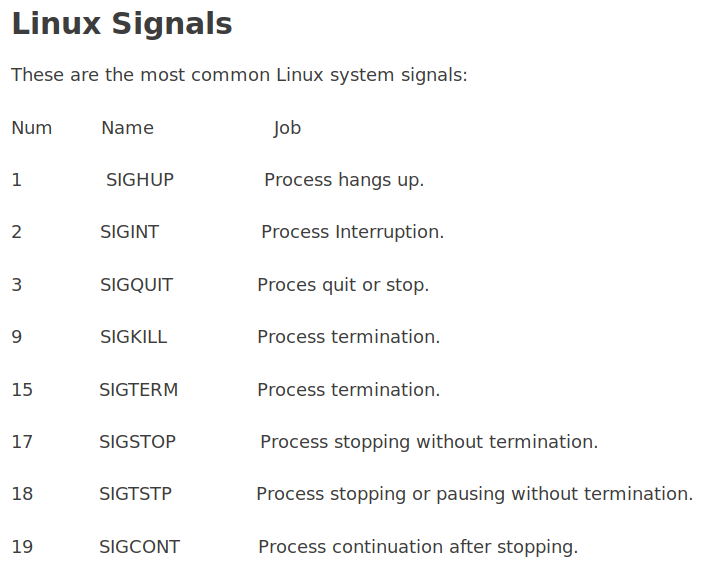
Your Linux bash scripts don’t control these signals, you can program your bash script to recognize signals and perform commands based on the signal that was sent.

Stop a Process

To stop a running process, you can press Ctrl+C which generates SIGINT signal to stop the current process running in the shell.

sleep 100

Ctrl+C

Linux bash scripting Signals and Jobs stop process

Pause a Process

The Ctrl+Z keys generate a SIGTSTP signal to stop any processes running in the shell, and that leaves the program in memory.

sleep 100

Ctrl+Z

pause process

The number between brackets which is (1) is the job number.

If try to exit the shell and you have a stopped job assigned to your shell, the bash warns you if you.

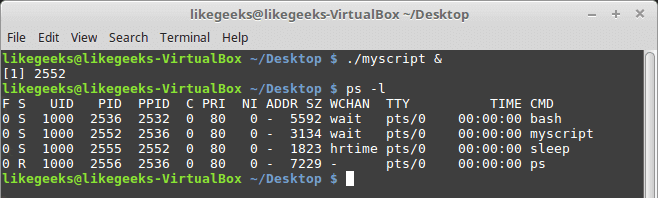
The ps command is used to view the stopped jobs.

ps –l

ps -l

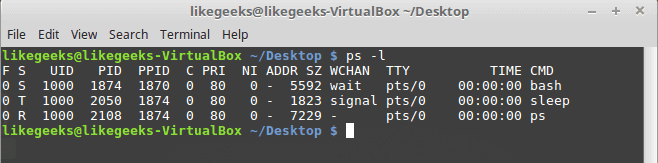
In the S column (process state), it shows the traced (T) or stopped (S) states.

If you want to terminate a stopped job you can kill its process by using kill command.

kill processID

Trap Signals

To trap signals, you can use the trap command. If the script gets a signal defined by the trap command, it stops processing and instead the script handles the signal.

You can trap signals using the trap command like this:

#!/bin/bash

trap "echo 'Ctrl-C was trapped'" SIGINT

total=1

while [ $total -le 3 ]; do

echo "#$total"

sleep 2

total=$(($total + 1))

done

Every time you press Ctrl+C, the signal is trapped and the message is printed.

trap signal

If you press Ctrl+C, the echo statement specified in the trap command is printed instead of stopping the script. Cool, right?

Trapping The Script Exit

You can trap the shell script exit using the trap command like this:

#!/bin/bash

# Add the EXIT signal to trap it

trap "echo Goodbye..." EXIT

total=1

while [ $total -le 3 ]; do

echo "#$total"

sleep 2

total=$(($total + 1))

done

trap exit

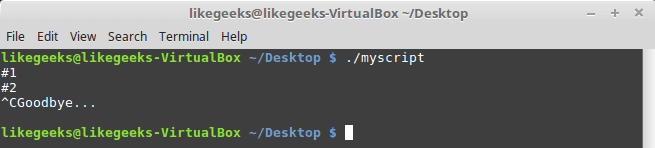
When the bash script exits, the Goodbye message is printed as expected.

Also, if you exit the script before finishing its work, the EXIT trap will be fired.

Modifying Or Removing a Trap

You can reissue the trap command with new options like this:

#!/bin/bash

trap "echo 'Ctrl-C is trapped.'" SIGINT

total=1

while [ $total -le 3 ]; do

echo "Loop #$total"

sleep 2

total=$(($total + 1))

done

# Trap the SIGINT

trap "echo ' The trap changed'" SIGINT

total=1

while [ $total -le 3 ]; do

echo "Second Loop #$total"

sleep 1

total=$(($total + 1))

done

modify trap

Notice how the script manages the signal after changing the signal trap.

You can also remove a trap by using 2 dashes trap -- SIGNAL

#!/bin/bash

trap "echo 'Ctrl-C is trapped.'" SIGINT

total=1

while [ $total -le 3 ]; do

echo "#$total"

sleep 1

total=$(($total + 1))

done

trap -- SIGINT

echo "I just removed the trap"

total=1

while [ $total -le 3 ]; do

echo "Loop #2 #$total"

sleep 2

total=$(($total + 1))

done

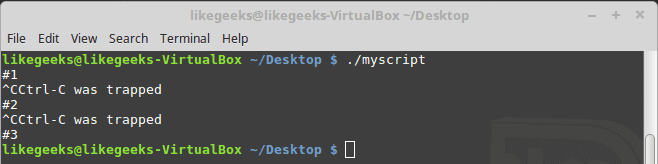
Notice how the script processes the signal before removing the trap and after removing the trap.

./myscript

Crtl+C

remove trap

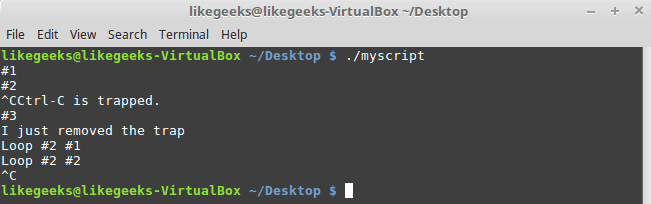
The first Ctrl+C was trapped and the script continues running while the second one exits the script because the trap was removed.

Running Linux Bash Scripts in Background Mode

If you see the output of the ps command, you will see all the running processes in the background and not tied to the terminal.

We can do the same, just place ampersand symbol (&) after the command.

#!/bin/bash

total=1

while [ $total -le 3 ]; do

sleep 2

total=$(($total + 1))

done

./myscipt &

run in background

Once you’ve done that, the script runs in a separate background process on the system and you can see the process id between the square brackets.

When the script dies,  you will see a message on the terminal.

Notice that while the background process is running, you can use your terminal monitor for STDOUT and STDERR messages so if an error occurs, you will see the error message and normal output.

run script in background

The background process will exit if you exit your terminal session.

So what if you want to continue running even if you close the terminal?

Running Scripts without a Hang-Up

You can run your Linux bash scripts in the background process even if you exit the terminal session using the nohup command.

The nohup command blocks any SIGHUP signals. This blocks the process from exiting when you exit your terminal.

nohup ./myscript &

linux bash nohup command

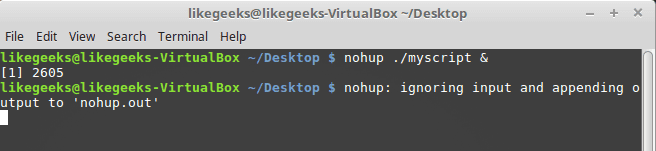
After running the nohup command, you can’t see any output or error from your script. The output and error messages are sent to a file called nohup.out.

Note: when running multiple commands from the same directory will override the nohup.out file content.

Viewing Jobs

To view the current jobs, you can use the jobs command.
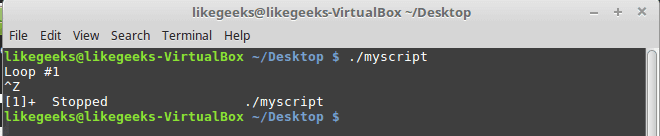
#!/bin/bash

total=1

while [ $total -le 3 ]; do

echo "#$count"

sleep 5

total=$(($total + 1))

done

Then run it.

./myscript

Then press Ctrl+Z to stop the script.

linux bash view jobs

Run the same bash script but in the background using the ampersand symbol and redirect the output to a file just for clarification.

./myscript > outfile &

linux bash list jobs

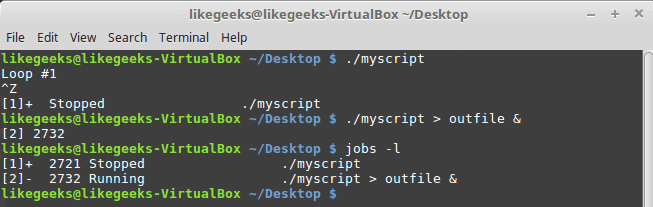
The jobs command shows the stopped and the running jobs.

jobs –l

-l parameter to view the process ID

 Restarting Stopped Jobs

The bg command is used to restart a job in background mode.

./myscript

Then press Ctrl+Z

Now it is stopped.

bg

linux bash restart job

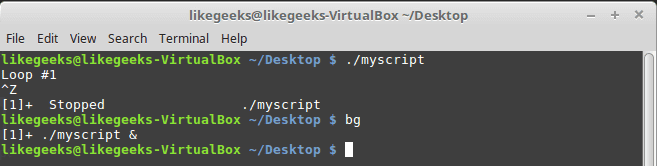
After using bg command, it is now running in background mode.

If you have multiple stopped jobs, you can do the same by specifying the job number to the bg command.

The fg command is used to restart a job in foreground mode.

fg 1

Scheduling a Job

The Linux system provides 2 ways to run a bash script at a predefined time:

  • at command.
  • cron table.

The at command

This is the format of the command

at [-f filename] time

The at command can accept different time formats:

  • Standard time format like 10:15.
  • An AM/PM indicator like 11:15PM.
  • A specifically named time like now, midnight.

You can include a specific date, using some different date formats:

  • A standard date format, such as MMDDYY or DD.MM.YY.
  • A text date, such as June 10 or Feb 12, with or without the year.
  • Now + 25 minutes.
  • 05:15AM tomorrow.
  • 11:15 + 7 days.

We don’t want to dig deep into the at command, but for now, just make it simple.

at -f ./myscript now

linux bash at command

The -M parameter is used to send the output to email if the system has email, and if not, this will suppress the output of the at command.

To list the pending jobs, use atq command:

linux bash at queue

Remove Pending Jobs

To remove a pending job, use the atrm command:

atrm 18

delete at queue

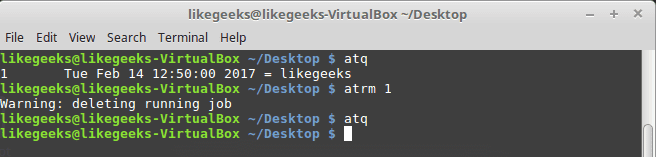
You must specify the job number to the atrm command.

Scheduling Scripts

What if you need to run a script at the same time every day or every month or so?

You can use the crontab command to schedule jobs.

To list the scheduled jobs, use the -l parameter:

crontab –l

The format for crontab is:

minute,Hour, dayofmonth, month, and dayofweek

So if you want to run a command daily at 10:30, type the following:

30 10 * * * command

The wildcard character (*) used to indicate that the cron will execute the command daily on every month at 10:30.

To run a command at 5:30 PM every Tuesday, you would use the following:

30 17 * * 2 command

The day of the week starts from 0 to 6 where Sunday=0 and Saturday=6.

To run a command at 10:00 on the beginning of every month:

00 10 1 * * command

The day of the month is from 1 to 31.

Let’s keep it simple for now and we will discuss the cron in great detail in future posts.

To edit the cron table, use the -e parameter like this:

crontab –e

Then type your command like the following:

30 10 * * * /home/likegeeks/Desktop/myscript

This will schedule our script to run at 10:30 every day.

Note: sometimes you see error says Resource temporarily unavailable.

All you have to do is this:

rm -f /var/run/crond.pid

You should be a root user to do this.

Just that simple!

You can use one of the pre-configured cron script directories like:

/etc/cron.hourly

/etc/cron.daily

/etc/cron.weekly

/etc/cron.monthly

Just put your bash script file on any of these directories and it will run periodically.

Starting Scripts at Login

In the previous posts, we’ve talked about startup files, I recommend you to review the previous.

$HOME/.bash_profile

$HOME/.bash_login

$HOME/.profile

To run your scripts at login, place your code in $HOME/.bash_profile.

Starting Scripts When Opening the Shell

OK, what about running our bash script when the shell opens? Easy.

Type your script on .bashrc file.

And now if you open the shell window, it will execute that command.

I hope you find the post useful. keep coming back.

Thank you.

0

Docker Tutorial: Play with Containers (Simple Examples)

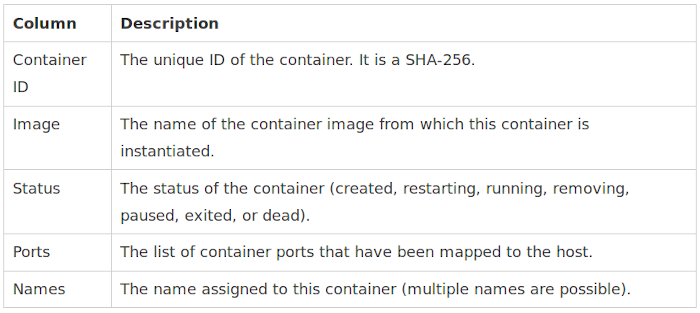
Docker has had a huge impact on software development life cycle, making the deployment of software at scale easy and secure. This Docker tutorial will cover the basics of running, starting, stopping, and removing Docker containers. Docker makes it so easy to work with different programming languages with different versions on different operating systems all this on the same host. Deploying your software becomes a lot easier after Docker where you don’t have to worry about missing a system configuration or a prerequisite. If you are using any kind of virtual machines to run your work inside it, why you would need Docker to run your work inside it instead? Well… The main difference between them is that Docker is an isolated process that runs in your native OS while the virtual machine is a complete isolated OS that runs on top of your host OS which takes more time to load.

Continue Reading →

Docker VS Virtual machine

So Docker has benefits over virtual machines such as:

  • Loading speed
  • Small hardware resources required, unlike virtual machines.
  • Running multiple Docker containers at the same time on the same OS.
  • You can modify your container and deploy it or give the Docker file definition to a friend to start working on the same environment.

Actually, Docker is not a replacement for virtual machines, it comes to solve specific problems.

Suppose that your application needs 3 or more services which run on different operating systems so instead of running 3 virtual machines on the same host, you can run 3 containers smoothly on the same host. Sounds great!!

Run your container

Before starting, ensure that Docker is installed correctly and is ready to accept your commands. Type the following command in a new Terminal window:

docker -v

The above command outputs the version of Docker installed on your PC:

Docker version 17.12.0-ce-rc2, build f9cde63

Time to start running the container:

docker container run alpine echo "Hello World"

When you run the above command for the first time, you should see an output in your Terminal window similar to this:

Unable to find image 'alpine:latest' locally

latest: Pulling from library/alpine

2fdfe1cd78c2: Pull complete

Digest: sha256:ccba511b...

Status: Downloaded newer image for alpine:latest

Hello World

That was easy, wasn’t it? Try running the same command again:

docker container run alpine echo "Hello World"

The second, third, or nth time you run the above command, you should see only this output in your Terminal:

Hello World

Now that you have successfully run a container, it’s time to analyze what exactly happened. Look at the following command:

docker container run alpine echo "Hello World"

This command contains multiple parts. First and foremost, you have the word docker. This is the name of the Docker command-line interface (CLI), used to interact with the Docker engine responsible for running containers.

Next, you have the word container, which indicates the context you are working with.

Next is the actual command you want to execute in the given context, which is run.

Now, you’d also need to tell Docker which container to run. In this case, this is the so-called alpine container.

Finally, you need to define what kind of a process or a task shall be executed inside the container when it is running. This is the last part of the command, echo “Hello World”.

Run a process inside a container

Now that you have understood the various parts of a command to run a container, try running another container with a different process running inside it:

docker container run centos ping -c 5 127.0.0.1

This is the output:

In the previous example, the container image you’ve used is centos and the process you’re executing inside the centos container is ping -c 5 127.0.0.1, which pings the loopback address five times until it stops.

  • The first line is as follows:

Unable to find image 'centos:latest' locally

This tells you that Docker didn’t find an image named centos:latest in the local cache of the system. So, Docker knows that it has to pull the image from some registry where the container images are stored.

By default, your Docker environment is configured such that images are pulled from the Docker Hub at hub.docker.com. This is expressed by the second line, as follows:

latest: Pulling from library/centos

  • The next three lines of output are as follows:

85432449fd0f: Pull completeDigest: sha256:3b1a65e9a05...Status: Downloaded newer image for centos:latest

This tells you that Docker has successfully pulled the image, centos:latest, from the Docker Hub.

All the subsequent lines of the output are generated by the process you ran inside the container, which is the ping tool in this case.

You may also have noticed the latest keyword occurring a few times. Each image has a version (also called a tag), and if you don’t specify a version explicitly, then Docker automatically assumes it as the latest version.

If you run the preceding container again on your system, the first five lines of the output will be missing since Docker will find the container image cached locally and so it won’t have to download it first. Try it out and verify.

Running a random quotes container

For the purpose of running a random quotes container, you’ll need an algorithm that produces random quotes. The API that produces those free random quotes can be found at https://talaikis.com/random_quotes_api/.

Now the goal is to have a process running inside a container that produces a new random quote every five seconds and outputs the quote to STDOUT:

while :
do
wget -qO- https://talaikis.com/api/quotes/random
printf 'n'
sleep 5
done

Stop the script by pressing Ctrl+C. Here’s the output:

{"quote":"Martha Stewart is extremely talented. Her designs are picture perfect. Our philosophy is life is messy, and rather than being afraid of those messes we design products that work the way we live.","author":"Kathy Ireland","cat":"design"}{"quote":"We can reach our potential, but to do so, we must reach within ourselves. We must summon the strength, the will, and the faith to move forward - to be bold - to invest in our future.","author":"John Hoeven","cat":"faith"}

Each response is a JSON-formatted string with the quote, its author, and its category.

Now, run this in an alpine container as a daemon in the background. For this, you’ll need to compact the preceding script into a one-liner and execute it using the /bin/sh -c “…” syntax. The Docker expression will look as follows :

docker container run -d --name quotes alpine \ /bin/sh -c "while :; do wget -qO- https://talaikis.com/api/quotes/random; printf '\n'; sleep 5; done"

In the above expression, you used two new command-line parameters, -d and –name. The -d tells Docker to run the process running in the container as a Linux daemon. The –name parameter can be used to give the container an explicit name.

If you don’t specify an explicit container name, Docker will automatically assign the container a random but unique name. This name will be composed of the name of a famous scientist and an adjective.

Such names could be boring_borg or angry_goldberg. Quite humorous, isn’t it?

One important takeaway is that the container name must be unique. Ensure that the quotes container is up and running:

docker container ls -l

The important part of the preceding output is the STATUS column, which, in this case, is Up 16 seconds. This means that the container has been up and running for 16 seconds now.

Listing containers

As you continue to run containers over time, you’d eventually get a lot of them in your system. To find out what is currently running on your host, you can use the container ls command as follows:

docker container ls

This will list all currently-running containers.

By default, Docker outputs seven columns with the following meanings:

If you want to list all the containers defined on your system, you can use the command-line parameter -a or –all as follows:

docker container ls -a

This will list containers in any state, be it created, running, or exited.

Sometimes, you may want to just list the IDs of all the containers. For this, you have the -q parameter:

docker container ls -q

You might wonder where this is useful. Here’s an example:

docker container rm -f $(docker container ls -a -q)

The above command deletes all the containers currently defined on the system, including the stopped ones. The rm command stands for remove, and it will be explained further down in the tutorial.

In the previous section, you used the -l parameter in the list command. Try to use Docker help to find out what the -l parameter stands for. You can invoke help for the list command as follows:

docker container ls -h

Stopping and starting containers

Sometimes, you may need to temporarily stop a running container. Try it out with the quotes container with this command:

docker container run -d --name quotes alpine \ /bin/sh -c "while :; do wget -qO- https://talaikis.com/api/quotes/random; printf '\n'; sleep 5; done"

Now, you can stop this container with the following command:

docker container stop quotes

When you try to stop the quotes container, you will probably note that it takes a while (about 10 seconds) until it’s executed. Why is this the case? Docker sends a Linux SIGTERM signal to the main process running inside the container.

If the process still doesn’t terminate itself, Docker waits for 10 seconds before sending SIGKILL, which kills the process forcefully and terminates the container.

In the above command, the name of the container is used to specify the container to be stopped. The container ID can also be used instead.

How do you get the container ID?

There are several ways of doing so. The manual approach is to list all the running containers and find the one that you’re looking for in the list. Just copy its ID from there.

A more automated way is to use shell scripting and environment variables. For example, if you want to get the ID of the quotes container, here’s an example:

export CONTAINER_ID = $(docker container ls | grep quotes | awk '{print $1}')

Here we used AWK to get the first field which is the container ID. Now, instead of using the container name, you can use the $CONTAINER_ID variable in your expression:

docker container stop $CONTAINER_ID

Once you stop the container, its status changes to Exited.

You can restart a stopped container with the docker container start command.

Removing containers

When you run the docker container ls -a command, you can see quite a few containers that are in the Exited status.

If you don’t need these containers anymore, it’s better to remove them from memory; otherwise, they unnecessarily occupy precious resources. The command to remove a container is as follows:

docker container rm <container ID>

Alternately, you can also use this command:

docker container rm <container name>

Sometimes, removing a running container will not work; if you want to force the removal, you can use the command-line parameter -f or –force.

Containerization has changed the way the industry used to operate by mitigating maintenance costs by over 50% and time-to-market by around 90%. Further, containers make applications more secure as opposed to running them outside containers.

If you found this tutorial helpful and want to learn more about Docker containers, you can read more from Learn Docker – Fundamentals of Docker 18.x, which explain all the critical concepts, related to containerization and orchestration.

Keep coming back. Thank you.


0

Install, Secure, Access and Configure Linux Mail Server (Postfix)

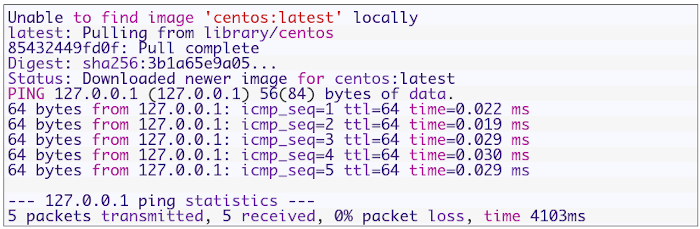
If you want to send or receive an email, you should have a mail server. In this post, we will discuss Linux mail server and how the SMTP (Simple Mail Transfer Protocol) works as well as other mail-related protocols, like Post Office Protocol (POP) and Internet Message Access Protocol (IMAP) and the relationship between them. SMTP defines how a mail is sent from one host to another, it is also system independent, which means the sender and receiver can have different operating systems. SMTP requires only that a server is able to send straight ASCII text to another server, and this is done by connecting to the server on port 25 which is the standard SMTP port. Most Linux distros today are shipped with two of the most common implementations of SMTP which are sendmail and Postfix. Sendmail is a famous and free mail server, but it has a little complex design and less secure. The Postfix took mail server implementation one step further, it was developed with security in mind.

Continue Reading →

Mail Service Components

The mail service on any mail server has three components:

Mail user agent (MUA): this component that the user sees and interacts with like Thunderbird and Microsoft Outlook, these user agents are responsible for reading mail and allowing you to compose mail.

Mail transport agent (MTA): this component is responsible for getting the mail from one site to another like Sendmail and Postfix.

Mail delivery agent (MDA): this component is responsible for distributing received messages on the local machine to the appropriate user mailbox like postfix-maildrop and Procmail.

Setup Email Server

We chose Postfix mail server, which is very popular and common among system administrators today.

Postfix is the default mail server on most modern Linux distros.

First, check if it is installed on your system or not:

rpm -qa | grep postfix

If not installed, you can install Postfix mail server on Red Hat based distros like this:

dnf -y install postfix

Then start the postfix service and enable it on system startup:

systemctl start postfix

systemctl enable postfix

On Debian based distros like Ubuntu, you can install it like this:

apt-get -y install postfix

You will be prompted to select your Postfix mail server configuration type during the installation process.

Among the four choices No configuration, Internet site, Internet with smarthost, Satellite system and Local only, we will choose No configuration option.

Configure Linux Mail Server

After installing the Postfix mail server, you will need to configure it, most of its configuration files can be found under the /etc/postfix/ directory.

You can find the main configuration for Postfix mail server in /etc/postfix/main.cf file.

This file contains a lot of options like:

myhostname

This option is used for specifying the hostname of the mail server. This is the Internet hostname which Postfix will receive emails on it.

The hostnames could be like mail.example.com, smtp.example.com.

It is written like this:

myhostname = mail.example.com

mydomain

This option is the mail domain that you will be servicing, like example.com

The syntax is like this:

mydomain = example.com

myorigin

All emails sent from this mail server will look as though it came from this option. You can set this to $mydomain value.

myorigin = $mydomain

You can use any option value, just precede it with a $ like $mydomain.

mydestination

This option lists the domains that the Postfix server uses for incoming emails.

It can take values like this:

mydestination = $myhostname, localhost.$mydomain, $mydomain, mail.$mydomain, www.$mydomain

mail_spool_directory

There are two modes of delivery that Postfix mail server can use:

  • Directly to a user’s mailbox.
  • To a central spool directory, this way, the mail will be in /var/spool/mail with a file for each user.

mail_spool_directory = /var/spool/mail

mynetworks

This option allows you to configure what servers can relay through your Postfix server.

This option should take local addresses like local mail scripts on your server only.

Otherwise, spammers can utilize your mail server to relay their messages and your mail server blacklisted and as a result, you will not be able to receive many emails.

This option has the following syntax:

mynetworks = 127.0.0.0/8, 192.168.1.0/24

smtpd_banner

This variable sets the message that is sent when the client after successful connection.

It is better to change the banner to something that doesn’t give an indication about the server you are using.

inet_protocols

This option specifies the IP protocol version used for server connections.

inet_protocols = ipv4

If you change the configuration files for Postfix mail server, you need to reload the service:

systemctl reload postfix

When you type any configuration, you may make a mistake, you can check for errors using the following command:

postfix check

This tool will help you find exactly the line and the error so you can fix it.

Checking the Mail Queue

Sometimes the mail queues on your system are filled up. This can be caused by many reasons like network failure or any reason that can delay mail delivery.

To check the mail queue on your Linux mail server, use the following command:

mailq

This command shows the Postfix mail queue.

If your queue is filled up and the message takes several hours to be sent, then you should flush the mail queue.

postfix flush

Now, if you check your mail queue you should find it empty.

Test Linux Mail Server

After configuring Postfix mail server correctly, you should test your mail server.

The first step is to use a local mail user agent like mailx or mail which is a symlink to mailx.

Try to send a mail to someone else on the same server, if this works, then send to a remote site.

echo "This is message body" | mailx -s "This is Subject" -r "likegeeks<[email protected]>" -a /path/to/attachment [email protected]

Then try to receive a mail from a remote site.

If you have any problems, check the logs. The log file on Red Hat based distros in /var/log/maillog file and on Debian based distros in /var/log/mail.log file or as defined in the rsyslogd configuration.

I recommend you to review the Linux Syslog Server for a detailed explanation about logs and how to configure the rsyslogd.

If you still have problems, try checking your DNS settings and check your MX records using Linux network commands.

Secure Mail Boxes From Spam Using SpamAssassin

One of the ways to fight spam is to scan the mailboxes by some tool, searching for certain patterns associated with spam.

One of the best solutions is SpamAssassin, which is open-source.

You can install it like this:

dnf -y install spamassassin

Then start the service and enable it at startup:

systemctl start spamassassin

systemctl enable spamassassin

Once you’ve installed it, you can check the configuration in /etc/mail/spamassassin/local.cf file.

SpamAssassin determines if an email is spam or not based on the result of the different scripts scores.

If the message has a higher score, that means a higher possibility of the mail being spam.

In the configuration file, the parameter required_hits 5 indicates that SpamAssassin will mark an email as spam if its score is five or higher.

The report_safe option takes the values 0, 1, or 2. If set to 0 means email marked as spam is sent as it is, only modifying the headers to show that it is spam.

If it takes the value 1 or 2, a new report message is generated by SpamAssassin and sent to the recipient.

If the value is 1, that means the spam message is coded as content message/rfc822, while if the value is 2, that means the message is coded as text/plain content.

The text/plain is safer since some mail clients execute message/rfc822 and could infect the client computer.

Now we need to integrate it into postfix. The simplest way to do this is probably by using procmail.

We’ll have to create a file, named /etc/procmailrc, and add the following content:

:0 hbfw
| /usr/bin/spamc

Then we edit Postfix configuration file /etc/postfix/main.cf and change mailbox_command like this:

mailbox_command = /usr/bin/procmail

Finally, restart Postfix and SpamAssassin services:

systemctl restart postfix

systemctl restart spamassassin

However, SpamAssassin sometimes does not recognize spam messages, that led to mailboxes filled with spam messages.

Fortunately, you can filter messages before they enter the Postfix server using Realtime Blackhole Lists (RBLs). That will decrease the load on your mail server and keep your mail server clean.

Open the configuration file of postfix server /etc/postfix/main.cf and change smtpd_recipient_restrictions option and add the following options like this:

Then restart your postfix server:

systemctl restart postfix

The above RBLs are the common ones, you can find more lists on the web and try them.

Securing SMTP Connection

It is better to transfer your SMTP traffic over TLS to protect it from being modified in the middle.

First, we need to generate the certificate and the key using openssl command:

openssl genrsa -des3 -out mail.key

openssl req -new -key mail.key -out mail.csr

cp mail.key mail.key.original

openssl rsa -in mail.key.original -out mail_secure.key

openssl x509 -req -days 365 -in mail_secure.csr -signkey mail_secure.key -out mail_secure.crt

cp mail_secure.crt /etc/postfix/

cp mail_secure.key /etc/postfix/

Then add the following option to Postfix configuration file /etc/postfix/main.cf:

smtpd_use_tls = yes

smtpd_tls_cert_file = /etc/postfix/mail_secure.crt

smtpd_tls_key_file = /etc/postfix/mail_secure.key

smtp_tls_security_level = may

Finally, restart your postfix service:

systemctl restart postfix

Now, you have to choose the TLS on your client when connecting to the server.

You will receive a warning when you send a mail the first time after changing the setting because of the certificate is not signed.

Using Let’s Encrypt Certificates

Let’s Encrypt is a free SSL certificate provider that enables you to encrypt your traffic.

Instead of using self-signed certificates which annoy your users about trusting them, you can use this good solution.

First, install letsencrypt:

yum install letsencrypt

Or if you are using Debian based distro, you can use the following command:

apt-get install letsencrypt

Then run letsencrypt like this:

letsencrypt certonly --standalone -d yourdomain.com

You should replace yourdomain.com with your actual domain.

After answering the prompted questions about the contact email, the email server domain, and the license, everything should be OK now.

The certificates will be stored in /etc/letsencrypt/live/yourdomain.com/

One last thing you have to do which is making postfix use those certificates, you can use the following commands:

sudo postconf -e 'smtpd_tls_cert_file = /etc/letsencrypt/live/yourdomain.com/fullchain.pem'

sudo postconf -e 'smtpd_tls_key_file = /etc/letsencrypt/live/yourdomain.com/privkey.pem'

Don’t forget to replace yourdomain.com with your actual domain.

Finally, restart your postfix server

systemctl restart postfix

POP3 and IMAP Protocol Basics

So far we’ve seen how SMTP mail server sends and receives emails without problems, but consider the following situations:

  • Users need local copies of e-mail for offline viewing.
  • mbox file format is not supported. The mbox format is used by many mail user agents like mailx and mutt.
  • Users cannot stay connected to a fast network to grab a local copy to read offline.
  • Some mail servers don’t give access to the shared mail spool directories for security reasons.

To handle these cases, another class of protocols was introduced. This type of protocols may be described as mail access protocols.

The most common two popular mail access protocols are Post Office Protocol (POP) and Internet Message Access Protocol (IMAP).

The idea behind POP is very simple: A central Linux mail server remains online all the time and receives and store emails for all users. All received emails are queued on the server until a user grabs them.

When a user wants to send an email, the email client relays it through the central Linux mail server via SMTP normally.

Note that the SMTP server and POP server can be on the same system without any problem. Most servers do this today.

Features like keeping a master copy of a user’s email on the server were missing, that led to the development of IMAP.

By using IMAP, your Linux mail server will support three modes of access:

  • The online mode is similar to having direct file system access to the Linux mail server.
  • The offline mode is similar to how POP works, where the client is disconnected from the network except when grabbing his email. In this mode, the server normally does not retain a copy of the email.
  • The disconnected mode works by allowing users to keep cached copies of their emails and the server retains a copy of the email.

There are several implementations for IMAP and POP, the most popular one is Dovecot server which provides both protocols.

The POP3, POP3S, IMAP, and IMAPS listen on ports 110, 995, 143, and 993 respectively.

Installing Dovecot

Most Linux distros come with dovecot preinstalled, however, you can install dovecot in Red Hat based distros like this:

dnf -y install dovecot

On Debian based distros, the IMAP and POP3 functionality are provided in two separate packages, you can install them like this:

apt-get -y install dovecot-imapd dovecot-pop3d

You will be prompted to create self-signed certificates for using IMAP and POP3 over SSL/TLS. Select yes and enter the hostname for your system when prompted.

Then you can run the service and enable it at startup like this:

systemctl start dovecot

systemctl enable dovecot

Configure Dovecot

The main configuration file for Dovecot is /etc/dovecot/dovecot.conf file.

Some Linux distros put the configuration under /etc/dovecot/conf.d/ directory and use the include directive to include the settings in the files.

The following list is the some of the parameters used to configure dovecot:

protocols: the protocols you want to support.

protocols = imap pop3 lmtp

lmtp means local mail transfer protocol.

listen: IP addresses to listen on.

listen = *, ::

The asterisk means all ipv4 interfaces and :: means all ipv6 interfaces

userdb: user database for authenticating users.

userdb {

driver = pam

}

passdb: password database for authenticating users.

passdb {

driver = passwd

}

mail_location: this entry in /etc/dovecot/conf.d/10-mail.conf file, and it is written like this:

mail_location = mbox:~/mail:INBOX=/var/mail/%u

Dovecot comes with generic SSL certificates and key files that are used in the /etc/dovecot/conf.d/10-ssl.conf

ssl_cert = </etc/pki/dovecot/certs/dovecot.pem

ssl_key = </etc/pki/dovecot/private/dovecot.pem

When a user tries to connect to dovecot server, it will show a warning because the certificates are not signed, you can purchase a certificate from a certificate authority if you want.

Or if you go with Let’s Encrypt certificates, you can point to them instead:

ssl_cert = </etc/letsencrypt/live/yourdomain.com/fullchain.pem

ssl_key = </etc/letsencrypt/live/yourdomain.com/privkey.pem

Don’t forget to open dovecot server ports in your iptables firewall by adding iptables rules for ports 110, 995, 143, 993, 25.

Then save the rules.

Or if you are using firewalld you can do the following:

firewall-cmd --permanent --add-port=110/tcp --add-port=995/tcp

firewall-cmd --permanent --add-port=143/tcp --add-port=993/tcp

firewall-cmd --reload

And again, for troubleshooting, you check the log files /var/log/messages, /var/log/maillog, and /var/log/mail.log files.

Linux mail server is one of the easiest servers to work with, especially Postfix mail server.

I hope you find the post useful and interesting. Keep coming back.

Thank you.

0

How to Install & Configure Squid Linux Proxy Server

Linux fproxy server or proxy server generally is a server that saves the visited web pages for later requests, so if you try to visit the same web page or any one else, the page will be retrieved from the proxy server. This is very useful, it makes web surfing much faster and reduces the traffic which means less cost. Caching servers can decrease external traffic up to 45%. Another main advantage for proxy servers, you can configure the proxy with some settings for access control. For example, you can restrict access to specific websites. If you surf the web before from an anonymous proxy, this is actually a proxy server. You can choose any of the available Linux proxy servers out there like: Squid, Varnish, Polipo, TinyProxy, and more. In this post, we will discuss the most common Linux proxy server which is Squid.

Continue Reading →

Install squid

Installing squid proxy server is very simple. For Red Hat based distro, you can install it like this:

dnf -y install squid

Or if you are using Debian based distro, you can install it like this:

apt-get -y install squid

Now you can start squid service and enable it at startup:

systemctl start squid
systemctl enable squid

To squid proxy server, you can check the configuration file in /etc/squid/squid.conf

Before we dig into the configuration, let’s see the proxy server in action.

Just change the proxy setting on your browser to the IP address of the proxy and the port 3128 since this is the squid default port. You can change the default port by changing the http_port option in the configuration file.

Linux Proxy Server set client

As shown on the image I’ve pointed my browser to my Linux proxy server and I can browse the web without any problems.

If you are using iptables firewall, don’t forget to open the squid server port.

Allow IP Address Range

If you open the configuration file /etc/squid/squid.conf, you will see the rules that allow IP addresses to connect to the proxy server like this:

acl localnet src 192.168.0.0/16

However, you can add a new ACL entry to allow a range of IP addresses to connect to your proxy server:

acl localnet src 212.80.113.0/16

Then save the file and restart squid service:

systemctl restart squid

Very easy, right?

Also, if you remove any ACL from the file, all IP addresses from that range will not be able to connect to the proxy server.

Allow Specific Ports

You can find all ports that are allowed in the configuration file like this:

acl Safe_ports port 80

Consider adding Safe_ports ACL rule for any port that your clients need. You can add a port range instead of writing a rule for every port like this:

acl Safe_ports port 6000-7000

Don’t forget to restart the squid proxy server after the modification:

systemctl restart squid

Authenticating Users

You can force your users to authenticate before they use your Linux proxy server using Apache authentication.

First, we create a file that will store the users:

touch /etc/squid/passwd

Then change the ownership to squid daemon so it can access the file:

chown squid /etc/squid/passwd

Now we will create a new user using the htpasswd command:

htpasswd /etc/squid/passwd likegeeks

It will prompt you for the password twice.

If you open the created file, you will see the user and the hashed password.

Then you change the squid configuration to tell it about the authentication that it should use.

Add the following lines below the ACL ports and nowhere else to enable authentication:

auth_param basic program /usr/lib64/squid/basic_ncsa_auth /etc/squid/passwd

auth_param basic children 5

auth_param basic realm Squid Basic Authentication

auth_param basic credentialsttl 3 hours

acl auth_users proxy_auth REQUIRED

http_access allow auth_users

Then restart the squid service and try to open the browser again.

systemctl restart squid

Authentication

As you can see, if you try to connect to the Linux proxy server, it will prompt you for the username and the password.

Block Websites

You can block websites from the proxy users, just create a separate file that will be the list of domains you want to block and point that file from the squid configuration like this:

touch /etc/squid/blocked

Then type all websites you want to block one per line in that file and save it.

Now change the squid configuration to block those websites under acl list and http_access list.

acl blocked_sites dstdomain "/etc/squid/blocked"

http_access deny blocked_sites

Then restart squid service:

systemctl restart squid

There are a lot of ready to use lists on the web and they are categorized, you can use them in squid, like MESD blacklists, Shalla’s Blacklists.

Modify Content

Since the Linux proxy server is between the browser and the internet, this is a very good position to alter the delivered content.

You can change images or ads or whatever. This can be done using the url_rewrite_program module.

Actually, you can do more than that, but we don’t want to be evil.

In our example, we will flip the images and surf the flipped images instead of the original.

First, we need to install ImageMagick:

dnf -y install imagemagick

Then we will write the script that will do the magic. The script will be written in Perl.

You can find the script here

This Perl script searches for JPG, GIF, and PNG, images in the carried content, once it is found, it uses mogrify utility that shipped with ImageMagick to flip the images and put the flipped image in /var/www/html/ which is the root directory for Apache server and apache service should be running of course, then send the flipped images as a response.

Just make sure to add ownership for squid for this folder:

usermod -aG www-data squid

Finally, you have to tell squid about this script. Open the configuration file and type the following:

url_rewrite_program /home/likegeeks/flip.pl

Then restart your squid service

systemctl restart squid

The web has a lot of Perl scripts that play with the content, some of them are good, and some others are evil.

Anonymous Browsing

By default squid proxy server forwards the client IP address to the requested site, if you want the proxy to be surf users anonymously, you should send squid IP instead of clients IPs.

To do that, change the forwarded_for option to off in /etc/squid/squid.conf file.

forwarded_for off

And add the following options mentioned here at the end of the configuration file.

Then restart the service:

systemctl restart squid

You can check your public IP address, you will notice that your IP is the squid proxy server IP.

Connecting Squid Servers

The cache_peer directive sets your peer caches and informs Squid how to communicate with them.

It is written like this:

cache_peer hostname Server-type http-port icp-port [options]

The first argument is the other squid hostname or IP address.

The 2nd argument specifies the type of the other server.

The 3rd argument is the port number.

The 4th argument specifies the ICP port (Internet Caching Protocol) which is 3130. This is used to query other cache servers.

The cache_peer has some options you can use like:

proxy-only: This option prevents Squid from saving any responses it receives from the other squid server.

no-delay: If any delay, it will be ignored.

login= user:password: The authentication credentials to the other server. It takes this formula login =user:password

connect-timeout: This option specifies the connection timeout to other squid servers.

Write your options and save the configuration file and restart the service.

Squid Log Files

Log files are your main source for problem diagnostics and various squid operations.

There are cache.log, access.log, and store.log. You can find them in /var/log/squid directory.

The cache.log file contains informational messages about Squid’s operation. All proxy errors are written to this file.

The access.log file contains all HTTP request made by the clients.

The store.log file contains information about the passed objects.

Each entry on these files is written with time stamps when the message was generated.

I hope you find the post easy. Keep coming back

Thank you.

0

LiVES video editor 3.0.1 nasıl yüklenir?

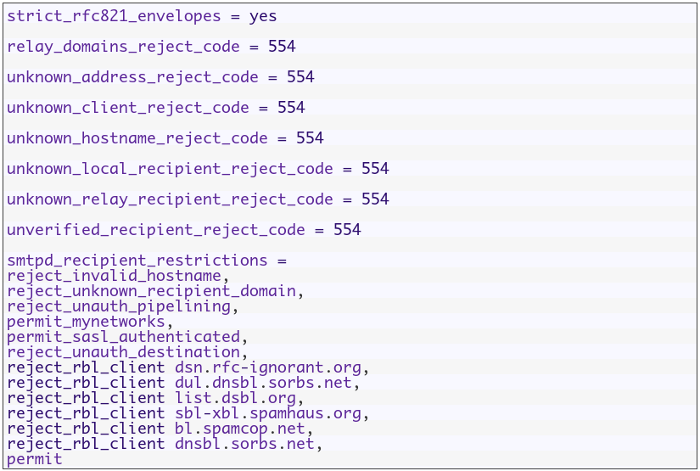
En iyi açık kaynak kodlu ve özgür video editörlerinden biri olan LiVES video editor, GNU General Public License v3 ile lisanslanmıştır. LiVES video editor, şu an için 3.0.1 sürümüne güncellenmiş bulunuyor. Bu güncelleme ile istenmeyen kilitlenmelerin önlendiği, video kaydının optimize edildiği, çevrimiçi video indiricisinin daha kullanışlı hale getirildiği söyleniyor. Daha pürüzsüz oynatmayı içeren openGL oynatma eklentisindeki iyileştirmelerle gelen sürümde, oynatma eklentisi için gelişmiş seçeneklerin yeniden etkinleştirildiği ifade ediliyor. Geniş kapsamlı ana arayüzün yeniden yazıldığı, kodun temizlendiği ve birçok görsel iyileştirme yapıldığı söyleniyor. Musl libc için destek eklenen sürümde, Ukraynaca için çeviri güncellemesi yapılmış. LiVES, genellikle pek çok GNU/Linux dağıtımının deposunda vardır. Ancak, bu yazıda yazılımı manuel olarak kurmak ihtiyacında olanlar hedeflenmiştir.

Continue Reading →

Manuel olarak kurmak isteyenler kimi dağıtımlara uygun paketleri, mesela Fedora ve Open SUSE için RPM paketlerini indirme sayfasında bulabilirler. Bu nedenle indirme sayfasını incelemeniz önerilir. Ubuntu ya da Ubuntu tabanlı dağıtımlarda ise kurulum, PPA deposu aracılığıyla olur. Buna göre, öncelikle PPA deponun sistem kaynaklarına eklenmesi gerekir:

sudo add-apt-repository ppa:ubuntuhandbook1/lives

Ardından depolarımızı güncelliyoruz:

sudo apt update

Son olarak, LiVES video editor’u yüklüyoruz:

sudo apt install lives lives-plugins

Güle güle kullanın.

0

Linux Virtual File System

The Linux virtual file system or virtual file system generally is a layer that sits on the top of your actual file system which allows the user to access different types of file systems, you can think of virtual file system as an interface between the kernel and the actual file system. That means you will not find any entries for those Linux virtual filesystems in your /etc/fstab file. Yet, you will still find them when you type the mount command. If you are coming from Windows, the virtual file system is the Registry. The proc file system is a virtual file system which is mounted on /proc directory. There is no real file system exists on /proc, it’s a virtual layer that is used for dealing with the kernel functionalities.

Continue Reading →

/proc File System

For example, to get the processor specifications, type the following command:

cat /proc/cpuinfo

This is a very powerful and easy way to query Linux kernel.

Notice that if you check the size of the file in /proc directory, you will find that all file sizes are 0, because as we said they don’t exist on the disk.

When you type cat /proc/cpuinfo command, a file is dynamically created to show you the CPU info.

The only file that has a size in /proc directory is /proc/kcore file, which shows the RAM content. Actually, this file isn’t occupying any space on the disk.

Writing to Proc Files

As we’ve seen, we can read the content of proc files, but some of them are writable, so we can write to them to change some functionality.

For example, this /proc/sys/net/ipv4/ip_forward file controls IP forwarding in case you have multiple network cards.

You can change the value of this file like this:

echo "1" > /proc/sys/net/ipv4/ip_forward

Keep in mind that when you change any file or value under /proc directory there is no validation of what you are doing, you may crash your system if you type a wrong setting.

Persisting /proc Files Changes

The previous modification to the /proc/sys/net/ipv4/ip_forward entry will not survive after rebooting since you are not writing to a file, this is a virtual file system, means change happens to the memory.

If you need to save changes under /proc, you have two ways:

You can write your entries in /etc/rc.local file, or in Red Hat based distros like CentOS, create /etc/rc.d/rc.local file and make it executable and enable the systemd service unit that enables the use of the rc.local file and write your entries.
The sysctl command is used to change entries in /proc/sys/ directory.

sysctl net.ipv4.ip_forward

This will show the value of the entry, to change it, use the -w option:

sysctl -w net.ipv4.ip_forward=1

One final step is to write the changes to /etc/sysctl.conf:

echo "net.ipv4.ip_forward = 1" >> /etc/sysctl.conf

Make sure that the file /etc/sysctl.conf does not contain the entry before you write your changes.

Common /proc Entries

These are some of the commonly used /proc entries:

/proc/cpuinfo                    information about CPUs in the system.

/proc/meminfo                information about memory usage.

/proc/ioports                     list of port regions used for I/O communication with devices.

/proc/mdstat                     display the status of RAID disks configuration.

/proc/kcore                        displays the system actual memory.

/proc/modules                 displays a list of kernel loaded modules.

/proc/cmdline                   displays the passed boot parameters.

/proc/swaps                      displays the status of swap partitions.

/proc/iomem                     the current map of the system memory for each physical device.

/proc/version                    displays the kernel version and time of compilation.

/proc/net/dev                   displays information about each network device like packets count.

/proc/net/sockstat         displays statistics about network socket utilization.

/proc/sys/net/ipv4/ip_ display the range of ports that Linux uses.

local_port_range

/proc/sys/net/ipv4/        protection against syn flood attacks.

tcp_ syncookies

These are some of the common entries in /proc directory.

Listing /proc Directory

If you list the files in /proc directory, you’ll notice a lot of directories which have numeric names, these directories contain information about the running processes and the numeric value is the corresponding process ID.

You can check the consumed resources by a specific process from these directories.

If you take a look at the folder named 1, it belongs to the init process or systemd (like CentOS 7) which is the first process runs When Linux starts.

ls -l /proc/1

The /proc/1/exe file is a symbolic link to /lib/systemd/systemd binary or /sbin/init in other systems that use init binary.

The same concept applies to all numeric folders under /proc directory.

/proc Useful Examples

To protect your server from SYN flood attack, you can use iptables to block SYN packets.

A better solution is to use SYN cookies. A special method in the kernel that keeps track of which SYN packets come. If the SYN packets don’t move to established state within a reasonable interval, the kernel will drop them.

sysctl -w net.ipv4.tcp_syncookies=1

And to persist the changes.

echo "net.ipv4.tcp_syncookies = 1" >> /etc/sysctl.conf

Another useful example which is the /proc/sys/fs/file-max, this value shows the maximum files (including sockets, files, etc,) that can be opened at the same time.

You can increase this number like this:

sysctl -w "fs.file-max=96992"

echo "fs.file-max = 96992" >> /etc/sysctl.conf

sysfs Virtual File System

sysfs is a Linux virtual file systems which mean it’s also in memory.

sysfs file system can be found at /sys. The sysfs can be used to get information about your system hardware.

ls -l /sys

From the result of the above command, the file sizes are all zero because as we know this is a Linux virtual file system.

The top level directory of /sys contains the following:

Block                     list of block devices detected on the system like sda.

Bus                        contains subdirectories for physical buses detected in the kernel.

class                      describes class of device like audio, network or printer.

Devices                 list all detected devices by the physical bus registered with the kernel.

Module                 lists all loaded modules.

Power                   the power state of your devices.

tmpfs Virtual File System

tmpfs is a Linux virtual file system that keeps data in the system virtual memory. It is the same like any other Virtual File Systems, any files are temporarily stored in the Kernel’s internal caches.

The /tmp file system is used as the storage location for temporary files.

The /tmp file system is backed by an actual disk-based storage and not by a virtual system.

This location is chosen during Linux installation.

The /tmp is created automatically by systemd service when booting the system.

You can setup tmpfs style file system with the size you want, using the mount command.

mount it tmpfs -o size=2GB tmpfs /home/myfolder

Awesome!!

Working with Linux virtual file system is very easy.

I hope you find the post useful and interesting. Keep coming back.

Thank you.

0