
Archive | GNU/Linux İpuçları

Bash Script Step By Step, You will love it

Today we are going to talk about bash scripting or shell scripting and how to write your first bash script. Actually, they are called shell scripts in general, but we are going to call them bash scripts because we are going to use bash among the other Linux shells. There are zsh, tcsh, ksh and other shells. In the previous posts, we saw how to use the bash shell and how to use Linux commands. The concept of a bash script is to run a series of Commands to get your job done. To run multiple commands in a single step from the shell, you can type them on one line and separate them with semicolons.

Continue Reading →

In the previous posts, we saw how to use the bash shell and how to use Linux commands.

The concept of a bash script is to run a series of Commands to get your job done.

To run multiple commands in a single step from the shell, you can type them on one line and separate them with semicolons.

pwd ; whoami

Actually, this is a bash script!!

The pwd command runs first, displaying the current working directory then the whoami command runs to show the currently logged in users.

You can run multiple commands as much as you wish, but with a limit. You can determine your max args using this command.

getconf ARG_MAX

Well, What about putting the commands into a file, and when we need to run these commands we run that file only. This is called a bash script.

First, make a new file using the touch command. At the beginning of any bash script, we should define which shell we will use because there are many shells on Linux, bash shell is one of them.

Bash Script Shebang

The first line you type when writing a bash script is the (#!) followed by the shell you will use.

#! <=== this sign is called shebang.

#!/bin/bash

If you use the pound sign (#) in front of any line in your bash script, this line will be commented which means it will not be processed, but, the above line is a special case . This line defines what shell we will use, which is bash shell in our case.

The shell commands are entered one per line like this:

#!/bin/bash

# This is a comment

pwd

whoami

You can type multiple commands on the same line but you must separate them with semicolons, but it is preferable to write commands on separate lines, this will make it simpler to read later.

Set Script Permission

After writing your bash script, save the file.

Now, set that file to be executable, otherwise, it will give you permissions denied. You can review how to set permissions using chmod command.

bash script permission

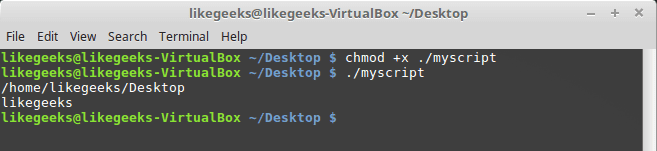
chmod +x ./myscript

Then try run it by just typing it in the shell:

./myscript

And Yes, it is executed.
bash script first run

Print Messages

As we know from other posts, printing text is done by echo command.

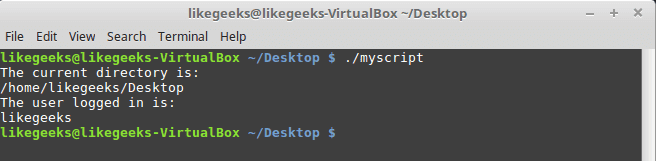
Edit our file and type this:

#!/bin/bash

# our comment is here

echo "The current directory is:"

pwd

echo "The user logged in is:"

whoami

Look at the output:
bash script echo command

Perfect! Now we can run commands and display text using echo command.

If you don’t know echo command or how to edit a file I recommend you to view previous articles about basic Linux commands

Using Variables

Variables allow you to store information to use it in your script.

You can define 2 types of variables in your bash script:

  • Environment variables
  • User variables

Environment Variables

Sometimes you need to interact with system variables, you can do this by using environment variables.

#!/bin/bash

# display user home

echo "Home for the current user is: $HOME"

Notice that we put the $HOME system variable between double quotations, and it prints the home variable correctly.

bash script global variables

What if we want to print the dollar sign itself?

echo "I have $1 in my pocket"

Because variable $1 doesn’t exist, it won’t work. So how to overcome that?

You can use the escape character which is the backslash \ before the dollar sign like this:

echo "I have \$1 in my pocket"

Now it works!!

bash script escape dollar sign

User Variables

Also, you can set and use your custom variables in the script.

You can call user variables in the same way like this:

#!/bin/bash

# User variables

grade=5

person="Adam"

echo "$person is a good boy, he is in grade $grade"

chmod +x myscript

./myscript

bash script user variables

Command Substitution

You can extract information from the result of a command using command substitution.

You can perform command substitution with one of the following methods:

  • The backtick character (`).
  • The $() format.

Make sure when you type backtick character, it is not the single quotation mark.

You must enclose the command with two backticks like this:

mydir=`pwd`

Or the other way:

mydir=$(pwd)

So the script could be like this:

#!/bin/bash

mydir=$(pwd)

echo $mydir

The output of the command will be stored in mydir variable.

bash script command substitution

Math calculation

You can perform basic math calculations using $(( 2 + 2 )) format:

#!/bin/bash

var1=$(( 5 + 5 ))

echo $var1

var2=$(( $var1 * 2 ))

echo $var2

Just that easy.

bash script math

if-then statement

You bash scripts will need conditional statements. Like if the value is smaller than 10 do this else do that. You can imagine any logic you want.

The most basic structure of if-then statement is like this:

if command

then

do something

fi

and here is an example:

#!/bin/bash

if whoami

then

echo "It works"

fi

Since the whoami command will return my user so the condition will return true and it will print the message.

Let’s dig deeper and use other commands we know.

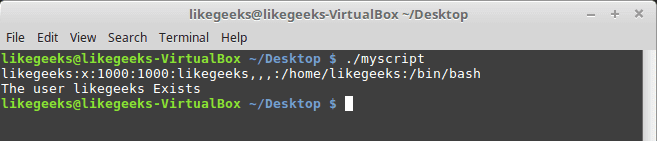
Maybe searching for a specific user in the user’s file /etc/passwd and if a record exists, tell me that in a message.

#!/bin/bash

user=likegeeks

if grep $user /etc/passwd

then

echo "No such a user $user"

fi
bash script if-else

We use the grep command to search for the user in /etc/passwd file. You can check our tutorial about the grep command.

If the user exists, the bash script will print the message.

What if the user doesn’t exist? The script will exit the execution without telling us that the user doesn’t exist. OK, let’s improve the script more.

if-then-else Statement

The if-then-else statement takes the following structure:

if command

then

do something

else

do another thing

fi

If the first command runs and returns zero; which means success, it will not hit the commands after the else statement, otherwise, if the if statement returns non-zero; which means the statement condition fails, in this case, the shell will hit the commands after else statement.

#!/bin/bash

user=anotherUser

if grep $user /etc/passwd

then

echo "The user $user Exists"

else

echo "The user $user doesn’t exist"

fi

bash script if-else

We are doing good till now, keep moving.

Now, what if we need more else statements.

Well, that is easy, we can achieve that by nesting if statements like this:

if condition1

then

commands

elif condition2

then

commands

fi

If the first command return zero; means success, it will execute the commands after it, else if the second command return zero, it will execute the commands after it, else if none of these return zero, it will execute the last commands only.

#!/bin/bash

user=anotherUser

if grep $user /etc/passwd

then

echo "The user $user Exists"

elif ls /home

then

echo "The user doesn’t exist"

fi

You can imagine any scenario here, maybe if the user doesn’t exist, create a user using the useradd command or do anything else.

Numeric Comparisons

You can perform a numeric comparison between two numeric values using numeric comparison checks like this:

number1 -eq number2 Checks if number1 is equal to number2.

number1 -ge number2 Checks if number1 is bigger than or equal number2.

number1 -gt number2 Checks if number1 is bigger than number2.

number1 -le number2 Checks if number1 is smaller than or equal number2.

number1 -lt number2 Checks if number1 is smaller than number2.

number1 -ne number2 Checks if number1 is not equal to number2.

As an example, we will try one of them and the rest is the same.

Note that the comparison statement is in square brackets as shown.

#!/bin/bash

num=11

if [ $num -gt 10]

then

echo "$num is bigger than 10"

else

echo "$num is less than 10"

fi

bash script numeric compare

The num is greater than 10 so it will run the first statement and prints the first echo.

String Comparisons

You can compare strings with one of the following ways:

string1 = string2 Checks if string1 identical to string2.

string1 != string2 Checks if string1 is not identical to string2.

string1 < string2 Checks if string1 is less than string2.

string1 > string2 Checks if string1 is greater than string2.

-n string1 Checks if string1 longer than zero.

-z string1 Checks if string1 is zero length.

We can apply string comparison on our example:

#!/bin/bash

user ="likegeeks"

if [$user = $USER]

then

echo "The user $user is the current logged in user"

fi

bash script string compare

One tricky note about the greater than and less than for string comparisons, they MUST be escaped with the backslash because if you use the greater-than symbol only, it shows wrong results.

So you should do it like that:

#!/bin/bash

v1=text

v2="another text"

if [ $v1 \> "$v2" ]

then

echo "$v1 is greater than $v2"

else

echo "$v1 is less than $v2"

fi

bash script string greater than

It runs but it gives this warning:

./myscript: line 5: [: too many arguments

To fix it, wrap the $vals with a double quotation, forcing it to stay as one string like this:

#!/bin/bash

v1=text

v2="another text"

if [ $v1 \> "$v2" ]

then

echo "$v1 is greater than $v2"

else

echo "$v1 is less than $v2"

fi

bash script string fix

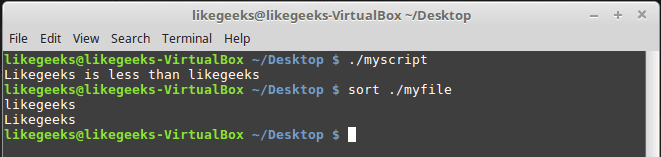
One important note about greater than and less than for string comparisons. Check the following example to understand the difference:

#!/bin/bash

v1=Likegeeks

v2=likegeeks

if [ $v1 \> $v2 ]

then

echo "$v1 is greater than $v2"

else

echo "$v1 is less than $v2"

fi

bash script character case

sort myfile

likegeeks

Likegeeks

bash script sort order

The test condition considers the lowercase letters bigger than capital letters. Unlike the sort command which does the opposite.

The test condition is based on the ASCII order, while the sort command is based on the numbering orders from the system settings.

File Comparisons

You can compare and check for files using the following operators:

-d my_file Checks if its a folder.

-e my_file Checks if the file is available.

-f my_file Checks if its a file.

-r my_file Checks if it’s readable.

my_file nt my_file2 Checks if my_file is newer than my_file2.

my_file ot my_file2 Checks if my_file is older than my_file2.

-O my_file Checks if the owner of the file and the logged user match.

-G my_file Checks if the file and the logged user have the idetical group.

As they imply, you will never forget them.

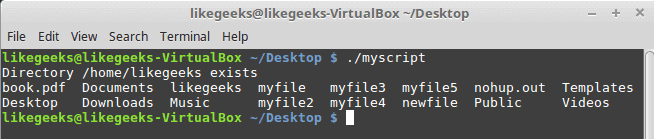
Let’s pick one of them and take it as an example:

#!/bin/bash

mydir=/home/likegeeks

if [ -d $mydir ]

then

echo "Directory $mydir exists"

cd $mydir

ls

else

echo "NO such file or directory $mydir"

fi
bash script file checking

We are not going to type every one of them as an example. You just type the comparison between the square brackets as it is and complete you script normally.

There are some other advanced if-then features but let’s make it in another post.

That’s for now. I hope you enjoy it and keep practicing more and more.

Thank you.

likegeeks.com

0

16 Useful Linux Command Line Tricks

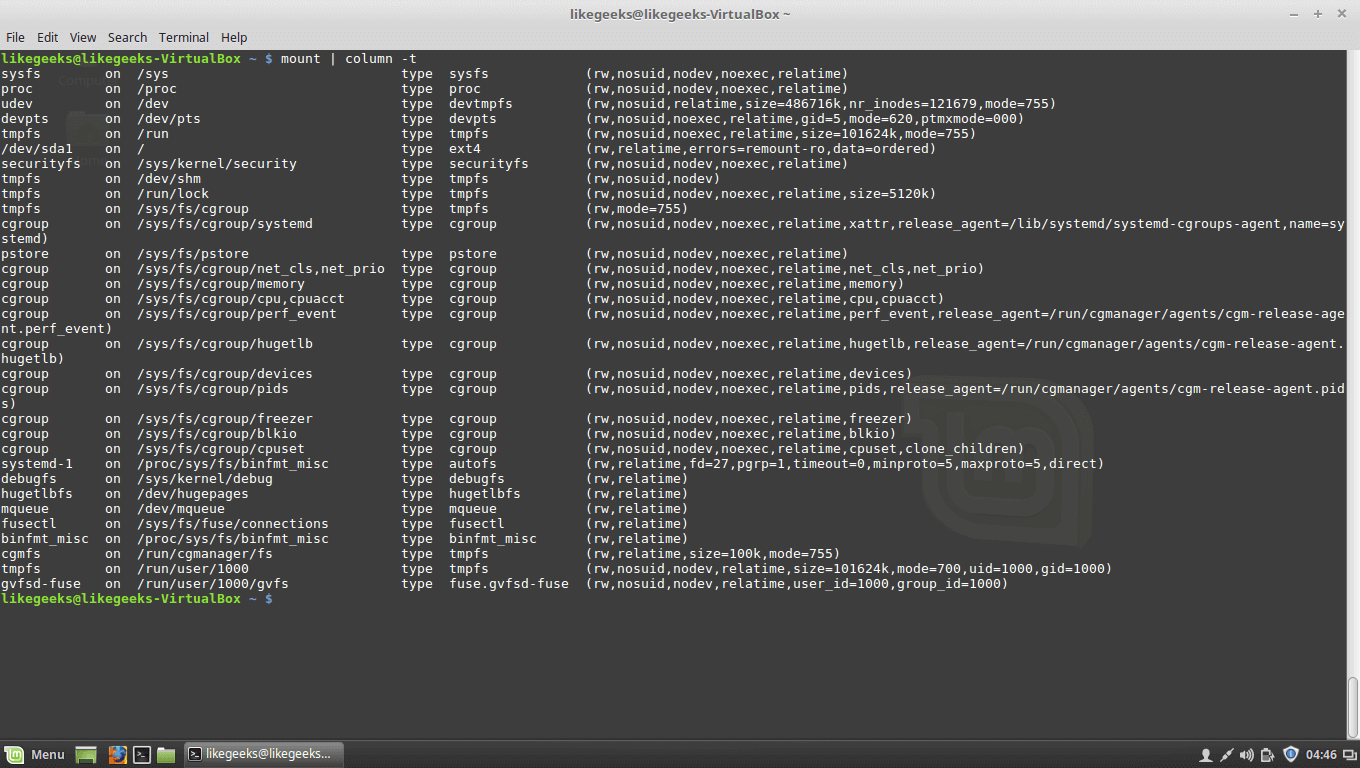
We use the Linux command line every day, and due to the little practicing, we may forget some of the Linux command line tricks. In this post, I’m going to show you some of these Linux command line tricks that you might forget or maybe new to you, so let’s get started. Sometimes it’s painful to read the output well due to the overcrowded strings, for example, the result of the mount command, what about viewing the output like a table? It is an easy job.
Continue Reading →

mount | column –t

mount table view

OK, in this example, we see the output is well formatted because the separator between them is spaces.

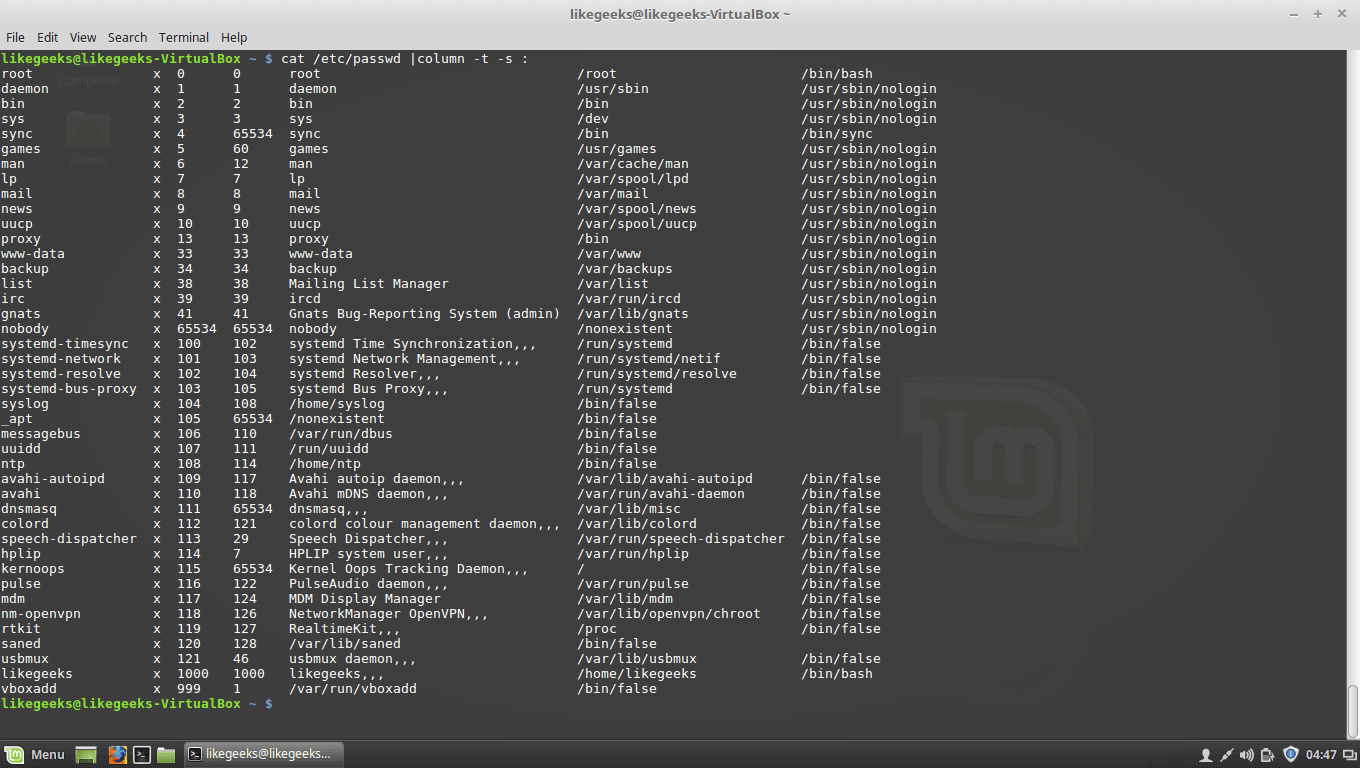
What if the separators are something else, like colons :

The /etc/passwd file is a good example.

Just specify the separator with -s parameter like this:

cat /etc/passwd | column -t -s :

users tabular view

 Run Until Success

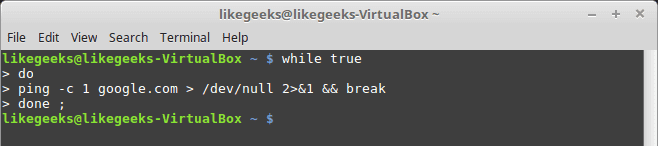
If you search google about that trick, you will find a lot of questions about people asking how to repeat the command till it returns success and runs properly, like ping the server till it becomes alive or check if a file with a specific extension is uploaded at specific directory or maybe check if a specific URL becomes available or maybe any geeky thing, the list is very long.

You can use the while true loop to achieve that:

repeat till success

We use > /dev/null 2>&1  to redirect normal output and errors to /dev/null.

Actually, this is one of coolest Linux Command Line Tricks for me.

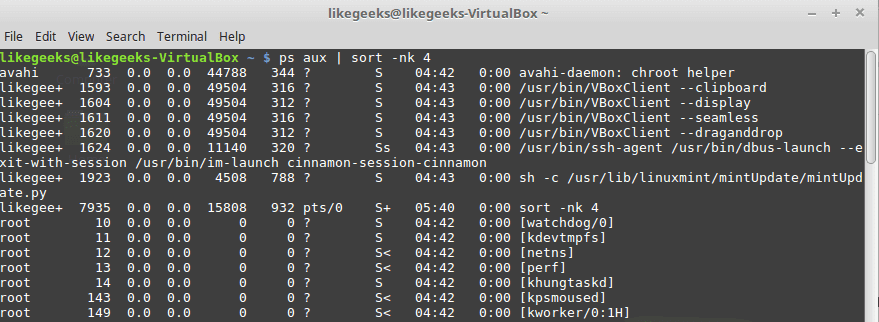
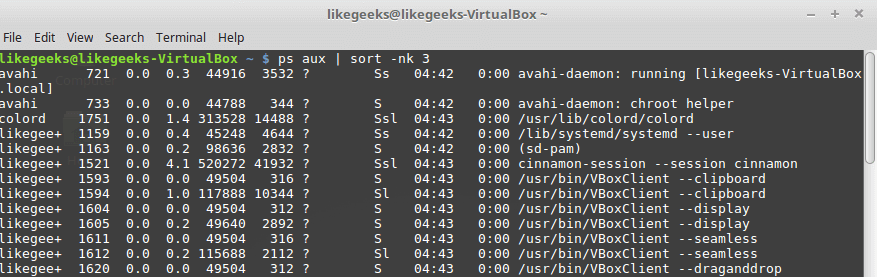
Sort Processes by (Memory – CPU) Usage

To sort by memory usage:

sort by memory usage

To sort by CPU usage:

sort by cpu usage

Check Your Architecture

getconf  LONG_BIT

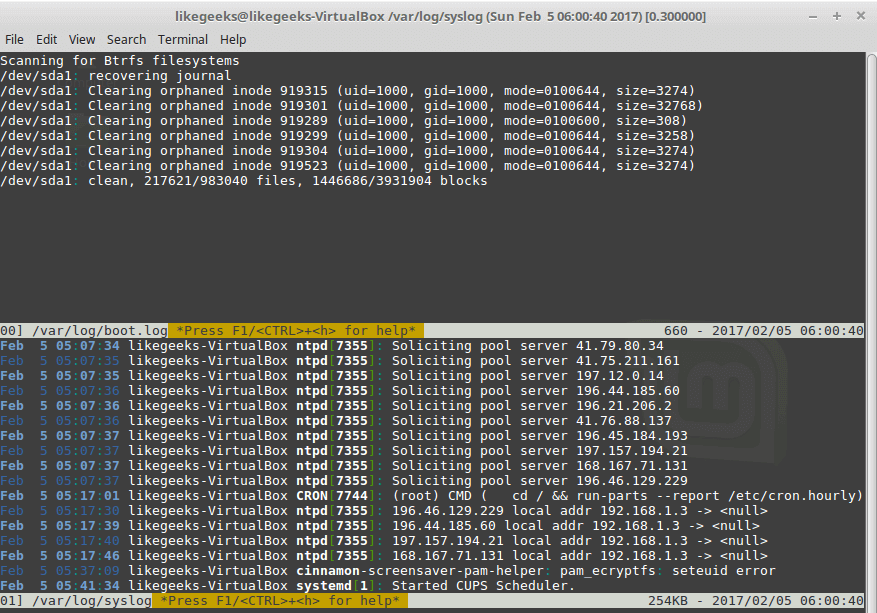
Monitor Multiple Log Files Concurrently

You can use the tail command to watch your logs and that’s fine, but sometimes you may need to monitor multiple log files simultaneously to take some actions.

Using multitail command which supports text highlighting, filtering, and many other features that you may need.

multitail command

You can install it if it is not found on your system like this:

aptget install multitail

Return to Your Previous Directory

It’s not a trick but some people forget it, others use it every minute.

Just type cd  and you will return back to the previous directory.

Make Non-Interactive as Interactive Shell Session

To do this, put our settings in ~/.bashrc  from ~/.bash_profile.

Watch Command Output

By using watch command, you can watch any output of any command, for example, you can watch the free space and how it is growing:

watch dfh

You can imagine what you can do with any variant data that you can watch using watch command.

Run Your Program After Session Killing

When you run any program in the background and close your shell, definitely it will be killed, what about if it continues running after closing the shell.

This can be done using the nohup command which stands for no hang up.

nohup wget site.com/file.zip

This command is really one of the most useful Linux command line tricks for most webmasters.

nohup command

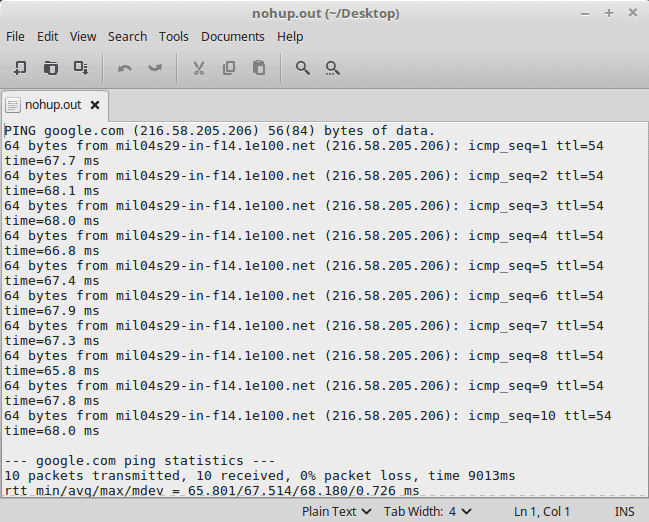
A file will be generated in the same directory with the name nohup.out contains the output of the running program.

nohup output

Cool command right?

Answer bot Using Yes & No Commands

It’s like an answer bot for those commands whose require the user to say yes.

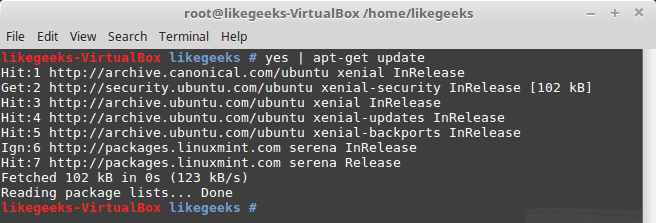
That can be done using the yes command:

yes | aptget update

Or maybe you want to automate saying no instead, this can be done using the following command:

yes no | command

yes command

Create a File With a Specific Size

Use the dd command to create a file with a specific size:

dd if=/dev/zero of=out.txt bs=1M count=10

This will create a file with 10-megabyte size filled with zeros.

dd command

Run Last Command as Root

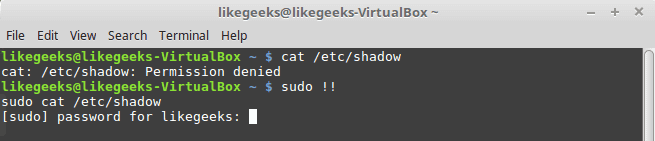
Sometimes you forget to type sudo before your command that requires root privileges to run, you don’t have to rewrite it, just type:

sudo !!

sudo command

Record your Command Line Session

If you want to record what you’ve typed in your shell screen, you can use the script command which will save all of your typings to a file named typescript.

script

Once you type exit, all of your commands will be written to that file so you can review them later.

Replacing Spaces with Tabs

You can replace any character with any other character using tr command which is very handy.

cat geeks.txt | tr ‘:[space]:’ ‘\t’ > out.txt

This command will replace the spaces with tabs.

tr command

Convert Character Case

cat my_file | tr az AZ > output.txt

This command converts the content of the file to upper case using the tr command.

Powerful xargs Command

We can say that xargs command is one of the most important Linux command line tricks, you can use this command to pass outputs between commands as arguments, for example, you may search for png files and compress them or do anything with them.

find . name “*.png” type f print | xargs tar cvzf pics.tar.gz

Or maybe you have a list of URLs in a file and you want to download them or process them in a different way:

cat links.txt | xargs wget

xargs command

The cat command result is passed to the end of xargs command.

What if your command needs the output in the middle?

Just use {} combined with –i parameter to replace the arguments in the place where the result should go like this:

ls /etc/*.conf | xargs i cp {} /home/likegeeks/Desktop/out

This is only some of the Linux command line tricks, but there are some more geeky things that you can do using other commands like awk command and sed command.

If you know any geeky command I didn’t mention, you can type it in a comment and share it with others.

I’m going to make another post about those Linux command line tricks so we can remember all what we’ve forgotten.

Thank you.

likegeeks.com

0

Learn Linux Environment Variables Step-By-Step Easy Guide

In the previous posts, we talked about some of the basic Linux commands, today we continue our journey, and we will talk about something very important in Linux which is Linux Environment Variables. So what are Environment Variables and what is the benefit of knowing them? Environment Variables are used to store some values which can be used by scripts from the shell. You are not limited to the shell environment variables, you can create your own. The bash shell has two types of environment variables: 1.Local variables, 2.Global variables. The local variable is visible in the shell where it was defined only. The global variable is visible for any running process that runs from the shell.
Continue Reading →

Global variables

The Linux system sets some global environment variables when you log into your system and they are always CAPITAL LETTERS to differentiate them from user-defined environment variables.

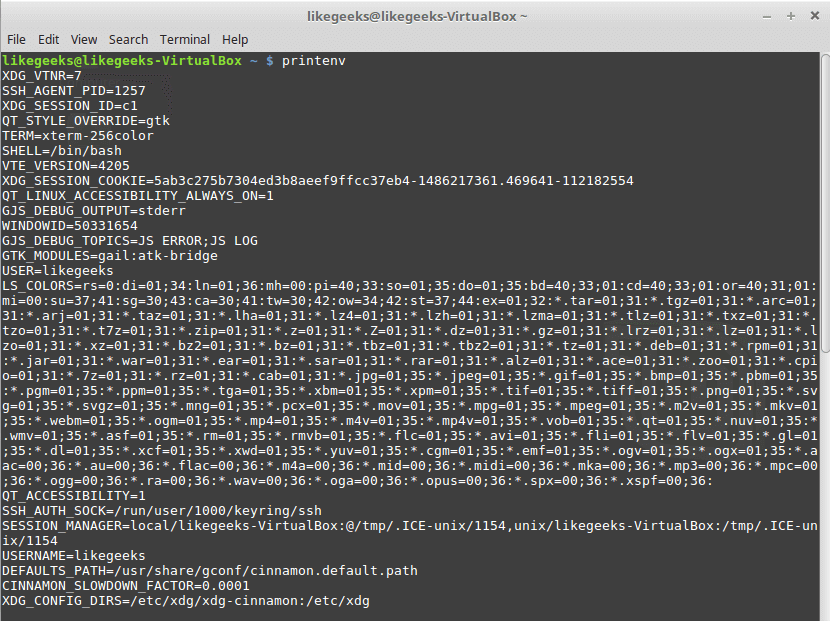
To see these global variables, type printenv command:

printenv command

As you can see, there are a lot of global environment variables, to print only one of them, type echo command followed by $VariableName. Ex: to print HOME variable type echo $HOME.

home variable

Local variables

Actually, the Linux system also defines some standard local environment variables for you by default.

To view the global and local variables for the shell you are running and available to that shell, type the set command.

Setting Local Environment Variables

To declare your own environment variables directly from the shell, type variableName you want, followed by an equal sign and the variable value WITHOUT any spaces:

mysite=likegeeks

And to print the variable value, use the echo command:

echo $mysite

Sure enough, it prints likegeeks.

local environment variables

OK, what if your variable is more than one word; may be a long string, you can put the string between single quotations:

mysite=’likegeeks is a website that offers tech tutorials for geeks’

And if we type echo $mysite

set environment variables

If you forget the single quotation, the shell will assume that the second word is another command and will show an error.

As you can see, I use lower case characters for my variable not upper case and this is recommended  NOT required, this helps you distinguishing your environment variables from the system environment variables.

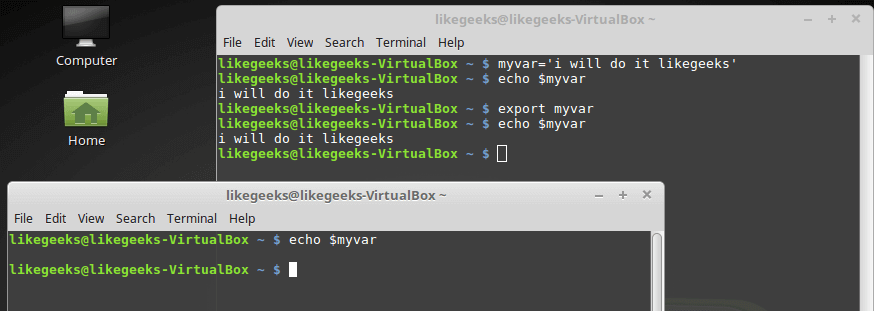
Once you have set your local variable, it will be visible in the currently running shell scope and that means if you start another shell window the variable will not be available in that new window.

Declare Global Environment Variables

To declare a global environment variable, you have to declare a local environment variable then use the export command like this:

myvar=’I will do it likegeeks’

echo $myvar

export myvar

global enviroment variables

As you can see I don’t use dollar sign with the export command so make sure of that.

But there is something, when I close the shell and open it again the variable is gone, so how to make it persistent?

Persisting Environment Variables

Just edit $HOME/.bashrc  and type   export myvar=‘welcome to likegeeks’  and save the file:

print persistent enviroment variable

Removing Environment Variables

This can be done by using the unset command:

unset enviroment variable

Default Environment Variables

As we know, the system defines some variables for us, one of those variables is the PATH variable, this variable holds some paths.

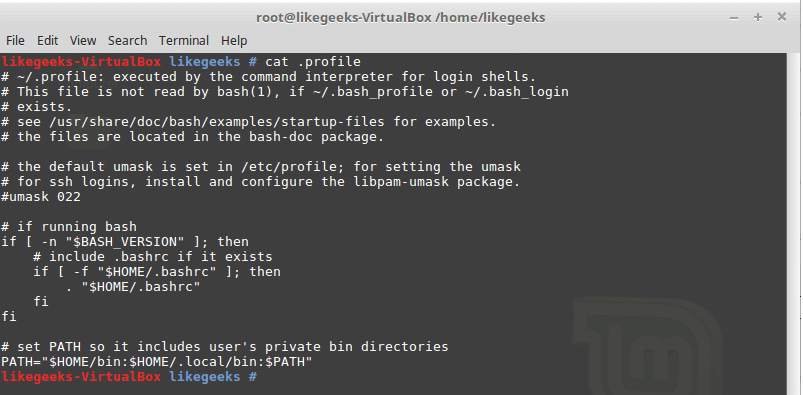
These paths are the default paths that the shell uses to look for a command when you type it in the shell.

Modifying the PATH Environment Variable

If you add a folder path to the PATH variable, the shell will look in that folder for any executable to run when you type any command.

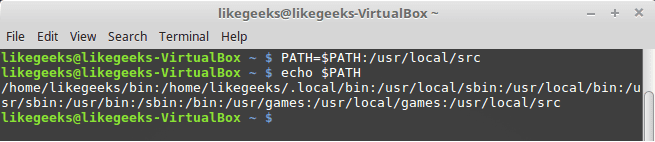
Just append the path variable followed by a colon and the new directory like this:

add path to enviroment variable

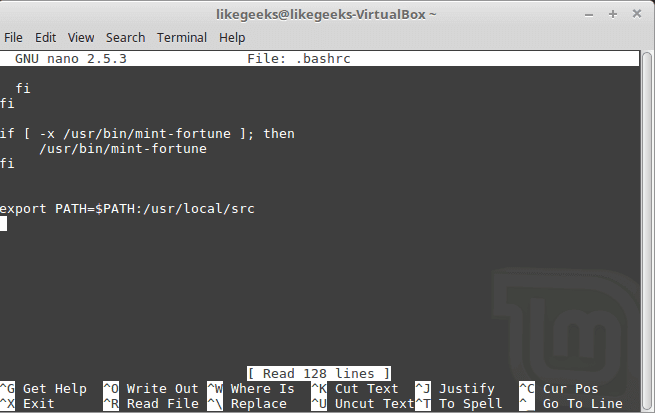
And if you want to persist the PATH variable, you have to edit the .bashrc file and add type it like this:

persistent path variable

There is a useful trick but RISKY that some sysadmins do which is adding a period . to the path variable. By doing this, the shell will search for executables in the current directory you are in wherever you are.

This is relatively risky, you might give the attacker the opportunity to run a malicious script or malware in his current directory, so if you do this trick, you should know what you are doing.

System Environment Variables Paths

You can start a bash shell with one of the following ways:

  • Login shell.
  • The interactive shell.
  • The non-interactive shell.

login shell

When you log onto the system, the search for those startup files to process the commands from them:

  • /etc/profile
  • $HOME/.bash_login
  • $HOME/.bash_profile
  • $HOME/.profile

/etc/profile runs on every startup with every user, the other 3 files run for every specific user, you can call them user specific environment variables.

Interactive shell

When you go to the rescue mode, this is the interactive shell.

If you start an Interactive shell, the system will not look for /etc/profile but instead will look for .bashrc in your HOME directory.

Non-interactive shell

This shell runs by the system itself to run a shell script.

Users can customize the above-mentioned files to include environment variables, just edit the desired file and type the variable you want and save it.

Variable Arrays

You can store many values as you want in one environment variable which is called array.

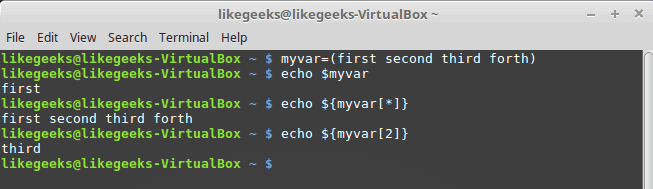
myvar=(first second third fourth)

Now if you check the value of that array using echo command, you will find it returns the first element only.

To get a specific element, just reference it by its position, and the positions start from zero so to get the third one, type it like this:

echo ${myvar[2]}

To display the entire array type asterisk instead of a number:

echo ${mytest[*]}

variable array

You can remove an element of the array using unset command:

unset mytest[2]

Or you can remove the whole array:

unset myvar

likegeeks.com

0

Basic Linux Commands Made Easy Part2

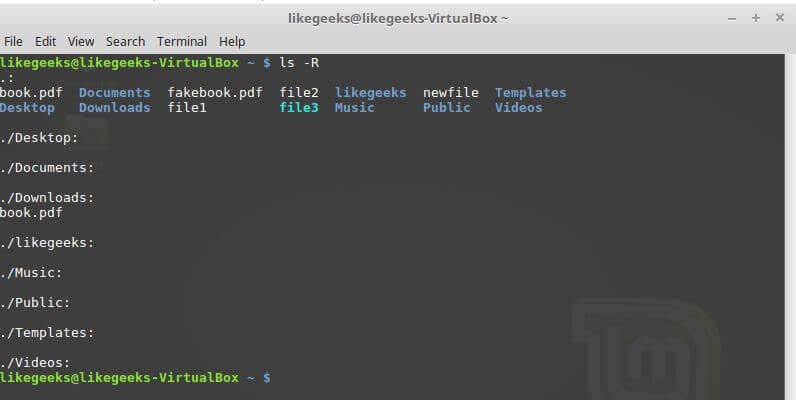
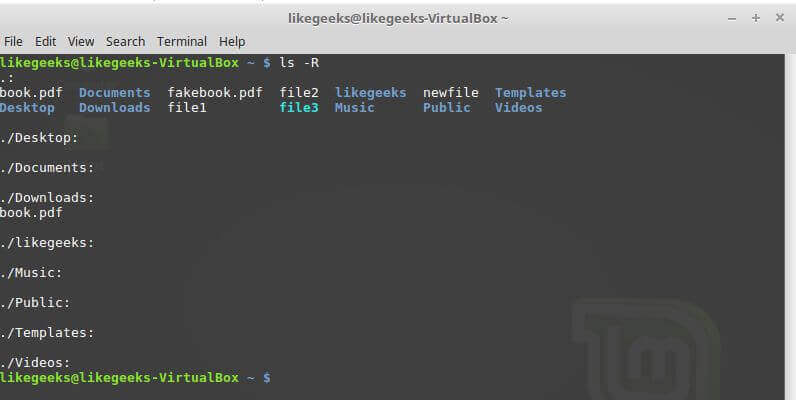
In the previous post, we discussed some Linux commands and we saw how to show files, traverse directories, make them, and much more. Now, that was just the first level of the basic Linux commands. Let’s take one more step and see more of the basic Linux commands that you will use. We talked about the ls command in the previous post and we’ve discussed only 2 parameters. Let’s dig deeper and see more parameters that can make you more powerful. ls -R to recursively list all files in a directory. The -R parameter will traverse deeply till it finishes all directories.
Continue Reading →

ls -R command

lsr  Reverses the sorting order for the displayed files and directories.

ls -r- command

ls S  Sorts the output by file size.

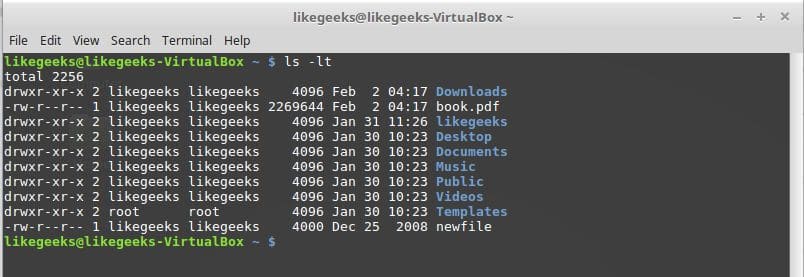
ls -lt command

Filter ls Command Output

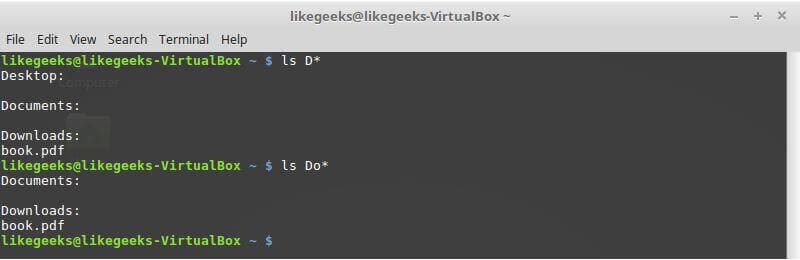
ls l myfile?

A question mark is used to represent one character.

ls l myprob*

An asterisk is used to represent zero or more characters.

The question mark and asterisk are called wild characters.

ls wild character

Create Files

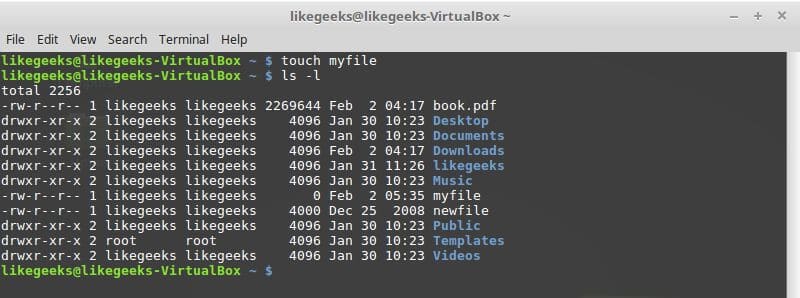
touch test1

The touch command is used to create an empty file.

touch command

If you use it against an existing file, it will change the access time, if the file doesn’t exist, it will create it.

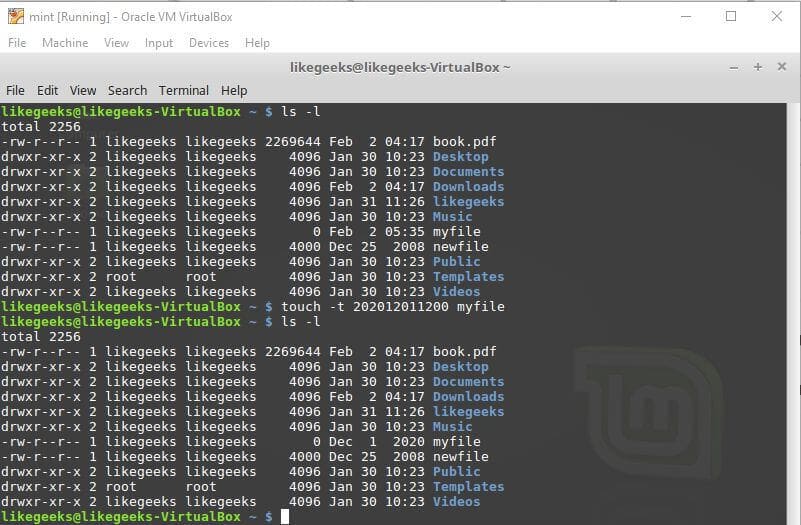
You can use the same command to change the modification time for an existing file,  just type it with -t followed by the time with the following format YYYYMMDDHHMM

touch t 202012011200 test1

touch existed file

Create Shortcuts (Links)

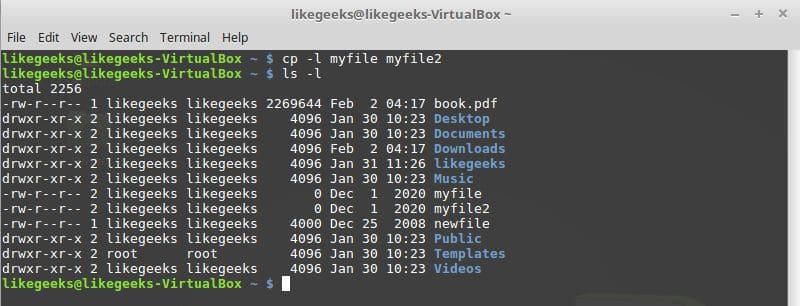
We know from the previous post that cp command is used to copy files.

In Linux, You can create:

  • Hard link.
  • Symbolic, or soft link.

cp l file1 file2

Hard Links

The hard link makes a separate file which contains information about the original file and where it is located.

Keep in mind that hard link only created between files on the same physical drive.

If you need to create links on a different physical drive, you’ll have to create a soft link instead.

cp hardlink

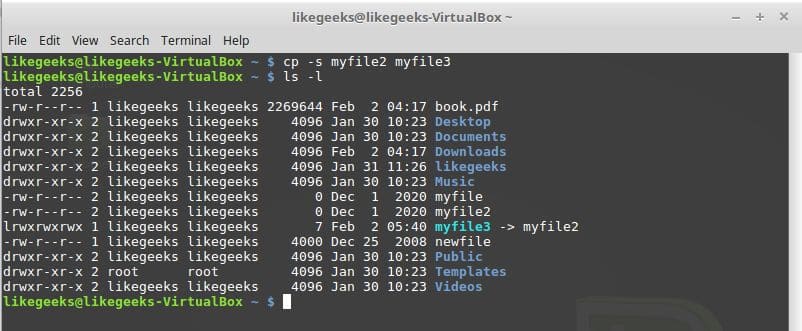
Symbolic Links

To create a symbolic or soft link, use the -s parameter:

cp s file1 file2

cp softlink

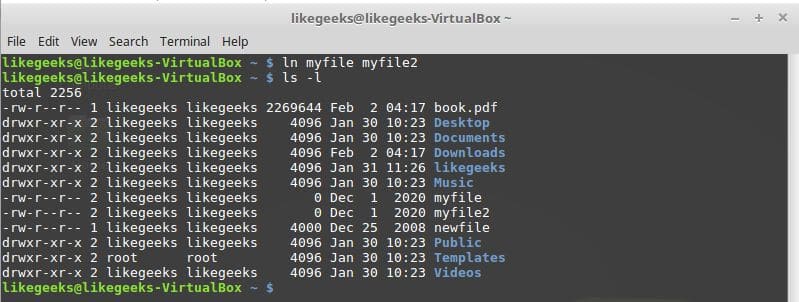
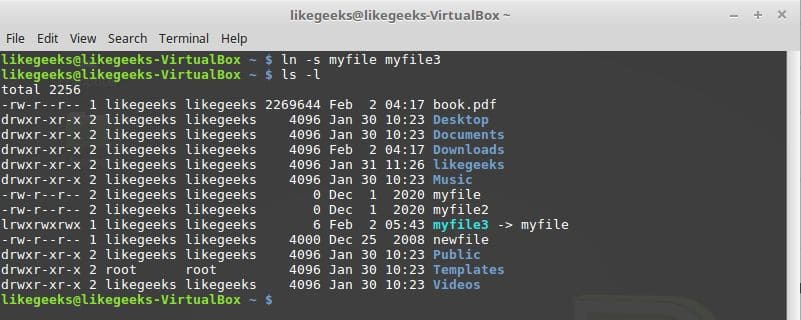
Here we should mention also another command that makes links other than cp which is ln command, you can create hard and soft links with it like this:

ln myfile myfile2

This command creates a hard link.

ln command

ln s myfile myfile2

This command creates a soft link.

ln softlink

Viewing the File Type

file myfile

Determines the kind of the file.

file command

Viewing End of File

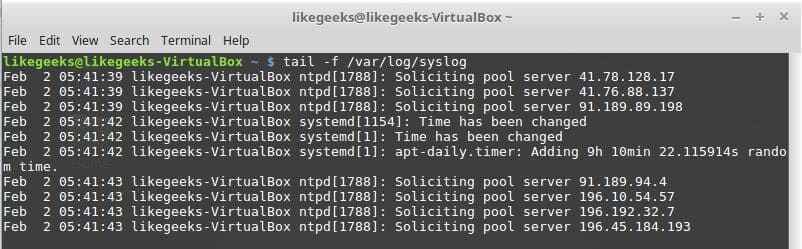
The tail command is used to view the last 10 lines of a file. This command is useful when working with big files.

-n parameter to specify the number of lines.

-f parameter to stay on the file and continue to watch the last lines you specified like monitoring, and this is very important when looking at log files.

tail command

View Top of File

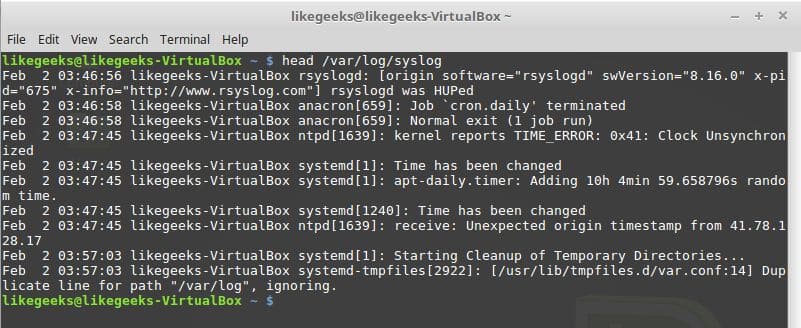
The head command is used to view the first 10 lines of a file.

head command

List Running Processes

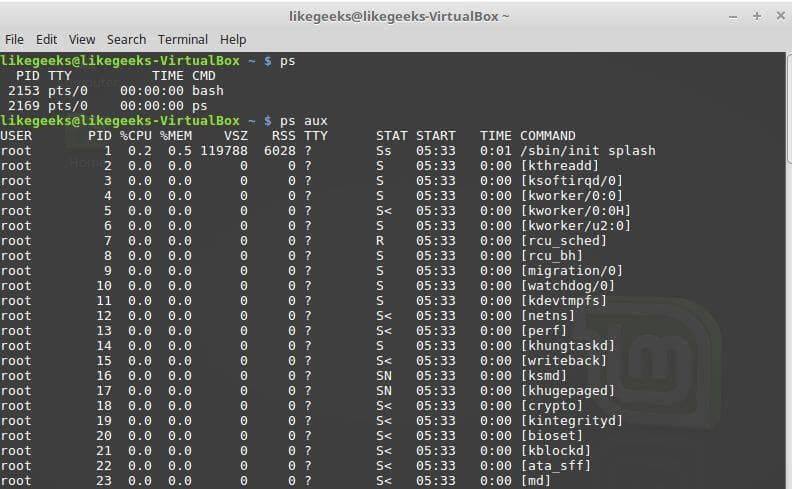
The ps command lists the currently running process.

$ ps aux

ps aux

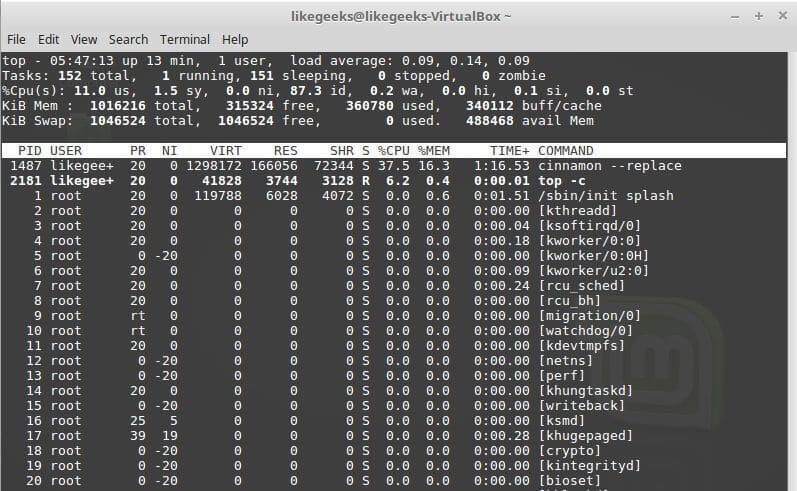
The top command does the same thing.

-You can use the top command with -c option to view the executable path for the running process.

top command

Kill a process

To kill a process:

pkill processName

kill command

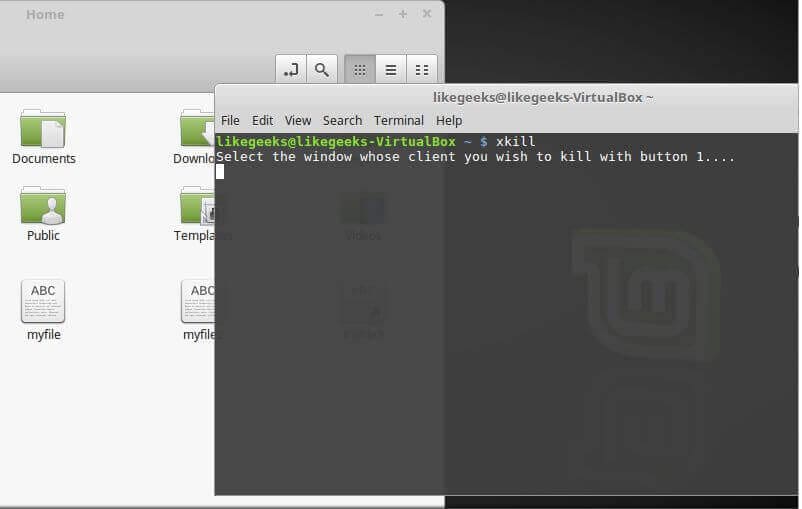
type xkill and press Enter to kill any nonresponsive window.

xkill command

Disk Free Space

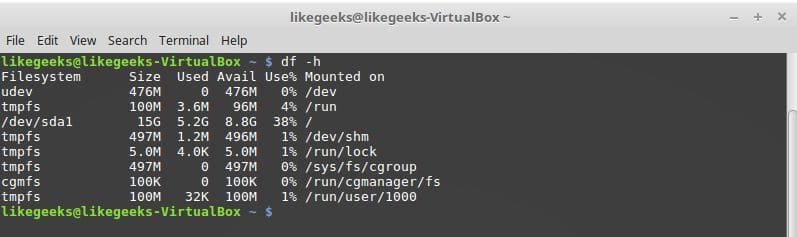
df command shows the disk free space.

df h

-h for human readable value

df command

That was some of the basic Linux Commands. I hope you enjoy it. Keep coming back.

likegeeks.com

0

Main Linux Commands Easy Guide

In the previous post, we discussed how to install Linux, now we are going to talk about the most powerful features in Linux which is Linux commands or shell commands. For the whole documentation of Linux Commands, you can check Linux Documentation. The power of Linux is in the power of commands that you can use. I’m going to talk about the main Linux commands with their main parameters that you might use daily.

 

Continue Reading →

ls Command

List file and folders of the current directory.

Parameters

–l

to list the content as a detailed list.

-a

Display all files (hidden + non-hidden).

You can combine parameters like this:

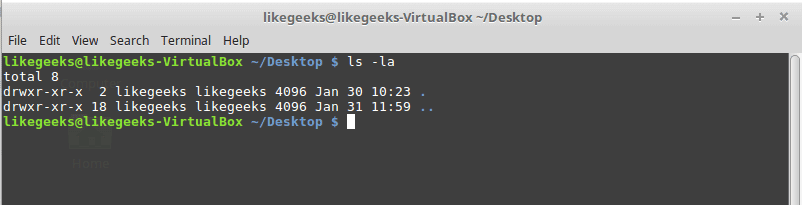
ls -la

linux ls command

cd Command

Change directory from the current directory to another one.

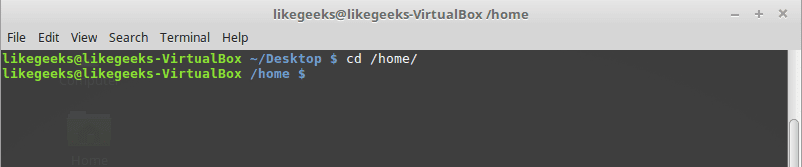
cd /home

Will go to home directory

linux cd command

cp Command

Copy the source to target.

Parameters

-i

Interactive mode means wait for the confirmation if there are files on the target will be overwritten.

-r

Recursive copy means include subdirectories if they found.

Example

cp –ir sourcedir targetdir

linux cp command

mv Command

Move the source to target and remove the source.

Parameters

-i

Interactive mode means wait for the confirmation if there are files on the target will be overwritten.

Example

mv –i sourceFile targetFile

linux mv command

rm Command

Delete file or directory and you must use –r in case you want to delete a directory.

Parameters

-r

Recursive delete means delete all subdirectories if found.

-i

Interactive means wait till confirmation

linux rm command

mkdir Command

Create a new directory.

mkdir newDir

linux mkdir command

rmdir Command

Delete a directory

linux rmdir command

chown Command

Change the owner of a file or directory.

Parameters:

-R

Capital R here means to change ownership of all subdirectories if found and you must use this parameter if you use the command against a directory.

chown –R root:root myDir

linux chown command

chmod Command

Change the permission of a file or directory.

Parameters

The mode which consists of 3 parts, owner, group, and others means what will be the permissions for these modes, and you must specify them.

The permission is one of the followings:

Read =4

Write = 2

Execute =1

Every permission represented by a number as shown and you can combine permissions.

Example

chmod 755 myfile

That means set permission for the file named myfile as follows:

owner: set it to 7 which means 4+2+1 means read+write+execute.

group: set it to 5 which means 4+1 means read+execute.

other: set it to 5 which means 4+1 means read+execute.

Note: execute for a folder permission means opening it.

linux chmod command

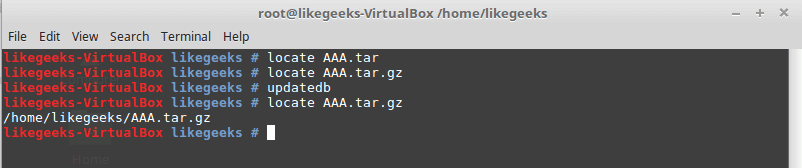
locate Command

To find a file in your system, the locate command will search the system for the pattern you provide.

locate myfile

linux locate command

updatedb Command

updates the database used by the locate command.

date Command

Simply prints today’s date. Just type date on the shell.

tar Command

Combines several files into archive and compression if you want.

Parameters

-c

Create new archive.

-z

Compress the archive using gzip package.

-j

Compress the archive using bzip2 package.

-v

Verbose mode means show the processed files.

-f

Write the output to a file and not to screen.

-x

Unpack files from archive.

Example

tar –czvf myfiles.tar.gz myfiles

linux tar command create

This command will pack and compress all files in folder myfiles to a compressed archive named myfiles.tar.gz.

tar-xzvf myfiels.tar.gz

linux tar command extract

This command will decompress the archive.

cat Command

Display file content to screen without limits.

Example

cat myfile.txt

linux cat command

less Command

Displays file content with scroll screen so you can navigate between pages using PgUp, PgDn, Home, and End.

less myfile

grep Command

Searches for a string in the specified files and displays which line contains the matched string.

Parameters

-R

Recursive search inside subdirectories if found.

-i

Insensitive search and ignore case.

-l

Display file name, not the text lines.

Example

grep –Ril mystring /home

linux grep command

passwd Command

Used to change your user password.

linux passwd command

du Command

Calculates the disk usage of a file or a directory.

Parameters

-h

Display human readable form.

-s

Summarize the output total size.

Example

du –hs /home

linux du command

reboot Command

Reboot the system immediately. Just type reboot.

halt Command

Shuts down the system, but make sure to close all of your files to avoid data loss.

That was just some of the main Linux commands.

Notice that, if you forget any command parameters,  just type the command with – -help as a parameter and it will list the used parameters so you don’t have to remember all those parameters at the beginning.

cat --help

likegeeks.com

0

How To Install Linux Step-By-Step

After you’ve chosen the Best Linux Distro, now it’s the time to know how to install Linux. If you want to install Linux, there are 2 ways to do that: The first way is to download the Linux distribution you want and burn it into a DVD or USB stick and boot your machine with it and complete the installation process. The second way is to install it virtually on a virtual machine like VirtualBox or VMware without touching your Windows or Mac system, so your Linux system will be contained in a window you can minimize and continue working on your real system. For me, I prefer VirtualBox, it’s free and runs very fast on my PC than VMware, and support installing Windows, Linux and Mac OS with all versions. Let’s choose any Linux distro and install it using both 2 ways. I’m going to choose Linux mint, they call it the Mac OS of Linux. It is a good distro for personal use. The version we are going to install is 18.1 “Serena” at the time of writing that article.
Continue Reading →

Go to this link and download it:

https://www.linuxmint.com/download.php

I prefer the Cinnamon desktop version it is promising and elegant.

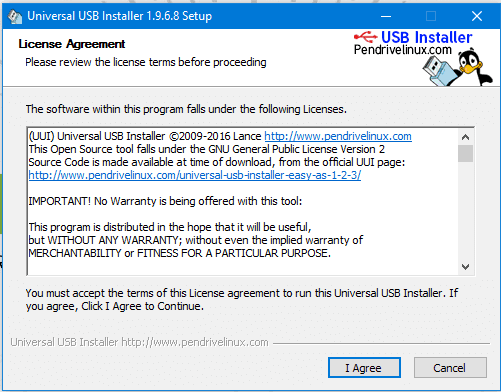
Once you download the ISO file, you will have to burn it on DVD or the easy way, copying it on a USB stick using a program called universal USB installer, you can download this program from this link:

https://www.pendrivelinux.com/universal-usb-installer-easy-as-1-2-3/

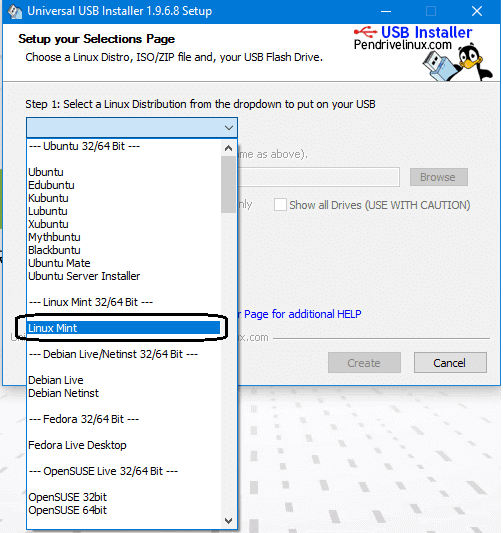
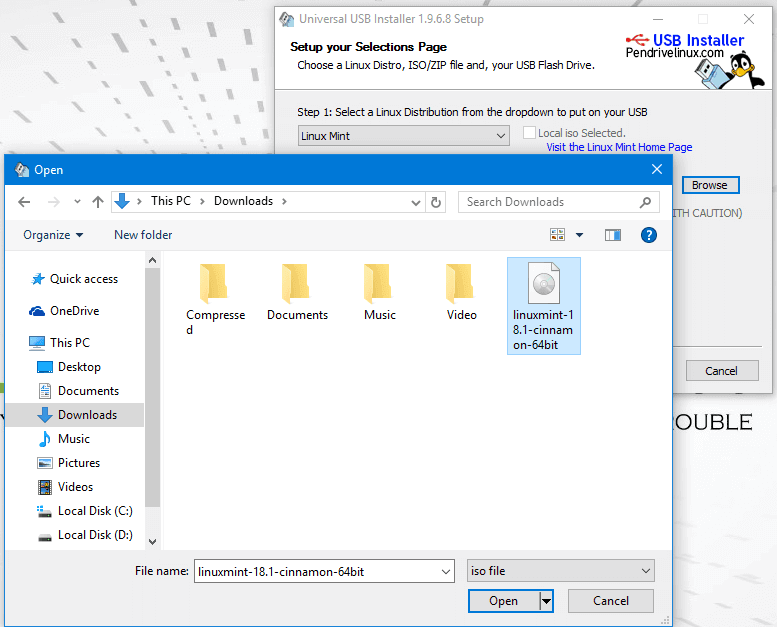
After downloading the program, open it and choose from the list the distro you want to install, in our case we will choose Linux mint.

Make sure that you put your memory stick on the computer and click next and wait till the copying process is finished.

how to install linux using usb
how to install Linux using USB

how to install linux mint

install linux choose iso

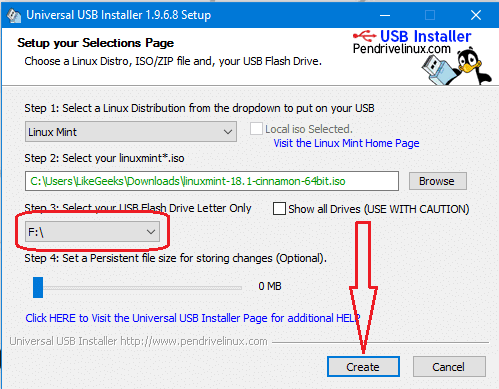
Now Finally we click create to create bootable USB

create bootable usb install linux

And now you can boot with this memory stick.

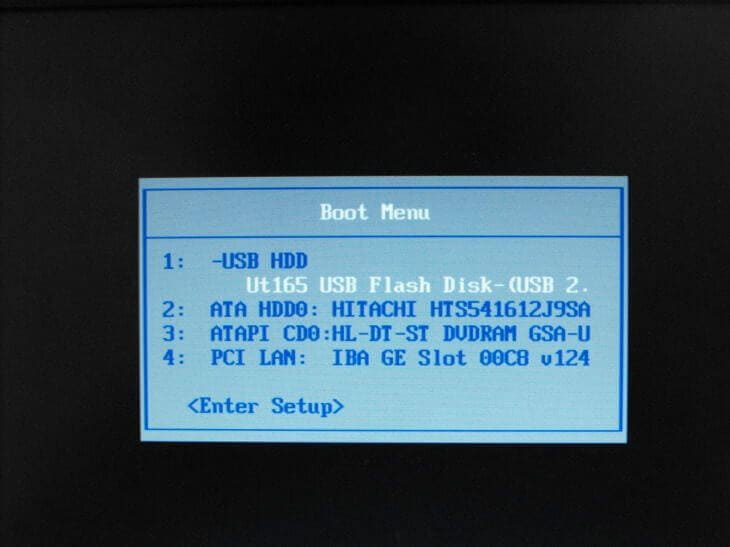
Then Restart your PC and go to BIOS settings and select boot options and make sure that the USB is the first option, then save your BIOS settings and reboot.

boot linux

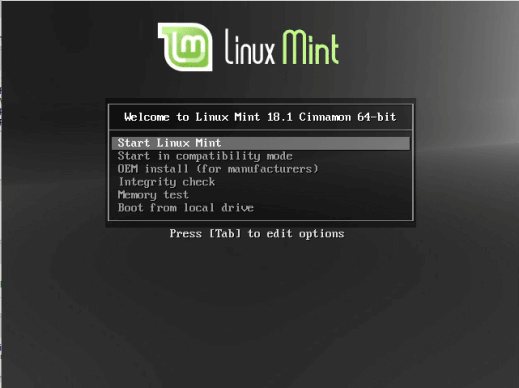
Then it will show the installation screen, press Enter and it will load the live CD content.

install linux boot menu

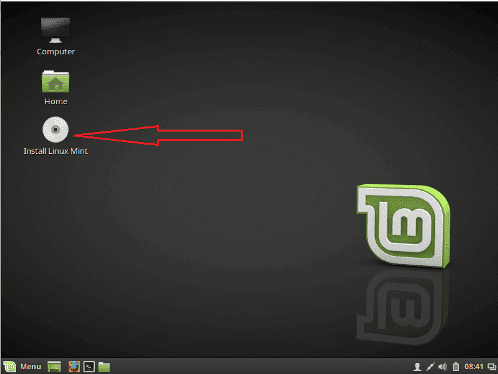
Now the desktop should appear like that:

linux boot complete

Click install Linux mint

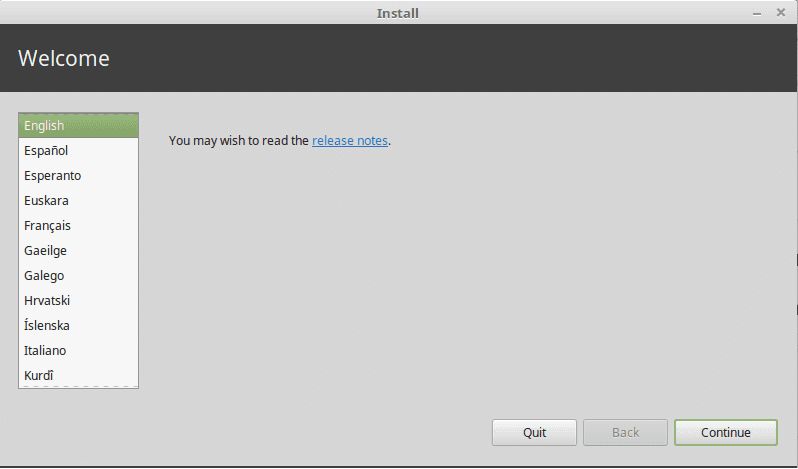
Then choose the language used for installation.

choose language

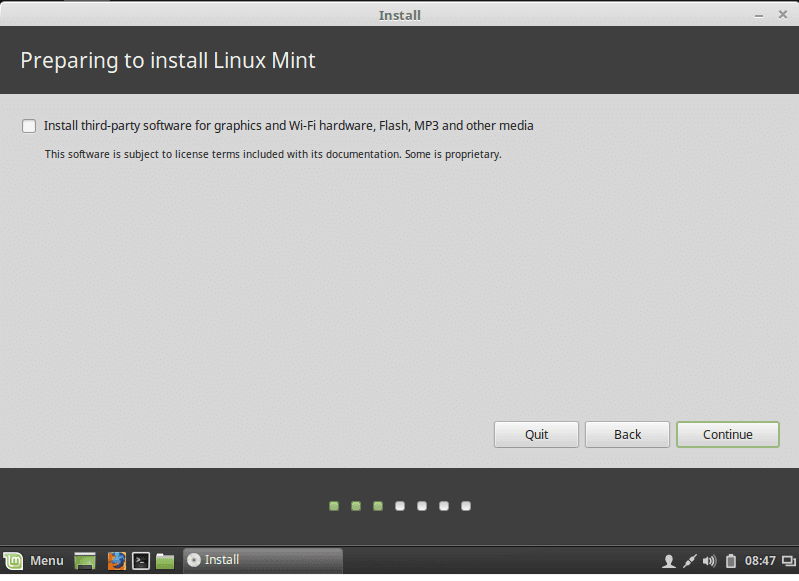
install third party

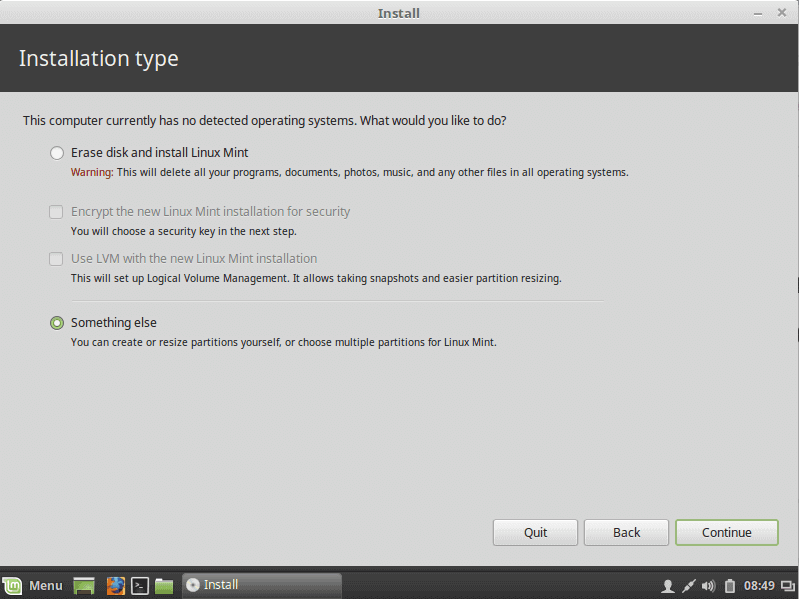
Then choose the installation type, and TAKE CARE if you are installing Linux on a disk that contains other operating systems, you MUST choose the option called something else.

delete partitions

If you are installing it on a new disk, choose the option Erase disk.

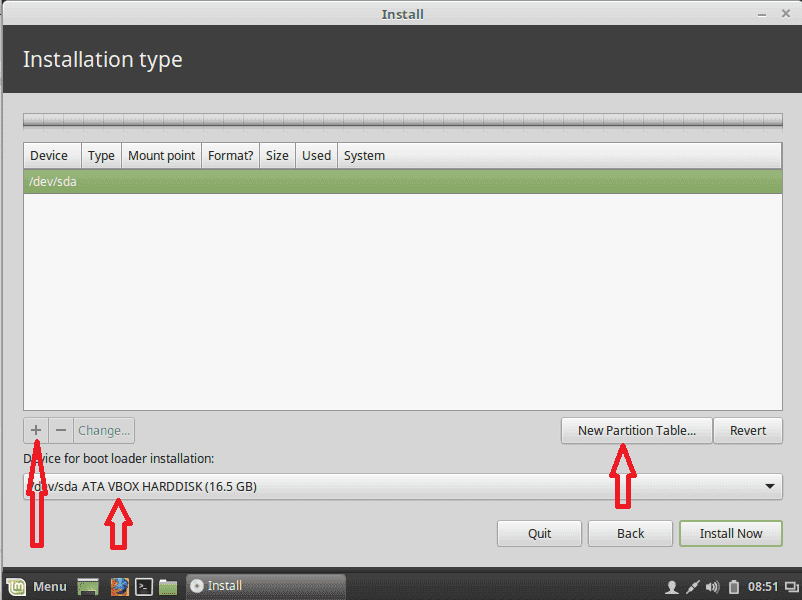
Linux requires 2 partitions to work, the root partition and the swap partition.

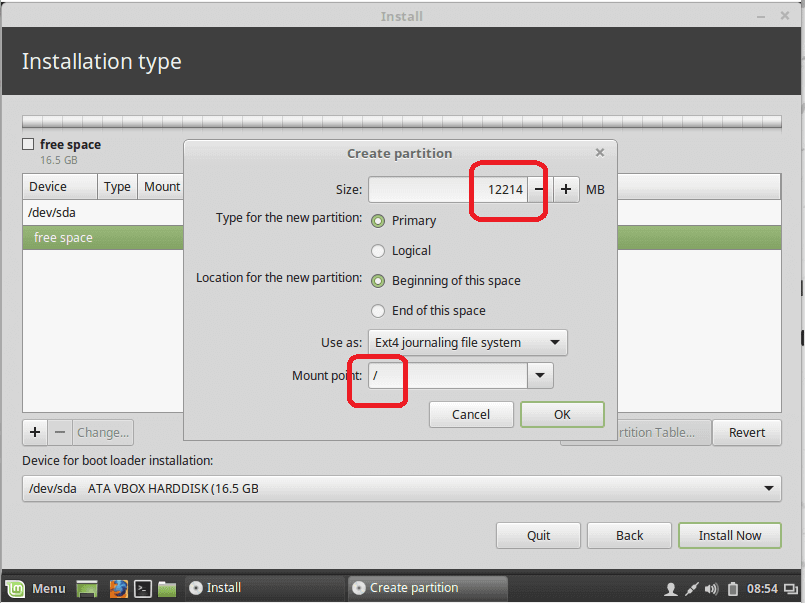
Now we will create them by clicking the plus button and choose about 12 GB or more as you need but not less than that for root partition, and choose mount type as / which stands for root and of course format will be Ext4.

linux create partitions

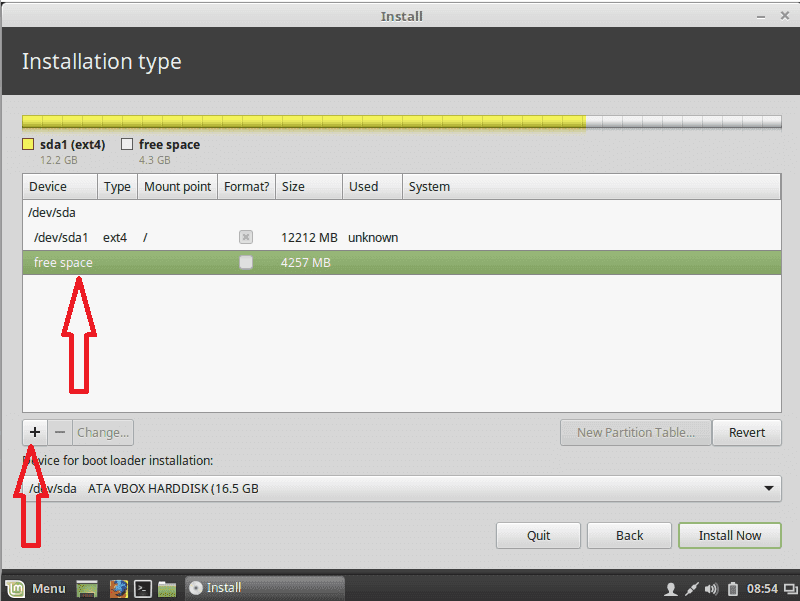
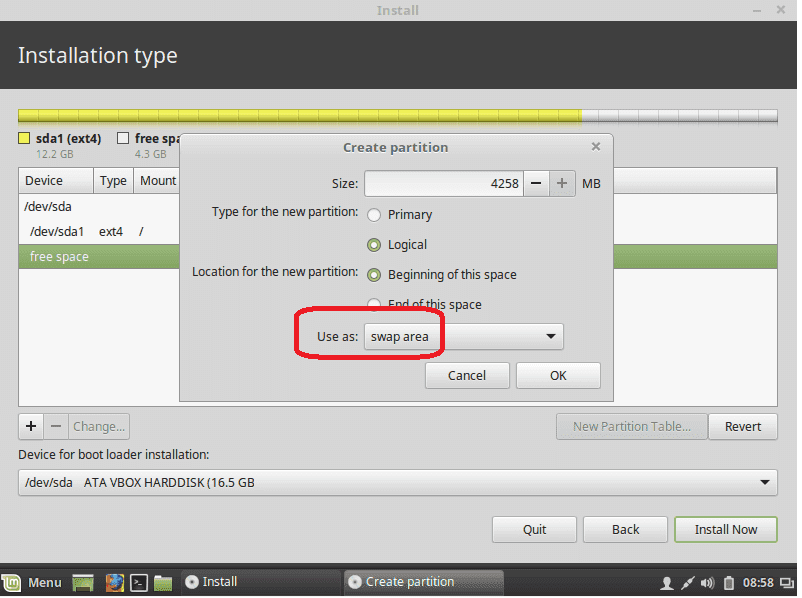
Now we create a swap partition, choose the remaining free space and click the plus button and choose swap area as shown:

create root partition

choose free space

Then Create the swap area:

create swap area

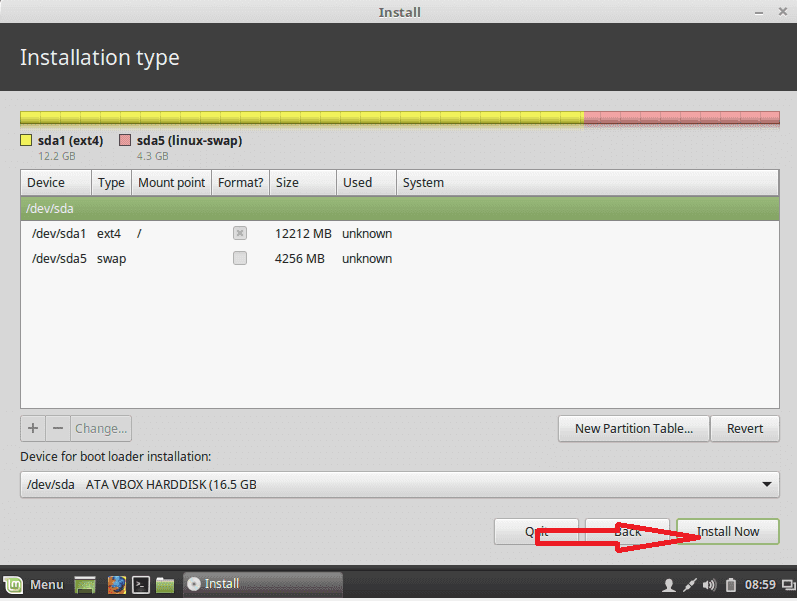
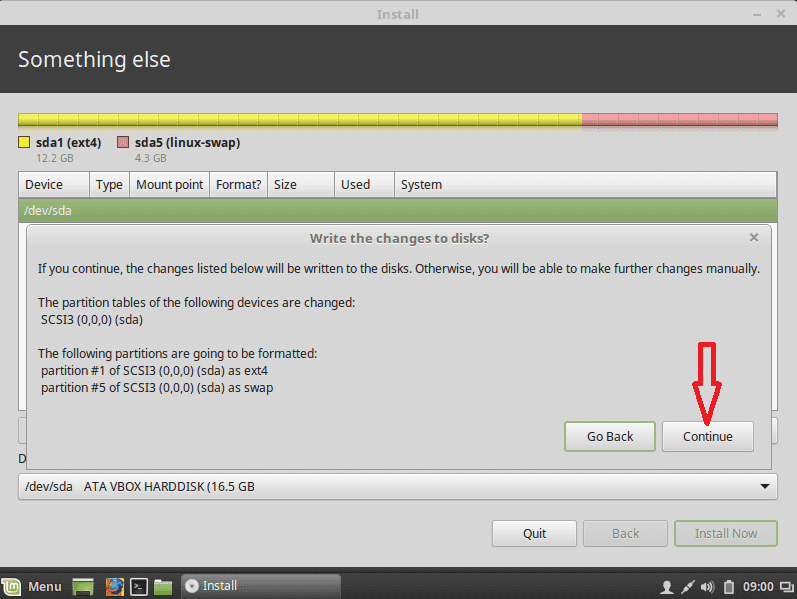
Then click install now and agree about writing changes to disk:

click install linux

confirm install

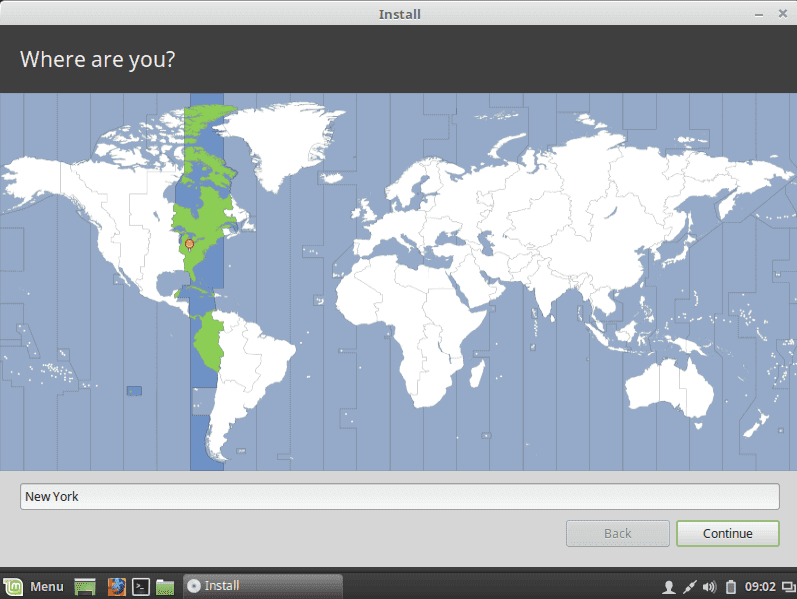
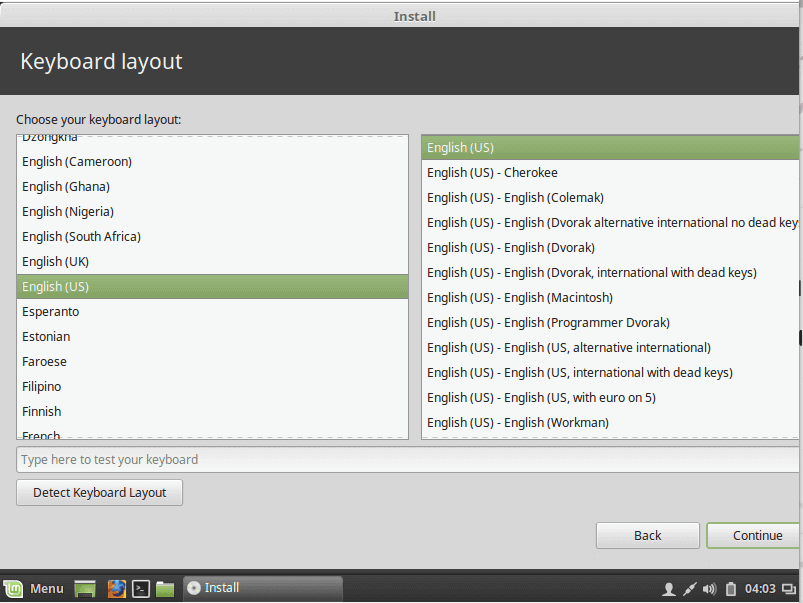
Now you choose the time zone and click continue the choose the language:

choose timezone

choose linux language

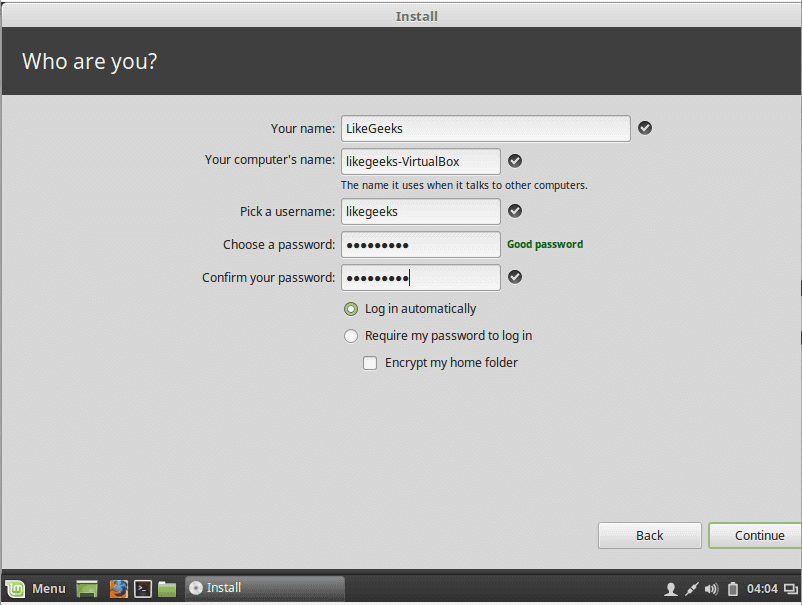
Now you write your username and password and click continue:

choose username

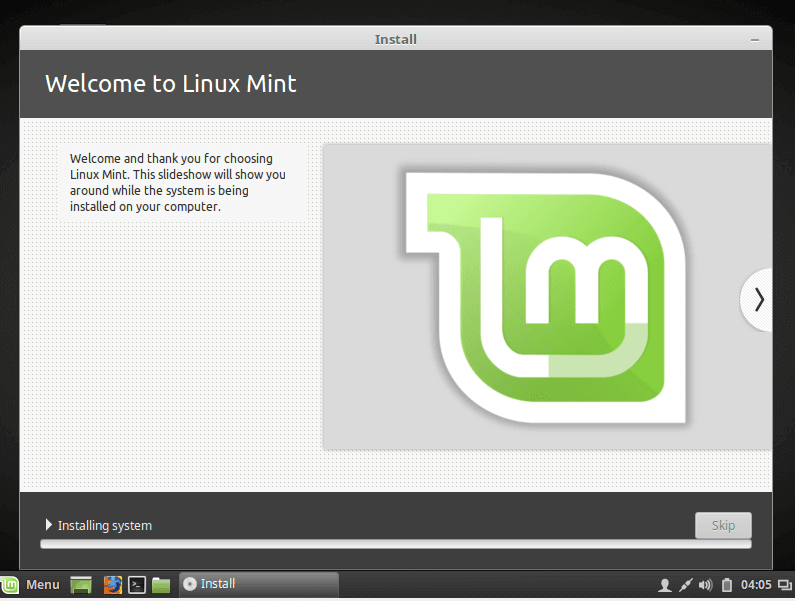
Finally, installation started:

linux installlation started

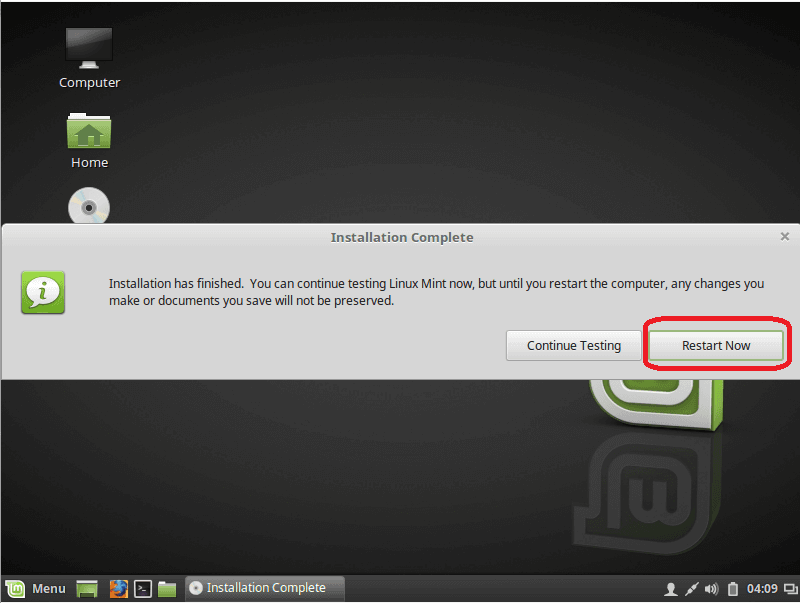
After finishing the installation, it will prompt you to reboot the machine and remove the installation media whether it is a DVD or USB.

linux installation finished

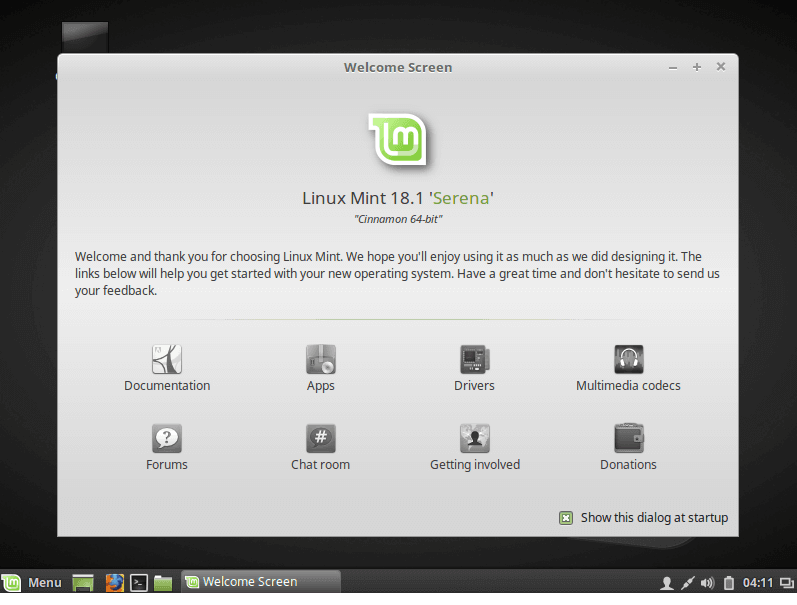
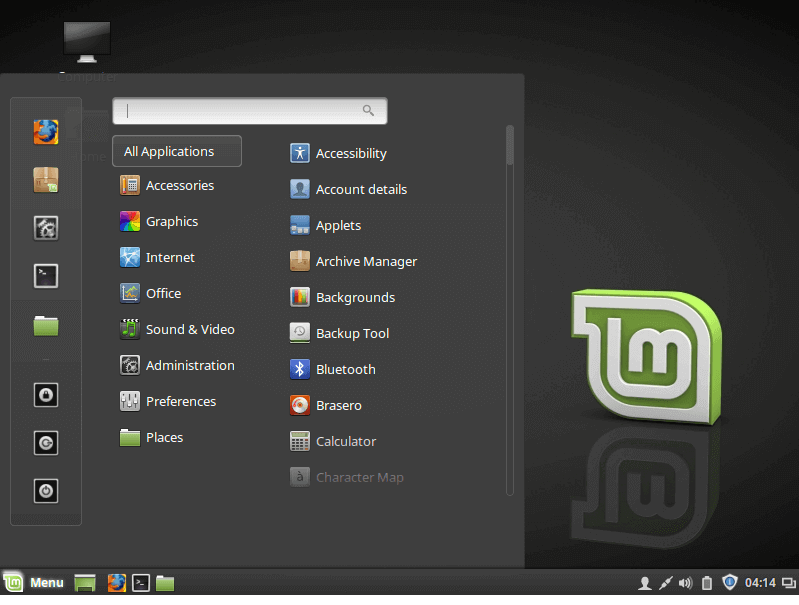
And yes, this is how to install Linux on Physical machine.

linux welcome screen

linux start menu

The second way it to install Linux is to install it on VirtualBox First download VirtualBox from here:

https://www.virtualbox.org/wiki/Downloads

There are 2 ways to use Linux on VirtualBox:

The first way is easy, it like the normal installation process

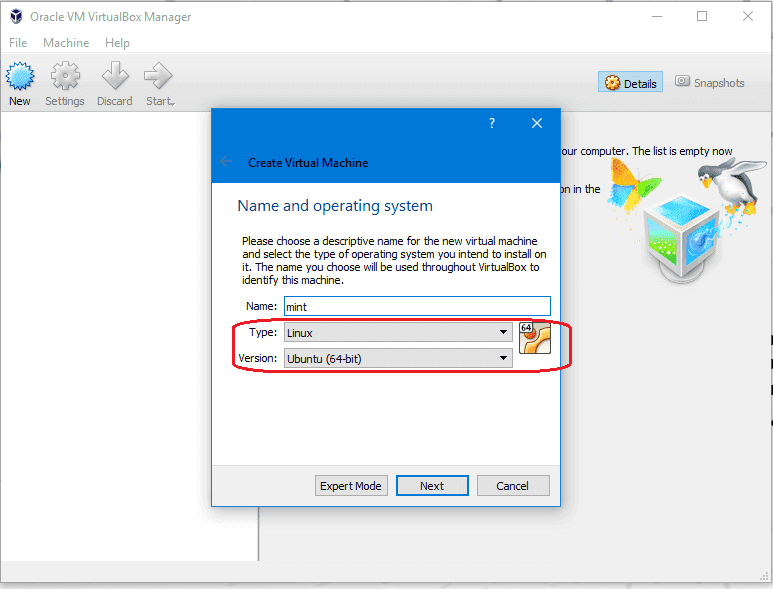
Open VirtualBox and click new and choose Linux and Ubuntu 64:

linux virtualbox create vm

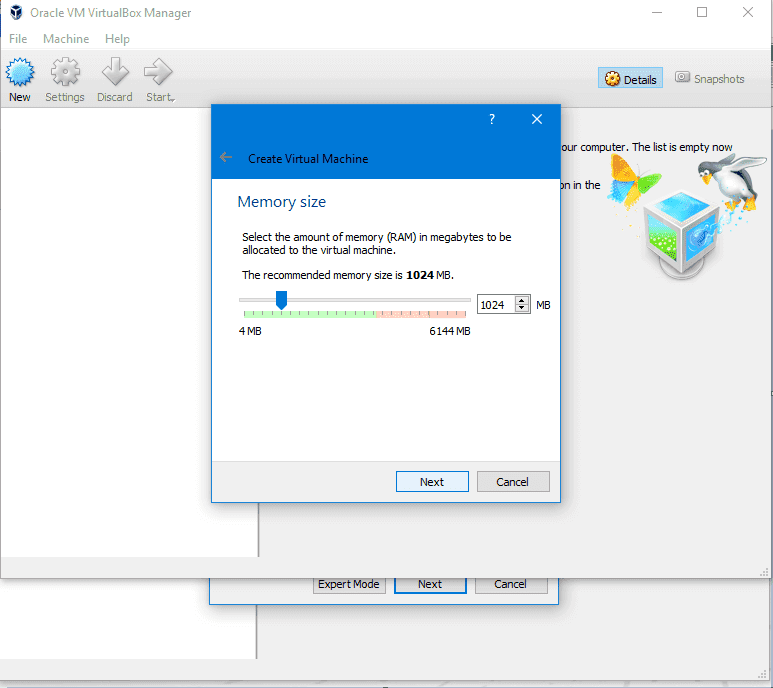
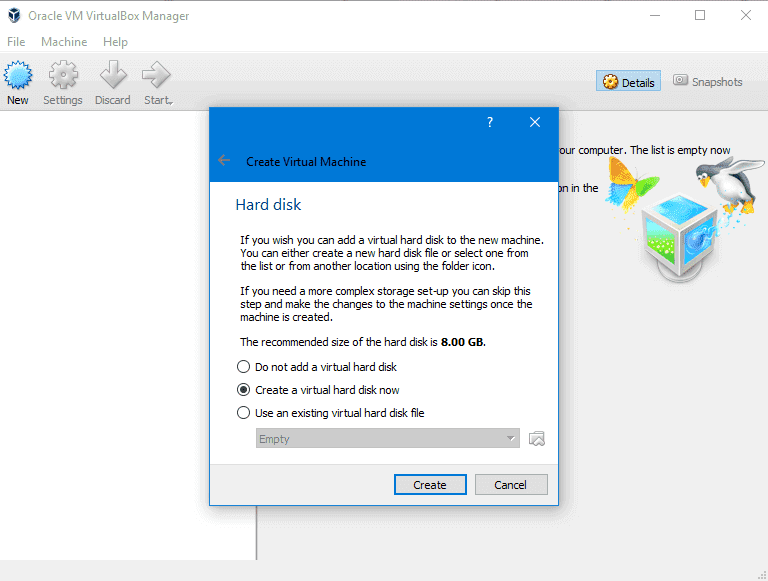
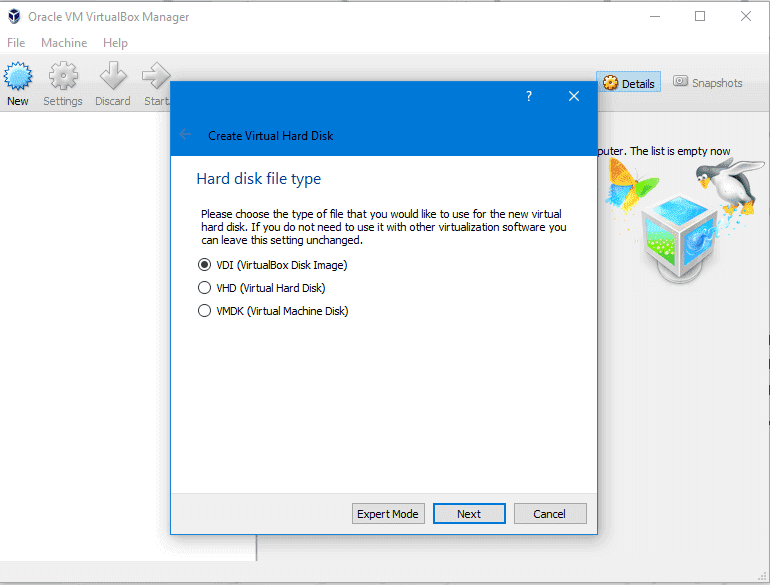
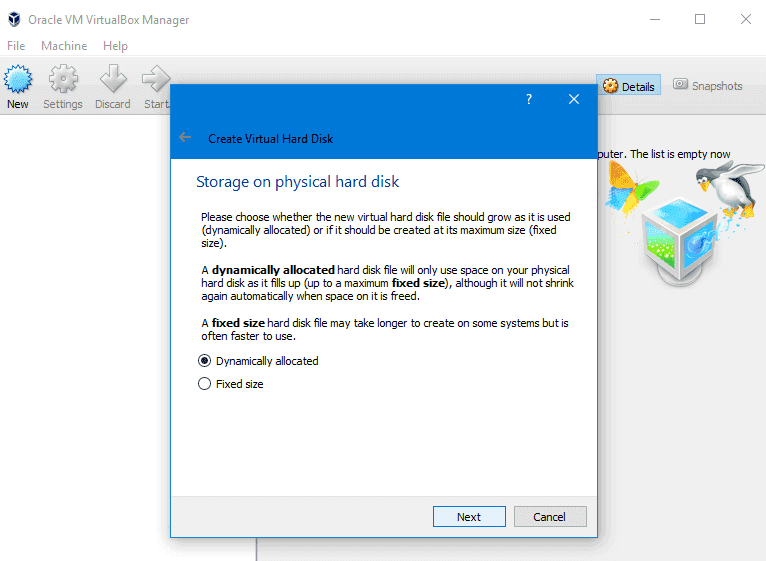
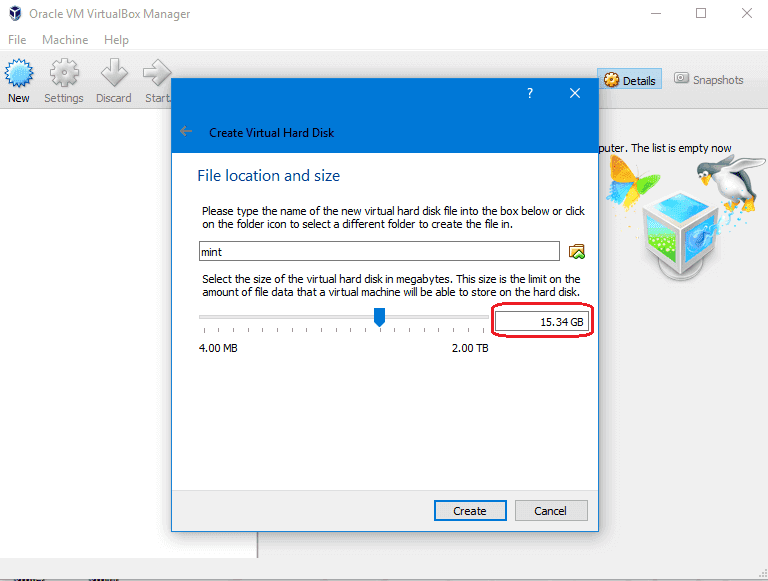
Then choose the RAM required not less than 1 GB and choose the disk file type or leave it as VDI and dynamically allocated and the size not less than 12 GB and hit ok.

linux virtualbox assign ram

linux virtualbox hdd type

linux virtualbox hdd file

linux virtualbox dynamic allocated
Then file location for disk to be used

linux virtualbox hdd size

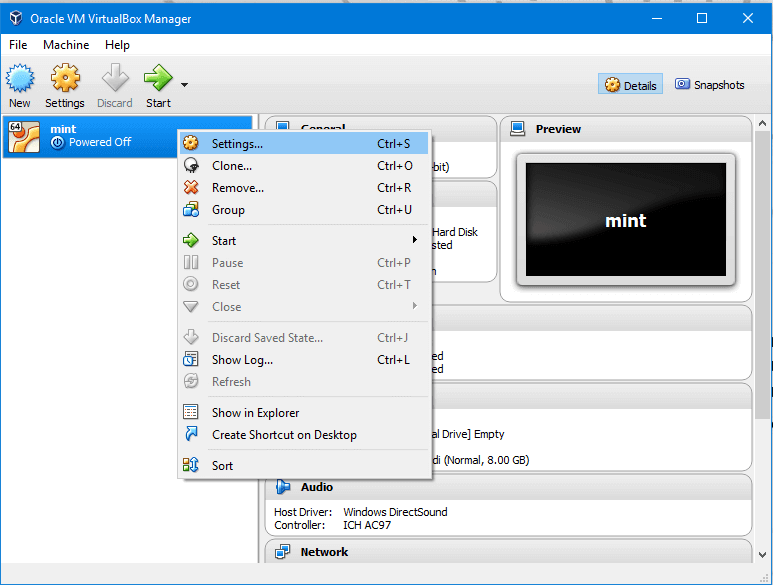
So now the VirtualBox is created, we just need to make it boot from the DVD that we’ve downloaded.

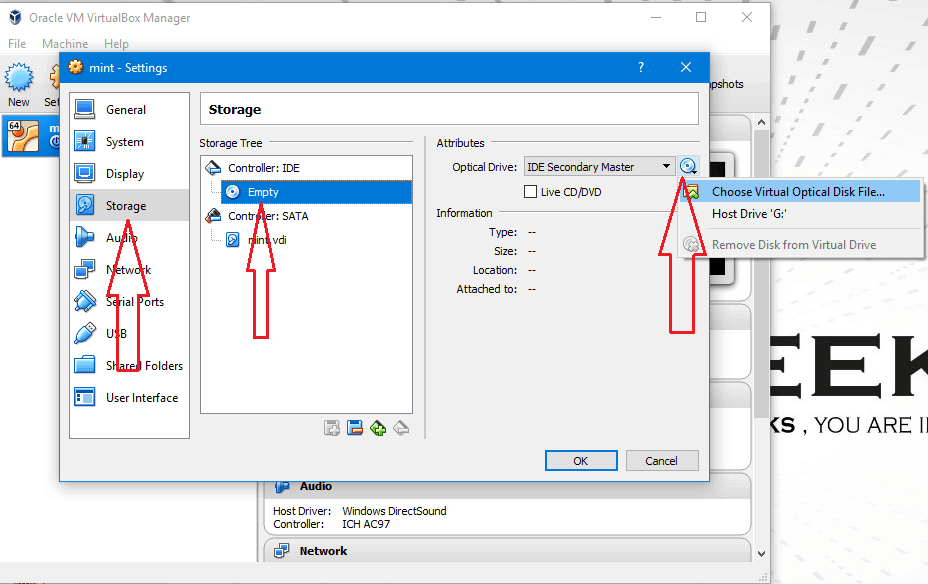
Choose from settings > Storage and choose the ISO image and click OK.

linux virtualbox settings
Then choose the iso image
linux virtualbox boot iso
Then Click start

linux virtualbox start

After loading the desktop, click install Linux mint and the rest of the steps are the same as the above mentioned without any change, And this is how to install Linux on a virtual machine.

likegeeks.com

0

Kernel 4.14 RC6 nasıl yüklenir?

Aslında Debian, Ubuntu ve tüm türevleri ile Linux Mint sürümleri için güncel Linux çekirdeğine nasıl yükseltme yapılacağını irdeleyen bir yazı yazmış olduğumuz için bu tür özel yazılar yazmamıza gerek olmamasına karşın, kullanıcılardan gelen beklentiler nedeniyle hâlâ böyle yazılar yazıyoruz. Linux’un en son yayınlanan kararsız (geliştirme) sürümü 4.14 RC6; 23 Ekim 2017 tarihi itibariyle duyuruldu. Kernel 4.14 RC6’nın resmi duyurusunu Linus Torvalds yaptı. Bu yazıda, 4.14 RC6 Linux çekirdeğinin nasıl yükleneceğine değineceğiz. Bilindiği gibi, bir Linux çekirdeğini derlemek çok zor olduğundan, Canonical, tüm çekirdek sürümlerini .deb paketleri olarak paketliyor ve bunları kernel.ubuntu.com deposu aracılığıyla Ubuntu veya Ubuntu tabanlı sistemleri kullananların kullanımına sunuyor. Bunun için, Canonical’ın kernel.ubuntu.com deposu aracılığıyla kullanıma sunduğu .deb paketlerini kullanacağız. Söz konusu işlemleri yaparken; temel olarak Ubuntu ile Linux Mint, Elementary OS, Pinguy OS, Deepin, Peppermint, LXLE, Linux Lite, Voyager gibi Ubuntu türevi dağıtımları hesaba kattığımızı hatırlatalım.
Continue Reading →

32 bit sistemler için: 4.14 RC6 Linux çekirdeği 32 bit sistemlere aşağıdaki gibi yüklenir. İlkin gerekli paketleri indiriyoruz:

cd /tmp

wget \kernel.ubuntu.com/~kernel-ppa/mainline/v4.14-rc6/linux-headers-4.14.0-041400rc6_4.14.0-041400rc6.201710230731_all.deb \

wget \kernel.ubuntu.com/~kernel-ppa/mainline/v4.14-rc6/linux-headers-4.14.0-041400rc6-generic_4.14.0-041400rc6.201710230731_i386.deb \

wget \kernel.ubuntu.com/~kernel-ppa/mainline/v4.14-rc6/linux-image-4.14.0-041400rc6-generic_4.14.0-041400rc6.201710230731_i386.deb

Şimdi 4.14 RC6 Linux çekirdeğini yükleyelim:

sudo dpkg -i linux-headers-4.14*.deb linux-image-4.14*.deb

Eğer gerek duyarsanız daha sonra çekirdeği kaldırmak için bu sayfadan yararlanabilir ya da aşağıdaki komutu verebilirsiniz.

sudo apt-get remove linux-headers-4.14* linux-image-4.14*

64 bit sistemler için: 4.14 RC6 Linux çekirdeği 64 bit sistemlere aşağıdaki gibi yüklenir. İlkin gerekli paketleri indiriyoruz:

cd /tmp

wget \kernel.ubuntu.com/~kernel-ppa/mainline/v4.14-rc6/linux-headers-4.14.0-041400rc6_4.14.0-041400rc6.201710230731_all.deb \

wget \kernel.ubuntu.com/~kernel-ppa/mainline/v4.14-rc6/linux-headers-4.14.0-041400rc6-generic_4.14.0-041400rc6.201710230731_amd64.deb \

wget \kernel.ubuntu.com/~kernel-ppa/mainline/v4.14-rc6/linux-image-4.14.0-041400rc6-generic_4.14.0-041400rc6.201710230731_amd64.deb

Şimdi 4.14 RC6 Linux çekirdeğini yükleyelim:

sudo dpkg -i linux-headers-4.14*.deb linux-image-4.14*.deb

Eğer gerek duyarsanız daha sonra çekirdeği kaldırmak için bu sayfadan yararlanabilir ya da aşağıdaki komutu verebilirsiniz.

sudo apt-get remove linux-headers-4.14* linux-image-4.14*

0